初学spring boot踩过的坑
一、搭建spring boot环境
maven工程
pom文件内容
|
<project xmlns="http://maven.apache.org/POM/4.0.0" xmlns:xsi="http://www.w3.org/2001/XMLSchema-instance" xsi:schemaLocation="http://maven.apache.org/POM/4.0.0 http://maven.apache.org/xsd/maven-4.0.0.xsd"> <parent> |
项目目录结构
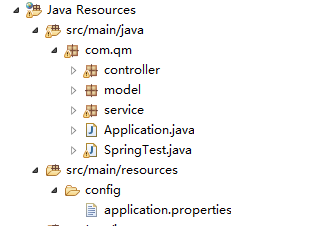
其中springTest类是spring boot内部tomcat启动时要运行的类
其中内容如下
| package com.qm;
import org.springframework.boot.SpringApplication; import com.qm.controller.UserController; @SpringBootApplication |
Application类的作用是外部服务器启动spring boot所要做的一些事。内容如下
|
package com.qm; import org.springframework.boot.SpringApplication; @SpringBootApplication |
application.properties文件内容如下
|
server.port=8080 //热部署,需要提供的路径 |
踩过的坑
坑一,
一开始以为文件目录,可以随便放,经过坑一的教训,才知道代码文件存放有一定的顺序
如上项目结构图,其中springtest类和application类一定要放在最外面的包里,如com.qm 当启动spring boot时,它会去加载com.qm包及其子包下的所有类,
当你不按顺序时,且代码中有@Autowired注解注入bean时,会报以下错误
Description:
Field userService in com.qm.controller.UserController required a bean of type 'com.qm.service.UserService' that could not be found.
Action:
Consider defining a bean of type 'com.qm.service.UserService' in your configuration.
,即bean找不到。,这是应该注意代码顺序。
坑二
补齐坑一后,在service层的接口继承jpa,然后在controller层使用注入的service方法会报以下错误
Error creating bean with name 'dataController': Unsatisfied dependency expressed through field 'personRepository'; nested exception is org.springframework.beans.factory.BeanCreationException: Error creating bean with name 'personRepository': Invocation of init method failed; nested exception is org.springframework.data.mapping.PropertyReferenceException: No property auto found for type Person!
这是因为hibernate版本的问题,
只要加上
<dependency>
<groupId>org.antlr</groupId>
<artifactId>antlr4-runtime</artifactId>
<version>4.1</version>
这个依赖即可
添加之后,若maven仓库中有该jar包,最好删掉,编译时重新下载
若spring boot正常启动,而地址栏访问不到controller,则此时应该注意,spring boot启动时,未扫描到controller类,
在spring boot入口类上再添加一个注解
@ComponentScan("要扫描的包名")
以上就是我在学spring boot时遇到过得一些坑。
初学spring boot踩过的坑的更多相关文章
- 部署spring boot + Vue遇到的坑(权限、刷新404、跨域、内存)
部署spring boot + Vue遇到的坑(权限.刷新404.跨域.内存) 项目背景是采用前后端分离,前端使用vue,后端使用springboot. 工具 工欲善其事必先利其器,我们先找一个操作L ...
- Spring Boot踩坑之路一
Takes an opinionated view of building production-ready Spring applications. Spring Boot favors conve ...
- Spring Boot 踩坑之路之 Configuration Annotation Proessor not found in classpath
1. 出现spring boot Configuration Annotation Proessor not found in classpath的提示是在用了@ConfigurationProper ...
- spring boot踩坑记
Resolved exception caused by handler execution: org.springframework.http.converter.HttpMessageNotWri ...
- 初学 Spring boot 报错 Whitelabel Error Page 404
按照教程,写了个最简单的 HelloWorld,尼玛报错 -->Whitelabel Error Page 404. 网上99%都是项目结构不对,说什么 Application放在父级 pack ...
- 记录初学Spring boot中使用GraphQL编写API的几种方式
Spring boot+graphql 一.使用graphql-java-tools方式 <dependency> <groupId>com.graphql-java-kick ...
- spring boot 枚举使用的坑3
上一篇说到spring boot 使用jackson在枚举enum序列化和反序列化的问题, 再来说说在JPA中实体entity使用枚举的问题. 还是这个枚举: @Getter @AllArgsCons ...
- spring boot 枚举使用的坑
java 枚举的功能挺多,但是坑更多,使用的时候要注意.如下面这个枚举. @Getter @AllArgsConstructor public enum EnumExpenseType impleme ...
- Spring Boot 学习填的坑一
1.关于springBoot自动扫描规则: SpringBoot项目的Bean装配默认规则是根据Application类所在的包位置从上往下扫描! "Application"类是指 ...
随机推荐
- bootstrap学习笔记之为导航条添加标题、二级菜单及状态 http://www.imooc.com/code/3120
为导航条添加标题.二级菜单及状态 加入导航条标题 在Web页面制作中,常常在菜单前面都会有一个标题(文字字号比其它文字稍大一些),其实在Bootstrap框架也为大家做了这方面考虑,其通过" ...
- js事件小结
首先事件绑定分为2种方法 一种为"DOM0级"方法,这里我理解为事件指定 var oDiv = document.getElementById("div1"); ...
- How To Configure VMware fencing using fence_vmware_soap in RHEL High Availability Add On(RHEL Pacemaker中配置STONITH)
本文主要简单介绍一下如何在RHEL 7 Pacemaker中配置一个fence_vmware_soap类型的STONITH设备(仅供测试学习). STONITH是Shoot-The-Other-Nod ...
- RabbitMQ安装记录(CentOS)
参照官方文档:http://www.rabbitmq.com/install-rpm.html Install Erlang from EPEL 激活EPEL源: rpm -ivh http://dl ...
- jquery+js实现鼠标位移放大镜效果
jQuery实现仿某东商品详情页放大镜效果 用jquery+js实现放大镜效果,效果大概如下图! 效果是不是大家很感兴趣,放大镜查看细节,下边大家可以详细看一看具体是怎么实现的.下边直接看代码! HT ...
- Node.js爬虫-爬取慕课网课程信息
第一次学习Node.js爬虫,所以这时一个简单的爬虫,Node.js的好处就是可以并发的执行 这个爬虫主要就是获取慕课网的课程信息,并把获得的信息存储到一个文件中,其中要用到cheerio库,它可以让 ...
- Spring学习(7)--- @Required注解
@Required注解是用于bean属性的setter方法 这个注解仅仅表示,受影响的bean属性必须在配置时被填充,通过在bean定义胡通过自动装配一个明确的属性值 package com.mypa ...
- git初步用法
三. Gerrit的注册及使用 1. 简介 Gerrit为代码审核工具,git提交的代码,必须经过审核才能合入到正式的版本库中. 2. 注册步骤 (1) ...
- Vue 爬坑之路(四)—— 与 Vuex 的第一次接触
在 Vue.js 的项目中,如果项目结构简单, 父子组件之间的数据传递可以使用 props 或者 $emit 等方式 http://www.cnblogs.com/wisewrong/p/62660 ...
- 《Python编程从入门到实践》第三章_列表简介
什么是列表呢? 官方说明就是由一些列按特点顺序排列的元素组成.其实可以看出很多个字符串的有序组合吧,里面的内容可以随时的删除,增加,修改. 下面这个就是一个列表,python打印列表的时候会将中括号和 ...