
spring Bean类自动装载实现
先贴spring的开发文档,有助于大家学习http://shouce.jb51.net/spring/beans.html#beans-factory-class
一直想研究一下spring bean的控制反转的实现,废话不多说。
1、先建了一个WEB工程,导入相关spring的jar包,装载到tomcat上,成功访问,有不懂的童鞋可以移步http://www.cnblogs.com/qing1002/p/6560332.html。
2.为了方便研究,我将对象的调用直接写在controller里,输出相应的日志,如果可以输出,证明bean是创建成功的,代码如下:
package com.controller;

import javax.annotation.Resource;

import org.springframework.beans.factory.annotation.Autowired;
import org.springframework.stereotype.Controller;
import org.springframework.ui.Model;
import org.springframework.web.bind.annotation.ModelAttribute;
import org.springframework.web.bind.annotation.RequestMapping;
import org.springframework.web.servlet.ModelAndView;

import com.entity.User;
import com.entity.World;

@Controller
public class SpringServlet {

    /**
     * @Autowired 自动装载world对象 自动按type装载,也就是bean的class属性
     * 或者@Resource(name="world") 按name装载,也就是bean的id
     */
    @Resource(name="world")    //这里的@Resource(name="world")和@Autowired是一模一样的,
    public World world;

    @RequestMapping("/index")
    public String index(Model model){
        world.worldTest();
        return "index";
    }

    @RequestMapping("/save")
    public String Save(@ModelAttribute("form") User user, Model model) { // user:视图层传给控制层的表单对象;model:控制层返回给视图层的对象
        System.out.println(model.toString());
        model.addAttribute("user", user);
        return "detail";
    }
}
3、然后还写了两个类,代码如下:
package com.entity;

import java.io.Serializable;
import java.util.Date;

import org.springframework.stereotype.Repository;

@Repository
public class User implements Serializable{

     private static final long serialVersionUID = 1L;
        private Integer id; // id
        private String name; // name
        private String pwd; // pwd
        private Integer age; // age
//        private Date creatTime; // creatTime

        public Integer getId() {
            return id;
        }

        public void setId(Integer id) {
            this.id = id;
        }

        public String getName() {
            return name;
        }

        public void setName(String name) {
            this.name = name;
        }

        public String getPwd() {
            return pwd;
        }

        public void setPwd(String pwd) {
            this.pwd = pwd;
        }

        public Integer getAge() {
            return age;
        }

        public void setAge(Integer age) {
            this.age = age;
        }

//        public Date getCreatTime() {
//            return creatTime;
//        }
//
//        public void setCreatTime(Date creatTime) {
//            this.creatTime = creatTime;
//        }
        public String toString(){
            return name+"333"+age;
        }
        public void test(){
            System.out.println("22222");
        }
}
package com.entity;

import java.io.Serializable;

import javax.annotation.Resource;

import org.springframework.beans.factory.annotation.Autowired;

public class World implements Serializable{

    private static final long serialVersionUID = 1L;

//  @Resource(name="user")   //这里的@Resource(name="user")和@Autowired是一模一样的,
    private User user;

    private String type;

    public String getType() {
        return type;
    }

    public void setType(String type) {
        this.type = type;
    }

    public void setUser(User user) {
        this.user = user;
    }

    public void worldTest(){
        user.test();
        System.out.println("worldTest------" + type+"------"+user.getName());
    }
}
在上述代码中,SpringServlet里的world是IOC容器通过标签@Resource从配置文件中根据name装载的,而World类里同样有一个User类,这个类没有加标签,他是通过setUser()的方法装载的user bean类,配置文件里配置一下bean类,代码如下:
<bean id="world" class="com.entity.World">
        <property name="user" ref="user" />
        <property name="type" value="stringWorld"></property>
    </bean>
    <bean id="user" class="com.entity.User"/>
这样,SpringServlet里的world就通过控制反转的方式生成对象,然后调用world的worldTest()方法,就可以成功输出,如果world对象没有成功生成,调用他的方法的时候会报 java.lang.NullPointerException,
后台日志打印:
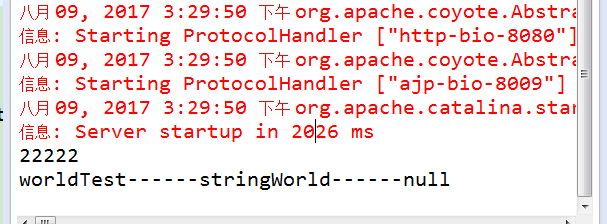
证明对象已经成功创建,如果想给对象添加属性,可以直接在配置文件里添加,如下形式:
<bean id="user" class="com.entity.User">
        <property name="id" value="1"></property>
        <property name="name" value="guan"></property>
        <property name="pwd" value="111111"></property>
        <property name="age" value="12"></property>
    </bean>
最后,我想让代码更精简,不想写那么多配置文件,可以采用注解的形式,为World.java的User属性添加@Autowired或者@Resource(name="user")标签,然后改一下配置文件,只需要写两行,如下:
<bean id="world" class="com.entity.World" />
<bean id="user" class="com.entity.User"/>
是不是代码精简了好多,也装逼了好多,程序可以成功运行,同时日志台输出: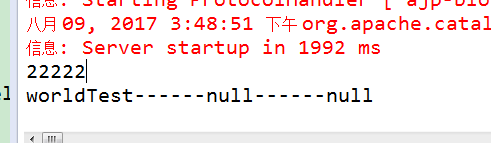
然后就结束了,很多东西还有待学习,,,有很多不明白,最后贴一下配置文件springSerblet-config.xml代码:
<?xml version="1.0" encoding="UTF-8"?>
<beans xmlns="http://www.springframework.org/schema/beans"
    xmlns:xsi="http://www.w3.org/2001/XMLSchema-instance" xmlns:p="http://www.springframework.org/schema/p"
    xmlns:context="http://www.springframework.org/schema/context"
    xmlns:task="http://www.springframework.org/schema/task"
    xmlns:util="http://www.springframework.org/schema/util" xmlns:mvc="http://www.springframework.org/schema/mvc"
    xsi:schemaLocation="
      http://www.springframework.org/schema/beans
      http://www.springframework.org/schema/beans/spring-beans-4.2.xsd
      http://www.springframework.org/schema/util
      http://www.springframework.org/schema/util/spring-util-4.2.xsd
      http://www.springframework.org/schema/context
      http://www.springframework.org/schema/context/spring-context-4.2.xsd
      http://www.springframework.org/schema/mvc
      http://www.springframework.org/schema/mvc/spring-mvc-4.2.xsd
      http://www.springframework.org/schema/task
      http://www.springframework.org/schema/task/spring-task.xsd ">

    <!-- 使用默认的注解映射 -->
    <mvc:annotation-driven />
    <!-- <mvc:resources location="/" mapping="/index.html" />
      <context:annotation-config></context:annotation-config>-->
    <!-- world bean类 -->
    <bean id="world" class="com.entity.World" />
        <!-- <property name="user" ref="user" />
        <property name="type" value="stringWorld"></property>
    </bean> -->
    <bean id="user" class="com.entity.User"/>
    <!-- user bean类 -->
    <!-- <bean id="user" class="com.entity.User">
        <property name="id" value="1"></property>
        <property name="name" value="guan"></property>
        <property name="pwd" value="111111"></property>
        <property name="age" value="12"></property>
    </bean> -->
    <!-- <bean id="world" class="com.entity.World">
        <property name="user">
            <idref bean="user"/>
        </property>
        <property name="type" value="stringWorld"></property>
    </bean> -->
    <!-- 自动扫描controller包中的控制器 -->
    <context:component-scan base-package="com.controller" />
    <bean class="org.springframework.web.servlet.view.InternalResourceViewResolver" >
        <property name="prefix" value="/WEB-INF/jsp/" />
        <property name="suffix" value=".jsp" />
    </bean>

    <!-- <bean id="urlMapping" class="org.springframework.web.servlet.handler.SimpleUrlHandlerMapping">
        <property name="mappings">
            <props>
                <prop key="/index.do">controllerDoem</prop>
            </props>
        </property>
    </bean>

     <bean id="controllerDoem" class="com.controller">
        <property name="view">
            <value>index</value>
        </property>
    </bean>-->

</beans>
applicationContext.xml和web.xml里的是一些web工程基本配置,不要动它,整体结构是这样的: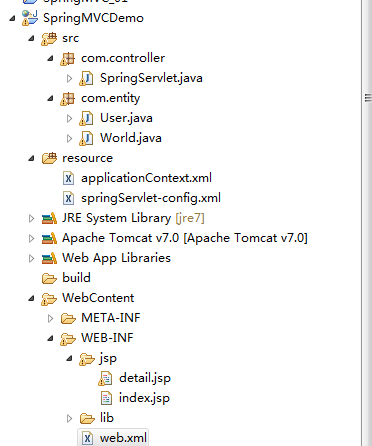
最后,欢迎各位大神指导,指出错误和不足。。。。 正在努力学习中。。。
spring Bean类自动装载实现的更多相关文章
- spring bean autowire自动装配
转自:http://blog.csdn.net/xiao_jun_0820/article/details/7233139 autowire="byName"会自动装配属性与Bea ...
- php类自动装载、链式操作、魔术方法
1.自动装载实例 目录下有3个文件:index.php load.php tests文件夹 tests文件夹里有 test1.php <?php namespace Tests; class T ...
- jdbc操作根据bean类自动组装sql,天啦,我感觉我实现了hibernate
场景:需要将从ODPS数仓中计算得到的大额可疑交易信息导入到业务系统的mysql中供业务系统审核.最简单的方式是用阿里云的组件自动进行数据同步了.但是本系统是开放是为了产品化,要保证不同环境的可移植性 ...
- Spring bean的自动装配属性
bean的自动装配属性能简化xml文件配置. bean 的自动装配属性分为四种: 1.byName 2.byTyoe 3.constructor 4. autodetect byName: 它查找配置 ...
- Spring框架——IOC 自动装载
IOC自动装载有两种形式 <?xml version="1.0" encoding="UTF-8"?> <beans xmlns=" ...
- Spring核心技术(八)——Spring自动装载的注解
本文针对自动装载的一些注解进行描述. 基于注解的容器配置 @Required注解 @Required注解需要应用到Bean的属性的setter方法上面,如下面的例子: public class Sim ...
- 解决Spring+Quartz无法自动注入bean问题
问题 我们有时需要执行一些定时任务(如数据批处理),比较常用的技术框架有Spring + Quartz中.无奈此方式有个问题:Spring Bean无法自动注入. 环境:Spring3.2.2 + Q ...
- 8 -- 深入使用Spring -- 2...1 搜索Bean类
8.2.1 搜索Bean类 既然不再使用Spring配置文件来配置任何Bean实例,那么只能希望Spring会自动搜索某些路径下的Java类,并将这些Java类注册成Bean实例. tips:Rail ...
- 【转】Spring Bean属性解析
转载自:http://wenku.baidu.com/view/30c7672cb4daa58da0114ae2.html Bean所以属性一览: <bean id="beanId&q ...
随机推荐
- PHP运行出现Notice : Use of undefined constant
这些是 PHP 的提示而非报错,PHP 本身不需要事先声明变量即可直接使用,但是对未声明变量会有提示.一般作为正式的网站会把提示关掉的,甚至连错误信息也被关掉 关闭 PHP 提示的方法 搜索php.i ...
- 页面加载的时候自动的执行js代码
<script> window.onload=MyAutoRun; function MyAutoRun(){ alert("函数自动执行哦!"); } </sc ...
- Kafka 源代码分析.
这里记录kafka源代码笔记.(代码版本是0.8.2.1) kafka的源代码如何下载.这里简单说一下. git clone https://git-wip-us.apache.org/repos/a ...
- 关闭chrome浏览器的developer tools
背景 Chrome使用过程中,很容易启动Chrome developer tools,一些误触如按到F12.CTRL+Shift+C等都会启动developer tools.对于不开发Web的人来说, ...
- Java基础(7)-异常处理
异常处理 异常继承层次 Throwable |-Error 致命的错误无法处理 |-Exception |-IOException 系统资源读取失败等错误 |-RuntimeException(未检异 ...
- java--while、do while、for三种循环体
1.for可以记录执行次数: 2.while.do while的i放在sum的后面和for得到的执行次数和结果是一致的. 1.从执行结果来看,放在前面,虽然执行次数和i放在sum的后面是相同,但是结果 ...
- H3CNE实验:H3C设备文件管理
第1步:配置文件的管理操作 (1) save [ safely ]--在H3C设备上将当前配置保存到存储介质的根目录下. 快速保存方式:不带 safely 参数. 安全方式:带 safely 参数. ...
- bash远程代码执行漏洞
博客园新闻:http://news.cnblogs.com/n/504506/(如果以下有说错的地方请不吝指出,谢谢~) 详情可围观上面的链接.因为我们的服务器都是私有网环境,即使要修复也得等到下次安 ...
- geotrellis使用(二十九)迁移geotrellis至1.1.1版
目录 前言 升级过程 总结 一.前言 由于忙着安装OpenStack等等各种事情,有半年的时间没有再亲密的接触geotrellis,甚至有半年的时间没能畅快的写代码.近来OpenStac ...
- PHP源码阅读strtr
strtr 转换字符串中特定的字符,但是这个函数使用的方式多种. echo strtr('hello world', 'hw', 'ab'); // 第一种 aello borld echo strt ...