
Ionic 常用组件解析
Ionic 常用组件解析
$ionicModal(弹出窗口):
	//创建一个窗口

	//此处注意目录的起始位置为app

	$ionicModal.fromTemplateUrl('app/security/model/regist-model.html', {

		scope: $scope,

		animation: 'slide-in-up'

	}).then(function(modal) {

		//缓存创建的窗口

		$scope.registModal = modal;

	});

	$scope.showRegist = function(){

		$scope.registModal.show();

	};

	$scope.hideDialog = function() {

		//隐藏

		$scope.registModal.hide();

		//移除

		//$scope.registModal.remove();

	};
$ionicLoading (loading ,可以作为信息提示)
											//是否不添加全屏遮罩效果     //自动消失时间

	$ionicLoading.show({template:'提示信息', noBackdrop: true, duration: 1500});
$ionicPopup (弹出一个小窗口 输入框,确认框,提示框)
	//1.创建一个自定义输入框

	$scope.showPopup = function() {

	    $scope.data = {}

	    var myPopup = $ionicPopup.show({

			template: '<input type="password" ng-model="data.wifi">',

			title: 'Enter Wi-Fi Password',

			subTitle: 'Please use normal things',

			scope: $scope,

			buttons: [{

				text: 'Cancel'

			},

			{

				text: '<b>Save</b>',

				type: 'button-positive',

				onTap: function(e) {

					if (!$scope.data.wifi) {

						//don't allow the user to close unless he enters wifi password

				 		e.preventDefault();

					} else {

					 	return $scope.data.wifi;

					}

				}

			}]

	   	});

	   	//输入后的处理

		myPopup.then(function(res) {

			console.log('Tapped!', res);

		});

		//自动消失时间

		$timeout(function() {

		  	myPopup.close(); //close the popup after 3 seconds for some reason

		}, 3000);

  	};

  	//2.普通输入框

  	$scope.showPopup = function() {

		$ionicPopup.prompt({

			title: 'Password Check',

			template: 'Enter your secret password',

			inputType: 'password',

			inputPlaceholder: 'Your password',

			okText:'OK'

		}).then(function(res) {

			console.log('Your password is', res);

		});

	}

    //3.确认框

	$scope.showConfirm = function() {

		var confirmPopup = $ionicPopup.confirm({

			title: 'Consume Ice Cream',

			template: 'Are you sure you want to eat this ice cream?'

		});

		confirmPopup.then(function(res) {

			//确认

			if(res) {

				console.log('You are sure');

			} else {//取消

				console.log('You are not sure');

			}

		});

	};

	//4.提示框

	$scope.showAlert = function() {

		var alertPopup = $ionicPopup.alert({

			title: 'Don\'t eat that!',

			template: 'It might taste good'

		});

		//确认后的操作

		alertPopup.then(function(res) {

			console.log('Thank you for not eating my delicious ice cream cone');

		});

	};
$ionicPopover (弹出一个带箭头的小对话框)
注意调用方法时不要漏掉 $event 参数
<p>

  <button ng-click="openPopover($event)">Open Popover</button>

</p>
	//方法一 直接自定义

	var template = '<ion-popover-view>' +

						'<ion-header-bar>' +

							'<h1 class="title">My Popover Title</h1>' +

						'</ion-header-bar>'+

						'<ion-content> Hello! </ion-content>'+

					'</ion-popover-view>';

	$scope.popover = $ionicPopover.fromTemplate(template, {

		scope: $scope

	});

	//方法二 引用已存在的html

	$ionicPopover.fromTemplateUrl('my-popover.html', {

		scope: $scope

	}).then(function(popover) {

		$scope.popover = popover;

	});

	$scope.openPopover = function($event) {

		$scope.popover.show($event);

	};

	$scope.closePopover = function() {

		$scope.popover.hide();

	};

	//拥有的相关事件

	//Cleanup the popover when we're done with it!

	$scope.$on('$destroy', function() {

		$scope.popover.remove();

	});

	// Execute action on hidden popover

	$scope.$on('popover.hidden', function() {

		// Execute action

	});

	// Execute action on remove popover

	$scope.$on('popover.removed', function() {

		// Execute action

	});
ionc-list (列表的使用,包括添加按钮,删除等)
ionc-list(基本列表创建)
	<ion-list>

	  <ion-item ng-repeat="item in items">

	    Hello, {{item}}!

	  </ion-item>

	</ion-list>
ion-delete-button,ion-reorder-button (delete按钮显示在左方,reorder按钮显示在右方)
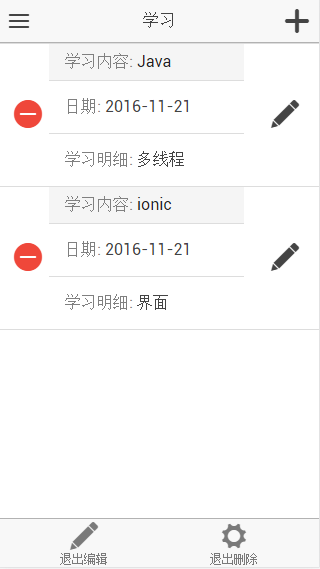
	<!--

		show-delete :控制是否显示删除按钮

		show-reorder:控制是否显示reorder按钮

	-->

	<ion-list show-delete="isShowDelete"  show-reorder="isShowEdit" class="my-divider-list">

	    <ion-item ng-repeat="studyItem in data.studyData">

	    <div class="item item-divider">

			<span class="expect-label">学习内容:</span> <span class="expect-desc">{{studyItem.title}}</span>

		</div>

		<a class="item" >

			<span class="expect-label">日期:</span> <span class="expect-desc">{{studyItem.date|date:'yyyy-M-dd'}}</span>

		</a>

		<a class="item" >

			<span class="expect-label">学习明细:</span> <span class="expect-desc">{{studyItem.desc}}</span>

		</a>

	  	<!--

			添加删除按钮

		-->

	    <ion-delete-button class="ion-minus-circled" ng-click="deleteStudy(studyItem)">

	    </ion-delete-button>

	   	<!--

			添加reorder 按钮

		-->

	   	<ion-reorder-button class="ion-edit" ng-click="showEditStudyDialog(studyItem, $fromIndex, $toIndex)">

		</ion-reorder-button>

	  </ion-item>

	</ion-list>
ion-option-button
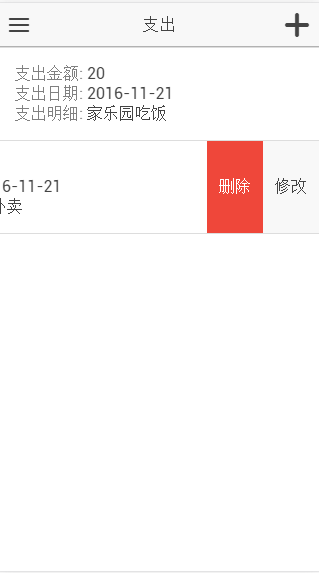
	<!-- can-swipe="true"  添加该属性才能开启滑动附加按钮-->

	<ion-list can-swipe="true">

	  	<ion-item ng-repeat="costItem in data.costData">

	    <div><span class="expect-label">支出金额:</span> <span class="expect-desc">{{costItem.money}}</span></div>

	    <div><span class="expect-label">支出日期:</span> <span class="expect-desc">{{costItem.date|date:'yyyy-M-dd'}}</span></div>

	   	<div><span class="expect-label">支出明细:</span> <span class="expect-desc">{{costItem.desc}}</span></div>

	    <!--添加滑动按钮-->

	    <ion-option-button class="button-info"

	                       ng-click="showEditCost(costItem)">

	      修改

	    </ion-option-button>

	    <ion-option-button class="button-assertive"

	                       ng-click="deleteCost(costItem)">

	      删除

	    </ion-option-button>

	  </ion-item>

	</ion-list>
	//该方法可以关闭已经显示的按钮

	$ionicListDelegate.closeOptionButtons()
ion-slide-box (滑动卡组件)
	<!--

		active-slide:初始index

		show-pager:是否显示下方滑动按钮

		on-slide-changed:滑动事件

		<ion-slide>滑动的内容

	-->

	<ion-slide-box  active-slide="activeSlideIndex" show-pager="true" on-slide-changed = "productSlideChanged($index)">

	  <ion-slide  ng-repeat="item in data.picTPLdata" >

		<div class="list card">

			<div class="item">

				<h2>{{item.desc1}} <span style ="color: gray;">{{item.desc0}}</span></h2>

			</div>

			<div class="item item-image">

				<img src="{{item.url}}">

			</div>

	    </div>

	  </ion-slide>

	</ion-slide-box>
ion-refresher (下拉刷新数据)
	<ion-refresher pulling-text="刷新数据中.." on-refresh="doRefresh()">

	</ion-refresher>
	$scope.doRefresh = function() {

	 	FGOService.getNoteData()

		.then(function(result){

			$scope.data.noteData  = result;

			//关闭刷新提示

			$scope.$broadcast('scroll.refreshComplete');

		})

	};
Ionic 常用组件解析的更多相关文章
- Ext 常用组件解析
Ext 常用组件解析 Panel 定义&常用属性 //1.使用initComponent Ext.define('MySecurity.view.resource.ResourcePanel' ...
- lonic常用组件之五------按钮
一.Ionic常用组件之五------按钮 <ion-button color="主题色" size="small/large" expand=& ...
- .NetCore中的日志(1)日志组件解析
.NetCore中的日志(1)日志组件解析 0x00 问题的产生 日志记录功能在开发中很常用,可以记录程序运行的细节,也可以记录用户的行为.在之前开发时我一般都是用自己写的小工具来记录日志,输出目标包 ...
- Android常用组件
UI相关 图片 Android-Universal-Image-Loader:com.nostra13.universalimageloader:异步加载.缓存.显示图片 ImageLoader:co ...
- Android常用组件【转】
UI相关 图片 Android-Universal-Image-Loader:com.nostra13.universalimageloader:异步加载.缓存.显示图片 ImageLoader:co ...
- 最全面 Nginx 入门教程 + 常用配置解析
转自 http://blog.csdn.net/shootyou/article/details/6093562 Nginx介绍和安装 一个简单的配置文件 模块介绍 常用场景配置 进阶内容 参考资料 ...
- 【转】【Nginx】Nginx 入门教程 + 常用配置解析
== Nginx介绍和安装 == Nginx是一个自由.开源.高性能及轻量级的HTTP服务器及反转代理服务器, 其性能与IMAP/POP3代理服务器相当.Nginx以其高性能.稳定.功能丰富.配置简单 ...
- android开发常用组件【持续更新中。。。】
UI相关 图片 Android-Universal-Image-Loader:com.nostra13.universalimageloader:异步加载.缓存.显示图片 ImageLoader:co ...
- React Native组件(三)Text组件解析
相关文章 React Native探索系列 React Native组件系列 前言 此前介绍了最基本的View组件,接下来就是最常用的Text组件,对于Text组件的一些常用属性,这篇文章会给出简单的 ...
随机推荐
- Java泛型的应用——T extends Comparable<? super T>
在观察Java源码的时候,发现了这么一个写法T extends Comparable<? super T>.不禁纳闷为什么要这么写呢?有什么好处吗,extends和super在这里的作用着 ...
- Java实现的高效计数器
本文转载地址: http://blog.csdn.net/snarlfuture/article/details/17049731 在统计来自数据库或文本中某些内容的频率时,你可 ...
- 省市联动_简单的Demo,适用于各种二级菜单联动
最近搞了一个功能,是查询页面需要用到二级菜单联动,获取到选中的属性value传入到后台. 平常都是用AJAX或者JQuery ,通过XML或者JSON的方式,这样的话需要调用数据库,像典型得到省市联动 ...
- Hibernate SQLQuery 原生SQL 查询及返回结果集处理-2
1. 返回List, .setResultTransformer( Transformers.ALIAS_TO_ENTITY_MAP);将结果转为Map,存放到list中,即list中为若干 ...
- [rctf](web)rcdn 解题分析,知识点总结
比赛平台关闭了,没有截图,见谅. 解题思路流程: 分析网站结构,看源码,元素审计.发现以下信息. 要得到flag要获得一个pro cdn pro 子域名长度为3到6个字符 存在一个提交ticke页 ...
- Java之【线程通信】--标志位练习2
定义一个线程A,输出1 - 10之间的整数,定义一个线程B,逆序输出1 - 10之间的整数,要求线程A和线程B交替输出 方法一:非标志位方法 package Homework; //1 定义一个线程A ...
- QT调用百度语音REST API实现语音合成
QT调用百度语音REST API实现语音合成 1.首先点击点击链接http://yuyin.baidu.com/docs/tts 点击access_token,获取access_token,里面有详细 ...
- OC对象之旅 weak弱引用实现分析
Runtime学习 -- weak应用源码学习 Runtime源码分析,带你了解OC实现过程.其中参考了大量的大神的代码以及文献,里面也有个人的见解,欢迎拍砖,欢迎交流. 两种常见使用场景 /// ...
- eclipse 好用的插件总结
改变eclipse的背景色,各种关键词颜色的插件. color theme. 在mac下最好是通过手动复制粘贴jar文件到, eclipse的plugins下面. 通过Install new soft ...
- 用javascript实现java的Map
function Map(){ var obj={}; //空的容器 //put方法 this.put=function(key,value){ obj[key]=value; //把键值绑定到obj ...