ChatterBot之linux下安装mongodb 02
当前环境 :centos 6.9
mongodb版本 mongodb-linux-x86_64-3.4.4.tgz
使用链接工具:studio-3t-x64.msi.zip
首先我们先来安装mongodb:
1.把下载好的mongodb-linux-x86_64-3.4.4.tgz 放在opc下面
2.解压到当前路径;
3.在根目录下新建data/db两个文件夹,这是mongodb数据文件默认的存放位置.
mkdir -p /data/db
4.命令行中运行 MongoDB 服务
你可以再命令行中执行mongo安装目录中的bin目录执行mongod命令来启动mongdb服务。
注意:如果你的数据库目录不是/data/db,可以通过 --dbpath 来指定。
下面这些是服务.
[root@localhost /]# cd /opt/mongodb-linux-x86_64-3.4.4/bin

[root@localhost bin]# ll

total 232816

-rwxr-xr-x. 1 root root  4769592 Apr 20  2017 bsondump

-rwxr-xr-x. 1 root root 29404312 Apr 20  2017 mongo

-rwxr-xr-x. 1 root root 53966552 Apr 20  2017 mongod   //启动

-rwxr-xr-x. 1 root root  8520309 Apr 20  2017 mongodump

-rwxr-xr-x. 1 root root  6491029 Apr 20  2017 mongoexport

-rwxr-xr-x. 1 root root  6345814 Apr 20  2017 mongofiles

-rwxr-xr-x. 1 root root  6641732 Apr 20  2017 mongoimport

-rwxr-xr-x. 1 root root  6118188 Apr 20  2017 mongooplog

-rwxr-xr-x. 1 root root 53347992 Apr 20  2017 mongoperf

-rwxr-xr-x. 1 root root  9678815 Apr 20  2017 mongoreplay

-rwxr-xr-x. 1 root root  9935423 Apr 20  2017 mongorestore

-rwxr-xr-x. 1 root root 30122568 Apr 20  2017 mongos

-rwxr-xr-x. 1 root root  6707676 Apr 20  2017 mongostat

-rwxr-xr-x. 1 root root  6324847 Apr 20  2017 mongotop  //停止
5.使用[root@localhost bin]# ./mongod 来启动服务(在第一次安装时会吧/data/db下需要的数据库文件生成出来);
 [root@localhost bin]# ./mongod              //启动

 2017-11-28T23:47:58.383-0800 I CONTROL  [initandlisten] MongoDB starting : pid=3289 port=27017 dbpath=/data/db 64-bit host=localhost.localdomain

 2017-11-28T23:47:58.383-0800 I CONTROL  [initandlisten] db version v3.4.4

 2017-11-28T23:47:58.383-0800 I CONTROL  [initandlisten] git version: 888390515874a9debd1b6c5d36559ca86b44babd

 2017-11-28T23:47:58.383-0800 I CONTROL  [initandlisten] allocator: tcmalloc

 2017-11-28T23:47:58.383-0800 I CONTROL  [initandlisten] modules: none

 2017-11-28T23:47:58.383-0800 I CONTROL  [initandlisten] build environment:

 2017-11-28T23:47:58.383-0800 I CONTROL  [initandlisten]     distarch: x86_64

 2017-11-28T23:47:58.383-0800 I CONTROL  [initandlisten]     target_arch: x86_64

 2017-11-28T23:47:58.383-0800 I CONTROL  [initandlisten] options: {}

 2017-11-28T23:47:58.406-0800 I STORAGE  [initandlisten]

 2017-11-28T23:47:58.406-0800 I STORAGE  [initandlisten] ** WARNING: Using the XFS filesystem is strongly recommended with the WiredTiger storage engine

 2017-11-28T23:47:58.406-0800 I STORAGE  [initandlisten] **          See http://dochub.mongodb.org/core/prodnotes-filesystem

 2017-11-28T23:47:58.406-0800 I STORAGE  [initandlisten] wiredtiger_open config: create,cache_size=256M,session_max=20000,eviction=(threads_min=4,threads_max=4),config_base=false,statistics=(fast),log=(enabled=true,archive=true,path=journal,compressor=snappy),file_manager=(close_idle_time=100000),checkpoint=(wait=60,log_size=2GB),statistics_log=(wait=0),

 2017-11-28T23:47:59.270-0800 I CONTROL  [initandlisten]

 2017-11-28T23:47:59.270-0800 I CONTROL  [initandlisten] ** WARNING: Access control is not enabled for the database.

 2017-11-28T23:47:59.270-0800 I CONTROL  [initandlisten] **          Read and write access to data and configuration is unrestricted.

 2017-11-28T23:47:59.270-0800 I CONTROL  [initandlisten] ** WARNING: You are running this process as the root user, which is not recommended.

 2017-11-28T23:47:59.270-0800 I CONTROL  [initandlisten]

 2017-11-28T23:47:59.272-0800 I CONTROL  [initandlisten]

 2017-11-28T23:47:59.272-0800 I CONTROL  [initandlisten] ** WARNING: /sys/kernel/mm/transparent_hugepage/enabled is 'always'.

 2017-11-28T23:47:59.272-0800 I CONTROL  [initandlisten] **        We suggest setting it to 'never'

 2017-11-28T23:47:59.272-0800 I CONTROL  [initandlisten]

 2017-11-28T23:47:59.275-0800 I CONTROL  [initandlisten] ** WARNING: /sys/kernel/mm/transparent_hugepage/defrag is 'always'.

 2017-11-28T23:47:59.275-0800 I CONTROL  [initandlisten] **        We suggest setting it to 'never'

 2017-11-28T23:47:59.275-0800 I CONTROL  [initandlisten]

 2017-11-28T23:47:59.339-0800 I FTDC     [initandlisten] Initializing full-time diagnostic data capture with directory '/data/db/diagnostic.data'

 2017-11-28T23:47:59.435-0800 I INDEX    [initandlisten] build index on: admin.system.version properties: { v: 2, key: { version: 1 }, name: "incompatible_with_version_32", ns: "admin.system.version" }

 2017-11-28T23:47:59.435-0800 I INDEX    [initandlisten]      building index using bulk method; build may temporarily use up to 500 megabytes of RAM

 2017-11-28T23:47:59.436-0800 I INDEX    [initandlisten] build index done.  scanned 0 total records. 0 secs

 2017-11-28T23:47:59.438-0800 I COMMAND  [initandlisten] setting featureCompatibilityVersion to 3.4

 2017-11-28T23:47:59.439-0800 I NETWORK  [thread1] waiting for connections on port 27017
注意!端口为默认27017 ;
这时安装完成;
检查方式:[root@localhost bin]# ./mongo 这是进入到客户端就能看到了当前的版本信息;
[root@localhost bin]# ./mongo

MongoDB shell version v3.4.4

connecting to: mongodb://127.0.0.1:27017

MongoDB server version: 3.4.4

Welcome to the MongoDB shell.

For interactive help, type "help".

For more comprehensive documentation, see

    http://docs.mongodb.org/

Questions? Try the support group

    http://groups.google.com/group/mongodb-user

Server has startup warnings:

2017-11-28T23:47:58.406-0800 I STORAGE  [initandlisten]

2017-11-28T23:47:58.406-0800 I STORAGE  [initandlisten] ** WARNING: Using the XFS filesystem is strongly recommended with the WiredTiger storage engine

2017-11-28T23:47:58.406-0800 I STORAGE  [initandlisten] **          See http://dochub.mongodb.org/core/prodnotes-filesystem

2017-11-28T23:47:59.270-0800 I CONTROL  [initandlisten]

2017-11-28T23:47:59.270-0800 I CONTROL  [initandlisten] ** WARNING: Access control is not enabled for the database.

2017-11-28T23:47:59.270-0800 I CONTROL  [initandlisten] **          Read and write access to data and configuration is unrestricted.

2017-11-28T23:47:59.270-0800 I CONTROL  [initandlisten] ** WARNING: You are running this process as the root user, which is not recommended.

2017-11-28T23:47:59.270-0800 I CONTROL  [initandlisten]

2017-11-28T23:47:59.272-0800 I CONTROL  [initandlisten]

2017-11-28T23:47:59.272-0800 I CONTROL  [initandlisten] ** WARNING: /sys/kernel/mm/transparent_hugepage/enabled is 'always'.

2017-11-28T23:47:59.272-0800 I CONTROL  [initandlisten] **        We suggest setting it to 'never'

2017-11-28T23:47:59.272-0800 I CONTROL  [initandlisten]

2017-11-28T23:47:59.275-0800 I CONTROL  [initandlisten] ** WARNING: /sys/kernel/mm/transparent_hugepage/defrag is 'always'.

2017-11-28T23:47:59.275-0800 I CONTROL  [initandlisten] **        We suggest setting it to 'never'

2017-11-28T23:47:59.275-0800 I CONTROL  [initandlisten]

>
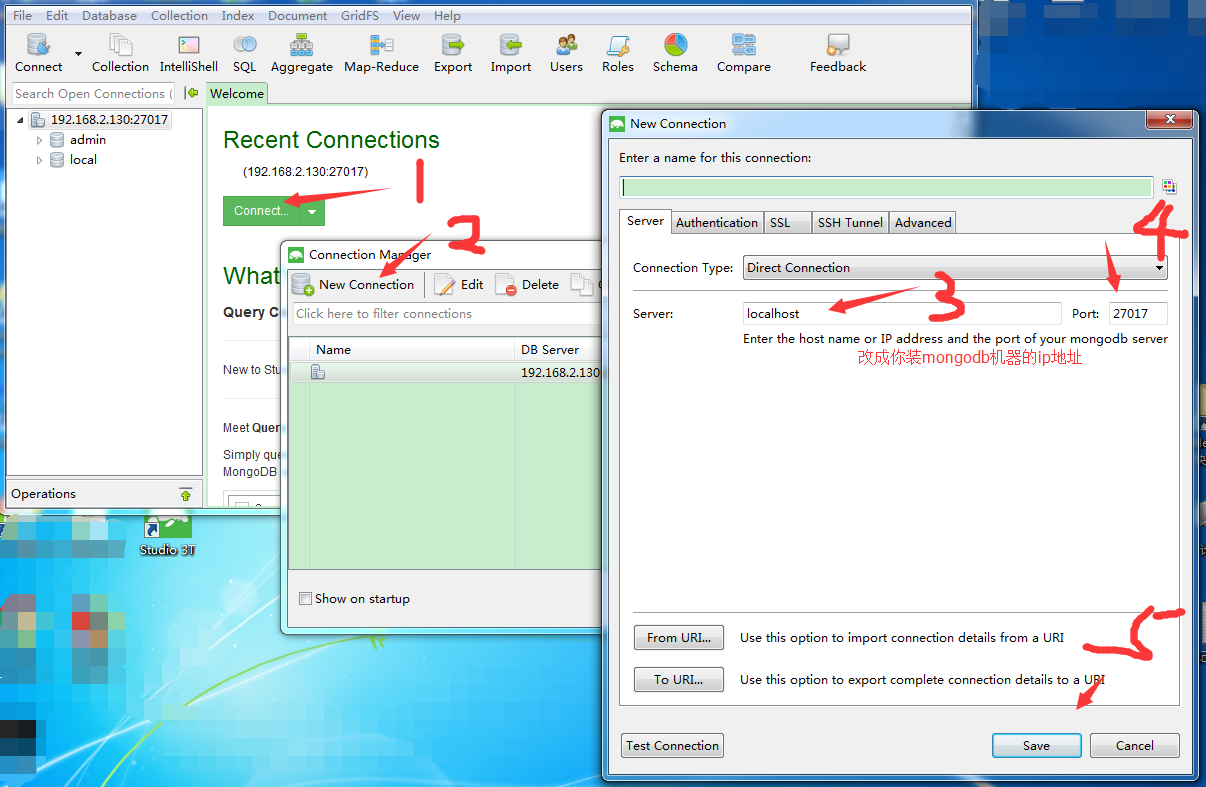
端口开放:在防火墙开放27017端口就可以使用外部机器链接了;
使用命令 [root@localhost bin]# vi /etc/sysconfig/iptables
添加
-A INPUT -m state --state NEW -m tcp -p tcp --dport 27017 -j ACCEPT
保存退出;
外面安装好studio-3t就可以链接了;
最后需要环境包的可以在评论留下你的联系方式我会给你发一份.
ChatterBot之linux下安装mongodb 02的更多相关文章
- Linux下安装MongoDB
MongoDB是一个C++编写的基于分布式文件存储的数据库,是一个介于关系和非关系之间的数据库,当然也属于NoSQL的行列,存储方式和Redis类似,是json格式的kav-value存储方式,只是R ...
- Linux下安装mongodb详细过程
本次安装mongodb使用yum.repo方式.详细过程请参考,也列出一些安装过程中的错误,欢迎指正. mongodb版本:3.0 先在linux下cd 到 /etc/yum.repos.d/ 新建脚 ...
- 26、linux下安装MongoDB
26.1.MongoDB介绍: 1.什么是MongoDB: MongoDB 是由C++语言编写的,是一个基于分布式文件存储的开源数据库系统.在高负载的情况下,添加更多的节点,可以保证服务器性能. Mo ...
- Linux下安装MongoDB 4.2数据库--使用tar包方式
(一)基础环境设置 操作系统版本 :centos-7.4 MongoDB版本:MongoDB 4.2 社区版 (1)关闭防火墙 # 关闭防火墙 [root@mongodbenterprise lib ...
- Linux 下安装 Mongodb
mongodb在linux下面的安装应该是很简单的,但是有一个小点需要注意,这也就是我为什么写这篇博客的原因. 首先到其官网上下载最新稳定版,解压到目录,如/usr/local/mongodb 在mo ...
- Linux下安装 mongodb
1.下载 去官网 https://www.mongodb.com 找到对应版本的mongodb 的下载地址 这样的: https://fastdl.mongodb.org/linux/mongodb ...
- linux下安装mongodb(php版本5.3)
转:原文出处忘记了. 1. 下载MongoDB 2. 解压文件到某目录下,然后重命名: [root@localhost var]# tar -xzvf mongodb-linux-i686-2.0.1 ...
- Linux下安装MongoDB全程记录
1.下载安装包 wget https://fastdl.mongodb.org/linux/mongodb-linux-x86_64-amazon-3.6.0.tgz 2.解压缩 [root@loca ...
- linux 下安装mongodb
1.初始化docker: -v 设置docker和host共享目录,格式hostPath:dockerContainerPath -p 端口映射 --name,容器名称 cen ...
随机推荐
- Android开发中的OpenCV霍夫直线检测(Imgproc.HoughLines()&Imgproc.HoughLinesP())
本文为作者原创,转载请注明出处(http://www.cnblogs.com/mar-q/)by 负赑屃 //2017-04-21更新: 很多网友希望能得到源码,由于在公司做的,所以不太方便传出来 ...
- Web设计新手应知道的10个锦囊妙计
摘要:你在网页设计所学到的大多数教训都来自工作经验.学习是一个反复持续的过程,并且没有比犯错更好的方式来获得知识.在本文中,我们将讨论10个重要并常规的技巧,这是每位Web设计师新手都应该知道. 在做 ...
- enum(枚举类型)
可以使用枚举类型声明代表整数常量的符号名称. 通过enum,创建一个新类型,并指定它可以拥有的值.(就像平常用一个整形变量,我们指定它等于0的时候代表什么,1呢,2呢...而通过枚举,就增加了程序的可 ...
- PyQt5安装目录中找不到designer.exe与pyrcc5.exe
我安装的是PyQt5的5.9版本,在安装目录下找不到designer.exe文件.在摸索一段后发现5.9版本对库文件和相关的开发工具是分开发布的.QtDesigner是在pyqt5-tools的包里. ...
- Leetcode题解(十八)
51.N-Queens ---------------------------------------------------------------------------------分割线---- ...
- VS2012环境下C#调用C++生成的DLL
1.VS2012 C++生成DLL 这个过程仿照http://www.cnblogs.com/LCCRNblog/p/3625200.html创建DLL即可,暂时不用创建测试工程,因为下面有测试工程的 ...
- Description has only two Sentences(欧拉定理 +快速幂+分解质因数)
Description has only two Sentences Time Limit: 3000/1000 MS (Java/Others) Memory Limit: 65536/32768 ...
- Photoshop颜色出现比较大的偏差,偏色严重,显示器配置文件2351似乎有问题
其实出现这个问题是因为 显示器的配置问题.并不是PS版本或者电脑系统问题. 一般在你首次启动PS的时候会出现提示:显示器配置文件2351似乎有问题. 如果你点击了继续运行那以后你使用PS打开任何文件都 ...
- [深度学习]实现一个博弈型的AI,从五子棋开始(2)
嗯,今天接着来搞五子棋,从五子棋开始给小伙伴们聊AI. 昨天晚上我们已经实现了一个五子棋的逻辑部分,其实讲道理,有个规则在,可以开始搞AI了,但是考虑到不够直观,我们还是顺带先把五子棋的UI也先搞出来 ...
- for循环中执行setTimeout问题
代码片段: for(var i=0;i<8;i++){ setTimeout(function () { console.log(i) },0) } 输出了8次8,这跟js的执行顺序和作用域链有 ...