Struts2+Spring+Hibernate实现员工管理增删改查功能(一)之ssh框架整合
前言 转载请标明出处:http://www.cnblogs.com/smfx1314/p/7795837.html
本项目是我写的一个练习,目的是回顾ssh框架的整合以及使用。项目介绍:此项目主要有前台管理员通过登录进入员工管理系统页面,之后可以对员工列表进行常规的增删改查。以及部门列表的增删改查。IDE使用的是eclipse,个人感觉比较好用,不过最近我正在研究idea,数据库是mysql,前台主要以bootstrap为主。
这点是直接摘抄的
struts 控制用的
hibernate 操作数据库的
spring 用解耦的
Struts 、 spring 、 Hibernate 在各层的作用
1 ) struts 负责 web 层 .
ActionFormBean 接收网页中表单提交的数据,然后通过 Action 进行处理,再 Forward 到对应的网页。
在 struts-config.xml 中定义 <action-mapping>, ActionServlet 会加载。
2 ) spring 负责业务层管理,即 Service (或 Manager).
1 . service 为 action 提供统计的调用接口,封装持久层的 DAO.
2 .可以写一些自己的业务方法。
3 .统一的 javabean 管理方法
4 .声明式事务管理
5. 集成 Hiberante
3 ) Hiberante ,负责持久化层,完成数据库的 crud 操作
hibernate 为持久层,提供 OR/Mapping 。
它有一组 .hbm.xml 文件和 POJO, 是跟数据库中的表相对应的。然后定义 DAO ,这些是跟数据库打交道的类,它们会使用 PO 。
在 struts+spring+hibernate 的系统中,
对象的调用流程是: jsp-> Action - > Service ->DAO ->Hibernate 。
数据的流向是 ActionFormBean 接受用户的数据, Action 将数据从 ActionFromBean 中取出,封装成 VO 或 PO,
再调用业务层的 Bean 类,完成各种业务处理后再 forward 。而业务层 Bean 收到这个 PO 对象之后,会调用 DAO 接口方法,进行持久化操作。
spring:Aop管理事务控制,IoC管理各个组件的耦合,DaoTemplate作为常规持久层的快速开发模板!
struts:控制层Action,页面标签和Model数据,调用业务层
Hibernate:负责数据库和对象的映射,负责DAO层(Data Access Object:数据访问)
spring整合hibernate和struts,只要在配好了applicationContext.xml,在struts的action中直接调用就可以了。hibernate访问数据库的操作都在spring中实现了,spring的调用又在stuts的action中实现了。这个ssh框架就连到了一起……
备注
这里关于mysql的表我就不贴出来了,这个大家可以根据实体类进行创建,我创建的是emp和dept表,他们之间是一对多关系。
另外,关于jsp页面中的*.js,你可以根据jsp中的路径自己创建
由于内容过多,今天我先说下ssh框架的整合
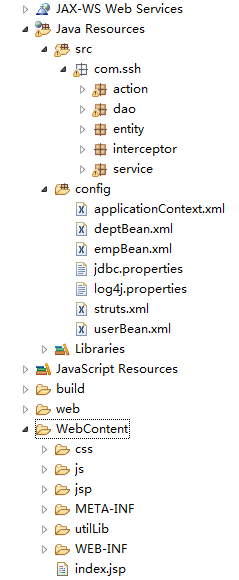
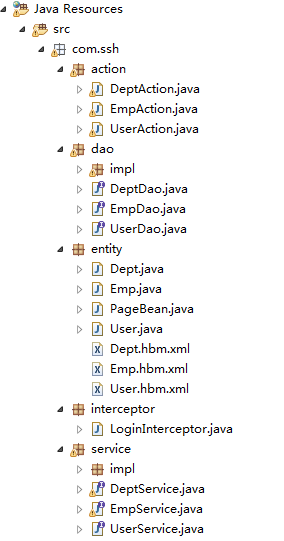
接下来让我们看下目录结构
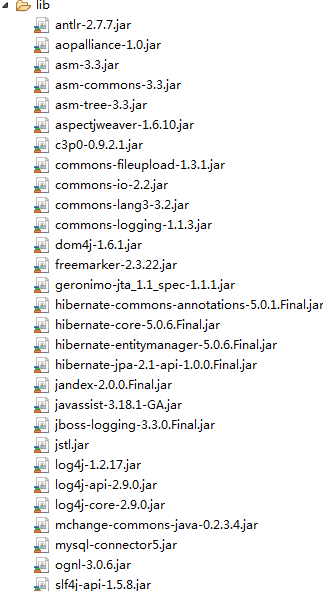
第一步,导入jar包

第二步:我们看下index.jsp页面
<%@ page language="java" contentType="text/html; charset=UTF-8"
pageEncoding="UTF-8"%>
<%@ taglib uri="/struts-tags" prefix="s" %>
<!DOCTYPE html PUBLIC "-//W3C//DTD HTML 4.01 Transitional//EN" "http://www.w3.org/TR/html4/loose.dtd">
<html>
<head>
<meta charset="utf-8">
<meta http-equiv="Content-Type" content="IE=edge">
<title>登录</title>
<script type="text/javascript" src="${pageContext.request.contextPath }/js/jquery.min.js"></script>
<link rel="stylesheet" href="${pageContext.request.contextPath }/utilLib/bootstrap.min.css" type="text/css" media="screen" />
</head>
<body>
<div class="div_from_aoto" style="width: 500px;">
<form action="${pageContext.request.contextPath }/user_login.action" method="post">
<div class="control-group">
<label class="laber_from">用户名</label>
<div class="controls" ><input class="input_from" type=text name="username" placeholder=" 请输入用户名"></input><p class="help-block"></p></div>
</div>
<div class="control-group">
<label class="laber_from" >密码</label>
<div class="controls" ><input class="input_from" type=password name="password" placeholder=" 请输入密码"></input><p class="help-block"></p></div>
</div>
<div class="control-group">
<label class="laber_from" ></label>
<div class="controls" >
<button class="btn btn-success" style="width:120px;" >确认</button>
</div>
</div>
</form>
</div>
</body>
</html>
上面主要使用了bootstrap框架。当然,登录页面我做的比较简单,你也可以根据自己的感觉去写效果
第三步是配置文件,首先我们配置web.xml
<?xml version="1.0" encoding="UTF-8"?>
<web-app xmlns:xsi="http://www.w3.org/2001/XMLSchema-instance" xmlns="http://java.sun.com/xml/ns/javaee" xmlns:web="http://java.sun.com/xml/ns/javaee/web-app_2_5.xsd" xsi:schemaLocation="http://java.sun.com/xml/ns/javaee http://java.sun.com/xml/ns/javaee/web-app_3_0.xsd" id="WebApp_ID" version="3.0">
<display-name>ssh-day02</display-name>
<welcome-file-list>
<welcome-file>index.jsp</welcome-file>
</welcome-file-list>
<!-- 加载spring监听器 -->
<listener>
<listener-class>org.springframework.web.context.ContextLoaderListener</listener-class>
</listener>
<!-- 加载spring的配置文件applicationContext.xml -->
<context-param>
<param-name>contextConfigLocation</param-name>
<param-value>classpath:applicationContext.xml</param-value>
</context-param>
<!-- 解决no session问题 -->
<filter>
<filter-name>OpenSessionInviewFilter</filter-name>
<filter-class>org.springframework.orm.hibernate5.support.OpenSessionInViewFilter</filter-class>
</filter>
<filter-mapping>
<filter-name>OpenSessionInviewFilter</filter-name>
<url-pattern>/*</url-pattern>
</filter-mapping>
<!-- 配置Struts -->
<filter>
<filter-name>struts2</filter-name>
<filter-class>org.apache.struts2.dispatcher.ng.filter.StrutsPrepareAndExecuteFilter</filter-class>
</filter>
<filter-mapping>
<filter-name>struts2</filter-name>
<url-pattern>/*</url-pattern>
</filter-mapping>
<!-- 设置session有效时间 -->
<!-- <session-config>
<session-timeout>1</session-timeout>
</session-config> -->
</web-app>
都是些基本的配置,no session配置是后边两张表进行关联查询时session提前关闭的问题
第四步:把对应的包类创建出来,方便我们在applicationContext.xml中配置bean实例
接下来我们开始配置applicationContext.xml
主要是创建数据库连接池,创建sessionFactory ,配置hibernate属性以及声明式事务,aop(我这块没有用到,就没有配置),以及bean的实例化配置
<?xml version="1.0" encoding="UTF-8"?>
<beans xmlns="http://www.springframework.org/schema/beans"
xmlns:xsi="http://www.w3.org/2001/XMLSchema-instance"
xmlns:aop="http://www.springframework.org/schema/aop"
xmlns:tx="http://www.springframework.org/schema/tx"
xmlns:context="http://www.springframework.org/schema/context"
xsi:schemaLocation="http://www.springframework.org/schema/beans
http://www.springframework.org/schema/beans/spring-beans.xsd
http://www.springframework.org/schema/tx
http://www.springframework.org/schema/tx/spring-tx.xsd
http://www.springframework.org/schema/aop
http://www.springframework.org/schema/aop/spring-aop.xsd
http://www.springframework.org/schema/context
http://www.springframework.org/schema/context/spring-context.xsd"> <!-- 整合hibernate -->
<!-- 1.配置数据库-->
<bean id="dataSource" class="com.mchange.v2.c3p0.ComboPooledDataSource">
<property name="driverClass" value="com.mysql.jdbc.Driver"></property>
<property name="jdbcUrl" value="jdbc:mysql://localhost:3306/ssh2"></property>
<property name="user" value="root"></property>
<property name="password" value="1234"></property>
</bean>
<!-- 配置sessionFactory -->
<bean id="sessionFactory" class="org.springframework.orm.hibernate5.LocalSessionFactoryBean">
<!-- 数据源 -->
<property name="dataSource" ref="dataSource"></property>
<!-- 配置hibernate基本属性 -->
<property name="hibernateProperties">
<props>
<prop key="hibernate.dialect">org.hibernate.dialect.MySQLDialect</prop>
<prop key="hibernate.show_sql">true</prop>
<prop key="hibernate.hbm2ddl.auto">update</prop>
</props>
</property>
<!-- 配置hibernate映射文件 -->
<property name="mappingResources">
<list>
<value>com/ssh/entity/User.hbm.xml</value>
<value>com/ssh/entity/Emp.hbm.xml</value>
<value>com/ssh/entity/Dept.hbm.xml</value>
</list>
</property>
</bean>
<!-- 配置hibernate事务 -->
<bean id="transactionManager" class="org.springframework.orm.hibernate5.HibernateTransactionManager">
<property name="sessionFactory" ref="sessionFactory"></property>
</bean>
<!-- 开启事务 -->
<tx:annotation-driven transaction-manager="transactionManager"/>
<!-- 配置aop -->
</beans>
然后在引入Struts2的配置文件
<?xml version="1.0" encoding="UTF-8" ?>
<!DOCTYPE struts PUBLIC
"-//Apache Software Foundation//DTD Struts Configuration 2.3//EN"
"http://struts.apache.org/dtds/struts-2.3.dtd">
<struts>
<package name="ssh-day02" namespace="/" extends="struts-default">
</package>
</struts>
注意,上面把hibernate的配置文件和spring进行了整合,所有没有单独创建hibernate的配置文件。
到这里,ssh的配置基本完成。运行成功就是一个登陆页面
Struts2+Spring+Hibernate实现员工管理增删改查功能(一)之ssh框架整合的更多相关文章
- Struts2+Spring+Hibernate实现员工管理增删改查功能(一)之登录功能
昨天的博客中我分享了个人关于ssh实现员工管理的框架整合,今天我在分享管理员登录功能的实现. 转载请注明出处"http://www.cnblogs.com/smfx1314/p/78013 ...
- hibernate关联对象的增删改查------查
本篇博客是之前博客hibernate关联对象的增删改查------查 的后继,本篇代码的设定都在前文已经写好,因此读这篇之前,请先移步上一篇博客 //代码片5 SessionFactory sessi ...
- python全栈开发中级班全程笔记(第二模块、第三章)(员工信息增删改查作业讲解)
python全栈开发中级班全程笔记 第三章:员工信息增删改查作业代码 作业要求: 员工增删改查表用代码实现一个简单的员工信息增删改查表需求: 1.支持模糊查询,(1.find name ,age fo ...
- springmvc+spring3+hibernate4框架简单整合,简单实现增删改查功能
转自:https://blog.csdn.net/thinkingcao/article/details/52472252 C 所用到的jar包 数据库表 数据库表就不用教大家了,一张表,很简 ...
- IDEA搭建SSM实现登录、注册,数据增删改查功能
本博文的源代码:百度云盘/java/java实例/SSM实例/SSM实现登录注册,增删改查/IDEA搭建SSM实现登录,注册,增删改查功能.zip 搭建空的Maven项目 使用Intellij id ...
- 使用MVC5+Entity Framework6的Code First模式创建数据库并实现增删改查功能
此处采用VS2017+SqlServer数据库 一.创建项目并引用dll: 1.创建一个MVC项目 2.采用Nuget安装EF6.1.3 二.创建Model 在models文件夹中,建立相应的mode ...
- BootstrapTable与KnockoutJS相结合实现增删改查功能
http://www.jb51.net/article/83910.htm KnockoutJS是一个JavaScript实现的MVVM框架.通过本文给大家介绍BootstrapTable与Knock ...
- JavaWeb 增删改查功能
1.今天来写一个简单的增删改查功能,这个项目还是接着在昨天写的 --JavaWeb实现简单登录注册-- 来写的. 登录成功进来后对学生信息的增删改查 2.项目文件为: 3.好了,直接贴上今天新写的代码 ...
- django学习-12.访问不同url/接口地址实现对指定数据的增删改查功能
1.前言 通过前面博客[django学习-10.django连接mysql数据库和创建数据表]里的操作,我们已经成功在数据库[hongjingsheng_project]里创建了一张数据表[hello ...
随机推荐
- 【个人笔记】《知了堂》express模块
NPM 包管理器 Node package module ==>简称npm 类似的bower 安装express 1.全局Npm install express -g 2.项目中安装 项目中 ...
- python 保存文本txt格式之总结篇,ANSI,unicode,UTF-8
aaarticlea/png;base64,iVBORw0KGgoAAAANSUhEUgAAA4wAAAEmCAIAAACmsIlUAAAgAElEQVR4nOydezxU+f/HP49WSstKkZ
- hibernate学习手记(1)
1. java.sql.SQLException: The server time zone value '?й???????' is unrecognized or represents more ...
- 实例讲解webpack的基本使用第二篇
这一篇来讲解一下如何设置webpack的配置文件webpack.config.js 我们新建一个webpack-demo的项目文件夹,然后安装webpack 执行如下命令 在项目文件夹下,建一个dis ...
- Happy 2006 poj2773
Happy 2006 Time Limit: 3000MS Memory Limit: 65536K Total Submissions: 9049 Accepted: 3031 Descri ...
- 687. Repeats spoj (后缀数组 重复次数最多的连续重复子串)
687. Repeats Problem code: REPEATS A string s is called an (k,l)-repeat if s is obtained by concaten ...
- Python数据分析(二): Numpy技巧 (4/4)
numpy.pandas.matplotlib(+seaborn)是python数据分析/机器学习的基本工具. numpy的内容特别丰富,我这里只能介绍一下比较常见的方法和属性. 第一部分: ht ...
- java基础(Fundamental)
第一节 java开发环境 1.Linux操作系统 1)开源的操作系统.免费,主要作为服务器操作系统, 而Java主要是服务器端开发,所以部署环境都是Linux 2)Linux与Windows目录结构的 ...
- M-自适应宽高样式
1 绝对定位 position: absolute; top: 0px; bottom: 0px; left: 0px; width: 100%; overflow: hidden;
- linux上redis安装配置及其防漏洞配置及其攻击方法
Linux上redis安装: 需先在服务器上安装yum(虚拟机可使用挂载的方式安装) 安装配置所需要的环境运行指令: yum -y install gcc 进入解压文件执行make 指令进行编译 执 ...