Typecho 博客文章评论添加显示 UserAgent(UA)的功能
- 本篇文章实现了为 Typecho 博客文章评论添加显示 UserAgent(UA)的功能
- 本功能可替代 UserAgent 插件,更美观、简洁且好看
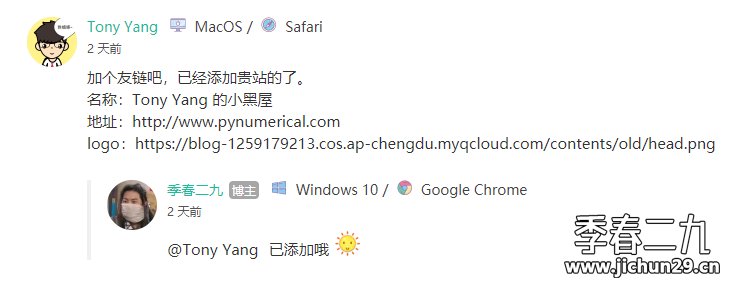
效果显示
- 大概就是这样了,实际效果请看我的评论!
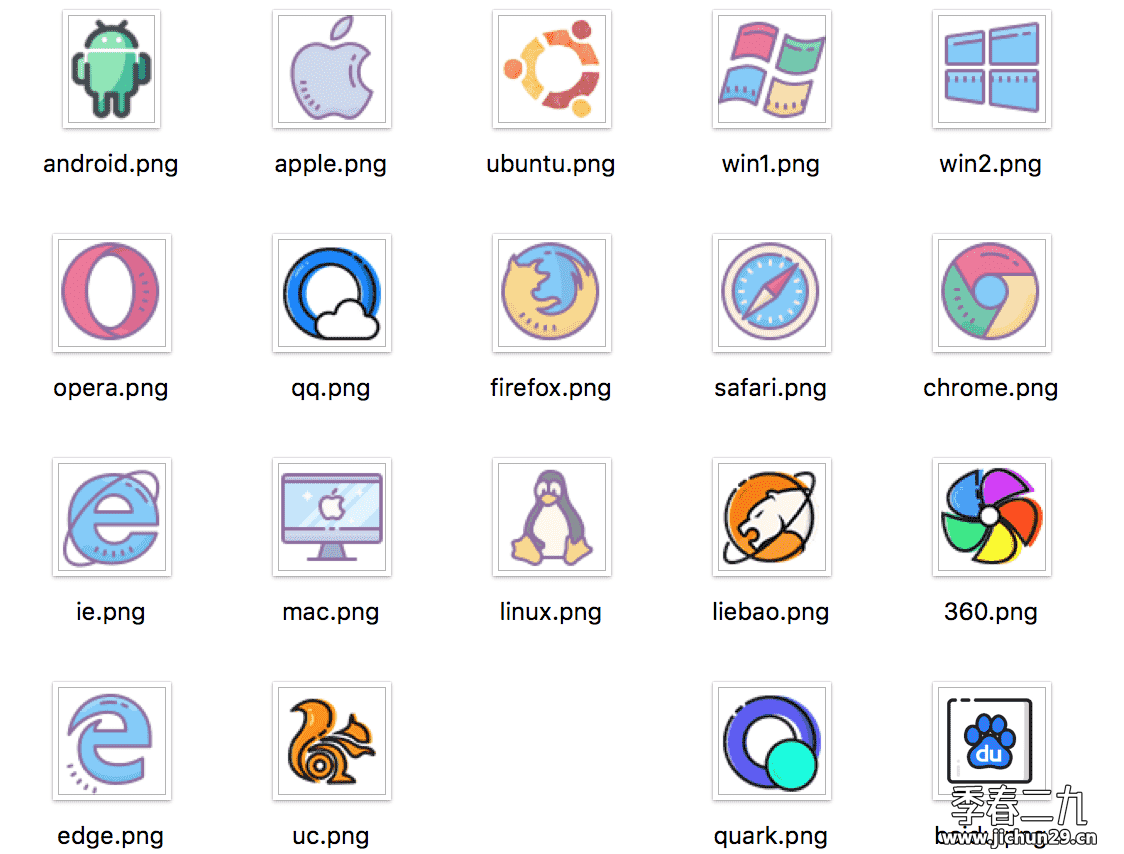
- 目前可以识别的操作系统以及浏览器
食用方法
- 这里以
Mirages主题为例,其他主题操作方法类似。
首先
将下面这段 css 全部加入到 Mirages/css/7.10.0/Mirages.min.css 末尾。
.ua-icon{display:inline-block;width:1pc;height:1pc;background-size:cover;background-repeat:no-repeat;vertical-align:text-top}.icon-360{background-image:url(https://img.jichun29.cn/img/20200226125429.png)}.icon-android{background-image:url(https://img.jichun29.cn/img/20200226125423.png);height:19px}.icon-apple{background-image:url(https://img.jichun29.cn/img/20200226125422.png)}.icon-baidu{background-image:url(https://img.jichun29.cn/img/20200226125424.png)}.icon-chrome{background-image:url(https://img.jichun29.cn/img/20200226125427.png)}.icon-edge{background-image:url(https://img.jichun29.cn/img/20200226125425.png)}.icon-firefox{background-image:url(https://img.jichun29.cn/img/20200226125426.png)}.icon-google{background-image:url(https://img.jichun29.cn/img/20200226125428.png)}.icon-ie{background-image:url(https://img.jichun29.cn/img/20200226125431.png)}.icon-liebao{background-image:url(https://img.jichun29.cn/img/20200226125430.png)}.icon-linux{background-image:url(https://img.jichun29.cn/img/20200226125433.png)}.icon-mac{background-image:url(https://img.jichun29.cn/img/20200226125432.png)}.icon-opera{background-image:url(https://img.jichun29.cn/img/20200226125434.png)}.icon-qq{background-image:url(https://img.jichun29.cn/img/20200226125435.png)}.icon-quark{background-image:url(https://img.jichun29.cn/img/20200226125437.png)}.icon-safari{background-image:url(https://img.jichun29.cn/img/20200226125438.png)}.icon-ubuntu{background-image:url(https://img.jichun29.cn/img/20200226125436.png)}.icon-uc{background-image:url(https://img.jichun29.cn/img/20200226125439.png)}.icon-win1{background-image:url(https://img.jichun29.cn/img/20200226125440.png)}.icon-win2{background-image:url(https://img.jichun29.cn/img/20200226125421.png)}
- 也可后台加入自定义 css 或是直接在 header.php 中引入
然后
找到 Mirages/functions.php,将下面代码完整复制,加到 functions.php 文件的最末尾
// 获取浏览器信息
function getBrowser($agent)
{
if (preg_match('/MSIE\s([^\s|;]+)/i', $agent, $regs)) {
$outputer = '<i class="ua-icon icon-ie"></i> Internet Explore';
} else if (preg_match('/FireFox\/([^\s]+)/i', $agent, $regs)) {
$str1 = explode('Firefox/', $regs[0]);
$FireFox_vern = explode('.', $str1[1]);
$outputer = '<i class="ua-icon icon-firefox"></i> FireFox';
} else if (preg_match('/Maxthon([\d]*)\/([^\s]+)/i', $agent, $regs)) {
$str1 = explode('Maxthon/', $agent);
$Maxthon_vern = explode('.', $str1[1]);
$outputer = '<i class="ua-icon icon-edge"></i> MicroSoft Edge';
} else if (preg_match('#360([a-zA-Z0-9.]+)#i', $agent, $regs)) {
$outputer = '<i class="ua-icon icon-360"></i> 360极速浏览器';
} else if (preg_match('/Edge([\d]*)\/([^\s]+)/i', $agent, $regs)) {
$str1 = explode('Edge/', $regs[0]);
$Edge_vern = explode('.', $str1[1]);
$outputer = '<i class="ua-icon icon-edge"></i> MicroSoft Edge';
} else if (preg_match('/UC/i', $agent)) {
$str1 = explode('rowser/', $agent);
$UCBrowser_vern = explode('.', $str1[1]);
$outputer = '<i class="ua-icon icon-uc"></i> UC浏览器';
} else if (preg_match('/QQ/i', $agent, $regs)||preg_match('/QQBrowser\/([^\s]+)/i', $agent, $regs)) {
$str1 = explode('rowser/', $agent);
$QQ_vern = explode('.', $str1[1]);
$outputer = '<i class= "ua-icon icon-qq"></i> QQ浏览器';
} else if (preg_match('/UBrowser/i', $agent, $regs)) {
$str1 = explode('rowser/', $agent);
$UCBrowser_vern = explode('.', $str1[1]);
$outputer = '<i class="ua-icon icon-uc"></i> UC浏览器';
} else if (preg_match('/Opera[\s|\/]([^\s]+)/i', $agent, $regs)) {
$outputer = '<i class= "ua-icon icon-opera"></i> Opera';
} else if (preg_match('/Chrome([\d]*)\/([^\s]+)/i', $agent, $regs)) {
$str1 = explode('Chrome/', $agent);
$chrome_vern = explode('.', $str1[1]);
$outputer = '<i class="ua-icon icon-chrome""></i> Google Chrome';
} else if (preg_match('/safari\/([^\s]+)/i', $agent, $regs)) {
$str1 = explode('Version/', $agent);
$safari_vern = explode('.', $str1[1]);
$outputer = '<i class="ua-icon icon-safari"></i> Safari';
} else{
$outputer = '<i class="ua-icon icon-chrome"></i> Google Chrome';
}
echo $outputer;
}
// 获取操作系统信息
function getOs($agent)
{
$os = false;
if (preg_match('/win/i', $agent)) {
if (preg_match('/nt 6.0/i', $agent)) {
$os = ' <i class= "ua-icon icon-win1"></i> Windows Vista / ';
} else if (preg_match('/nt 6.1/i', $agent)) {
$os = ' <i class= "ua-icon icon-win1"></i> Windows 7 / ';
} else if (preg_match('/nt 6.2/i', $agent)) {
$os = ' <i class="ua-icon icon-win2"></i> Windows 8 / ';
} else if(preg_match('/nt 6.3/i', $agent)) {
$os = ' <i class= "ua-icon icon-win2"></i> Windows 8.1 / ';
} else if(preg_match('/nt 5.1/i', $agent)) {
$os = ' <i class="ua-icon icon-win1"></i> Windows XP / ';
} else if (preg_match('/nt 10.0/i', $agent)) {
$os = ' <i class="ua-icon icon-win2"></i> Windows 10 / ';
} else{
$os = ' <i class="ua-icon icon-win2"></i> Windows X64 / ';
}
} else if (preg_match('/android/i', $agent)) {
if (preg_match('/android 9/i', $agent)) {
$os = ' <i class="ua-icon icon-android"></i> Android Pie / ';
}
else if (preg_match('/android 8/i', $agent)) {
$os = ' <i class="ua-icon icon-android"></i> Android Oreo / ';
}
else{
$os = ' <i class="ua-icon icon-android"></i> Android / ';
}
}
else if (preg_match('/ubuntu/i', $agent)) {
$os = ' <i class="ua-icon icon-ubuntu"></i> Ubuntu / ';
} else if (preg_match('/linux/i', $agent)) {
$os = ' <i class= "ua-icon icon-linux"></i> Linux / ';
} else if (preg_match('/iPhone/i', $agent)) {
$os = ' <i class="ua-icon icon-apple"></i> iPhone / ';
} else if (preg_match('/mac/i', $agent)) {
$os = ' <i class="ua-icon icon-mac"></i> MacOS / ';
}else if (preg_match('/fusion/i', $agent)) {
$os = ' <i class="ua-icon icon-android"></i> Android / ';
} else {
$os = ' <i class="ua-icon icon-linux"></i> Linux / ';
}
echo $os;
}
最后
在 Mirages/lib/comments.php 中找到合适位置添加以下代码:
<span class="comment-ua">

    <?php getOs($comments->agent); ?>

    <?php getBrowser($comments->agent); ?></span>
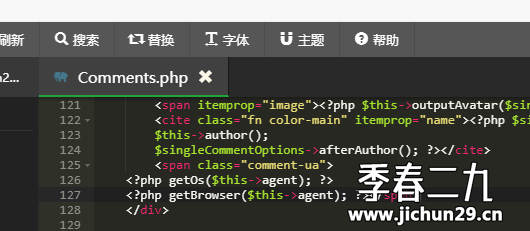
如果修改完都显示 Linux 的话,需要将上面的 $comments 替换成 $this 即可,注意代码缩进
修改完后刷新浏览器缓存,现在你的评论 UA 已经变得很漂亮啦!
Typecho 博客文章评论添加显示 UserAgent(UA)的功能的更多相关文章
- 用 Flask 来写个轻博客 (22) — 实现博客文章的添加和编辑页面
Blog 项目源码:https://github.com/JmilkFan/JmilkFan-s-Blog 目录 目录 前文列表 新建表单 新建视图函数 新建模板 在博客文章页面添加 New 和 Ed ...
- 使用Webdriver刷博客文章评论
package com.zhc.webdriver; import java.util.ArrayList; import java.util.Iterator; import java.util.c ...
- 解决wordpress部分博客文章页面无法显示的问题
搭建完wordpress,试着写了一篇博客.文章发布后,首页已经能显示出文章的标题,但是点进去后却提示该页无法显示. 百度一番,先后尝试网上的修改apache配置等方法后依然无效.折腾到最后无意间发现 ...
- 利用Flask-SQLAlchemy提供的paginate()方法实现博客文章的分页显示
在开发blog系统的时候,我们有一个需求,就是要显示作者已经发表的blog文章的列表,或显示作者关注者的文章列表.实现这个功能并不复杂,只需要在存储文章的数据库中过滤出指定作者的文章,然后渲染HTML ...
- Flask——向博客文章中添加图片
未添加图片样式 添加图片设置: 1.允许渲染img标签 在数据库文章模型allowed_tags中添加img 2.给clean函数加个参数attributes=attrs, attrs = { '*' ...
- Typecho博客添加版权说明
版权声明是指作品权利人对自己创作作品的权利的一种口头或书面声明,一般版权声明应该包括权利归属.作品使用准许方式.责任追究等方面的内容.诸如平时看文章时最后会有一个严禁转载的说明,其实这就是版权声明. ...
- HelloDjango 第 08 篇:开发博客文章详情页
作者:HelloGitHub-追梦人物 文中涉及的示例代码,已同步更新到 HelloGitHub-Team 仓库 首页展示的是所有文章的列表,当用户看到感兴趣的文章时,他点击文章的标题或者继续阅读的按 ...
- python:简单爬取自己的一篇博客文章
1.爬取文章地址:https://www.cnblogs.com/Mr-choa/p/12495157.html 爬取文章的标题.具体内容,保存到文章名.txt 代码如下: # 导入requests模 ...
- SQL Sever 博客文章目录(2016-07-06更新)
SQL Server方面的博客文章也陆陆续续的写了不少了,顺便也将这些知识点整理.归纳一下下.方便自己和他人查看. MS SQL 数据类型 三大数据库对比研究系列--数据类型 MS SQL 表和视图 ...
- VM 映像 PowerShell 教学系列博客文章
编辑人员注释:本文章是与Microsoft Azure工程的项目经理Kay Singh共同撰写的 正如我在第一篇博客文章中所承诺的,我又回来了,为大家分步介绍如何在PowerShell中使用VM ...
随机推荐
- uni-app开发的app版本更新
标签: uni-app 版本更新 前情 uni-app是我很喜欢的跨平台框架,它能开发小程序,H5,APP(安卓/iOS),对前端开发很友好,自带的IDE让开发体验也很棒,公司项目就是主推uni-ap ...
- cve-2021-3156-sudo堆溢出简单分析
调试方式 首先从github下载代码 https://github.com/sudo-project/sudo/archive/SUDO_1_9_5p1.tar.gz 编译 tar xf sudo-S ...
- openEuler欧拉部署gitbook
安装nodejs10 参见<openEuler欧拉安装指定版本的nodejs> 安装Gitbook n 16 # 选择高版本的node npm config set registry ht ...
- [OS] 计算机资源虚拟化技术
1 定义:计算机资源虚拟化 服务器虚拟化主要通过软件技术将物理服务器的硬件资源抽象化,创建多个独立的虚拟服务器环境. 2 虚拟化技术方向 以下是一些常见的服务器虚拟化方式和工具: 基于hypervis ...
- HttpClient初步理解
昨天做完网站项目,就立刻接到了接口的项目,遇到了httpclient,因为毕业不久,遇到这块所以特此留下理解 HttpClient介绍 概念: HTTP 协议可能是现在 Internet 上使用得最多 ...
- 重磅宣布|强强联合,腾讯云携手Veeam提供云上数据存储服务
近日获悉,腾讯云对象存储COS正式通过Veeam备份软件标准化测试,携手为用户提供云上数据存储服务. Veeam对COS的支持是通过SOBR( Scale out backup repository) ...
- 获取公众号openid,通过unionid 和小程序用户绑定起来
时间仓促,暂时记录一下,有问题请留言 背景:目前客户项目有两套系统.一套暂时定为A系统,另一套为B系统,两套系统下有不同的公众号,小程序. 需求:B系统为用户端系统,需要发送公众号模板消息,所以需要用 ...
- IOS颜色选择器
IOS颜色选择器 UIColorWell UIColorWell是一个继承UIControl的视图,它不能调整大小和UISwitch类似,大小大约是44*44.点击可弹出一个选择颜色的弹窗 因为是继承 ...
- .NET Threadpool 饥渴,以及队列是如何使它更糟的
.NET Threadpool 饥渴,以及队列是如何使它更糟的 .NET Threadpool starvation, and how queuing makes it worse - Criteo ...
- Qt项目升级到Qt6吐血经验总结
Qt的版本发布越来越频繁,Qt6发布已经有一段时间了,越来越多的人咨询之前的代码是否可以增加对Qt6的支持,包括开源的项目QWidgetDemo(一年时间超过2.6K star),近期百忙之中,对所有 ...