
centos6.9安装oracle11g
感谢强哥的文档 源文档链接
https://www.qstack.com.cn/archives/68.html
#-------------------------------------------------------------------------------
#
# 安装centos6.9下的oracle
# Author:nod
# Date:18-09-05
# 请确认hostname设置为oracle
# 创建目录/tmp/oracle mkdir -p /tmp/oracle
# 将p10404530_112030_Linux-x86-64_1of7.zip p10404530_112030_Linux-x86-64_2of7.zip\
# pdksh-5.2.14-30-mdv2011.0.x86_64.rpm 上传到/tmp/oracle目录
# 硬盘最低要求为50G 内存2G
# 百度云地址:链接:https://pan.baidu.com/s/11rgfBVJ-Vh46JKkIIu73Mg 密码:x34r
#-------------------------------------------------------------------------------
#-------------------------------------------------------------------------------
# 环境准备
#-------------------------------------------------------------------------------
/etc/init.d/iptables stop
chkconfig iptables off
sed -i 's/SELINUX=enforcing/SELINUX=disabled/' /etc/selinux/config
setenforce 0
curl -o /etc/yum.repos.d/CentOS-Base.repo http://mirrors.aliyun.com/repo/Centos-6.repo
wget -O /etc/yum.repos.d/epel.repo http://mirrors.aliyun.com/repo/epel-6.repo
#检查内容
cat /etc/sysconfig/i18n
#LANG="en_US.UTF-8"
#SYSFONT="latarcyrheb-sun16"
echo $LANG
#en_US.UTF-8
yum -y groupinstall "Compatibility libraries" "Base" "Development tools" "debugging Tools"
yum -y install lrzsz
umount /mnt
cd /etc/yum.repos.d/
mkdir test -p
\mv *.repo test
echo '[local]
name=local
baseurl=file:///mnt
gpgcheck=0' >local.repo
mount /dev/cdrom /mnt
yum makecache
yum groupinstall desktop -y
yum install -y xorg-x11-utils
echo '*/5 * * * * /usr/sbin/ntpdate ntp1.aliyun.com >/dev/null 2>&1' >/var/spool/cron/root
mkdir -p /tmp/oracle
#-------------------------------------------------------------------------------
# 用户环境
#-------------------------------------------------------------------------------
groupadd oinstall
groupadd dba
useradd -g oinstall -G dba oracle
echo 123456 |passwd --stdin oracle
mkdir -p /u01/app
chown -R oracle:oinstall /u01
chmod -R 755 /u01
#-------------------------------------------------------------------------------
# 用户环境
#-------------------------------------------------------------------------------
#修改host解析
#172.30.2.119本机ip oracle
cat >> /etc/profile << EOF
if [ \$USER = "oracle" ];then
if [ \$SHELL = "/bin/ksh" ];then
ulimit -p 16384
ulimit -n 65536
else
ulimit -u 16384 -n 65536
fi
fi
EOF
cat >> /home/oracle/.bash_profile <<EOF
HISTTIMEFORMAT='[%F %T]'
ORACLE_BASE=/u01/app
ORACLE_SID=orcl
ORACLE_HOME=\$ORACLE_BASE/oracle/product/11.2.0.3/db_1
NLS_LANG=AMERICAN_CHINA.ZHS16GBK
LD_LIBRARY_PATH=\$ORACLE_HOME/lib:/lib:/usr/lib
PATH=\$ORACLE_HOME/bin:\$PATH
export ORACLE_BASE ORACLE_HOME ORACLE_SID NLS_LANG PATH
EOF
cat >> /etc/sysctl.conf <<EOF
kernel.shmmni = 4096
kernel.sem = 250 32000 100 128
fs.file-max = 6815744
net.ipv4.ip_local_port_range = 9000 65500
net.core.rmem_default = 262144
net.core.rmem_max = 4194304
net.core.wmem_default= 262144
net.core.wmem_max = 1048576
fs.aio-max-nr = 1048576
EOF
cat >> /etc/security/limits.conf <<EOF
oracle soft nproc 2047
oracle hard nproc 16384
oracle soft nofile 1024
oracle hard nofile 65536
EOF
cat >> /etc/pam.d/login <<EOF
session required /lib64/security/pam_limits.so
EOF
sysctl -p
cd /tmp/oracle
unzip -q p10404530_112030_Linux-x86-64_1of7.zip
unzip -q p10404530_112030_Linux-x86-64_2of7.zip
#此处是你物理机的ip 需要开启Xmanager - Passive
export DISPLAY=172.30.2.113:0.0
su - oracle
cd /tmp/oracle/database/
./runInstaller
#-------------------------------------------------------------------------------
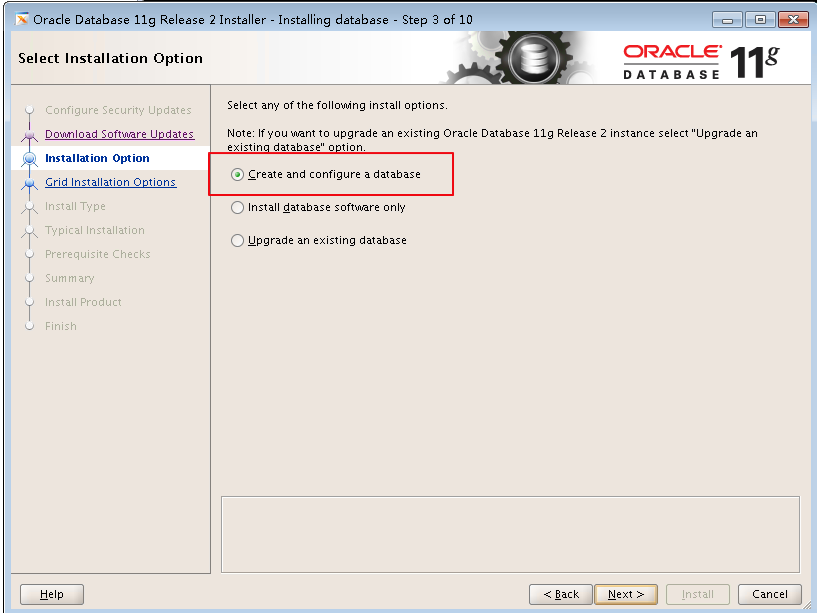
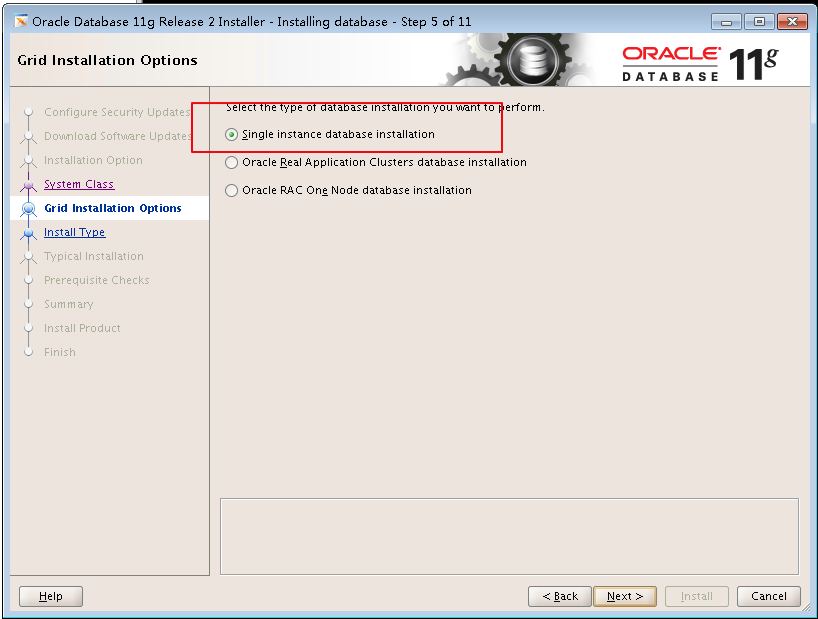
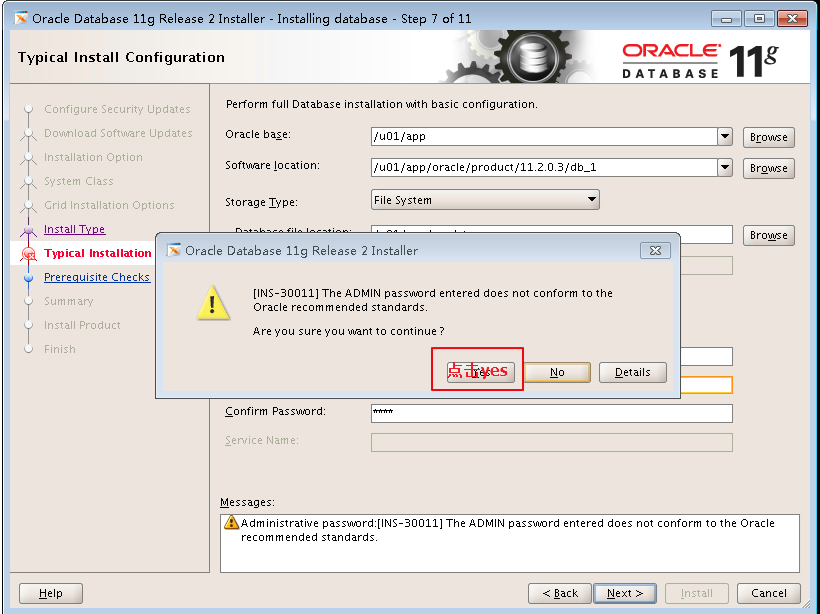
# 进入图形界面更改 建议设置orcl密码为orcl
#-------------------------------------------------------------------------------
yum install -y libaio-devel
yum install -y elfutils-libelf-devel
cd /tmp/oracle
rpm -ivh pdksh-5.2.14-30-mdv2011.0.x86_64.rpm
sh /u01/oraInventory/orainstRoot.sh
sh /u01/app/oracle/product/11.2.0.3/db_1/root.sh
[root@oracle logs]# sh /u01/oraInventory/orainstRoot.sh
Changing permissions of /u01/oraInventory.
Adding read,write permissions for group.
Removing read,write,execute permissions for world.
Changing groupname of /u01/oraInventory to oinstall.
The execution of the script is complete.
[root@oracle logs]# sh /u01/app/oracle/product/11.2.0.3/db_1/root.sh
Performing root user operation for Oracle 11g
The following environment variables are set as:
ORACLE_OWNER= oracle
ORACLE_HOME= /u01/app/oracle/product/11.2.0.3/db_1
Enter the full pathname of the local bin directory: [/usr/local/bin]:
Copying dbhome to /usr/local/bin ...
Copying oraenv to /usr/local/bin ...
Copying coraenv to /usr/local/bin ...
Creating /etc/oratab file...
Entries will be added to the /etc/oratab file as needed by
Database Configuration Assistant when a database is created
Finished running generic part of root script.
Now product-specific root actions will be performed.
Finished product-specific root actions.
sqlplus / as sysdba







centos6.9安装oracle11g的更多相关文章
- CentOS6.8安装Oracle11g
===== 这中间还有很多细节问题该文档中并没有说明和指出: 1.如/tmp目录必须单独分出来,不然oracle在以后的使用中会逐渐变慢 2.官网说的512M内存即可,这里纠正下,如果只是测试安装那还 ...
- CentOS6.4 安装 Oracle11g
1.硬件要求检查: 1.1 内存要求: 内存大于1G(使用虚拟机安装时内存要稍微大一些,否则安装检查不通过) #cat /proc/meminfo //查看内存大小 1.2 交换分区要求: 交换分区是 ...
- 【通过ssh oracle11g安装】centos6静默安装oracle11g
转载链接:https://blog.csdn.net/u011391839/article/details/76566316 根据实际情况略作调整~ 博主参考了以上链接成功进行安装,列一下自己遇到的坑 ...
- CentOS6.5安装Oracle11g
安装前必读: 1. 安装Oracle的虚拟机需要固定IP. 2. 注意安装过程中root用户与oracle用户的切换(su root/su oracle) 3. 环境变量 ...
- centos7远程安装oracle11g R2详细教程-解决一切问题
相关链接与资源: sqldevelper(各种操作系统的oracle客户端) http://www.oracle.com/technetwork/cn/developer-tools/sql-deve ...
- Linux CentOS 6.5 64位 静默安装Oracle11g 云主机
本例: 通过SSH远程连接云主机,上传oracle11g安装包,在centos6.5上无图形化界面静默安装oracle11g. 涉及工具及环境: 1.本地环境windows7+ssh远程连接工具xSh ...
- Centos6.5 安装 Oracle11gR2(64位)
Centos6.5安装 Oracle11gR2(64位) 安装centos6.5 (我的是虚拟机环境) 1. 下载centos6.5的安装包,不解释. 例如以下图: 2. 下载oracle安装包, ...
- Linux-CentOS7下安装Oracle11g
简述: 本文操作环境采用CentOS7 Linux安装Oracle11g与Windows区别较大,在Linux下需要创建用户以及用户组来供Oracle使用 Windows可以直接图形化界面从第一步到最 ...
- vmware Centos6.6安装64位
Centos6.6安装64位 必须开启BIOS中的虚拟化技术 首先开机进入BIOS,一般机器是按F2,我的T420是按F1,然后进入Security,Virtualization,选择Enable即可 ...
随机推荐
- plsql快速入门
汉化plsql方法: 本来想直接使用英文版的,但是太多专业名词看不懂,只好先汉化熟悉一下先. 安装好plsq后,百度下载plsql汉化包 执行汉化包里面的安装程序,安装目标路径选择plsql的安装路径 ...
- C++中的智能指针、轻量级指针、强弱指针学习笔记
一.智能指针学习总结 1.一个非const引用无法指向一个临时变量,但是const引用是可以的! 2.C++中的delete和C中的free()类似,delete NULL不会报"doubl ...
- jenkins 集成 keycloak 认证
keycloak 是很不错的sso 工具,当然也有Jenkins 的插件,我们可以使用jenkins 插件,方便用户账户的管理 环境准别 docker-compose version: "3 ...
- ipfs docker 运行试用
ipfs 是一个分布式,p2p 的文件系统,参考了git.bt.sfs 以及web 的设计 环境准备 docker-compose 文件 version: "3" services ...
- linux修改文件所有者和文件所在组 【转载】
chgrp 用户名 文件名 -R chown 用户名 文件名 -R -R表示递归目录下所有文件 以上部分已验证 地址原贴
- python 术语
python 术语 术语英文 术语中文 说明 PyPI(Python Package Index) 搜索python包的网站:https://pypi.org/ pip.easy_install 包管 ...
- Iris花逻辑回归与实现
Iris花的分类是经典的逻辑回归的代表:但是其代码中包含了大量的python库的核心处理模式,这篇文章就是剖析python代码的文章. #取用下标为2,3的两个feture,分别是花的宽度和长度: # ...
- 配置中心Client端
配置中心Client端 1.在Order工程中的Order-Server模块的pom.xml中增加 <dependency> <groupId>org.springframew ...
- linux 添加用户并赋予root权限
1.添加用户,首先用adduser命令添加一个普通用户,命令如下: #adduser tommy //添加一个名为tommy的用户#passwd tommy //修改密码Changing pass ...
- piwik优化之定时任务生成统计数据
piwik的ui界面,使用起来是无比的慢,让苏南大叔不得不对比wordpress的使用体验.当然了,如果你的服务器足够强大,这些都是小事儿.官方对此给出了一系列的优化建议,大家可以读一下:https: ...