[AWS] Deploy react project on EC2
AWS的项目服务
如何在aws部署项目
申请到亚马逊AWS免费账户后,我们可以拥有很多的免费云服务产品项目,其中包括:
- EC2云服务器、
- Amazon S3存储、
- Amazon RDS数据库、
- Amazon CloudFront分发服务、
- Mobile Analytics移动分析服务、
- Amazon SNS消息推送服务等等项目。
Ref: 亚马逊AWS免费EC2虚拟机开通实例和部署密钥、安全策略过程 【很详细】
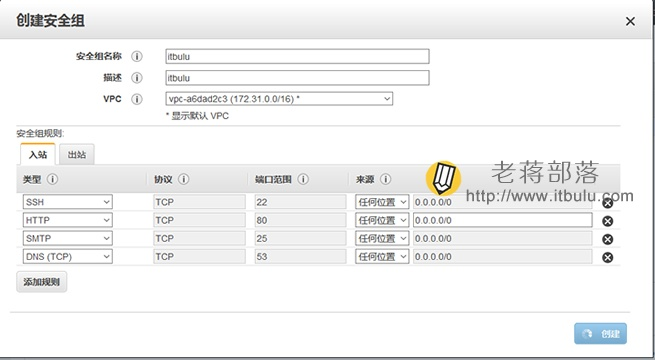
开放端口比较有讲究,如下:
更多详细内容可以参见:[AWS] EC2 & GPU
如何关掉EC2上的镜像
Terminate Instance
When you terminate an EC2 instance, the instance will be shutdown and the virtual machine that was provisioned for you will be permanently taken away and you will no longer be charged for instance usage. Any data that was stored locally on the instance will be lost. Any attached EBS volumes will be detached and deleted. However, if you attach an EBS Snapshot to an instance at boot time, the default option in the Dashboard is to delete the attached EBS volume upon termination.
Stop Instance
When you stop an EC2 instance, the instance will be shutdown and the virtual machine that was provisioned for you will be permanently taken away and you will no longer be charged for instance usage.
The key difference between stopping and terminating an instance is that the attached bootable EBS volume will not be deleted. <----
The data on your EBS volume will remain after stopping while all information on the local (ephemeral) hard drive will be lost as usual. The volume will continue to persist in its availability zone. Standard charges for EBS volumes will apply. Therefore, you should only stop an instance if you plan to start it again within a reasonable timeframe. Otherwise, you might want to terminate an instance instead of stopping it for cost saving purposes.
The ability to stop an instance is only supported on instances that were launched using an EBS-based AMI where the root device data is stored on an attached EBS volume as an EBS boot partition instead of being stored on the local instance itself. As a result, one of the key advantages of starting a stopped instance is that it should theoretically have a faster boot time. When you start a stopped instance the EBS volume is simply attached to the newly provisioned instance. Although, the AWS-id of the new virtual machine will be the same, it will have new IP Addresses, DNS Names, etc. You shouldn't think of starting a stopped instance as simply restarting the same virtual machine that you just stopped as it will most likely be a completely different virtual machine that will be provisioned to you.
For more information about what really happens during each server/instance state, please see Server States.
Warning! - When stopping an instance, keep in mind that it must be started again through RightScale in order to operate correctly. If the instance is started outside of RightScale, we will not be able to generate the required user data so that the instance will be able to properly communicate with RightScale via the RightLink agent.
步步实践
AWS EC2 Tutorial For Beginners | AWS Certified Solutions Architect Tutorial | AWS Training | Edureka【2+ hours】
[AWS] How to deploy Node.js apps on AWS EC2【step by step】
远程登录配置
简单地说就是配置完毕后,通过ssh登录远程服务器。
chmod 400 lotusairline-test.pem

ssh -i "lotusairline-test.pem" ubuntu@ec2-54-252-131-130.ap-southeast-2.compute.amazonaws.com
代码运行环境配置
  git clone https://github.com/hoanghuynh1995/AirlineReservation.git

  cd AirlineReservation/

  sudo apt-get update

  sudo apt-get install npm

  npm install

  # install node.

  node server.js

  sudo apt-get install nodejs-legacy

  node server.js

  # change port.

  vim server.js

  # start.

  sudo node server.js
一开始连接不上,如下:
ubuntu@ip-172-31-4-91:~/demo/AirlineReservation$ node server.js

Mongoose: mpromise (mongoose's default promise library) is deprecated, plug in your own promise library instead: http://mongoosejs.com/docs/promises.html

`open()` is deprecated in mongoose >= 4.11.0, use `openUri()` instead, or set the `useMongoClient` option if using `connect()` or `createConnection()`. See http://mongoosejs.com/docs/4.x/docs/connections.html#use-mongo-client

Server running at http://localhost:3000

Db.prototype.authenticate method will no longer be available in the next major release 3.x as MongoDB 3.6 will only allow auth against users in the admin db and will no longer allow multiple credentials on a socket. Please authenticate using MongoClient.connect with auth credentials.

Mongoose: airports.ensureIndex({ code: 1 }, { unique: true, background: true })

Mongoose: bookings.findOne({}, { sort: { bookedAt: -1 }, limit: 1, fields: {} })

Mongoose: bookings.ensureIndex({ code: 1 }, { unique: true, background: true })

Mongoose: routes.ensureIndex({ code: 1 }, { unique: true, background: true })
全局安装yarn
npm install -g yarn
node版本过低!
ubuntu@ip-172-31-4-91:~/hahaha/proj$ sudo yarn

yarn install v1.7.0

warning You are using Node "4.2.6" which is not supported and may encounter bugs or unexpected behavior. Yarn supports the following semver range: "^4.8.0 || ^5.7.0 || ^6.2.2 || >=8.0.0"

warning package.json: No license field

warning tc_platform@0.0.1: No license field

[1/5] Validating package.json...

error tc_platform@0.0.1: The engine "node" is incompatible with this module. Expected version ">= 8.9.0".

error Found incompatible module

info Visit https://yarnpkg.com/en/docs/cli/install for documentation about this command.

ubuntu@ip-172-31-4-91:~/my_fiora_resume/tc_platform$ node -v

v4.2.6
故,选择合适版本的源码安装node.js。
$ sudo git clone https://github.com/nodejs/node.git

Cloning into 'node'...
lolo@lolo-UX303UB$ node -v
v8.9.4 //一个实践所得匹配的版本
lolo@lolo-UX303UB$ yarn -v
1.7.0
$ sudo chmod -R 755 node

$ cd node

$ sudo ./configure

$ sudo make

$ sudo make install

$ node --version

v0.10.25
远程连接并查看数据库
安装mongodb
sudo apt-get install mongodb
删掉某数据库
> use rc_platform

switched to db rc_platform

> db.dropDatabase()

{ "dropped" : "rc_platform", "ok" :  }
删掉文档
> db.users.remove({"username" : "jessehao123"})

WriteResult({ "nRemoved" :  })
备份数据库
ubuntu@ip----:~$  mongodump -h 127.0.0.1: -d HotspotDB -o backup_HotspotDB

connected to: 127.0.0.1:

--22T12::28.413+ DATABASE: HotspotDB     to     backup_HotspotDB/HotspotDB

--22T12::28.413+     HotspotDB.system.indexes to backup_HotspotDB/HotspotDB/system.indexes.bson

--22T12::28.414+           documents

--22T12::28.414+     HotspotDB.messages to backup_HotspotDB/HotspotDB/messages.bson

--22T12::28.414+           documents

--22T12::28.414+     Metadata for HotspotDB.messages to backup_HotspotDB/HotspotDB/messages.metadata.json

--22T12::28.415+     HotspotDB.users to backup_HotspotDB/HotspotDB/users.bson

--22T12::28.415+           documents

--22T12::28.415+     Metadata for HotspotDB.users to backup_HotspotDB/HotspotDB/users.metadata.json

--22T12::28.415+     HotspotDB.groups to backup_HotspotDB/HotspotDB/groups.bson

--22T12::28.415+           documents

--22T12::28.415+     Metadata for HotspotDB.groups to backup_HotspotDB/HotspotDB/groups.metadata.json

--22T12::28.416+     HotspotDB.friends to backup_HotspotDB/HotspotDB/friends.bson

--22T12::28.416+           documents

--22T12::28.416+     Metadata for HotspotDB.friends to backup_HotspotDB/HotspotDB/friends.metadata.json

--22T12::28.416+     HotspotDB.sockets to backup_HotspotDB/HotspotDB/sockets.bson

--22T12::28.416+           documents

--22T12::28.416+     Metadata for HotspotDB.sockets to backup_HotspotDB/HotspotDB/sockets.metadata.json
Ref: MongoDB导入导出以及数据库备份
还原数据库
ubuntu@ip----:~$ mongorestore -h 127.0.0.1: -d HotspotDB --dir backup_HotspotDB/HotspotDB/

connected to: 127.0.0.1:

--22T12::34.301+ backup_HotspotDB/HotspotDB/sockets.bson

--22T12::34.301+     going into namespace [HotspotDB.sockets]

Restoring to HotspotDB.sockets without dropping. Restored data will be inserted without raising errors; check your server log

 objects found

--22T12::34.304+     Creating index: { key: { _id:  }, name: "_id_", ns: "HotspotDB.sockets" }

--22T12::34.304+     Creating index: { unique: true, key: { id:  }, name: "id_1", ns: "HotspotDB.sockets", background: true }

--22T12::34.305+     Creating index: { key: { user:  }, name: "user_1", ns: "HotspotDB.sockets", background: true }

--22T12::34.305+ backup_HotspotDB/HotspotDB/groups.bson

--22T12::34.305+     going into namespace [HotspotDB.groups]

Restoring to HotspotDB.groups without dropping. Restored data will be inserted without raising errors; check your server log

 objects found

--22T12::34.306+     Creating index: { key: { _id:  }, name: "_id_", ns: "HotspotDB.groups" }

--22T12::34.315+     Creating index: { unique: true, key: { name:  }, name: "name_1", ns: "HotspotDB.groups", background: true }

--22T12::34.315+ backup_HotspotDB/HotspotDB/friends.bson

--22T12::34.315+     going into namespace [HotspotDB.friends]

Restoring to HotspotDB.friends without dropping. Restored data will be inserted without raising errors; check your server log

 objects found

--22T12::34.317+     Creating index: { key: { _id:  }, name: "_id_", ns: "HotspotDB.friends" }

--22T12::34.318+     Creating index: { key: { from:  }, name: "from_1", ns: "HotspotDB.friends", background: true }

--22T12::34.318+ backup_HotspotDB/HotspotDB/users.bson

--22T12::34.318+     going into namespace [HotspotDB.users]

Restoring to HotspotDB.users without dropping. Restored data will be inserted without raising errors; check your server log

 objects found

--22T12::34.320+     Creating index: { key: { _id:  }, name: "_id_", ns: "HotspotDB.users" }

--22T12::34.320+     Creating index: { unique: true, key: { username:  }, name: "username_1", ns: "HotspotDB.users", background: true }

--22T12::34.320+ backup_HotspotDB/HotspotDB/messages.bson

--22T12::34.320+     going into namespace [HotspotDB.messages]

Restoring to HotspotDB.messages without dropping. Restored data will be inserted without raising errors; check your server log

 objects found

--22T12::34.326+     Creating index: { key: { _id:  }, name: "_id_", ns: "HotspotDB.messages" }

--22T12::34.326+     Creating index: { key: { createTime:  }, name: "createTime_1", ns: "HotspotDB.messages", background: true }

--22T12::34.327+     Creating index: { key: { to:  }, name: "to_1", ns: "HotspotDB.messages", background: true }
查看内容
> show collections

friends

users

> db.users.find().pretty()

{

    "_id" : ObjectId("5b1e34f98a51ee0f6fa3cf1f"),

    "expressions" : [ ],

       ...

}
GUI远程连接
Ref: MongoDB Basic: How to Connect to MongoDB Remote Server
当然,有了GUI,以上的命令就扔一边儿去了。
/* 有待学习 */
端口服务管理
端口查看
查看服务器运行程序的相关端口
lsof -i :

列出8081谁在用,然后杀掉,腾出地方。

kill - <PID>
服务查看
查看某个进程或者服务是否存在。
ps -aux | grep “xxx”
持续运行
Ref: 如何实现SSH断开后 进程仍然在后台运行
(cmd &)
AWS全家桶
常见策略
链接:https://www.zhihu.com/question/19568090/answer/263234569
不光使用过Amazon EC2,还是用过Lambda,Kinesis,DynamoDB,IoT等等其他服务,感觉AWS不仅仅是IaaS,他的很多服务都已经超出了IaaS的界限,所以不太好定义它是IaaS还是PaaS或是其他,
简单的说它是云计算服务,我的规律是,我的业务架构里哪些有痛点了或感觉麻烦了,就看看AWS有哪些服务可以解决。
先谈一下EC2的感受:EC2+ELB+Autoscaling简直就是绝配,
- ELB - 接收外部请求,
- EC2 - 处理业务逻辑,
- Autoscaling - 做自动伸缩。
总结起来,高可用,负载均衡,弹性,自动化这些高档的词无形中都已经实现了。
再谈谈Lambda,估计这就是从物理机器->虚拟机->容器->函数发展的趋势吧,Lambda确实是无服务器架构的典范,直接写代码,免运维,事件触发这是对软件开发模式的一次重大的变革。
DynamoDB同样也是无服务器架构的一个重要组件,自定义吞吐、无需关心容量限制、NoSQL简直是互联网应用的最爱。
IoT解决了大规模连接设备的并发连接和海量数据的传输,他的很有特色的设备影子真实解决了我们再设备时常断网情况下的设备的控制难题。
客户端布置
create-react-app
是来自于Facebook出品的零配置命令行工具,能够帮你自动创建基于 Webpack+ES6 的最简易的React项目模板,有助于初学者快速上手实践。
安装 create-react-app 的方式也非常简单,可以直接使用 npm 命令进行全局安装。
npm install -g create-react-app

create-react-app my-app

cd my-app/

npm start
npm run build
运行后,到底发生了什么?
Build complete.

Tip: built files are meant to be served over an HTTP server.

Opening index.html over file:// won't work.

构建文件务必放在一个HTTP服务器。
直接打开index.html文件将不工作。
参考:npm run build 打包后,如何运行在本地查看效果
代码会被编译到build目录。将整个应用打包发布,自动试用webpack进行压缩与优化。【webpack的一个作用】
大致意思是:
已经编译好啦。build生成的这些东西要放在服务器root下,可以在pakege.json里,根据绿字里的例子,再重写。
也能让它充当静态的服务器,敲:npm install -g serve,在敲serve -s build,就可以了。
用cdn
除了html文件, 打包的静态内容会传到cdn;
html文件放到服务器上的 fiora/public目录 下。
不用cdn
不用cdn的话, 就把build内容全放到public目录。
End.
[AWS] Deploy react project on EC2的更多相关文章
- Deploy .Net project automatically with MsBuild and MsDeploy (0)
I will use a example of my project to show how to use MS Build and MS Deploy in a real project and s ...
- AWS系列之二 使用EC2
在本文中我们有三个任务. 第一:使用Amazon management console创建一个EC2实例. 第二:使用本地的命令行工具远程登陆到该EC2实例. 第三:在该EC2实例上创建一个web服务 ...
- AWS 云产品 CloudFront + ELB + EC2 + S3 构建虚拟主机动+静分离站点
目录 一.架构图 二.实现步骤 2.1.EC2 配置 2.2.ELB 设置 2.2.1.创建目标组 2.2.2.创建负载均衡器 2.3.S3 设置 2.4.CloudFront 分配 2.4.1.创建 ...
- AWS—Xshell工具远程登录EC2虚拟机
一.创建AWS账户(已有AWS账号的请跳过) 访问 https://amazonaws-china.com/cn/,点击创建AWS账户,根据提示填写个人相关信息,创建AWS账户. 二.创建EC2虚拟机 ...
- 【AWS】【TroubleShooting】EC2实例无法使用SSH远程登陆(EC2 failure for SSH connection)
1. Login AWS web console and check the EC2 instance.
- 亚马逊记AWS(Amazon Web Services)自由EC2应用
很长时间,我听到AWS能够应用,但是需要结合信用卡,最近申请了. 说是免费的,我还是扣6.28,后来我上网查了.认为是通过进行验证.像服务期满将返回. 关键是不要让我进入全抵扣信用卡支付passwor ...
- Deploy .Net project automatically with MsBuild and MsDeploy (1)
Q: How to change parameter values in configuration files dynamically In the first section http://www ...
- [Full-stack] 快速上手开发 - React
故事背景 [1] 博客笔记结合<React快速上手开发>再次系统地.全面地走一遍. [2] React JS Tutorials:包含了JS --> React --> Red ...
- [Full-stack] 一切皆在云上 - AWS
一元课程:https://edu.51cto.com/center/course/lesson/index?id=181407[非常好] Based on AWS Lambda. 包含:DevOps ...
随机推荐
- oracle中查找和删除重复记录的几种方法总结
平时工作中可能会遇到当试图对库表中的某一列或几列创建唯一索引时,系统提示 ORA-01452 :不能创建唯一索引,发现重复记录. 下面总结一下几种查找和删除重复记录的方法(以表CZ为例): 表CZ的结 ...
- windows Server 2008 R2 开关机取消登录时要按Ctrl+Alt+Delete组合键登录的方法
1.点桌面任务栏的“开始-->运行”在弹出的窗口中输入gpedit.msc . 2.找到如下图所示的位置 右键属性进行设置如下
- Eureka的优势
http://www.cnblogs.com/zgghb/p/6515062.html Eureka的优势 1.在Eureka平台中,如果某台服务器宕机,Eureka不会有类似于ZooKeeper的选 ...
- 使用AOF持久化文件实现还原Redis数据库并得到RDB持久化文件
目录 1 编写本文的初衷 2 具体实施 2.1 Redis持久化概念简介 2.2 获取指定Redis的AOF持久化文件 2.3 把Redis的持久化AOF文件转换为RDB文件 1 编写本文的初衷 因为 ...
- 解决 Docker pull 出现的net/http: TLS handshake timeout 的一个办法
echo "DOCKER_OPTS=\"\$DOCKER_OPTS --registry-mirror=http://f2d6cb40.m.daocloud.io\"&q ...
- ios中输入框的父类--文本框,DataPick,pickerview
父控制器 #import <UIKit/UIKit.h> #import "ScrollViewExt.h" @interface BaseKeyBoardCtrl : ...
- [转] Dangers of using dlsym() with RTLD_NEXT
There are times when you want to wrap a library function in order to provide some additional functio ...
- 可显示行号的log工具
import android.util.Log; /** * (ExtendedLog=>ELog)可以记录行号,类名,方法名的Log工具 * * @author Fantouch */ pub ...
- R语言编程艺术#03#列表(list)
向量的元素要求都是同类型的,而列表(list)与向量不同,可以组合多个不同类型的对象.类似于C语言中的结构体(struct)类型. 1.创建列表 从技术上讲,列表就是向理.之前我们接触过的普通向量都称 ...
- mark 阿里支付
开源软件企业版特惠高校版博客 我的码云 ·· 8月18日(周六)成都源创会火热报名中,四位一线行业大牛与你面对面,探讨区块链技术热潮下的冷思考. 开源项目 > WEB应用开发 > Web开 ...