Hbase-2.0.0_01_安装部署
该文章是基于 Hadoop2.7.6_01_部署 进行的
1. 主机规划
|
主机名称 |
IP信息 |
内网IP |
操作系统 |
安装软件 |
备注:运行程序 |
|
mini01 |
10.0.0.11 |
172.16.1.11 |
CentOS 7.4 |
jdk、hadoop、zookeeper、hbase |
QuorumPeerMain、NameNode、HMaster |
|
mini02 |
10.0.0.12 |
172.16.1.12 |
CentOS 7.4 |
jdk、hadoop、zookeeper、hbase |
QuorumPeerMain、ResourceManager、HMaster |
|
mini03 |
10.0.0.13 |
172.16.1.13 |
CentOS 7.4 |
jdk、hadoop、zookeeper、hbase |
QuorumPeerMain、DataNode、NodeManager、HRegionServer |
|
mini04 |
10.0.0.14 |
172.16.1.14 |
CentOS 7.4 |
jdk、hadoop、zookeeper、hbase |
QuorumPeerMain、DataNode、NodeManager、HRegionServer |
|
mini05 |
10.0.0.15 |
172.16.1.15 |
CentOS 7.4 |
jdk、hadoop、zookeeper、hbase |
QuorumPeerMain、DataNode、NodeManager、HRegionServer |
2. Zookeeper部署
共部署5台,所以在mini01~mini05都得部署
2.1. 配置信息
 [yun@mini01 conf]$ pwd

 /app/zookeeper/conf

 [yun@mini01 conf]$ cat zoo.cfg

 #单个客户端与单台服务器之间的连接数的限制,是ip级别的,默认是60,如果设置为0,那么表明不作任何限制。

 maxClientCnxns=

 # The number of milliseconds of each tick

 tickTime=

 # The number of ticks that the initial

 # synchronization phase can take

 initLimit=

 # The number of ticks that can pass between

 # sending a request and getting an acknowledgement

 syncLimit=

 # the directory where the snapshot is stored.

 # do not use /tmp for storage, /tmp here is just

 # example sakes.

 # dataDir=/tmp/zookeeper

 dataDir=/app/bigdata/zookeeper/data

 # the port at which the clients will connect

 clientPort=

 #

 # Be sure to read the maintenance section of the

 # administrator guide before turning on autopurge.

 #

 # http://zookeeper.apache.org/doc/current/zookeeperAdmin.html#sc_maintenance

 #

 # The number of snapshots to retain in dataDir

 #autopurge.snapRetainCount=

 # Purge task interval in hours

 # Set to "" to disable auto purge feature

 #autopurge.purgeInterval=

 # leader和follow通信端口和投票选举端口

 server.=mini01::

 server.=mini02::

 server.=mini03::

 server.=mini04::

 server.=mini05::
2.2. 添加myid文件
 [yun@mini01 data]$ pwd

 /app/bigdata/zookeeper/data

 [yun@mini01 data]$ ll

 total

 -rw-r--r--  yun yun    May  : myid

 drwxr-xr-x  yun yun  Jun  : version-

 [yun@mini01 data]$ cat myid  # 其中mini01的myid 为1;mini02的myid 为2;mini03的myid 为3;mini04的myid 为4;mini05的myid 为5
2.3. 环境变量
 [root@mini01 profile.d]# pwd

 /etc/profile.d

 [root@mini01 profile.d]# cat zk.sh

 export ZK_HOME="/app/zookeeper"

 export PATH=$ZK_HOME/bin:$PATH

 [root@mini01 profile.d]# logout

 [yun@mini01 conf]$ source /etc/profile # 重新加载环境变量
2.4. 启动zk服务
 # 依次在启动mini01、mini02、mini03、mini04、mini05  zk服务

 [yun@mini01 zookeeper]$ pwd

 /app/zookeeper

 [yun@mini01 zookeeper]$ zkServer.sh start

 JMX enabled by default

 Using config: /app/zookeeper/bin/../conf/zoo.cfg

 Starting zookeeper ... STARTED
建议在 /app/zookeeper,因为在启动时,会有相关日志产生
 [yun@mini01 zookeeper]$ pwd

 /app/zookeeper

 [yun@mini01 zookeeper]$ ll zookeeper.out

 -rw-rw-r--  yun yun  Aug   : zookeeper.out
2.5. 查询运行状态
 # 其中mini01、mini02、mini04、mini05状态如下

 [yun@mini01 zookeeper]$ zkServer.sh status

 JMX enabled by default

 Using config: /app/zookeeper/bin/../conf/zoo.cfg

 Mode: follower

 # 其中mini03 状态如下

 [yun@mini03 zookeeper]$ zkServer.sh status

 JMX enabled by default

 Using config: /app/zookeeper/bin/../conf/zoo.cfg

 Mode: leader
3. Hbase部署与配置修改
3.1. 软件部署
 [yun@mini01 software]$ pwd

 /app/software

 [yun@mini01 software]$ tar xf hbase-2.0.-bin.tar.gz

 [yun@mini01 software]$ mv hbase-2.0. /app/

 [yun@mini01 software]$ cd

 [yun@mini01 ~]$ ln -s hbase-2.0./ hbase
3.2. 环境变量
注意所有部署hbase的机器【mini01、mini02、mini03、mini04、mini05】都需要该环境变量
 [root@mini01 profile.d]# pwd

 /etc/profile.d

 [root@mini01 profile.d]# cat hbase.sh  # 也可以直接写在 /etc/profile 文件中

 export HBASE_HOME="/app/hbase"

 export PATH=$HBASE_HOME/bin:$PATH

 [root@mini01 profile.d]# logout

 [yun@mini01 hbase]$ source /etc/profile  # 使用yun用户,并重新加载环境变量
3.3. hbase-env.sh 修改
 [yun@mini01 conf]$ pwd

 /app/hbase/conf

 [yun@mini01 conf]$ cat hbase-env.sh

 #!/usr/bin/env bash

 ………………

 # The java implementation to use.  Java 1.8+ required.

 # export JAVA_HOME=/usr/java/jdk1.8.0/

 export JAVA_HOME=${JAVA_HOME}

 # Extra Java CLASSPATH elements.  Optional.  # hadoop配置文件的位置

 # export HBASE_CLASSPATH=

 export HBASE_CLASSPATH=${HADOOP_HOME}/etc/hadoop/

 ………………

 # Tell HBase whether it should manage it's own instance of ZooKeeper or not.

 # 如果使用独立安装的zookeeper这个地方就是false

 # export HBASE_MANAGES_ZK=true

 export HBASE_MANAGES_ZK=false

 ………………
3.4. hbase-site.xml 修改
 [yun@mini01 conf]$ pwd

 /app/hbase/conf

 [yun@mini01 conf]$ cat hbase-site.xml

 <?xml version="1.0"?>

 <?xml-stylesheet type="text/xsl" href="configuration.xsl"?>

 <!--

 /**

  *

 ………………

  */

 -->

 <configuration>

   <property>

     <name> hbase.master.port</name>  <!-- hbasemaster的端口 -->

     <value></value>

   </property>

   <property>

     <name>hbase.tmp.dir</name>        <!-- hbase 临时存储 -->

     <value>/app/hbase/tmp</value>

   </property>

   <property>

     <name>hbase.master.maxclockskew</name>   <!-- 时间同步允许的时间差 单位毫秒 -->

     <value></value>

   </property>

   <property>

     <name>hbase.rootdir</name>

     <value>hdfs://mini01:9000/hbase</value>  <!-- hbase共享目录,持久化hbase数据  存放在对应的HDFS上 -->

   </property>

   <property>

     <name>hbase.cluster.distributed</name>  <!-- 是否分布式运行,false即为单机 -->

     <value>true</value>

   </property>

   <property>

     <name>hbase.zookeeper.property.clientPort</name> <!-- zookeeper端口 -->

     <value></value>

   </property>

   <property>

     <name>hbase.zookeeper.quorum</name>  <!-- zookeeper地址 -->

     <value>mini01,mini02,mini03,mini04,mini05</value>

   </property>

   <property>

     <name>hbase.zookeeper.property.dataDir</name>  <!-- zookeeper配置信息快照的位置 -->

     <value>/app/hbase/tmp/zookeeper</value>

   </property>

 </configuration>
3.5. regionservers 修改
 [yun@mini01 conf]$ pwd

 /app/hbase/conf

 [yun@mini01 conf]$ cat regionservers  # 从机器的域名

 mini03

 mini04

 mini05
4. Hbase的分发与启动
注意:启动hbase之前,必须保证hadoop集群和zookeeper集群是可用的。
4.1. hbase分发到其他机器
将 /app/hbase-2.0.0 从mini01 分发到mini02【用于HA】、mini03、mini04、mini05
其中配置不需要任何修改
 scp hbase-2.0. yun@mini02:/app

 scp hbase-2.0. yun@mini03:/app

 scp hbase-2.0. yun@mini04:/app

 scp hbase-2.0. yun@mini05:/app
分发完毕后,记得登录不同的主机然后创建软连接
 [yun@mini02 ~]$ pwd

 /app

 [yun@mini02 ~]$ ln -s hbase-2.0./ hbase
4.2. 启动程序
 [yun@mini01 ~]$ start-hbase.sh

 SLF4J: Class path contains multiple SLF4J bindings.

 SLF4J: Found binding in [jar:file:/app/hbase-2.0./lib/slf4j-log4j12-1.7..jar!/org/slf4j/impl/StaticLoggerBinder.class]

 SLF4J: Found binding in [jar:file:/app/hadoop-2.7./share/hadoop/common/lib/slf4j-log4j12-1.7..jar!/org/slf4j/impl/StaticLoggerBinder.class]

 SLF4J: See http://www.slf4j.org/codes.html#multiple_bindings for an explanation.

 SLF4J: Actual binding is of type [org.slf4j.impl.Log4jLoggerFactory]

 running master, logging to /app/hbase/logs/hbase-yun-master-mini01.out

 SLF4J: Class path contains multiple SLF4J bindings.

 SLF4J: Found binding in [jar:file:/app/hbase-2.0./lib/slf4j-log4j12-1.7..jar!/org/slf4j/impl/StaticLoggerBinder.class]

 SLF4J: Found binding in [jar:file:/app/hadoop-2.7./share/hadoop/common/lib/slf4j-log4j12-1.7..jar!/org/slf4j/impl/StaticLoggerBinder.class]

 SLF4J: See http://www.slf4j.org/codes.html#multiple_bindings for an explanation.

 SLF4J: Actual binding is of type [org.slf4j.impl.Log4jLoggerFactory]

 mini05: running regionserver, logging to /app/hbase/bin/../logs/hbase-yun-regionserver-mini05.out

 mini04: running regionserver, logging to /app/hbase/bin/../logs/hbase-yun-regionserver-mini04.out

 mini03: running regionserver, logging to /app/hbase/bin/../logs/hbase-yun-regionserver-mini03.out
master进程
 [yun@mini01 ~]$ jps

  SecondaryNameNode

  NameNode

  HMaster

  QuorumPeerMain

  Jps
slave进程
 [yun@mini04 ~]$ jps

  Jps

  QuorumPeerMain

  NodeManager

  DataNode

  HRegionServer
4.3. zk中的信息
 [zk: localhost:(CONNECTED) ] ls /hbase

 [replication, meta-region-server, rs, splitWAL, backup-masters, table-lock, flush-table-proc, master-maintenance, online-snapshot, switch, master, running, draining, namespace, hbaseid, table]

 [zk: localhost:(CONNECTED) ] ls /hbase/rs

 [mini03,,, mini05,,, mini04,,]
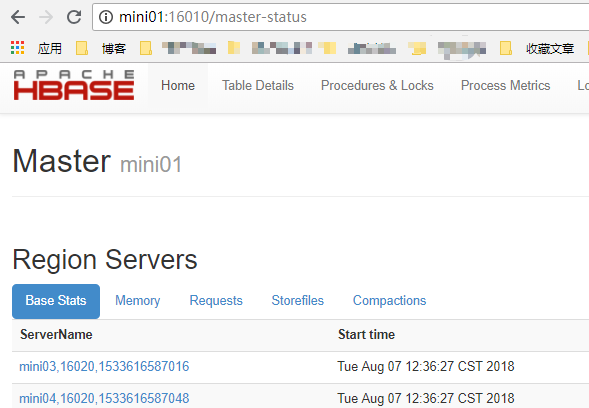
4.4. 浏览器访问
http://mini01:16010
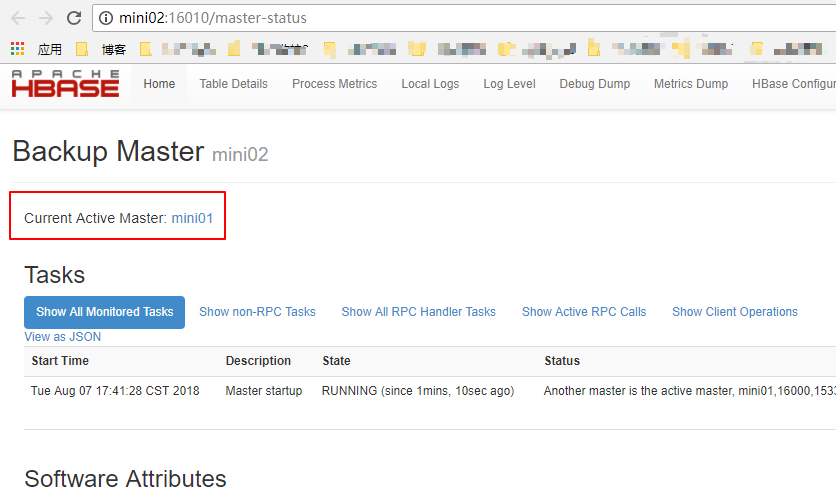
5. Hbase的HA
根据规划,mini01和mini02为Hmaster,其中mini01的Hmaster已经起来了
5.1. 启动另一个HMaster
 [yun@mini02 ~]$ hbase-daemon.sh start master  # 在mini02起一个 HMaster

 running master, logging to /app/hbase/logs/hbase-yun-master-mini02.out

 SLF4J: Class path contains multiple SLF4J bindings.

 SLF4J: Found binding in [jar:file:/app/hbase-2.0./lib/slf4j-log4j12-1.7..jar!/org/slf4j/impl/StaticLoggerBinder.class]

 SLF4J: Found binding in [jar:file:/app/hadoop-2.7./share/hadoop/common/lib/slf4j-log4j12-1.7..jar!/org/slf4j/impl/StaticLoggerBinder.class]

 SLF4J: See http://www.slf4j.org/codes.html#multiple_bindings for an explanation.

 SLF4J: Actual binding is of type [org.slf4j.impl.Log4jLoggerFactory]

 [yun@mini02 ~]$

 [yun@mini02 ~]$ jps

  Jps

  ResourceManager

  QuorumPeerMain

  HMaster
5.2. zk中的信息
 [zk: localhost:(CONNECTED) ] ls /hbase/backup-masters

 [mini02,,]
5.3. 浏览器访问
http://mini02:16010
Hbase-2.0.0_01_安装部署的更多相关文章
- kafka_2.11-2.0.0_安装部署
参考博文:kafka 配置文件参数详解 参考博文:Kafka[第一篇]Kafka集群搭建 参考博文:如何为Kafka集群选择合适的Partitions数量 参考博文:Kafka Server.prop ...
- HBase的概述和安装部署
一.HBase概述 1.HBase是Hadoop数据库,是一个分布式.可扩展的大数据存储. HBase是用于对大数据进行随机.实时读写访问的非关系型数据库,它的目标托管非常大的表——数十亿行N百万列. ...
- Storm-0.9.0.1安装部署 指导
可以带着下面问题来阅读本文章: 1.Storm只支持什么传输 2.通过什么配置,可以更改Zookeeper默认端口 3.Storm UI必须和Storm Nimbus部署在同一台机器上,UI无法正常工 ...
- 大数据篇:DolphinScheduler-1.2.0.release安装部署
大数据篇:DolphinScheduler-1.2.0.release安装部署 1 配置jdk #查看命令 rpm -qa | grep java #删除命令 rpm -e --nodeps xxx ...
- [DPI][suricata] suricata-4.0.3 安装部署
suricata 很值得借鉴.但是首先还是要安装使用,作为第一步的熟悉. 安装文档:https://redmine.openinfosecfoundation.org/projects/suricat ...
- zabbix4.0.1 安装部署
zabbix安装部署 目录 一.环境准备... 3 1.1.版本:... 3 1.2.部署环境... 3 二.安装部署... 3 2.1.zabbix安装... 3 2.1.1.下载zabbix的rp ...
- presto 0.166安装部署
系统:linux java:jdk 8,64-bit Connector:hive 分布式,node1-3 node1:Coordinator . Discovery service node2-3: ...
- Hadoop1.0.3安装部署
0x00 大数据平台相关链接 官网:http://hadoop.apache.org/ 主要参考教程:http://www.cnblogs.com/xia520pi/archive/2012/05/1 ...
- jumperserver3.0的安装部署
适用于jumperserver版本:v0.3.1-2 官网:http://www.jumpserver.org/ 系统:centos7.2 基本安装 备注:如果是centos系统最好使用基本安装,否 ...
随机推荐
- 通过证书请求Https站点
前几天在做与平安银行对接接口,主要是给平安银行推送用户数据(申请贷款的用户),平安银行提供的是https的地址,请求https地址的时候还要发送证书,刚接到这个任务的时候一头雾水,百度上各种所搜,最后 ...
- Netty源码分析之服务启动
本节主要分析server的启动过程. Netty是基于Nio实现的,所以也离不开selector.serverSocketChannel.socketChannel和selectKey等,只不过Net ...
- 【Spark笔记】Windows10 本地搭建单机版Spark开发环境
0x00 环境及软件 1.系统环境 OS:Windows10_x64 专业版 2.所需软件或工具 JDK1.8.0_131 spark-2.3.0-bin-hadoop2.7.tgz hadoop-2 ...
- Shell 函数定义与调用
linux shell 可以用户定义函数,然后在 shell 脚本中可以随便调用. 以一个计算两数之和的函数为例: #! /bin/bash # 函数定义 sum(){ return $(($1+$2 ...
- c# txt代码转换成HTML格式
/// <summary> /// 字符串字符处理 /// </summary> /// <param name="chr">等待处理的字符串& ...
- ELK日志分析平台系统CentOS7环境搭建和基本使用
一.搭建环境 系统环境:CentOS7 安装iptables:https://blog.csdn.net/momo_mutou/article/details/81739155 jdk1.8: ht ...
- 支持开源,推动Orchard
希望正在研究果园,和对果园感兴趣的,加入Orchard高级开发群,进行交流和讨论及深入研究Orchard开发,我们致力寻求志同道合推动Orchard发展的屌丝!!! 干净.专注.社区力量的圈子
- Electron 应用入门 (参考官方示例)
Electron 应用 1.去官方下案例 # 克隆示例项目的仓库 $ git clone https://github.com/electron/electron-quick-start # 进入这个 ...
- 通过webpack2从0开始配置自己的vue项目 1
PS 阅读者需要node基础.webpack原理知识.vue基础 安装node 这个网上很多教程 打开终端 创建项目 npm init 全局安装: cnpm i webpack webpack-dev ...
- CSS总结div中的内容垂直居中的五种方法
一.行高(line-height)法 如果要垂直居中的只有一行或几个文字,那它的制作最为简单,只要让文字的行高和容器的高度相同即可,比如: p { height:30px; line-height:3 ...