Windows系统使用Nginx部署Vue
Nginx是什么?
Nginx (engine x) 是一个高性能的HTTP和反向代理web服务器 ,同时也提供了IMAP/POP3/SMTP服务。Nginx是由伊戈尔·赛索耶夫为俄罗斯访问量第二的Rambler.ru站点开发的,因它的稳定性、丰富的功能集、简单的配置文件和低系统资源的消耗而闻名。
优点
- 速度更快、并发更高
- 配置简单,扩展性强
- 高可靠性
- 热部署
- 成本低、BSD许可证
安装
下载地址:http://nginx.org/en/download.html
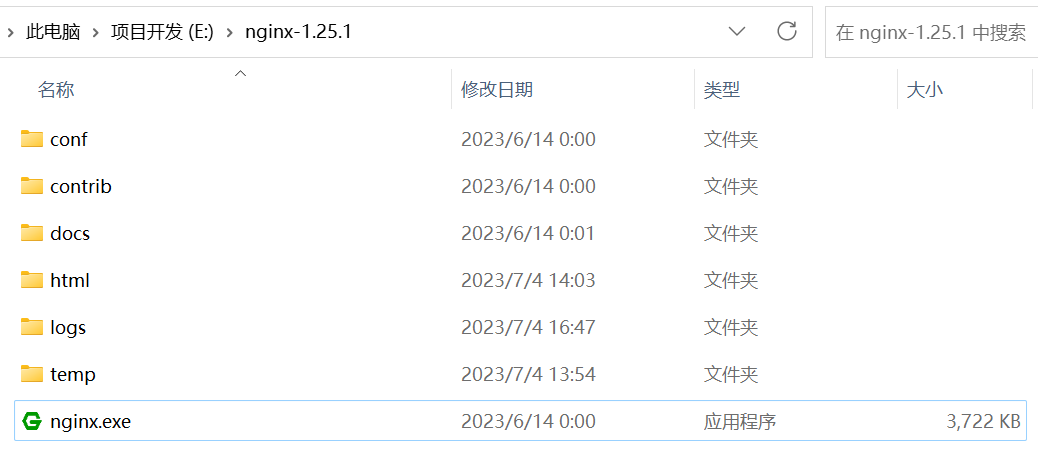
解压后目录如下:
启动
双击nginx.exe,会有黑窗闪过。
用cmd命令窗口,cd 到nginx解压目录,
./nginx启动。在浏览器中访问
http://localhost:80,出现以下界面说明启动成功(由于笔者电脑80端口被占用,所以更改为8080,nginx默认为80端口)。

部署Vue项目
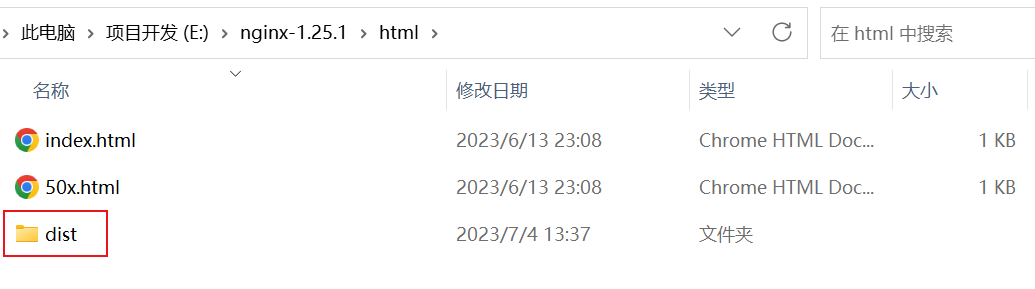
- 将build后的文件夹放到nginx目录下的html文件夹当中。
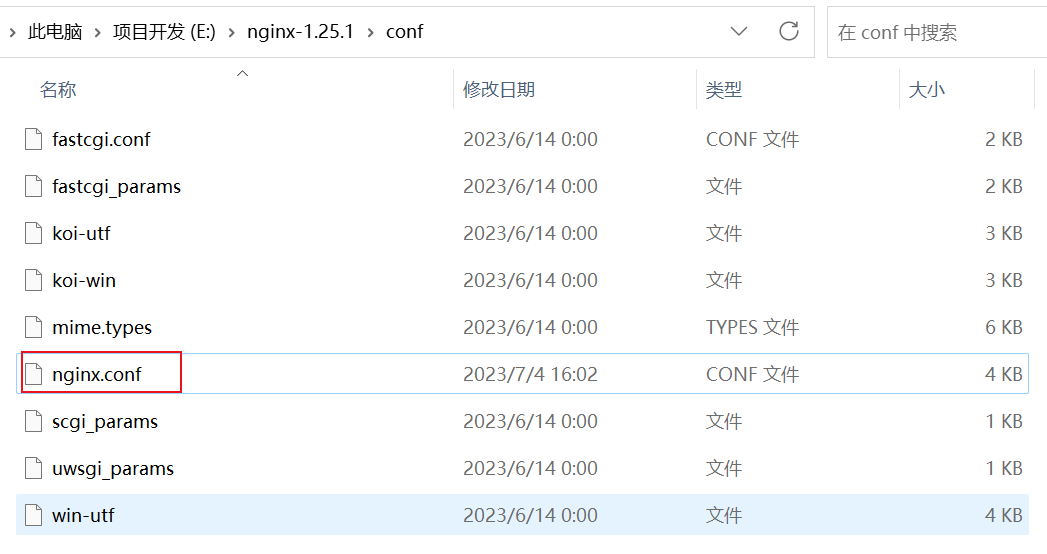
- 修改nginx.conf配置文件。
- 配置访问地址。
其他常用配置
跨域配置
代码:
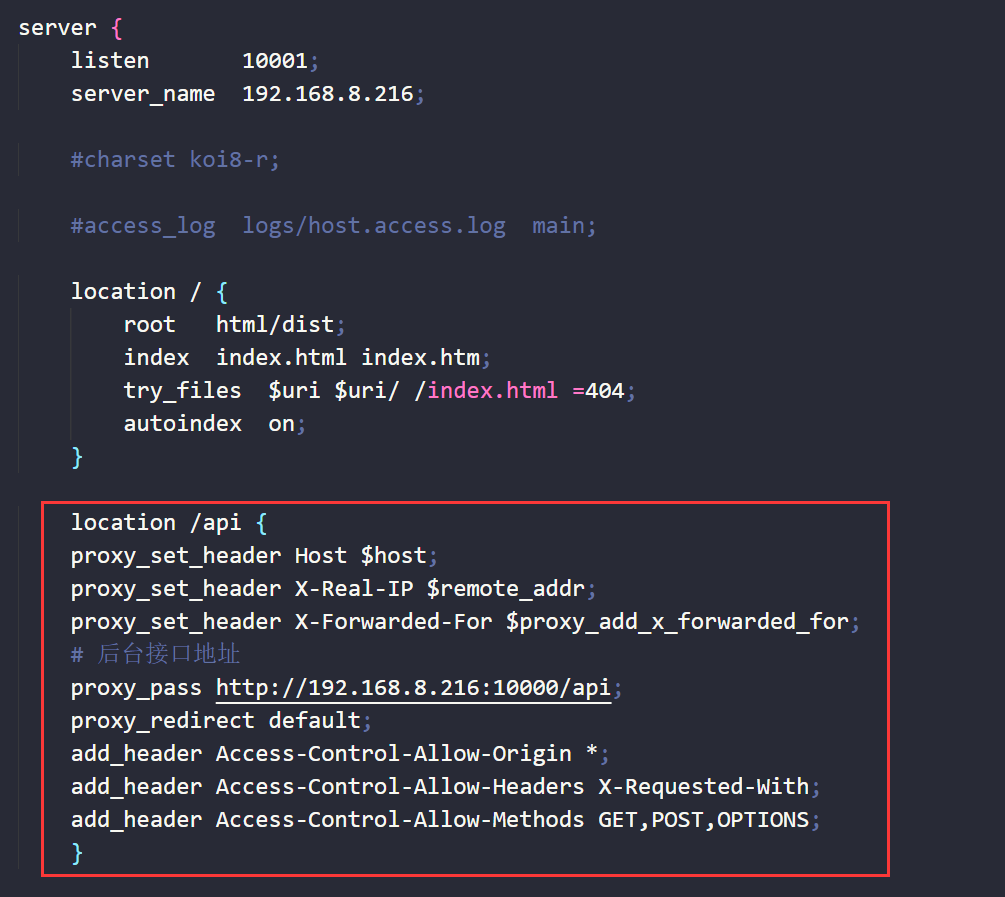
location /api {

		proxy_set_header Host $host;

		proxy_set_header X-Real-IP $remote_addr;

		proxy_set_header X-Forwarded-For $proxy_add_x_forwarded_for;

		# 后台接口地址

		proxy_pass http://192.168.8.216:10000/api;

		proxy_redirect default;

		add_header Access-Control-Allow-Origin *;

		add_header Access-Control-Allow-Headers X-Requested-With;

		add_header Access-Control-Allow-Methods GET,POST,OPTIONS;

		}
文件上传大小配置
代码:
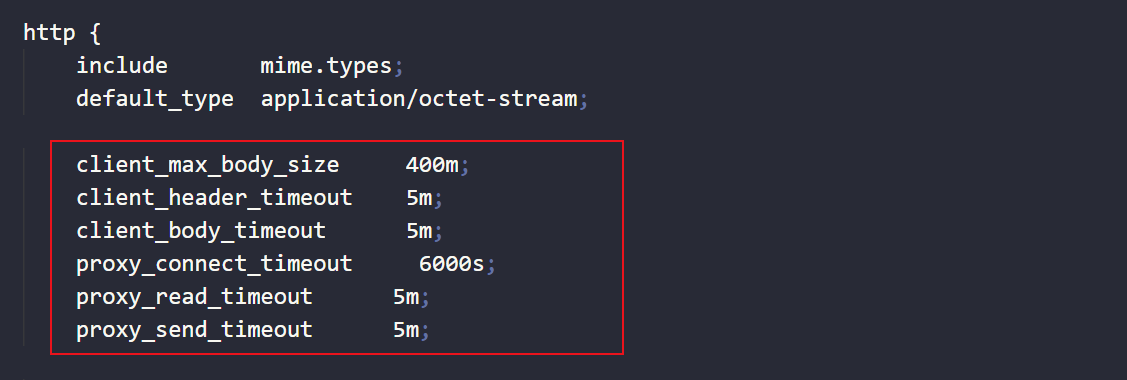
client_max_body_size     50m;  # 限制请求体的大小,若超过所设定的大小,返回413错误,默认1m

client_header_timeout    1m;  # 读取请求头的超时时间,若超过所设定的大小,返回408错误

client_body_timeout      1m; # 读取请求实体的超时时间,若超过所设定的大小,返回413错误

proxy_connect_timeout     60s; # http请求无法立即被容器(tomcat, netty等)处理,被放在nginx的待处理池中等待被处理。此参数为等待的最长时间,默认为60秒,官方推荐最长不要超过75秒

proxy_read_timeout      1m;  # http请求被容器(tomcat, netty等)处理后,nginx会等待处理结果,也就是容器返回的response。此参数即为服务器响应时间,默认60秒

proxy_send_timeout      1m; # http请求被服务器处理完后,把数据传返回给Nginx的用时,默认60秒
Nginx部署Vue项目刷新404问题

代码:
     location / {

            root   html/dist;

            index  index.html index.htm;

            try_files  $uri $uri/ /index.html =404;

            autoindex  on;

        }
常用命令
| 序号 | 命令 | 功能 |
|---|---|---|
| 1 | taskkill /im nginx.exe /f | 关闭所有nginx进程 |
| 2 | tasklist | find /i “nginx.exe” || exit | 查看nginx的进程使用情况 |
| 3 | taskkill /pid 1234 /f | 关闭指定进程 |
| 4 | ./nginx | 启动 |
| 5 | ./nginx-s stop | 停止 |
| 6 | ./nginx-s quit | 安全退出 |
| 7 | ./nginx-s reload | 重新加载配置文件 |
完整配置
#user nobody;
worker_processes 1;
#error_log logs/error.log;
#error_log logs/error.log notice;
#error_log logs/error.log info;
#pid logs/nginx.pid;
events {
worker_connections 1024;
}
http {
include mime.types;
default_type application/octet-stream;
client_max_body_size 400m;
client_header_timeout 5m;
client_body_timeout 5m;
proxy_connect_timeout 6000s;
proxy_read_timeout 5m;
proxy_send_timeout 5m;
#log_format main '$remote_addr - $remote_user [$time_local] "$request" '
# '$status $body_bytes_sent "$http_referer" '
# '"$http_user_agent" "$http_x_forwarded_for"';
#access_log logs/access.log main;
sendfile on;
#tcp_nopush on;
#keepalive_timeout 0;
keepalive_timeout 65;
#gzip on;
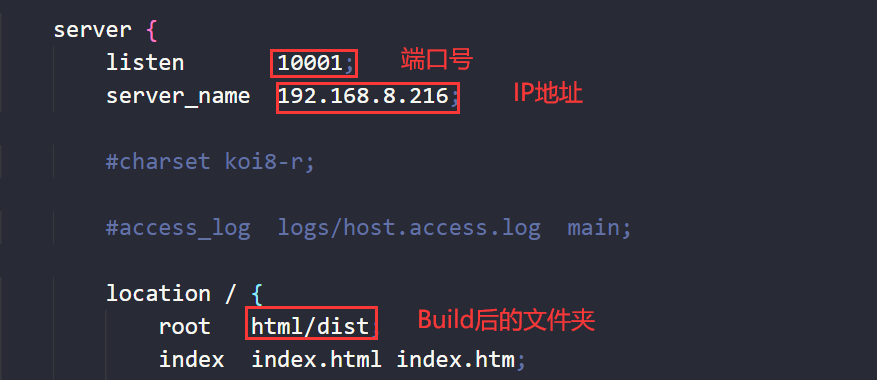
server {
listen 10001;
server_name 192.168.8.216;
#charset koi8-r;
#access_log logs/host.access.log main;
location / {
root html/dist;
index index.html index.htm;
try_files $uri $uri/ /index.html =404;
autoindex on;
}
location /api {
proxy_set_header Host $host;
proxy_set_header X-Real-IP $remote_addr;
proxy_set_header X-Forwarded-For $proxy_add_x_forwarded_for;
# 后台接口地址
proxy_pass http://192.168.8.216:10000/api;
proxy_redirect default;
add_header Access-Control-Allow-Origin *;
add_header Access-Control-Allow-Headers X-Requested-With;
add_header Access-Control-Allow-Methods GET,POST,OPTIONS;
}
#error_page 404 /404.html;
# redirect server error pages to the static page /50x.html
#
error_page 500 502 503 504 /50x.html;
location = /50x.html {
root html;
}
# proxy the PHP scripts to Apache listening on 127.0.0.1:80
#
#location ~ \.php$ {
# proxy_pass http://127.0.0.1;
#}
# pass the PHP scripts to FastCGI server listening on 127.0.0.1:9000
#
#location ~ \.php$ {
# root html;
# fastcgi_pass 127.0.0.1:9000;
# fastcgi_index index.php;
# fastcgi_param SCRIPT_FILENAME /scripts$fastcgi_script_name;
# include fastcgi_params;
#}
# deny access to .htaccess files, if Apache's document root
# concurs with nginx's one
#
#location ~ /\.ht {
# deny all;
#}
}
# another virtual host using mix of IP-, name-, and port-based configuration
#
#server {
# listen 8000;
# listen somename:8080;
# server_name somename alias another.alias;
# location / {
# root html;
# index index.html index.htm;
# }
#}
# HTTPS server
#
#server {
# listen 443 ssl;
# server_name localhost;
# ssl_certificate cert.pem;
# ssl_certificate_key cert.key;
# ssl_session_cache shared:SSL:1m;
# ssl_session_timeout 5m;
# ssl_ciphers HIGH:!aNULL:!MD5;
# ssl_prefer_server_ciphers on;
# location / {
# root html;
# index index.html index.htm;
# }
#}
}
Nginx开机自启
原理
通过 Windows Service Wrapper 工具,将Nginx转换为Windows服务,Windows系统重启后会自动启动Nginx服务。
实现方法
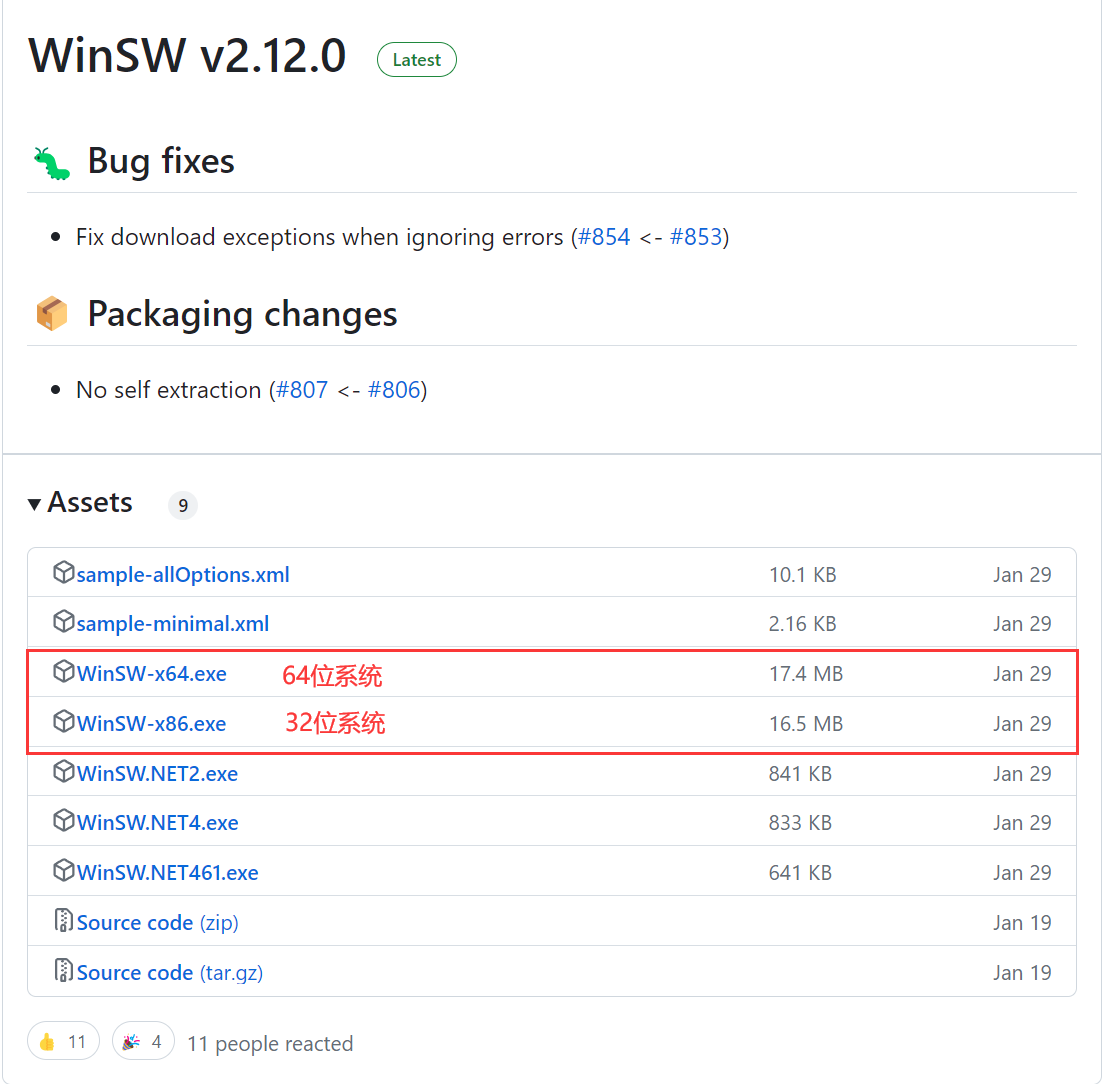
下载
Windows Service Wrapper工具,地址:https://github.com/winsw/winsw/releases,根据系统版本下载对应工具。百度云:https://pan.baidu.com/s/1_olg0NN4lvhC5bmnZIoZ5w 提取码:polf
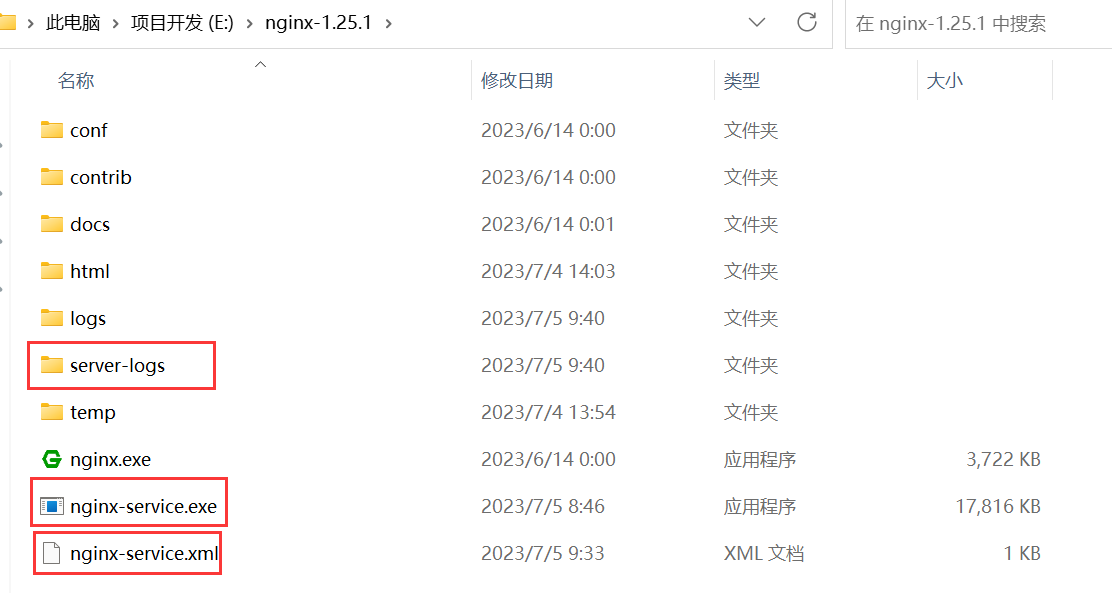
将工具放到Nginx安装目录并命名为
nginx-service.exe。在Nginx目录新建服务日志文件夹
server-logs文件夹。新建
nginx-service.xml文件,写入配置文件。整体目录如下:
配置文件如下:主要包含日志位置、启动和关闭,目录根据自己安装位置调整(不要有中文)。
<!-- nginx-service.xml -->

<service>

	<id>nginx</id>

	<name>nginx</name>

	<description>nginx</description>

	<logpath>E:\nginx-1.25.1\server-logs\</logpath>

	<logmode>roll</logmode>

	<depend></depend>

	<executable>E:\nginx-1.25.1\nginx.exe</executable>

	<stopexecutable>E:\nginx-1.25.1\nginx.exe -s stop</stopexecutable>

</service>
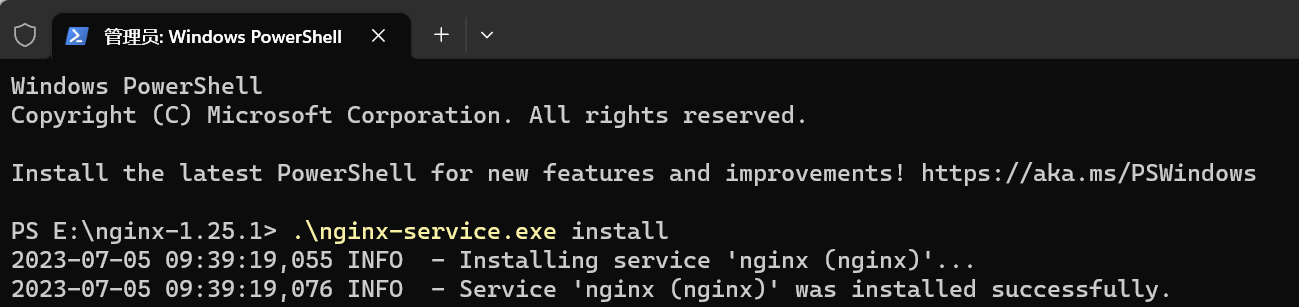
- 将nginx加载到Windows服务中。在nginx安装目录以管理员身份启用CMD输入:
.\nginx-service.exe install
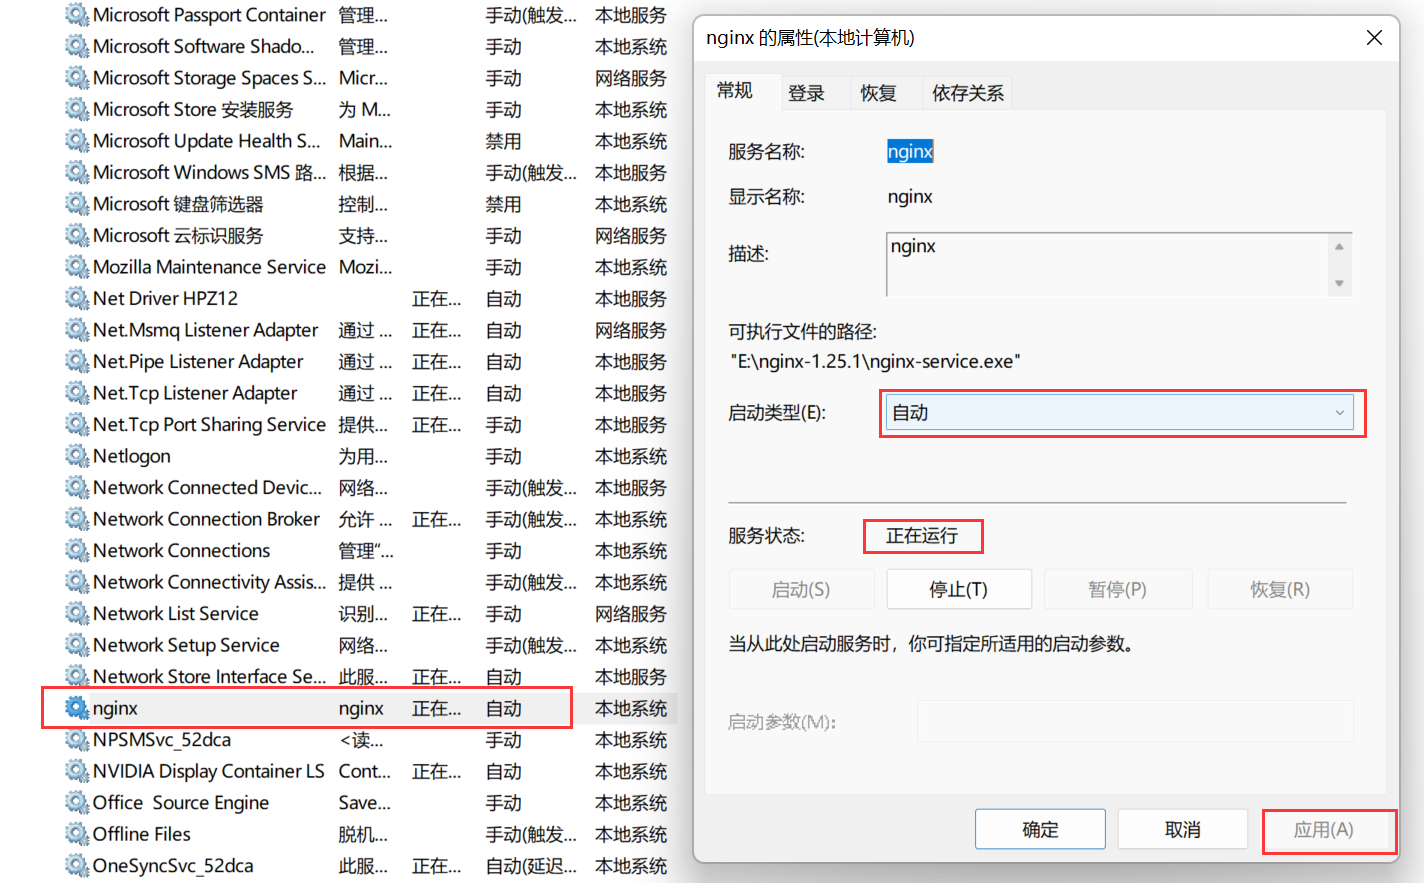
- 在Windows服务中找到nginx服务,将启动方式改成自动并将其启动。
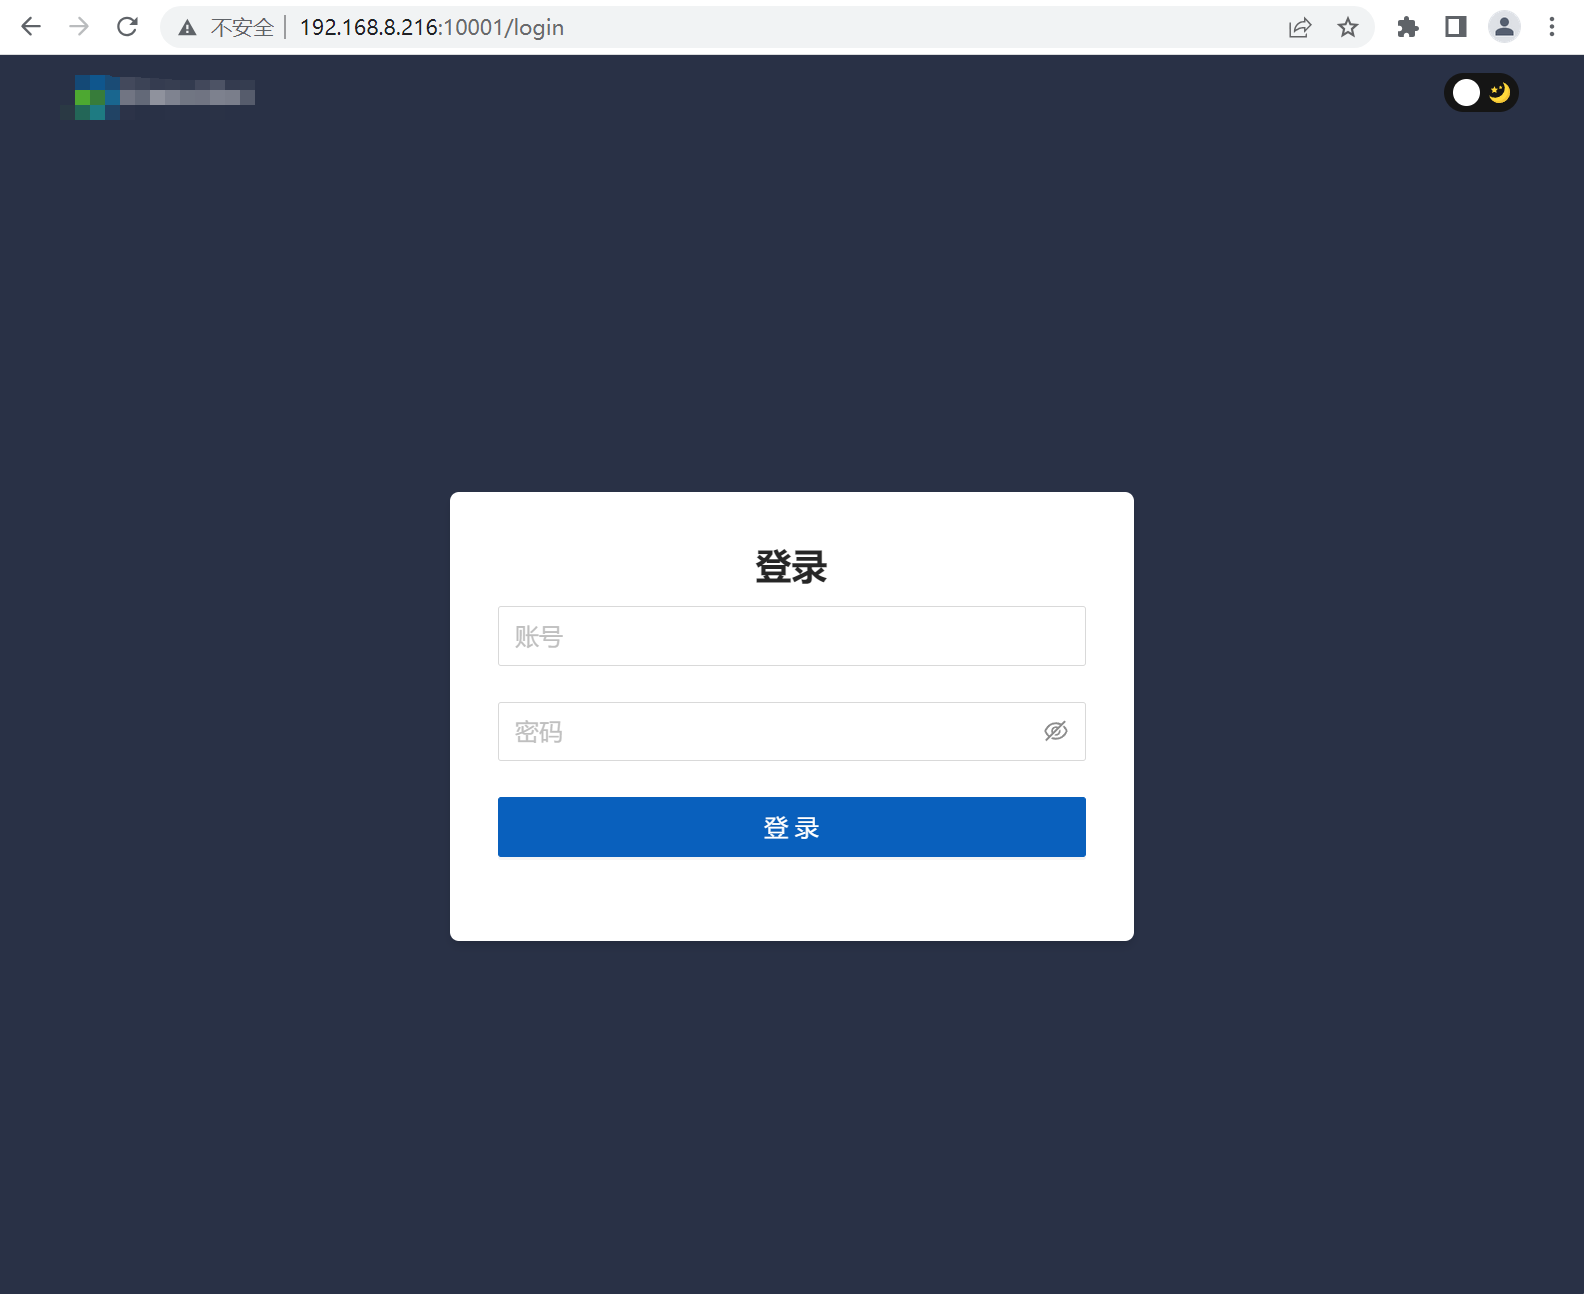
- 通过浏览器访问项目地址,检查是否启动成功。
Windows Service Wtapper 命令
| 命令 | 功能 |
|---|---|
| nginx-service.exe install | 注册系统服务 |
| nginx-service.exe uninstall | 删除已注册系统服务 |
| nginx-service.exe stop | 关闭服务 |
| nginx-service.exe start | 启动服务 |
Windows系统使用Nginx部署Vue的更多相关文章
- nginx部署vue项目
nginx是一个高性能的HTTP和反向代理服务器.因此常用来做静态资源服务器和后端的反向代理服务器.本文主要记录使用nginx去部署使用vue搭建的前端项目,项目基于vue官方的脚手架vue-cli构 ...
- windows系统dokuwiki安装部署设置 xampp环境配置
简单记录一次安装dokuwiki的过程 dokuwiki下载 dokuwiki下载地址 https://download.dokuwiki.org/ 下载前有一些可选项目,版本.语言.插件,可以按照需 ...
- 部署基于.netcore5.0的ABP框架后台Api服务端,以及使用Nginx部署Vue+Element前端应用
前面介绍了很多关于ABP框架的后台Web API 服务端,以及基于Vue+Element前端应用,本篇针对两者的联合部署,以及对部署中遇到的问题进行处理.ABP框架的后端是基于.net core5.0 ...
- Windows系统下Nginx的安装与配置
Nginx是lgor Sysoev在2004年的时候为俄罗斯访问量第二大的rambler.ru站点设计开发的,发布至今,凭借开源的力量,已经接近成熟与完善.其功能丰富,可作为HTTP服务器,也可作为反 ...
- CentOS7 安装nginx部署vue项目
简单描述:代码开发完了,需要环境来运行测试.服务器上没有nginx,搞起搞起. 在Centos下,yum源不提供nginx的安装,可以通过切换yum源的方法获取安装.也可以通过直接下载安装包的方法 ...
- Windows版:Nginx部署React项目并访问Spring Boot后台数据
一, 打包react项目 1,在工作空间目录下create-react-app test-arrange 创建项目test-arrange 2,在新建的项目中写好请求与页面 3,打包, 在项目目录下 ...
- Window 使用Nginx 部署 Vue 并把nginx设为windows服务开机自动启动
1.编译打包Vue项目 在终端输入 npm run build 进行打包编译.等待... 打包完成生成dist文件夹,这就是打包完成的文件. 我们先放着,进行下一步. 2下载Nginx 下载地址: h ...
- 吻逗死(windows)系统下自动部署脚本(for java spring*)及linux命令行工具
转载请注明出处:https://www.cnblogs.com/funnyzpc/p/10051647.html (^^)(^^)自動部署腳本原本在上個公司就在使用,由於近期同事需要手動部署一個Spr ...
- windows环境下Nginx部署及Https设置
一.Nginx安装部署及常用命令. 1.1.其实Nginx是免安装的.直接在官网下载zip包,解压即可,下载地址:http://nginx.org/en/download.html,因为我这边的开发服 ...
- Docker镜像+nginx 部署 vue 项目
一.打包vue项目 在开发完的vue项目输入如下命名,打包生成dist文件夹 yarn build / npm run build 此时根目录会多出一个文件夹:dist文件夹,里面就是我们要发布的东西 ...
随机推荐
- day03-Redis的客户端
Redis的Java客户端 在Redis官网中提供了各种语言的客户端,地址:Get started using Redis clients | Redis Redis的Java客户端: 1.Jedis ...
- 如果你项目使用了MyBatis-Plus你一定要用它
还是先举个例子,魂斗罗小游戏应该很多90后都玩过,那个时代没有Iphone,没有各种电子产品(小学初中时代),这种小游戏应该就是很多90后的青春,反正那个时候只要放假就白天黑夜得玩.它就是那种2个好基 ...
- P4055 [JSOI2009] 游戏(博弈论 、最大匹配)
P4055 [JSOI2009] 游戏 目录 P4055 [JSOI2009] 游戏 题目传送门 题目大意 : 思路: code 题目传送门 题目大意 : 小AA和小YY玩游戏,在这个游戏中,同一个格 ...
- Appweb-6.1.1 移植到ARM
Appweb-6.1.1 移植到ARM 编译环境:ubuntu-12.04 x64 开发平台:Hi3535 arm版 编译版本:appweb-6.1.1.zip ESP下载地址=> ESP we ...
- 从零开始基于Archlinux 安装 containerd + k8s
下载ISO文件:https://mirrors.tuna.tsinghua.edu.cn/archlinux/iso/latest/ 目录 1. 准备工作 2. 磁盘管理 2.1 磁盘分区 2.2 磁 ...
- 获取电脑的网络连接状态(三)Ping
网络连接判断,使用ping测试获取: 1 private static async Task<bool> IsPingSuccess() 2 { 3 try 4 { 5 using (Pi ...
- 关于ObservableCollection的更新与不更新分析
因为最近在WPF项目中,遇到ObservableCollection这个属性的频繁使用,一个一个坑跳过来,今天看到这个贴子 玩转INotifyPropertyChanged和ObservableCol ...
- 读《图解HTTP》
最近读了一本书<图解HTTP>,读完后在大体上对HTTP协议有了更深层次的了解.以下是我以前不懂的问题,通过阅读此书后,这些问题都有了答案: 问题: URI和URL的区别? cookie到 ...
- [SWPUCTF 2021 新生赛]简简单单的逻辑
得到一个.py文件,一般是没壳的,不过还是要养成习惯,查个壳: 意料之中,啥也没有,打开文件: 给了我们一个加密逻辑,然后最后一行给了一个结果:那么就是根据上述的逻辑,反解密出flag就好了 分析一下 ...
- drf重写authenticate方法实现多条件登录(源码分析)
drf重写authenticate方法实现多条件登录(源码分析) 1. 思路 JWT拓展的登录视图中, 在接受到用户名和密码时, 调用的也是Django的认证系统中提供的authenticate()来 ...