记录--分享并解析一个倒计时组件(Vue)
这里给大家分享我在网上总结出来的一些知识,希望对大家有所帮助

一、前言
入职的第一个需求是跟着一位前端大佬一起完成的一个活动项目。
由于是一起开发,当然不会放过阅读大佬的代码的机会。
因为我的页面中需要使用到倒计时功能,发现大佬的已经写了个现成的倒计时组件,于是直接就拿过来用了。
传个参数就实现了功能的感觉真是太棒了。项目完成后,就膜拜了一下大佬的倒计时组件的代码。真是让我学到了不少。列举如下:
1.计时器为什么要用setTimeout而不用setInterval

2.为什么不直接将剩余时间-1。

3.如何将所需要的时间返回出去(有可能我只需要分钟和秒数,那就只返回分钟和秒数,也有可能我全都要)。

4.不确定接口返回的是剩余时间还是截止日期,该怎么同时兼容这两种情况。

5.不确定接口返回的时间是秒还是毫秒单位。
好了,你可能不太理解这些问题,但是没关系,看完下面的解释,相信你会豁然开朗。
二、开始手操
1. 先创建一个vue组件
<template>

  <div class="_base-count-down">

  </div>

</template>

<script>

export default {

  data: () => ({

  }),

  props: {

  },

};

</script>

<style lang='scss' scoped>

</style>
2. 实现基本的倒计时组件
接下来,假设接口获得的是一个剩余时间。
将剩余时间time传入这个倒计时组件,由于time可能是秒为单位的,也有可能是毫秒为单位的,所以我们需要在传入time的是有也传入一个isMilliSecond来告诉倒计时组件这个time是毫秒还是秒为单位的。如下代码中的props所示。
<template>

  <div class="_base-count-down">

  </div>

</template>

<script>

export default {

  data: () => ({

  }),

  props: {

    time: {

      type: [Number, String],

      default: 0

    },

    isMilliSecond: {

      type: Boolean,

      default: false

    }

  },

  computed: {

    duration() {

      const time = this.isMiniSecond ? Math.round(+this.time / 1000) : Math.round(+this.time);

      return time;

    }

  },

};

</script>

<style lang='scss' scoped>

</style>
computed中的duration是将time进行转化的结果,不管time是毫秒还是秒,都转化为秒 不知道你注意到了没有:+this.time。为什么要在前面加个‘+’号。这点很值得我们学习,因为接口返回的一串数字有时候是字符串的形式,有时候是数字的形式(不能过分相信后端同学,必须自己做好防范)。所以通过前面加个‘+’号 通通转化为数字。现在的duration就是转化后的time啦!
我们获得duration之后就可以开始倒计时了
<template>

  <div class="_base-count-down">

  </div>

</template>

<script>

export default {

  data: () => ({

  }),

  props: {

    time: {

      type: [Number, String],

      default: 0

    },

    isMilliSecond: {

      type: Boolean,

      default: false

    }

  },

  computed: {

    duration() {

      const time = this.isMiniSecond ? Math.round(+this.time / 1000) : Math.round(+this.time);

      return time;

    }

  },

  // 新增代码:

  mounted() {

    this.countDown();

  },

  methods: {

    countDown() {

      this.getTime(this.duration);

    },

  }

};

</script>

<style lang='scss' scoped>

</style>
在这里创建了一个countDown方法,表示开始倒计时的意思,已进入页面就开始执行countdown方法。
countDown方法调用了getTime方法,getTime需要传入duration这个参数,也就是我们获得的剩余时间。
现在来实现一下这个方法。
<template>

  <div class="_base-count-down">

    还剩{{days}}天{{hours}}:{{mins}}:{{seconds}}

  </div>

</template>

<script>

export default {

  data: () => ({

    days: '0',

    hours: '00',

    mins: '00',

    seconds: '00',

    timer: null,

  }),

  props: {

    time: {

      type: [Number, String],

      default: 0

    },

    isMilliSecond: {

      type: Boolean,

      default: false

    }

  },

  computed: {

    duration() {

      const time = this.isMiniSecond ? Math.round(+this.time / 1000) : Math.round(+this.time);

      return time;

    }

  },

  mounted() {

    this.countDown();

  },

  methods: {

    countDown() {

      this.getTime(this.duration);

    },

    // 新增代码:

    getTime(duration) {

      this.timer && clearTimeout(this.timer);

      if (duration < 0) {

        return;

      }

      const { dd, hh, mm, ss } = this.durationFormatter(duration);

      this.days = dd || 0;

      this.hours = hh || 0;

      this.mins = mm || 0;

      this.seconds = ss || 0;

      this.timer = setTimeout(() => {

        this.getTime(duration - 1);

      }, 1000);

    }

  }

};

</script>

<style lang='scss' scoped>

</style>
可以看到,getTime的目的就是获得 days,hours,mins,seconds,然后显示到html上,并且通过定时器实时来刷新days,hours,mins,seconds这个几个值。从而实现了倒计时。很简单,有木有?
durationFormatter是一个将duration转化成天数,小时,分钟,秒数的方法,很简单,可以看下它的具体实现。
durationFormatter(time) {

  if (!time) return { ss: 0 };

  let t = time;

  const ss = t % 60;

  t = (t - ss) / 60;

  if (t < 1) return { ss };

  const mm = t % 60;

  t = (t - mm) / 60;

  if (t < 1) return { mm, ss };

  const hh = t % 24;

  t = (t - hh) / 24;

  if (t < 1) return { hh, mm, ss };

  const dd = t;

  return { dd, hh, mm, ss };

},
好了,问题开始来了!!
3. 为什么要用setTimeout来模拟setInterval的行为?
这里用setInerval不是更方便吗?
setTimeout(function(){··· }, n); // n毫秒后执行function
setInterval(function(){··· }, n); // 每隔n毫秒执行一次function
可以看看setInterval有什么缺点:
再次强调,定时器指定的时间间隔,表示的是何时将定时器的代码添加到消息队列,而不是何时执行代码。所以真正何时执行代码的时间是不能保证的,取决于何时被主线程的事件循环取到,并执行。
setInterval(function, N)

//即:每隔N秒把function事件推到消息队列中
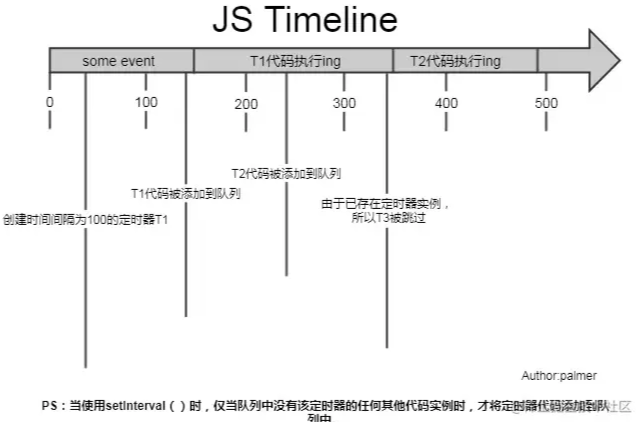
上图可见,setInterval每隔100ms往队列中添加一个事件;100ms后,添加T1定时器代码至队列中,主线程中还有任务在执行,所以等待,some event执行结束后执行T1定时器代码;又过了100ms,T2定时器被添加到队列中,主线程还在执行T1代码,所以等待;又过了100ms,理论上又要往队列里推一个定时器代码,但由于此时T2还在队列中,所以T3不会被添加,结果就是此时被跳过;这里我们可以看到,T1定时器执行结束后马上执行了T2代码,所以并没有达到定时器的效果。
综上所述,setInterval有两个缺点:
1.使用setInterval时,某些间隔会被跳过;

2.可能多个定时器会连续执行;
可以这么理解:每个setTimeout产生的任务会直接push到任务队列中;而setInterval在每次把任务push到任务队列前,都要进行一下判断(看上次的任务是否仍在队列中)。
因而我们一般用setTimeout模拟setInterval,来规避掉上面的缺点。
4. 为什么要clearTimeout(this.timer)
第二问:为什么要有this.timer && clearTimeout(this.timer);这一句?
假设一个场景:
如图所示,在倒计时的父组件中,有两个按钮,点击活动一就会传入活动一的剩余时间,点击活动二,就会传入活动二的时间。
如果此时倒计时组件正在做活动一的倒计时,然后点击活动二,就要会马上传入新的time,这个时候就需要重新计时。当然,这里并不会重新计时,因为组件的mounted只会执行一次。也就是说this.countDown();只会执行一次,也就是说this.getTime(this.duration);只会执行一次,因此duration还是活动一的时间,怎么办呢?watch派上用场了。
我们来监听duration,如果发现duration变化,说明新的时间time传入组件,这时就要重新调用this.countDown()。
代码如下:
<template>

  <div class="_base-count-down">

    还剩{{day}}天{{hours}}:{{mins}}:{{seconds}}

  </div>

</template>

<script>

export default {

  data: () => ({

    days: '0',

    hours: '00',

    mins: '00',

    seconds: '00',

    timer: null,

  }),

  props: {

    time: {

      type: [Number, String],

      default: 0

    },

    isMilliSecond: {

      type: Boolean,

      default: false

    }

  },

  computed: {

    duration() {

      const time = this.isMiniSecond ? Math.round(+this.time / 1000) : Math.round(+this.time);

      return time;

    }

  },

  mounted() {

    this.countDown();

  },

  // 新增代码:

  watch: {

    duration() {

      this.countDown();

    }

  },

  methods: {

    countDown() {

      this.getTime(this.duration);

    },

    durationFormatter(){...}

    getTime(duration) {

      this.timer && clearTimeout(this.timer);

      if (duration < 0) {

        return;

      }

      const { dd, hh, mm, ss } = this.durationFormatter(duration);

      this.days = dd || 0;

      this.hours = hh || 0;

      this.mins = mm || 0;

      this.seconds = ss || 0;

      this.timer = setTimeout(() => {

        this.getTime(duration - 1);

      }, 1000);

    }

  }

};

</script>

<style lang='scss' scoped>

</style>
好了,但是并没有解释上面提出的那个问题:为什么要有this.timer && clearTimeout(this.timer);这一句?
这样,假设现在页面显示的是活动一的时间,这时,执行到setTimeout,在一秒后就会把setTimeout里的回调函数放到任务队列中,注意是一秒后哦!这时,然而,在这一秒的开头,我们点击了活动二按钮,这时候的活动二的时间就会传入倒计时组件中,然后触发countDown(),也就调用this.getTime(this.duration);,然后执行到setTimeout,也会一秒后把回调函数放到任务队列中。
这时,任务队列中就会有两个setTimeout的回调函数了。等待一秒过去,两个回调函数相继执行,我们就会看到页面上的时间一下子背减了2,实际上是很快速地进行了两遍减1的操作。
这就是为什么要添加上this.timer && clearTimeout(this.timer);这一句的原因了。就是要把上一个setTimeout清除掉。
5. 使用 diffTime
当你认为这是一个完美的组件的时候,你想把这个组件用到项目上,假设你也确实用了,而且还上线了,确发现出现了个大问题:当页面打开的时候,倒计时开始了,时间是 还剩1天12:25:25,然后有人给你发微信,你马上切换到微信,回复消息后切回浏览器,发现倒计时时间却还是还剩1天12:25:25。你慌了:你写的代码出现bug了!
这是怎么回事?
出于节能的考虑, 部分浏览器在进入后台时(或者失去焦点时), 会将 setTimeout 等定时任务暂停 待用户回到浏览器时, 才会重新激活定时任务
说是暂停, 其实应该说是延迟, 1s 的任务延迟到 2s, 2s 的延迟到 5s, 实际情况因浏览器而异。
原来如此,看来不能每次都只是减1这么简单了(毕竟你把浏览器切到后台之后setTimeout就冷却了,等几秒后切回,然后执行setTimeout,只是减了一秒而已)。
所以我们需要改写一下getTime方法。
<template>

  <div class="_base-count-down">

    还剩{{day}}天{{hours}}:{{mins}}:{{seconds}}

  </div>

</template>

<script>

export default {

  data: () => ({

    days: '0',

    hours: '00',

    mins: '00',

    seconds: '00',

    timer: null,

    curTime: 0,// 新增代码:

  }),

  props: {

    time: {

      type: [Number, String],

      default: 0

    },

    isMilliSecond: {

      type: Boolean,

      default: false

    }

  },

  computed: {

    duration() {

      const time = this.isMiniSecond ? Math.round(+this.time / 1000) : Math.round(+this.time);

      return time;

    }

  },

  mounted() {

    this.countDown();

  },

  watch: {

    duration() {

      this.countDown();

    }

  },

  methods: {

    countDown() {

      // 新增代码:

      this.curTime = Date.now();

      this.getTime(this.duration);

    },

    durationFormatter(){...}

    getTime(duration) {

      this.timer && clearTimeout(this.timer);

      if (duration < 0) {

        return;

      }

      const { dd, hh, mm, ss } = this.durationFormatter(duration);

      this.days = dd || 0;

      this.hours = hh || 0;

      this.mins = mm || 0;

      this.seconds = ss || 0;

      this.timer = setTimeout(() => {

        // 新增代码:

        const now = Date.now();

        const diffTime = Math.floor((now - this.curTime) / 1000);

        this.curTime = now;

        this.getTime(duration - diffTime);

      }, 1000);

    }

  }

};

</script>

<style lang='scss' scoped>

</style>
可以看到,我们在三个位置添加了新的代码。
首先在data了添加了curTime这个变量,然后在执行countDown的时候给curTime赋值Date.now(),也就是当前的时刻,也就是显示在页面上的那个时刻。
然后看修改的第三处代码。可以看到是将-1改成了-diffTime。
now 是 setTimeout的回调函数执行的时候的那个时刻。
因而 diffTime 则 表示 当前这个setTimeout的回调函数执行的时刻距离上 页面上的剩余时间上一次变化的时间段。其实也就是 当前这个setTimeout的回调函数执行的时刻距离上 一个setTimeout的回调函数执行的时刻时间段。
可能你还是不太能理解diffTime。举个例子:
你打开了这个倒计时页面,于是执行了countDown,也就是说要执行getTime这个方法了。也就是会马上执行下列的代码。
this.days = dd || 0;

this.hours = hh || 0;

this.mins = mm || 0;

this.seconds = ss || 0;
执行完这些代码页面上就会出现剩余时间。
而this.curTime = Date.now(); 就记录下了此刻的时间点。
然后一秒后执行setTimeout里的回调函数:
const now = Date.now(); 记录当前这个setTimeout的回调函数执行的时间点。
const diffTime = Math.floor((now - this.curTime) / 1000); 记录当前这个setTimeout的回调函数执行的时间点距离页面上开始 渲染 剩余时间的 这一段时间。其实此时的diffTime就是=1。
然后this.curTime = now; 将curTime的值变成当前这个setTimeout的回调函数执行的时间点。
this.getTime(duration - diffTime); 其实就是this.getTime(duration - 1);
然后又执行getTime,就会重新执行下面的代码,有渲染了新的剩余时间。
this.days = dd || 0;

this.hours = hh || 0;

this.mins = mm || 0;

this.seconds = ss || 0;
然后一秒后又要执行setTmieout的回调函数,在这一秒还没结束的时候,我们将浏览器切到后台,此时setTimeout冷却了。等5秒后再切回。于是setTmieout的回调函数才得以执行。
这时const now = Date.now(); 记录当前这个setTimeout的回调函数执行的时间点。
而curTime是上一个setTimeout的回调函数执行的时间。
所以const diffTime = Math.floor((now - this.curTime) / 1000);实际上,diffTime的值就是5秒。
因而this.getTime(duration - diffTime); 其实就是this.getTime(duration - 5);
这样就完美解决了因为浏览器切到后台,导致剩余时间不变的问题。
6. 添加新功能:可以传入到期时间。
之前是只能传入剩余时间的,现在希望也支持传入到期时间。
只需要改动一下duration就好了。
  computed: {

    duration() {

      if (this.end) {

        let end = String(this.end).length >= 13 ? +this.end : +this.end * 1000;

        end -= Date.now();

        return end;

      }

      const time = this.isMiniSecond ? Math.round(+this.time / 1000) : Math.round(+this.time);

      return time;

    }

  },
判断传入的end的长度是否大于13来判断是秒还是毫秒。轻松!
7. 添加新功能:可以选择要显示的内容,例如只显示秒,或者只显示小时。
只需要改动一下html:
<template>

  <div class="_base-count-down no-rtl">

    <div class="content">

      <slot v-bind="{

        d: days, h: hours, m: mins, s: seconds,

        hh: `00${hours}`.slice(-2),

        mm: `00${mins}`.slice(-2),

        ss: `00${seconds}`.slice(-2),

      }"></slot>

    </div>

  </div>

</template>
很巧妙有没有,只需要用插槽,就把倒计时组件,也就是把子组件的值传递给父组件了。
看看父组件是怎么使用这个组件的。
<base-counter v-slot="timeObj" :time="countDown">

  <div class="count-down">

    <div class="icon"></div>

    {{timeObj.d}}天{{timeObj.hh}}小时{{timeObj.mm}}分钟{{timeObj.ss}}秒

  </div>

</base-counter>
看,如此巧妙又简单。
发现00${hours}.slice(-2) 这种写法也很值得学习。以前在获得到分钟的时候,要手动判断获得的分钟是两位数还是一位数,如果是一位数的话就要在前面手动补上0。就像下面的代码:
var StartMinute = startDate.getMinutes().toString().length >= 2 ? startDate.getMinutes() : '0' + startDate.getHours();
而00${hours}.slice(-2) 则不用判断,先补上0再说,然后再从后面往前截取两位。
到此。
一个完美的倒计时组件就完成了。
三、学习总结
1.明白了setInterval的缺点以及用setTimeout代替setInterval。

2.学到了“+”,操作,不管三七二十一,将接口得到的长串数字转化为数字保平安。

3.利用clearTimeout来清除掉之前的计时器,以防止造成影响。

4.学会使用v-slot来子传父传值

5.学会一个倒计时组件,为了以后方便cv操作。把组件完整代码贴上:
最后
全部代码如下:
<template>

  <div class="time-box">

    还剩{{days}}天{{`00${hours}`.slice(-2)}}:{{`00${mins}`.slice(-2)}}:{{`00${seconds}`.slice(-2)}}

  </div>

</template>

<script>

export default {

  name: 'compTime',

  data: () => ({

    days: '0',

    hours: '00',

    mins: '00',

    seconds: '00',

    timer: null,

    curTime: 0,

  }),

  props: {

    time:{

      type:[Number,String],

      default:0

    },

    refreshCounter:{

      type:[Number,String],

      default:0

    },

    end:{

      type:[Number,String],

      default:0

    },

    isMilliSecond:{

      type:Boolean,

      default: false

    }

  },

  //传入数据处理

  computed:{

    duration(){

      if(this.end){

        let end = String(this.end).length >= 13 ? +this.end : +this.end * 1000

        end -= Date.now()

        return (end / 1000).toFixed(0)

      }

      const time = this.isMilliSecond ? Math.round(+this.time/1000):Math.round(+this.time)

      return time

    }

  },

  mounted() {

    this.countDown()

  },

  watch:{

    duration(){

      this.countDown()

    },

    refreshCounter(){

      this.countDown()

    }

  },

  methods:{

    //总启动

    countDown(){

      this.curTime = Date.now()

      this.getTime(this.duration)

    },

    //定时器方法,定时获取时间

    getTime(duration){

      this.timer && clearTimeout(this.timer)

      if(duration < 0){

        return

      }

      const { dd,hh,mm,ss } = this.durationForMatter(duration)

      this.days = dd || 0

      this.hours = hh || 0

      this.mins = mm || 0

      this.seconds = ss || 0

      this.timer = setTimeout(()=>{

        const now = Date.now()

        const diffTime = Math.floor((now - this.curTime) / 1000)

        const step = diffTime > 1?diffTime:1

        this.curTime = now

        this.getTime(duration - step)

      },1000)

    },

    durationForMatter(time){

      if(!time) return { ss:0 }

      let t = time

      const ss = t % 60

      t = (t - ss) / 60

      if(t < 1) return { ss }

      const mm = t % 60

      t = (t - mm) / 60

      if(t < 1)return { mm,ss }

      const hh = t % 24

      t = (t - hh) / 24

      if(t< 1)return { hh,mm,ss }

      const dd = t

      return { dd,hh,mm,ss }

    }

  }

};

</script>

<style lang='stylus' scoped>

 .time-box

   width 100%

   line-height 100px

   font-weight bold

   font-size 30px

   text-align center

   background white

</style>
本文转载于:
https://juejin.cn/post/6992083502254522399
如果对您有所帮助,欢迎您点个关注,我会定时更新技术文档,大家一起讨论学习,一起进步。

记录--分享并解析一个倒计时组件(Vue)的更多相关文章
- Vue3语法快速入门以及写一个倒计时组件
Vue3写一个倒计时组件 vue3 beta版本发布已有一段时间了,文档也大概看了一下,不过对于学一门技术,最好的方法还是实战,于是找了一个比较简单的组件用vue3来实现,参考的是vant的count ...
- 如何在react中实现一个倒计时组件
倒计时组件 import React, { Component } from 'react' import $ from 'jquery' import "../../css/spellTE ...
- 发布自己第一个npm 组件包(基于Vue的文字跑马灯组件)
一.前言 总结下最近工作上在移动端实现的一个跑马灯效果,最终效果如下: 印象中好像HTML标签的'marquee'的直接可以实现这个效果,不过 HTML标准中已经废弃了'marquee'标签 既然HT ...
- CozyRSS开发记录9-快速实现一个RSS解析器
CozyRSS开发记录9-快速实现一个RSS解析器 1.再读RSS标准 既然需要自己实现一个RSS解析器,那自然需要仔细的读一读RSS的标准文档.在网上随便找了两份,一份英文一份中文: http:// ...
- Vue+ElementUI: 手把手教你做一个audio组件
目的 本项目的目的是教你如何实现一个简单的音乐播放器(这并不难) 本项目并不是一个可以用于生产环境的element播放器,所以并没有考虑太多的兼容性问题 本项目不是ElementUI的一个音频插件,只 ...
- 在vue中使用基于d3为基础的dagre-d3.js搞定一个流程图组件
项目中想搞定一个流程图,开始使用了阿里的G6,但是G6目前不支持手势,这样就很郁闷了,因为公司的领导都是使用iPad看的,你不支持手势是不行的,后来又想到了百度的echarts,试了试,感觉还不错,手 ...
- 怎么定义一个自己的vue组件
1.在src文件夹中创建一个hello文件夹,然后创建hello.js和hello.vue 2.hello.vue代码如下 <template> <button>这是hello ...
- Vue + Element-ui实现后台管理系统(4)---封装一个ECharts组件的一点思路
封装一个ECharts组件的一点思路 有关后台管理系统之前写过三遍博客,看这篇之前最好先看下这三篇博客.另外这里只展示关键部分代码,项目代码放在github上: mall-manage-system ...
- 使用Vue实现一个树组件
HTML代码: <!DOCTYPE html> <html> <head> <title>Vue Demo</title> <meta ...
- Vue回炉重造之封装防刷新考试倒计时组件
<!-- 考试倒计时组件 --> <template> <div class="time"> <p>00:{{timerCount2 ...
随机推荐
- CF1834
A 给出一个由 \(1,-1\) 组成的序列.一次操作可以让一个数变相反. 要多少次操作,才能让整个序列和非负且积等于 \(1\). 大 氵题. B 定义两个数 \(A,B\) 有一个价值:每一位上的 ...
- 好书推荐之《JAVA编程思想》
名人推荐 真是一本透着编程思想的书. 上面的书让你从微观角度了解 Java,而这本书则可以让你从一个宏观角度了解 Java. 这本书和 Java 核心技术的厚度差不多,但这本书的信息密度比较大. 所以 ...
- golang微服务实践:分布式链路追踪系统-jaeger安装与简单使用
简介 jaeger是一个比较有名的分布式链路追踪系统,底层用golang实现,兼容opentracing标准. 文档地址:docs github地址:github 官网:website blog:bl ...
- 使用Java线程同步工具类CyclicBarrier
如何使用 java.util.concurrent.CyclicBarrier是Java并发并发编程中的线程同步工具类,基于java.util.concurrent.locks.ReentrantLo ...
- Java缓存框架整理
Spring Cache 为基于Spring框架的应用提供了一套完整的缓存API抽象,具体的缓存实现可以对接如Ehcache,Redis等. https://docs.spring.io/spring ...
- RK3568开发笔记(三):RK3568虚拟机基础环境搭建之更新源、安装网络工具、串口调试、网络连接、文件传输、安装vscode和samba共享服务
前言 开始搭建RK3568的基础虚拟机,具备基本的通用功能,主要包含了串口工具minicom,远程登陆ssh,远程传输filezilla,代码编辑工具vscode. 虚拟机 文档对对虚拟机 ...
- Golang标准库——io
原文:Golang标准库--io 1.io io包提供了对I/O原语的基本接口.本包的基本任务是包装这些原语已有的实现(如os包里的原语),使之成为共享的公共接口,这些公共接口抽象出了泛用的函数并附加 ...
- [golang] 概念: struct vs interface
struct vs interface go语言的简化哲学: class = struct + receiver method set 注意: go 语言的struct,在参数传递中,是值拷贝. st ...
- The OCaml Language Cheatsheets
The OCaml Language Cheatsheets OCaml v.4.08.1 Syntax Implementations are in .ml files, interfaces ar ...
- mysql常用语句(持续更新)
查询数据库中各表数量 select table_name,table_rows from information_schema.tables where TABLE_SCHEMA = 'miot' o ...