spring之事务详解
1.背景
该博客要解决的重要问题如下:
spring的3种安全性问题,4种事务特性,5种隔离级别,7种传播行为


spring的3种安全性问题,4种事务特性,5种隔离级别,7种传播行为

spring事务:

什么是事务:

事务逻辑上的一组操作,组成这组操作的各个逻辑单元,要么一起成功,要么一起失败.

事务特性(4种):

原子性 (atomicity):强调事务的不可分割.

一致性 (consistency):事务的执行的前后数据的完整性保持一致.

隔离性 (isolation):一个事务执行的过程中,不应该受到其他事务的干扰

持久性(durability) :事务一旦结束,数据就持久到数据库

如果不考虑隔离性引发安全性问题(3种):

脏读 :一个事务读到了另一个事务的未提交的数据

不可重复读 :一个事务读到了另一个事务已经提交的 update 的数据导致多次查询结果不一致.

虚幻读 :一个事务读到了另一个事务已经提交的 insert 的数据导致多次查询结果不一致.

解决读问题: 设置事务隔离级别(5种)

DEFAULT 这是一个PlatfromTransactionManager默认的隔离级别,使用数据库默认的事务隔离级别.

未提交读(read uncommited) :脏读,不可重复读,虚读都有可能发生

已提交读 (read commited):避免脏读。但是不可重复读和虚读有可能发生

可重复读 (repeatable read) :避免脏读和不可重复读.但是虚读有可能发生.

串行化的 (serializable) :避免以上所有读问题.

Mysql 默认:可重复读

Oracle 默认:读已提交

read uncommited:是最低的事务隔离级别,它允许另外一个事务可以看到这个事务未提交的数据。

read commited:保证一个事物提交后才能被另外一个事务读取。另外一个事务不能读取该事物未提交的数据。

repeatable read:这种事务隔离级别可以防止脏读,不可重复读。但是可能会出现幻象读。避免脏读、不可重复读的问题

serializable:这是花费最高代价但最可靠的事务隔离级别。事务被处理为顺序执行。可以避免脏读、不可重复读、虚幻读的问题(避免三种)。

事务的传播行为(7种)

保证同一个事务中

propagion_required: 支持当前事务,如果不存在 就新建一个(默认)

propagion_supports: 支持当前事务,如果不存在,就不使用事务

propagion_mandatory: 支持当前事务,如果不存在,抛出异常

保证没有在同一个事务中

propagion_requires_new:  如果有事务存在,挂起当前事务,创建一个新的事务

propagion_not_supported: 以非事务方式运行,如果有事务存在,挂起当前事务

propagion_never: 以非事务方式运行,如果有事务存在,抛出异常

propagion_nested: 如果当前事务存在,则嵌套事务执行
2.事务简介
2.1.什么是事务
(1)事务是数据库操作最基本单元,逻辑上一组操作,要么都成功,要么都失败。
(2)典型应用场景:银行转账
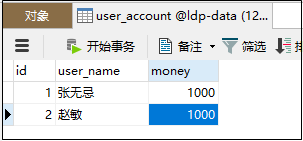
* 张无忌 转账 100 元 给 赵敏
* 张无忌 少 100,赵敏 多 100,
这一组操作要么都成功,要么都失败,
绝对不允许出现,张无忌少了100,但是赵敏却没有增加100
原生的jdbc的处理逻辑如下:
try {
// 开启事务
connection.setAutoCommit(false);
// 转出100元
// 传入100元
// 其他数据库操作....
// 提交事务
connection.commit();
} catch (Exception e) {
// 事务回滚
connection.rollback();
} finally {
// 关闭资源
statement.close();
connection.close();
}
2.2.事务四个特性(ACID)
(1)、原子性
事务是数据库的逻辑工作单位,事务中包含的各操作要么都做,要么都不做
(2)、一致性
事务执行的结果必须是使数据库从一个一致性状态变到另一个一致性状态。因此当数据库只包含成功事务提交的结果时,就说数据库处于一致性状态。
如果数据库系统 运行中发生故障,有些事务尚未完成就被迫中断,这些未完成事务对数据库所做的修改有一部分已写入物理数据库,这时数据库就处于一种不正确的状态,或者说是 不一致的状态。
(3)、隔离性
一个事务的执行不能其它事务干扰。即一个事务内部的操作及使用的数据对其它并发事务是隔离的,并发执行的各个事务之间不能互相干扰。
(4) 、持续性
也称永久性,指一个事务一旦提交,它对数据库中的数据的改变就应该是永久性的。接下来的其它操作或故障不应该对其执行结果有任何影响。
3.回顾原生态的jdbc实现事务
需求:使用原生的jdbc事务实现张无忌向赵敏转账100元,并模拟如果转账过程中出现异常的情况。
步骤一:数据库表如下
步骤二:事务测试代码如下
 /**

     * 测试

     * jdbc事务演示

     */

    @Test

    public void test01() throws Exception {

        Connection connection = null;

        Statement statement = null;

        try {

            Class.forName("com.mysql.jdbc.Driver");

            connection = DriverManager.getConnection("jdbc:mysql://localhost:3306/ldp-data?characterEncoding=utf8", "root", "admin");

            statement = connection.createStatement();

            // 开启事务

            connection.setAutoCommit(false);

            System.out.println("开启事务----------");

            // 转出100元

            String sql01 = "UPDATE user_account SET money=money-100 WHERE id=1";

            statement.executeUpdate(sql01);

            // 模拟故障

            System.out.println(1 / 0);

       // 模拟转入100元

            String sql02 = "UPDATE user_account SET money=money+100 WHERE id=2";

            statement.executeUpdate(sql02);

            // 提交事务

            System.out.println("提交事务----------");

            connection.commit();

        } catch (Exception e) {

            connection.rollback();

            System.out.println("事务回滚---------");

        } finally {

            // 关闭资源

            statement.close();

            connection.close();

        }

    }
步骤三:
通过开启事务与不开启是否,执行程序观察结果;
通过有故障与无故障的情况下查看数据库数据结果变化;
通过上面测试结果与数据观察深入理解事务的重要性;
4.JdbcTemplate实现事务
这一节中我们的需求与上一节一样:
实现张无忌向赵敏转账100元,并模拟如果转账过程中出现异常的情况。
只是实现的方式不一样,这一节我们要使用JdbcTemplate实现事务
4.1.理论知识
1、事务添加到 JavaEE 三层结构里面 Service 层(业务逻辑层)
2、在 Spring 进行事务管理操作
有两种方式:
(1)编程式事务管理(就像之前讲的jdbc原生事务,一般不用)
(2)声明式事务管理(贴标签就可以了,生产中常用)
3、声明式事务管理
(1)基于注解方式
(2)基于 xml 配置文件方式
4、在 Spring 进行声明式事务管理,底层使用 AOP 原理
4.2.准备工作
写一个没有事务的转账业务
步骤一:编写model
package com.ldp.jdbctemplate.model;

/**

 * @author 姿势帝-博客园

 * @address https://www.cnblogs.com/newAndHui/

 * @WeChat 851298348

 * @create 02/09 4:36

 * @description

 */

public class UserAccount {

    private Integer id;

    private String userName;

    private Integer money;

    public Integer getId() {

        return id;

    }

    public void setId(Integer id) {

        this.id = id;

    }

    public String getUserName() {

        return userName;

    }

    public void setUserName(String userName) {

        this.userName = userName;

    }

    public Integer getMoney() {

        return money;

    }

    public void setMoney(Integer money) {

        this.money = money;

    }

    @Override

    public String toString() {

        return "UserAccount{" +

                "id=" + id +

                ", userName='" + userName + '\'' +

                ", money=" + money +

                '}';

    }

}
步骤二:编写dao接口
public interface IUserAccountDao {

    int update(UserAccount userAccount);

}
步骤三:编写dao实现
package com.ldp.jdbctemplate.dao.impl;

import com.ldp.jdbctemplate.dao.IUserAccountDao;

import com.ldp.jdbctemplate.model.UserAccount;

import org.springframework.beans.factory.annotation.Autowired;

import org.springframework.jdbc.core.JdbcTemplate;

import org.springframework.stereotype.Repository;

/**

 * @author 姿势帝-博客园

 * @address https://www.cnblogs.com/newAndHui/

 * @WeChat 851298348

 * @create 02/09 7:04

 * @description

 */

@Repository

public class UserAccountDaoImpl implements IUserAccountDao {

    @Autowired

    private JdbcTemplate jdbcTemplate;

    @Override

    public int update(UserAccount userAccount) {

        String sql = "UPDATE user_account SET money=money+? WHERE id=?";

        return jdbcTemplate.update(sql, userAccount.getMoney(), userAccount.getId());

    }

}
步骤四:编写service接口
package com.ldp.jdbctemplate.service;

import com.ldp.jdbctemplate.model.UserAccount;

/**

 * @author 姿势帝-博客园

 * @address https://www.cnblogs.com/newAndHui/

 * @WeChat 851298348

 * @create 02/10 12:21

 * @description

 */

public interface IUserAccountService {

    /**

     * 转账

     *

     * @param account1

     * @param account2

     */

    void transferAccounts(UserAccount account1, UserAccount account2);

}
步骤五:编写service实现
package com.ldp.jdbctemplate.service.impl;

import com.ldp.jdbctemplate.dao.IUserAccountDao;

import com.ldp.jdbctemplate.model.UserAccount;

import com.ldp.jdbctemplate.service.IUserAccountService;

import org.springframework.beans.factory.annotation.Autowired;

import org.springframework.stereotype.Service;

/**

 * @author 姿势帝-博客园

 * @address https://www.cnblogs.com/newAndHui/

 * @WeChat 851298348

 * @create 02/10 12:23

 * @description

 */

@Service

public class UserAccountServiceImpl implements IUserAccountService {

    @Autowired

    private IUserAccountDao userAccountDao;

    @Override

    public void transferAccounts(UserAccount account1, UserAccount account2) {

        // 更新账户1

        userAccountDao.update(account1);

        // 模拟故障

        // System.out.println(1 / 0);

        // 更新账户2

        userAccountDao.update(account2);

    }

}
步骤六:编写service测试
package com.ldp.jdbctemplate.service.impl;

import com.ldp.jdbctemplate.model.UserAccount;

import com.ldp.jdbctemplate.service.IUserAccountService;

import org.junit.jupiter.api.Test;

import org.springframework.beans.factory.annotation.Autowired;

import org.springframework.test.context.junit.jupiter.SpringJUnitConfig;

/**

 * @author 姿势帝-博客园

 * @address https://www.cnblogs.com/newAndHui/

 * @WeChat 851298348

 * @create 02/10 12:26

 * @description

 */

@SpringJUnitConfig(locations = "classpath:bean01.xml")

public class UserAccountServiceImplTest {

    @Autowired

    private IUserAccountService userAccountService;

    @Test

    public void transferAccounts() {

        System.out.println("测试开始....");

        // 账户1

        UserAccount account1 = new UserAccount();

        account1.setId(1);

        account1.setUserName("张无忌");

        account1.setMoney(-100);

        // 账户2

        UserAccount account2 = new UserAccount();

        account2.setId(2);

        account2.setUserName("赵敏");

        account2.setMoney(100);

        userAccountService.transferAccounts(account1, account2);

        System.out.println("测试结束....");

    }

}
到这里转账业务功能已经实现,但是还没有加入事务管理,如果在转账的过程中出现异常,会导致账户出错!
4.3.基于注解方式的声明式事务管理实现
步骤一:在xml中创建事务管理器与开启事务管理注解
 <!--创建事务管理器-->

    <bean id="transactionManager"

          class="org.springframework.jdbc.datasource.DataSourceTransactionManager">

        <!--注入数据源-->

        <property name="dataSource" ref="dataSource"></property>

    </bean>

    <!--开启事务注解-->

    <tx:annotation-driven transaction-manager="transactionManager"></tx:annotation-driven>
步骤二:在service的类或者方法上贴注解@Transactional
   @Override

    @Transactional //基于注解方式的声明式事务管理实现

    public void transferAccounts(UserAccount account1, UserAccount account2) {

        // 更新账户1

        userAccountDao.update(account1);

        // 模拟故障

       // System.out.println(1 / 0);

        // 更新账户2

        userAccountDao.update(account2);

    }
步骤三:测试
与上一步中的测试一样,就算是查询异常,数据仍然会保持一致性!
4.4.基于xml配置方式的声明式事务管理实现
步骤一:xml配置
<?xml version="1.0" encoding="UTF-8"?>

<beans xmlns="http://www.springframework.org/schema/beans"

       xmlns:xsi="http://www.w3.org/2001/XMLSchema-instance"

       xmlns:context="http://www.springframework.org/schema/context" xmlns:tx="http://www.springframework.org/schema/tx"

       xmlns:aop="http://www.springframework.org/schema/aop"

       xsi:schemaLocation="http://www.springframework.org/schema/beans http://www.springframework.org/schema/beans/spring-beans.xsd

       http://www.springframework.org/schema/context https://www.springframework.org/schema/context/spring-context.xsd

       http://www.springframework.org/schema/tx http://www.springframework.org/schema/tx/spring-tx.xsd http://www.springframework.org/schema/aop https://www.springframework.org/schema/aop/spring-aop.xsd">

    <!--1.组件扫描-->

    <context:component-scan base-package="com.ldp.jdbctemplate"></context:component-scan>

    <!--2.数据库连接池-->

    <bean id="dataSource" class="com.alibaba.druid.pool.DruidDataSource" destroy-method="close">

        <property name="url" value="jdbc:mysql://127.0.0.1:3306/ldp-data?characterEncoding=utf8"/>

        <property name="username" value="root"/>

        <property name="password" value="admin"/>

        <property name="driverClassName" value="com.mysql.jdbc.Driver"/>

    </bean>

    <!--3.JdbcTemplate对象-->

    <bean id="jdbcTemplate" class="org.springframework.jdbc.core.JdbcTemplate">

        <!--注入dataSource-->

        <property name="dataSource" ref="dataSource"></property>

    </bean>

    <!--      xml声明事务管理     -->

    <!--1.创建事务管理器-->

    <bean id="transactionManager"

          class="org.springframework.jdbc.datasource.DataSourceTransactionManager">

        <!--注入数据源-->

        <property name="dataSource" ref="dataSource"></property>

    </bean>

    <!--2. 配置通知-->

    <tx:advice id="txadvice">

        <!--配置事务参数-->

        <tx:attributes>

            <!--指定哪种规则的方法上面添加事务-->

            <tx:method name="*" propagation="REQUIRED"/>

            <!--<tx:method name="transfer*"/>-->

            <!--以下这些方法不加入事务-->

            <tx:method name="get*" propagation="SUPPORTS" read-only="true"/>

            <tx:method name="query*" propagation="SUPPORTS" read-only="true"/>

            <tx:method name="select*" propagation="SUPPORTS" read-only="true"/>

            <tx:method name="find*" propagation="SUPPORTS" read-only="true"/>

        </tx:attributes>

    </tx:advice>

    <!--3. 配置切入点和切面-->

    <aop:config>

        <!--配置切入点-->

        <aop:pointcut id="pt" expression="execution(* com.ldp.jdbctemplate.service.impl.*ServiceImpl.*(..))"/>

        <!--配置切面-->

        <aop:advisor advice-ref="txadvice" pointcut-ref="pt"/>

    </aop:config>

</beans>
步骤二:测试
注意:
1.测试方式与之前的一样
2.测试的时候删除上一节中的@Transactional注解,避免造成测试干扰
4.5.全注解实现事务
步骤一:编写配置类
package com.ldp.jdbctemplate.config;

import com.alibaba.druid.pool.DruidDataSource;

import org.springframework.context.annotation.Bean;

import org.springframework.context.annotation.ComponentScan;

import org.springframework.context.annotation.Configuration;

import org.springframework.jdbc.core.JdbcTemplate;

import org.springframework.jdbc.datasource.DataSourceTransactionManager;

import org.springframework.transaction.annotation.EnableTransactionManagement;

import javax.sql.DataSource;

/**

 * @author 姿势帝-博客园

 * @address https://www.cnblogs.com/newAndHui/

 * @WeChat 851298348

 * @create 02/10 5:04

 * @description

 */

@Configuration //配置类

@ComponentScan(basePackages = "com.ldp") //组件扫描

@EnableTransactionManagement //开启事务

public class TransactionConfig {

    //创建数据库连接池

    @Bean

    public DruidDataSource getDruidDataSource() {

        DruidDataSource dataSource = new DruidDataSource();

        dataSource.setDriverClassName("com.mysql.jdbc.Driver");

        dataSource.setUrl("jdbc:mysql:///ldp-data");

        dataSource.setUsername("root");

        dataSource.setPassword("admin");

        return dataSource;

    }

    //创建 JdbcTemplate 对象

    @Bean

    public JdbcTemplate getJdbcTemplate(DataSource dataSource) {

        //到 ioc 容器中根据类型找到 dataSource

        JdbcTemplate jdbcTemplate = new JdbcTemplate();

        //注入 dataSource

        jdbcTemplate.setDataSource(dataSource);

        return jdbcTemplate;

    }

    //创建事务管理器

    @Bean

    public DataSourceTransactionManager getDataSourceTransactionManager(DataSource dataSource) {

        DataSourceTransactionManager transactionManager = new DataSourceTransactionManager();

        transactionManager.setDataSource(dataSource);

        return transactionManager;

    }

}
步骤二:xml文件
<?xml version="1.0" encoding="UTF-8"?>

<beans xmlns="http://www.springframework.org/schema/beans"

       xmlns:xsi="http://www.w3.org/2001/XMLSchema-instance"

       xmlns:context="http://www.springframework.org/schema/context" xmlns:tx="http://www.springframework.org/schema/tx"

       xmlns:aop="http://www.springframework.org/schema/aop"

       xsi:schemaLocation="http://www.springframework.org/schema/beans http://www.springframework.org/schema/beans/spring-beans.xsd

       http://www.springframework.org/schema/context https://www.springframework.org/schema/context/spring-context.xsd

       http://www.springframework.org/schema/tx http://www.springframework.org/schema/tx/spring-tx.xsd http://www.springframework.org/schema/aop https://www.springframework.org/schema/aop/spring-aop.xsd">

    <!--1.组件扫描-->

    <context:component-scan base-package="com.ldp.jdbctemplate"></context:component-scan>

</beans>
步骤三:service方法上增加@Transactional注解
    @Override

    @Transactional //基于注解方式的声明式事务管理实现

    public void transferAccounts(UserAccount account1, UserAccount account2) {

        // 更新账户1

        userAccountDao.update(account1);

        // 模拟故障

      //  System.out.println(1 / 0);

        // 更新账户2

        userAccountDao.update(account2);

    }
步骤四:测试
与之前的测试逻辑一样
5.事务配置详解
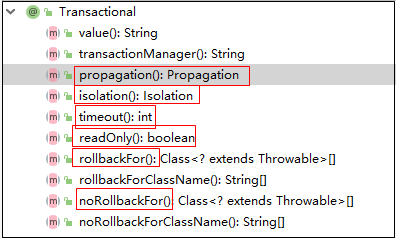
注解@Transactional的配置参数
5.1.事务传播行为propagation
propagation:事务传播行为,多事务方法直接进行调用,这个过程中事务是如何进行管理的。
spring框架提供了7种事务传播行为
|
类别 |
传播属性 |
单词含义 |
简要描述 |
具体描述 |
|
保证在同 |
required |
必须的 |
支持当前事务,如果不存在 就新建一个(默认) |
如果有事务在运行,当前的方法就在这个事务内运行, |
|
supports |
支持 |
支持当前事务,如果不存在,就不使用事务 |
如果有事务在运行,当前的方法就在这个事务内运行, |
|
|
mandatory |
强制性的 |
支持当前事务,如果不存在,抛出异常 |
当前的方法必须运行在事务内部, |
|
|
保证不在同 |
requires_new |
如果有事务存在,挂起当前事务,创建一个新的事务 |
当前的方法必须启动新事务,并在它自己的事务内运行。 |
|
|
not_supported |
以非事务方式运行,如果有事务存在,挂起当前事务 |
当前的方法不应该运行在事务中。 |
||
|
never |
绝不 |
以非事务方式运行,如果有事务存在,抛出异常 |
当前的方法不应该运行在事务中, |
|
|
nested |
嵌套的 |
如果当前事务存在,则嵌套事务执行 |
如果有事务在运行,当前的方法就应该在这个事务的嵌套事务内运行。 |
下面我们来测试这些传播方式
测试设计思路,method01A()中调用方法method02A(),通过修改@Transactional(propagation = Propagation.REQUIRED)参数、是否抛出异常等条件,观察数据库中数据变化与事务名称的变化。
// 查看是否存在事务
boolean active = TransactionSynchronizationManager.isActualTransactionActive();
// 获取当前事务名称
String transactionName = TransactionSynchronizationManager.getCurrentTransactionName();
具体步骤:
步骤一:数据库设计

步骤二:业务类TransactionTest01ServiceImpl
package com.ldp.jdbctemplate.service.impl;

import com.ldp.jdbctemplate.dao.IUserAccountDao;

import com.ldp.jdbctemplate.model.UserAccount;

import com.ldp.jdbctemplate.service.ITransactionTest01Service;

import com.ldp.jdbctemplate.service.ITransactionTest02Service;

import org.springframework.beans.factory.annotation.Autowired;

import org.springframework.stereotype.Service;

import org.springframework.transaction.annotation.Propagation;

import org.springframework.transaction.annotation.Transactional;

import org.springframework.transaction.support.TransactionSynchronizationManager;

/**

 * @author 姿势帝-博客园

 * @address https://www.cnblogs.com/newAndHui/

 * @WeChat 851298348

 * @create 02/11 11:11

 * @description

 */

@Service

public class TransactionTest01ServiceImpl implements ITransactionTest01Service {

    @Autowired

    private IUserAccountDao userAccountDao;

    @Autowired

    private ITransactionTest02Service test02Service;

    @Override

    // 修改了参数观察变化

    @Transactional(propagation = Propagation.REQUIRED)

    public void method01A() {

        // 账户

        UserAccount account1 = new UserAccount(1, "张无忌", -100);

        UserAccount account2 = new UserAccount(2, "赵敏", 100);

        // 查看是否存在事务

        boolean active = TransactionSynchronizationManager.isActualTransactionActive();

        // 获取当前事务名称

        String transactionName = TransactionSynchronizationManager.getCurrentTransactionName();

        System.out.println("active01A=" + active + ",transactionName01A=" + transactionName);

        // 更新账户1

        userAccountDao.update(account1);

        // 模拟故障

        // System.out.println(1 / 0);

        // 更新账户2

        userAccountDao.update(account2);

        // 测试01A事务下 02A事务的情况

        test02Service.method02A();

    }

}
步骤三:业务类TransactionTest02ServiceImpl
package com.ldp.jdbctemplate.service.impl; import com.ldp.jdbctemplate.dao.IUserAccountDao;
import com.ldp.jdbctemplate.model.UserAccount;
import com.ldp.jdbctemplate.service.ITransactionTest02Service;
import org.springframework.beans.factory.annotation.Autowired;
import org.springframework.stereotype.Service;
import org.springframework.transaction.annotation.Propagation;
import org.springframework.transaction.annotation.Transactional;
import org.springframework.transaction.support.TransactionSynchronizationManager; /**
* @author 姿势帝-博客园
* @address https://www.cnblogs.com/newAndHui/
* @WeChat 851298348
* @create 02/11 11:11
* @description
*/
@Service
public class TransactionTest02ServiceImpl implements ITransactionTest02Service {
@Autowired
private IUserAccountDao userAccountDao; @Override
// 修改了参数观察变化
@Transactional(propagation = Propagation.MANDATORY)
public void method02A() {
// 账户
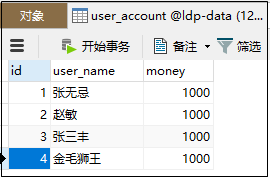
UserAccount account1 = new UserAccount(3, "张三丰", -100);
UserAccount account2 = new UserAccount(4, "金毛狮王", 100);
boolean active = TransactionSynchronizationManager.isActualTransactionActive();
String transactionName = TransactionSynchronizationManager.getCurrentTransactionName();
System.out.println("active02A" + active + ",transactionName02A=" + transactionName);
// 更新账户1
userAccountDao.update(account1);
// 模拟故障
System.out.println(1 / 0);
// 更新账户2
userAccountDao.update(account2);
}
}
步骤四:测试代码
package com.ldp.jdbctemplate.service.impl;

import com.ldp.jdbctemplate.service.ITransactionTest01Service;

import org.junit.jupiter.api.Test;

import org.springframework.beans.factory.annotation.Autowired;

import org.springframework.test.context.junit.jupiter.SpringJUnitConfig;

/**

 * @author 姿势帝-博客园

 * @address https://www.cnblogs.com/newAndHui/

 * @WeChat 851298348

 * @create 02/11 11:21

 * @description

 */

@SpringJUnitConfig(locations = "classpath:bean04.xml")

public class TransactionTest01ServiceImplTest {

    @Autowired

    private ITransactionTest01Service test01Service;

    @Test

    public void method01A() {

        test01Service.method01A();

    }

}
5.2.隔离级别isolation详解
如果不考虑隔离性引发安全性问题:
脏读 :一个事务读到了另一个事务的未提交的数据
不可重复读 :一个事务读到了另一个事务已经提交的 update 的数据导致多次查询结果不一致.
虚幻读 :一个事务读到了另一个事务已经提交的 insert 的数据导致多次查询结果不一致.
解决读问题: 设置事务隔离级别(5种)
DEFAULT 这是一个PlatfromTransactionManager默认的隔离级别,使用数据库默认的事务隔离级别.
未提交读(read uncommited) :脏读,不可重复读,虚读都有可能发生
已提交读 (read commited):避免脏读。但是不可重复读和虚读有可能发生
可重复读 (repeatable read) :避免脏读和不可重复读.但是虚读有可能发生.
串行化的 (serializable) :避免以上所有读问题.
Mysql 默认:可重复读
Oracle 默认:读已提交
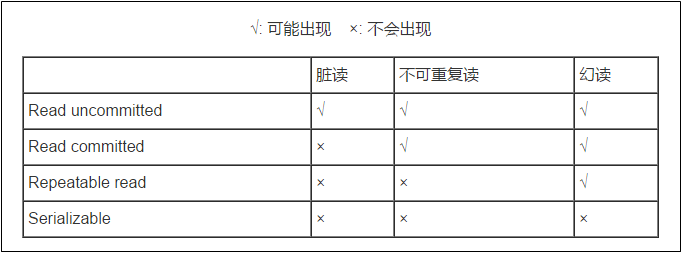
read uncommited:是最低的事务隔离级别,它允许另外一个事务可以看到这个事务未提交的数据。
read commited:保证一个事物提交后才能被另外一个事务读取。另外一个事务不能读取该事物未提交的数据。
repeatable read:这种事务隔离级别可以防止脏读,不可重复读。但是可能会出现幻象读。它除了保证一个事务不能被另外一个事务读取未提交的数据之外,还避免了不可重复读的情况。
serializable:这是花费最高代价但最可靠的事务隔离级别。事务被处理为顺序执行。除了防止脏读,不可重复读之外,还避免了幻象读(避免三种)。
代码测试
编写代码测试,主要通过设置不同的隔离级别,验证脏读、不可重复、幻读的三中情况,加深对隔离级别的理解
步骤一:数据库表设计
步骤二:对数据库的新增、修改、查询方法实现
package com.ldp.jdbctemplate.dao.impl;

import com.ldp.jdbctemplate.dao.IUserAccountDao;

import com.ldp.jdbctemplate.model.UserAccount;

import org.springframework.beans.factory.annotation.Autowired;

import org.springframework.jdbc.core.BeanPropertyRowMapper;

import org.springframework.jdbc.core.JdbcTemplate;

import org.springframework.stereotype.Repository;

import java.util.List;

/**

 * @author 姿势帝-博客园

 * @address https://www.cnblogs.com/newAndHui/

 * @WeChat 851298348

 * @create 02/09 7:04

 * @description

 */

@Repository

public class UserAccountDaoImpl implements IUserAccountDao {

    @Autowired

    private JdbcTemplate jdbcTemplate;

    @Override

    public int update(UserAccount userAccount) {

        String sql = "UPDATE user_account SET money=money+? WHERE id=?";

        return jdbcTemplate.update(sql, userAccount.getMoney(), userAccount.getId());

    }

    @Override

    public UserAccount selectByUserName(String userName) {

        // String sql = "SELECT id,user_name,money FROM user_account WHERE user_name=? for update";

        String sql = "SELECT id,user_name,money FROM user_account WHERE user_name=?";

        List<UserAccount> list = jdbcTemplate.query(sql, new BeanPropertyRowMapper<UserAccount>(UserAccount.class), userName);

        if (list.size() == 0) {

            return null;

        }

        return list.get(0);

    }

    @Override

    public int save(UserAccount userAccount) {

        String sql = "INSERT INTO user_account(user_name,money) VALUES (?,?)";

        return jdbcTemplate.update(sql, userAccount.getUserName(), userAccount.getMoney());

    }

}
步骤三:sevice方法实现三个业务方法:无数据时增加数据、有数据时修改数据、多次查询数据
package com.ldp.jdbctemplate.service.impl;

import com.ldp.jdbctemplate.dao.IUserAccountDao;

import com.ldp.jdbctemplate.model.UserAccount;

import com.ldp.jdbctemplate.service.IIsolationTest01Service;

import org.springframework.beans.factory.annotation.Autowired;

import org.springframework.stereotype.Service;

import org.springframework.transaction.annotation.Isolation;

import org.springframework.transaction.annotation.Transactional;

/**

 * @author 姿势帝-博客园

 * @address https://www.cnblogs.com/newAndHui/

 * @WeChat 851298348

 * @create 02/16 6:21

 * @description

 */

@Service

public class IsolationTest01ServiceImpl implements IIsolationTest01Service {

    @Autowired

    private IUserAccountDao userAccountDao;

    /**

     * 用户不存在新增该用户

     *

     * @param userName

     */

    @Override

    // 通过设置不同的隔离级别验证 脏读、不可重复读、虚幻读 三中情况

    @Transactional(isolation = Isolation.DEFAULT)

    public void save01A(String userName) {

        UserAccount userAccount = userAccountDao.selectByUserName(userName);

        if (userAccount == null) {

            userAccountDao.save(new UserAccount(userName, 100));

            UserAccount userAccountNew = userAccountDao.selectByUserName(userName);

            System.out.println("用户保存成功:" + userAccountNew);

        } else {

            System.out.println("用户已存在:" + userAccount);

        }

    }

    /**

     * 用户存在时修改用户

     *

     * @param userName

     */

    @Override

    // 通过设置不同的隔离级别验证 脏读、不可重复读、虚幻读 三中情况

    @Transactional(isolation = Isolation.READ_UNCOMMITTED)

    public void update01B(String userName) {

        UserAccount userAccount = userAccountDao.selectByUserName(userName);

        if (userAccount != null) {

            userAccountDao.update(new UserAccount(userAccount.getId(), userName, -100));

            UserAccount userAccountNew = userAccountDao.selectByUserName(userName);

            System.out.println("用户修改成功:" + userAccountNew);

        } else {

            System.out.println("用户不存在:" + userName);

        }

    }

    /**

     * 多次查询用户

     *

     * @param userName

     */

    @Override

    // 通过设置不同的隔离级别验证 脏读、不可重复读、虚幻读 三中情况

    @Transactional(isolation = Isolation.REPEATABLE_READ)

    public void select01C(String userName) {

        // 第一次查询

        UserAccount userAccount1 = userAccountDao.selectByUserName(userName);

        System.out.println("第一次查询结果:" + userAccount1);

        UserAccount userAccount2 = userAccountDao.selectByUserName(userName);

        System.out.println("第二次查询结果:" + userAccount2);

    }

}
步骤四:测试方法
package com.ldp.jdbctemplate.service.impl;

import com.ldp.jdbctemplate.service.IIsolationTest01Service;

import org.junit.jupiter.api.Test;

import org.springframework.beans.factory.annotation.Autowired;

import org.springframework.test.context.junit.jupiter.SpringJUnitConfig;

/**

 * @author 姿势帝-博客园

 * @address https://www.cnblogs.com/newAndHui/

 * @WeChat 851298348

 * @create 02/16 6:36

 * @description

 */

@SpringJUnitConfig(locations = "classpath:bean04.xml")

public class IsolationTest01ServiceImplTest {

    @Autowired

    private IIsolationTest01Service test01Service;

    /**

     * 隔离级别演示方法01A

     * 用户不存在新增该用户

     */

    @Test

    public void save01ATest() {

        test01Service.save01A("张三112");

    }

    /**

     * 隔离级别演示方法01B

     * 用户存在修改用户账户余额

     */

    @Test

    public void update01BTest() {

        test01Service.update01B("张三11");

    }

    /**

     * 隔离级别演示方法01C

     * 根据用户名连续查询2次

     * 不可重复读 :一个事务读到了另一个事务已经提交的 update 的数据导致多次查询结果不一致.

     */

    @Test

    public void select01CTest() {

        test01Service.select01C("张三112");

    }

}
测试逻辑与参数配置如下:
|
类别测试 |
定义 |
测试方法启动步骤 |
save01A |
update01B |
select01C |
|
脏读 |
一个事务读到了另一个事务的未提交的数据 |
1.启动save01ATest(),在执行了保存sql语句后断点 |
DEFAULT |
READ_UNCOMMITTED |
|
|
不可重复读 |
一个事务读到了另一个事 |
1.启动select01CTest,执行到第一次查询时断点; |
DEFAULT |
READ_COMMITTED |
|
|
虚幻读 |
一个事务读到了另一个事务已经提交的 insert 的数据导致多次查询结果不一致. |
1.启动select01CTest,执行到第一次查询无数据时断点; |
DEFAULT |
REPEATABLE_READ |
补充:
1.spring事务本质上使用数据库事务,而数据库事务本质上使用数据库锁,所以spring事务本质上使用数据库锁,开启spring事务意味着使用数据库锁,
因此要想深入学习好spring事务,应该先系统化的学习好mysql的事务,如果之前没有系统化的学习过mysql事务,可以学习之前讲的《深入学习mysql实战》课程;
2.如何查看mysql事务隔离级别
查看mysql事务隔离级别

切换到performance_schema database下,

执行sql语句:

mysql> select * from global_variables where variable_name like "%tx%";

+---------------+-----------------+

| VARIABLE_NAME | VARIABLE_VALUE  |

+---------------+-----------------+

| TX_ISOLATION  | REPEATABLE-READ |

+---------------+-----------------+

1 row in set

mysql>
5.3.timeout:超时时间
(1)事务需要在一定时间内进行提交,如果不提交进行回滚
(2)默认值是 -1 ,设置时间以秒单位进行计算
测试比较简单,请自己测试
5.4.readOnly:是否只读
(1)读:查询操作,写:添加修改删除操作
(2)readOnly 默认值 false,表示可以查询,可以添加修改删除操作
(3)设置 readOnly 值是 true,设置成 true 之后,只能查询
测试比较简单,请自己测试
5.5.rollbackFor:回滚
(1)设置出现哪些异常进行事务回滚
测试比较简单,请自己测试
5.6.noRollbackFor:不回滚
(1)设置出现哪些异常不进行事务回滚
测试比较简单,请自己测试
6.总结
到此spring事务相关的核心技术已经讲解完毕,
如果看博客理解不是很深入,为了更好的讲解清楚spring事务,该博客已经录制成视频讲解,可以结合视频进行学习,
如果还是有不理解的地方可以单独问我或者获取课程中使用到的源码。
完美!
spring之事务详解的更多相关文章
- 【SSM框架】Spring笔记 --- 事务详解
1.Spring的事务管理: 事务原本是数据库中的概念,在实际项目的开发中,进行事务的处理一般是在业务逻辑层, 即 Service 层.这样做是为了能够使用事务的特性来管理关联操作的业务. 在 Spr ...
- Spring 分布式事务详解
在学习分布式事务的过程中会遇到以下关键名词: 相关名词: XA :XA规范的目的是允许多个资源(如数据库,应用服务器,消息队列,等等)在同一事务中访问,这样可以使ACID属性跨越应用程序而保持有效.X ...
- spring事务详解(五)总结提高
系列目录 spring事务详解(一)初探事务 spring事务详解(二)简单样例 spring事务详解(三)源码详解 spring事务详解(四)测试验证 spring事务详解(五)总结提高 一.概念 ...
- spring事务详解(四)测试验证
系列目录 spring事务详解(一)初探事务 spring事务详解(二)简单样例 spring事务详解(三)源码详解 spring事务详解(四)测试验证 spring事务详解(五)总结提高 一.引子 ...
- spring事务详解(二)简单样例
系列目录 spring事务详解(一)初探事务 spring事务详解(二)简单样例 spring事务详解(三)源码详解 spring事务详解(四)测试验证 spring事务详解(五)总结提高 一.引子 ...
- spring事务详解(三)源码详解
系列目录 spring事务详解(一)初探事务 spring事务详解(二)简单样例 spring事务详解(三)源码详解 spring事务详解(四)测试验证 spring事务详解(五)总结提高 一.引子 ...
- spring事务详解(一)初探事务
系列目录 spring事务详解(一)初探事务 spring事务详解(二)简单样例 spring事务详解(三)源码详解 spring事务详解(四)测试验证 spring事务详解(五)总结提高 引子 很多 ...
- Spring jar包详解
Spring jar包详解 org.springframework.aop ——Spring的面向切面编程,提供AOP(面向切面编程)的实现 org.springframework.asm——spri ...
- Spring——jar包详解(转)
Spring——jar包详解 org.springframework.aop ——Spring的面向切面编程,提供AOP(面向切面编程)的实现 org.springframework.asm——spr ...
- spring原理案例-基本项目搭建 02 spring jar包详解 spring jar包的用途
Spring4 Jar包详解 SpringJava Spring AOP: Spring的面向切面编程,提供AOP(面向切面编程)的实现 Spring Aspects: Spring提供的对Aspec ...
随机推荐
- maven和gradle环境变量配置及idea相关的设置
1.maven 环境变量添加之后,重新打开cmd窗口,验证是否配置成功. idea File >> Settings idea配置之后的验证: 2.gradle 环境变量添加之后,重新 ...
- echarts 各种特效图
饼图标签展示数值 配置项: option = { title: { text: '项目时间分布', left: 'center' }, tooltip: { trigger: 'item', form ...
- spring事务传递特性-REQUIRES_NEW和NESTED
spring对于事务的实现的确是它的一大优点,节省了程序员不少时间. 关于事务,有许多可以聊的内容,例如实现方式.实现原理.传递特性等. 本文讨论传递特性中的REQUIRES_NEW,NESTED. ...
- PPP协议简介
转载出处:https://blog.csdn.net/csucxcc/article/details/1684416 PPP(Point-to-Point Protocol)协议是在SLIP的基础上发 ...
- 颠覆传统编程,用ChatGPT十倍提升生产力
我们即将见证一个新的时代!这是最好的时代,也是最坏的时代! 需求背景 背景: 平时会编写博客,并且会把这个博客上传到github上,然后自己买一个域名挂到github上. 我平时编写的博客会有一些图片 ...
- Chrome插件:Vue.js Devtools 高效地开发和调试
在现代前端开发中,Vue.js因其灵活性和性能优势,受到越来越多开发者的青睐.然而,随着项目规模的扩大,调试和优化变得愈发复杂.幸运的是,Vue.js Devtools的出现,为开发者提供了一套强 ...
- 嵌入式工业开发板基础测试手册——基于NXP iMX6ULL开发板(1)
前 言 本文档适用开发环境: Windows开发环境:Windows 7 64bit.Windows 10 64bit 虚拟机:VMware15.1.0 Linux开发环境:Ubuntu18.04.4 ...
- FFmpeg开发笔记(三十八)APP如何访问SRS推流的RTMP直播地址
<FFmpeg开发实战:从零基础到短视频上线>一书在第10章介绍了轻量级流媒体服务器MediaMTX,通过该工具可以测试RTSP/RTMP等流媒体协议的推拉流.不过MediaMTX的功能 ...
- Python 基于lxml.etree实现xpath查找HTML元素
基于lxml.etree实现xpath查找HTML元素 By:授客 QQ:1033553122 #实践环境 WIN 10 Python 3.6.5 lxml-4.6.2-cp36-cp36m-win_ ...
- Springboot层级关系以及作用
entity entity是实体层,与model,pojo相似,是存放实体的类,类中定义了多个类属性,并且与数据库表的字段保持一致,一张表对应了一个entity类.主要用于定于与数据库对象对应的属性, ...