
使用windows自带linux子系统开发esp32
步骤:
1.打开windows商店,搜索ubuntu,安装18.04版本。
2.控制面板 /程序和功能 /打开或关闭windows功能
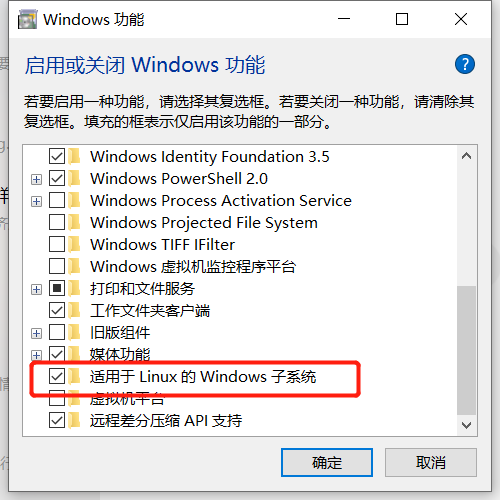
3.关机重启
4.打开刚安装得ubuntu,设置用户名和密码。
5.更换为清华源,以提高安装软件得数据。https://mirror.tuna.tsinghua.edu.cn/help/ubuntu/
Ubuntu 的软件源配置文件是 /etc/apt/sources.list。将系统自带的该文件做个备份,将该文件替换为下面内容,即可使用 TUNA 的软件源镜像。
# 默认注释了源码镜像以提高 apt update 速度,如有需要可自行取消注释

deb https://mirrors.tuna.tsinghua.edu.cn/ubuntu/ bionic main restricted universe multiverse

# deb-src https://mirrors.tuna.tsinghua.edu.cn/ubuntu/ bionic main restricted universe multiverse

deb https://mirrors.tuna.tsinghua.edu.cn/ubuntu/ bionic-updates main restricted universe multiverse

# deb-src https://mirrors.tuna.tsinghua.edu.cn/ubuntu/ bionic-updates main restricted universe multiverse

deb https://mirrors.tuna.tsinghua.edu.cn/ubuntu/ bionic-backports main restricted universe multiverse

# deb-src https://mirrors.tuna.tsinghua.edu.cn/ubuntu/ bionic-backports main restricted universe multiverse

deb https://mirrors.tuna.tsinghua.edu.cn/ubuntu/ bionic-security main restricted universe multiverse

# deb-src https://mirrors.tuna.tsinghua.edu.cn/ubuntu/ bionic-security main restricted universe multiverse

# 预发布软件源,不建议启用

# deb https://mirrors.tuna.tsinghua.edu.cn/ubuntu/ bionic-proposed main restricted universe multiverse

# deb-src https://mirrors.tuna.tsinghua.edu.cn/ubuntu/ bionic-proposed main restricted universe multiverse
sudo apt-get update 更新源sudo apt-get upgrade 更新软件
6.新建esp目录
cd ~

mkdir esp
7.将下载好的esp-idf复制到linux,windows得盘符在目录 /mnt/c d ...等
blue@%#*¥&#%¥&6$:~/esp/esp-idf$ cp /mnt/d/esp32/esp-idf-v4.0.zip .
8.安装unzip解压软件并解压,更名
sudo apt install unzip

unzip esp-idf-v4.0.zip

mv esp-idf-v4.0 esp-idf
9.安装所需得软件包
sudo apt-get install git wget flex bison gperf python python-pip python-setuptools python-serial python-click python-cryptography python-future python-pyparsing python-pyelftools cmake ninja-build ccache libffi-dev libssl-dev
10.继续安装
sudo apt-get install gawk gperf grep gettext libncurses-dev python python-dev automake bison flex texinfo help2man libtool make
11.安装解压好的esp-idf
cd ~/esp/esp-idf

sh install.sh
12.设置环境变量
刚才安装的xtensa-esp32-elf在目录 ~/.espressif/tools/xtensa-esp32-elf/esp-2019r2-8.2.0/xtensa-esp32-elf
在 ~/.barchrc中,将工具和esp-idf添加到PATH中
cd ~

vi .barhrc
在最后添加:
export PATH="$HOME/.espressif/tools/xtensa-esp32-elf/esp-2019r2-8.2.0/xtensa-esp32-elf/bin:$PATH"

export IDF_PATH="$HOME/esp/esp-idf"
:wq 保存退出
exit 推出终端,并重新打开,让PATH生效。
13.拷贝hello_world测试
cd ~/esp

cp -r esp-idf/examples/get-started/hello_world/ .

make
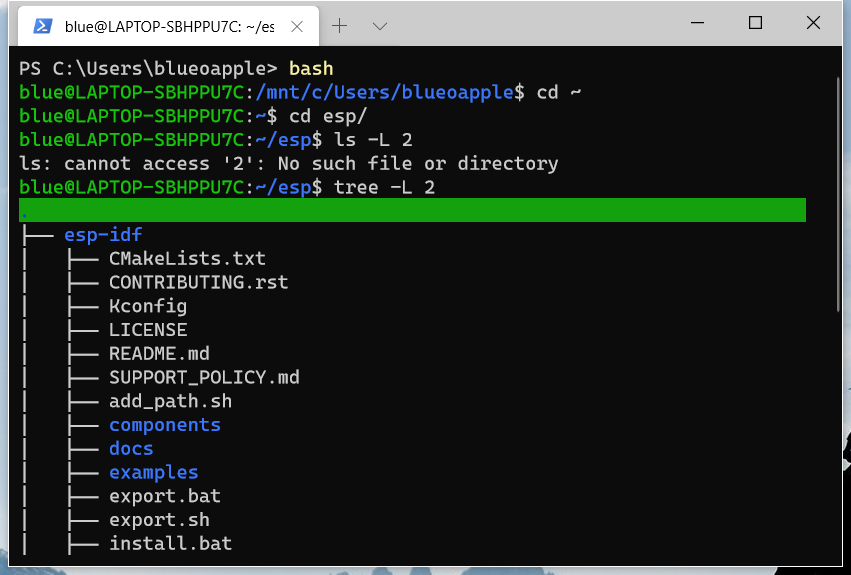
14.推荐一个比较好用的 终端Windows Terminal,可在商店获取,输入bash即可启动 linux,如下:
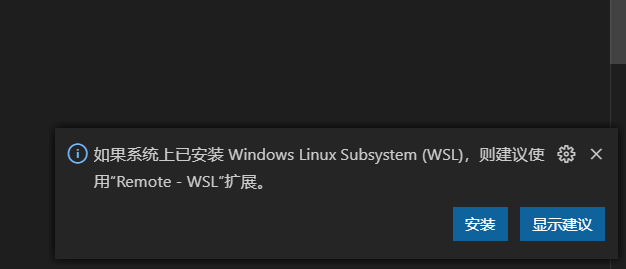
15.配合 vscode使用,可安装WSL插件,可通过该插件通过linux编译本地项目,vscode的默认终端改为wsl.exe。
"terminal.integrated.shell.windows": "C:\\Windows\\System32\\wsl.exe",
使用windows自带linux子系统开发esp32的更多相关文章
- WSL(Windows上的Linux子系统)
WSL(Windows上的Linux子系统) WSL,Windows Subsystem for Linux,就是之前的Bash on [Ubuntu on] Windows(嗯,微软改名部KPI++ ...
- Windows 10 下 Linux 子系统的安装和使用
介绍 适用于 Windows 的 Linux 子系统(英语:Windows Subsystem for Linux,简称 WSL)是一个为在 Windows 10 和 Windows Server 2 ...
- Windows下的Linux子系统安装,WSL 2下配置docker
Windows下的Linux子系统安装,WSL 2下配置docker 前提条件: 安装WSL 2需要Windows 10版本是Build 18917或更高,首先先确认系统版本已升级. 在“启用或关闭W ...
- 在Windows下配置Linux远程开发环境
在Windows下配置Linux远程开发环境 欢迎光临我的个人博客 https://source.chens.life/Configure-Linux-remote-development-envir ...
- windows 下使用Linux子系统
在 Windows 上进行 web 开发,比较普遍的方案是使用 phpstudy 或者别的一些集成环境软件进行环境搭建,写好代码后将代码上传至版本管理工具 git/svn,再将代码同步到 Linux ...
- 关于WSL(Windows上的Linux子系统)的介绍
WSL,Windows Subsystem for Linux,就是之前的Bash on [Ubuntu on] Windows(嗯,微软改名部KPI++ 首先要说一句,其实Windows 10在一周 ...
- 关于WSL(Windows上的Linux子系统)的简单介绍及安装
WSL,Windows Subsystem for Linux,就是之前的Bash on [Ubuntu on] Windows(嗯,微软改名部KPI++),在wsl环境下我们可以运行一些Linux程 ...
- Windows下的Linux子系统
强调!!!必须是Windows专业版!!! 一.安装运行过程 第一步:打开开发人员模式 第二步:进入 '控制面板 '--'程序'--'启用的Windows功能'--勾选Linux子系统(根据提示进行重 ...
- WSL2:Windows 亲生的 Linux 子系统
作 者:道哥,10+年的嵌入式开发老兵. 公众号:[IOT物联网小镇],专注于:C/C++.Linux操作系统.应用程序设计.物联网.单片机和嵌入式开发等领域. 公众号回复[书籍],获取 Linux. ...
随机推荐
- 《Spring Boot 实战纪实》之过滤器
导航 什么是过滤器 Spring的过滤器 Filter定义 过滤的对象 典型应用 过滤器的使用 Filter生命周期 过滤器链 自定义敏感词过滤器 新增自定义过滤器 添加 @WebFilter注解 添 ...
- Linux性能优化实战(一)
一.优化方向 1,性能指标 从应用负载的视角出发,考虑"吞吐"和"延时" 从系统资源的视角出发,考虑资源使用率.饱和度等 2,性能优化步骤 选择指标评估应用程序 ...
- 使用Typora+PicGo实现图片自动上传到Gitee图床
一.前言 我们在使用Typora编辑器时,会加上图片,有个弊端,只能在本地访问,你发送给别人就无法查看图片,当然可以导出pdf.小编这边的需求是这样的,自己搭建的一个博客系统,基于Hexo搭建的,这个 ...
- STC8H开发(九): STC8H8K64U模拟USB HID外设
目录 STC8H开发(一): 在Keil5中配置和使用FwLib_STC8封装库(图文详解) STC8H开发(二): 在Linux VSCode中配置和使用FwLib_STC8封装库(图文详解) ST ...
- Tomcat临时目录及java.io.tmpdir对应的目录
最近客户现场的技术支持接连反馈了一个问题:导入数据的时候,上传的excel会在服务器上生成一个临时文件,而这个临时文件都在 tomcat 的安装目录下,如果上传次数比较多的话,就会导致tomcat安 ...
- java实现多线程生产者消费者模式
1.概念 生产者消费者模式就是通过一个容器来解决生产者和消费者的强耦合问题.生产者和消费者彼此之间不直接通讯,而通过阻塞队列来进行通讯,所以生产者生产完数据之后不用等待消费者处理,直接扔给阻塞队列,消 ...
- Td 内容不换行,超过部分自动截断,用...表示
转载请注明来源:https://www.cnblogs.com/hookjc/ <table width="200px" style="table-layout:f ...
- div置顶
转载请注明来源:https://www.cnblogs.com/hookjc/ <!DOCTYPE html PUBLIC "-//W3C//DTD XHTML 1.0 Transit ...
- web项目获取全路径、端口、项目名等
感谢大佬:https://blog.csdn.net/u010180031/article/details/52369537 request.getSchema(),返回的是当前连接使用的协议,一般应 ...
- MySQL-MMM高可用架构
MySQL-MMM高可用架构 目录 MySQL-MMM高可用架构 一.MMM 1. MMM的概述 2. MMM的应用场景 3. MMM的特点 4. 关于MMM高可用架构的说明 5. 用户及授权 二.案 ...