【Spring Framework】Spring入门教程(三)使用注解配置
本文主要介绍四个方面:
(1) 注解版本IOC和DI
(2) Spring纯注解
(3) Spring测试
(4) SpringJDBC - Spring对数据库的操作
使用注解配置Spring入门
说在前面
学习基于注解的IoC配置,大家脑海里首先得有一个认知,即注解配置和xml配置要实现的功能都是一样的,都是要降低模块间的耦合度。仅仅只是配置的形式不一样。
关于实际的开发中到底使用xml还是注解,每家公司有着不同的使用习惯。所以这两种配置方式我们都需要掌握。
基于注解配置的方式也已经逐渐代替xml配置。所以我们必须要掌握使用注解的方式配置Spring。
配置步骤
注意:如果使用Eclipse需要先安装了STS插件,或者使用STS开发工具创建项目。本文使用IDEA进行演示。
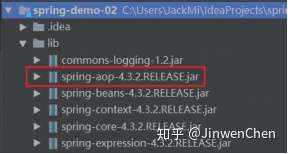
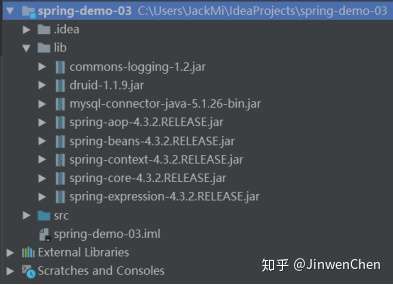
1.2.1. 第一步:拷贝必备jar包到工程的lib目录。
注意:在基于注解的配置中,我们还要多拷贝一个aop的jar包。如下图:
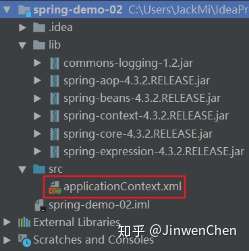
1.2.2. 第二步:在类的根路径下创建一个任意名称的xml文件(不能是中文)
注意:基于注解整合时,Spring配置文件导入约束时需要多导入一个context命名空间下的约束。
<?xml version="1.0" encoding="UTF-8"?>

<beans xmlns="http://www.springframework.org/schema/beans"

       xmlns:xsi="http://www.w3.org/2001/XMLSchema-instance"

       xmlns:context="http://www.springframework.org/schema/context"

       xsi:schemaLocation="http://www.springframework.org/schema/beans

       http://www.springframework.org/schema/beans/spring-beans.xsd

       http://www.springframework.org/schema/context

       http://www.springframework.org/schema/context/spring-context.xsd">

</beans>
1.2.3. 第二步:创建一个服务类
创建一个测试的服务类,并且加入使用@Component注解,声明该类允许注入到Spring容器
package org.cjw.service;

import org.springframework.stereotype.Component;

/*

    使用注解配置时,需要将Spring框架启动就创建对象的类表示为组件类

    表示组件类使用@Component注解

 */

@Component

public class CustomerService {

    public void save() {

        System.out.println("-保存数据-");

    }

}
1.2.4. 第四步在spring的配置文件加入扫描注解
<?xml version="1.0" encoding="UTF-8"?>

<beans xmlns="http://www.springframework.org/schema/beans"

       xmlns:xsi="http://www.w3.org/2001/XMLSchema-instance"

       xmlns:context="http://www.springframework.org/schema/context"

       xsi:schemaLocation="http://www.springframework.org/schema/beans

       http://www.springframework.org/schema/beans/spring-beans.xsd

       http://www.springframework.org/schema/context

       http://www.springframework.org/schema/context/spring-context.xsd">

    <!-- 声明扫描包及其子包的类,如果发现有组件注解的类,就创建对象并加入到容器中去 -->

    <context:component-scan base-package="org.cjw" />

</beans>
1.2.5. 第五步:测试调用代码
package org.cjw.test;

import org.cjw.service.CustomerService;

import org.junit.Test;

import org.springframework.context.ApplicationContext;

import org.springframework.context.support.ClassPathXmlApplicationContext;

public class CustomerServiceTest {

    @Test

    public void testSave() {

        ApplicationContext context = new ClassPathXmlApplicationContext("applicationContext.xml");

        CustomerService customerService = context.getBean(CustomerService.class);

        customerService.save();

    }

}
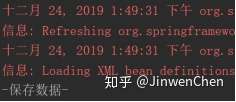
--测试结果,如果可以调用服务方法,测试成功。
1.2.6. 设置注解扫描的组件的名称
默认情况下,被注解@Component 扫描的类的名称就是当前类名的首字母小写名称,开发者可以自定义组件的名称。
--组件类
package org.cjw.service;

import org.springframework.stereotype.Component;

/*

    使用注解的方式配置IOC:

        标注了@Component注解表示当前类被Spring管理,Spring框架启动的时候就会创建此类的对象到spring容器中去

    设置当前Bean的名称:

        默认当前Bean的名称就是简单类名的首字母小写(customerService)

        @Component注解的value属性可以自定义组件的名称,等价于<bean id/name="bean名称" />

        @Component(value="service")表示将bean的名称设置service

        当注解的属性只有一个,并且名为value的时候,可以省略value,

        即@Component(value="service")等价于@Component("service")

 */

@Component("service")

public class CustomerService {

    public void save() {

        System.out.println("-保存数据-");

    }

}
--测试代码
Test

public void testSave() {

    ApplicationContext context = new ClassPathXmlApplicationContext("applicationContext.xml");

    CustomerService customerService = (CustomerService) context.getBean("service");

    customerService.save();

}
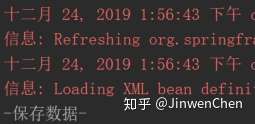
--测试结果
Spring常用注解说明
2.1. 用于对象的注解-组件注解
我们将用于被扫描创建对象的注解,统称为组件注解。
组件包括:@Controller、@Service、@Repository、@Component。
组件注解的功能就是标识那些在Spring框架启动时,需要创建对象并保存在IOC容器中的类。意味着,只有加了这四个注解中的任何一个注解的类,在Spring框架启动的时候,Spring就通过配置文件指定的路径将该路径下的所有带组件注解的类创建对象并且放在容器里面。
组件注解的功能类似原来配置文件的<bean>标签。
问题:明明一个@Component注解就可以满足了扫描的需要,为什么要有四个呢?
答:其实Spring第一版注解的实现(spring 2.5),只有@Component组件注解。从spring3.0以后,作者认为根据分层的需要,把它拆成了四个。为了可以让开发人员可见即可得,一看到注解,立即知道类的性质。所以分成了四个。
@Controller:用于声明表示层的组件注解
@Service:用于声明服务层的组件注解
@Repository:用于声明持久层的组件注解
@Component:用于声明三层以外的组件注解
问题:那么,这四个注解交换使用会报错吗。如:持久层,我放@Service标记。
答:@Controller在SpringMVC里面有强制的要求,SpringMVC的表示层必须使用@Controller组件注解。其他情况,用乱了是不会报错的,不过我们必须不能用乱。不遵守规范,不然别人就无法跟我们一起开发了。
2.1.1. @Scope用于设置对象的生命周期注解
Xml配置需要配置对象的作用范围
<bean id="" class="" scope="作用域"/>
如果使用注解配置bean,那么bean的作用范围也需要使用注解配置。
@Scope("作用范围")
singleton:单例,在ioc容器中仅存在一个Bean实例(默认的scope)。
prototype:多例,每次从容器中调用Bean时,都返回一个新的实例,即每次调用getBean()时 ,相当于执行newInstance(),并且ioc容器不会管理多例对象。
request:用于web开发,将Bean放入request作用域中,request.setAttribute("xxx") , 在同一个request对象中获取同一个Bean。
session:用于web开发,将Bean 放入Session作用域中,在同一个Session对象中获取同一个Bean。
--组件代码
@Component("customerService")

@Scope("singleton")

public class CustomerService {

}

@Service("customerService2")

@Scope("prototype")

public class CustomerService2 {

}
--测试代码
 @Test

public void testSave() {

    ApplicationContext context = new ClassPathXmlApplicationContext("applicationContext.xml");

    CustomerService customerService = (CustomerService) context.getBean("customerService");

    CustomerService customerService2 = (CustomerService) context.getBean("customerService");

    System.out.println("singleton: " + (customerService == customerService2));

    CustomerService2 customerService3 = (CustomerService2) context.getBean("customerService2");

    CustomerService2 customerService4 = (CustomerService2) context.getBean("customerService2");

    System.out.println("prototype: " + (customerService3 == customerService4));

}
--测试结果
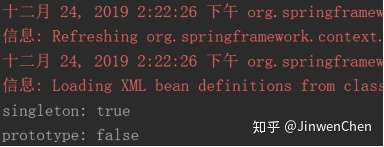
在开发中主要使用 scope="singleton"、 scope="prototype"
对于MVC中的Action/Controller使用prototype类型,其他使用singleton。
2.1.2. @PostConstruct @PreDestroy初始化和销毁方法注解
在xml配置中可以配置对象的初始化方法和销毁方法。
<bean id="someBean" class="org.cjw.pojo.SomeBean"

      init-method="init"

      destroy-method="destory"/>
如果使用注解配置bean,那么bean的作用范围也需要使用注解配置。
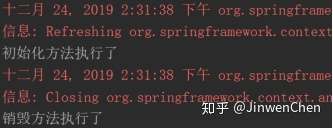
@PostConstruct // 相当于<bean init-method="init" />

public void init() {

    System.out.println("初始化方法执行了");

}

@PreDestroy// 相当于<bean destroy-method="destory" />

public void destory() {

    System.out.println("销毁方法执行了");

}
--测试代码
@Test

public void testXml() {

    ClassPathXmlApplicationContext context = new ClassPathXmlApplicationContext("applicationContext.xml");

    context.close();

}
--测试结果
用于依赖注入的注解
回顾:XML配置文件使用<property name=”” value/ref=””>、<constructor-arg name="" value/ref="" />实现setter注入和构造注入。通过注入注解也可以实现DI。
Spring提供了两套注解可以解决对象依赖注入的方案:
1. @Autowired +@Qualifier():是Spring定义的标签
2. @Resouce:是JavaEE的规范
2.2.1. @Autowired注解
@Autowired注解:用于标识需要依赖注入的对象属性。
@Autowired注解贴在字段或者setter方法上。
默认情况下@Autowired注解必须要能找到对应的对象,否则报错。不过,可使用required=false来避免该问题:
@Autowired(required=false)@Autowired找bean的方式:
(1) 首先按照依赖对象的类型找,如果只找到一个则使用字段或者setter方法直接注入。
(2) 如果在Spring上下文中找到多个匹配的类型,则再按照名字去找,如果没有匹配则报错(NoSuchBeanDefinitionException)。
(3) 可以通过使用@Qualifier("otherBean")注解来规定依赖对象按照类型+bean的id去找。
使用@Autowired注入的三种情况
2.2.1.1. 字段注入
@Controller("customerController")

public class CustomerController {

    // 反射字段直接注入:Field.set(obj, value);

    @Autowired

    private CustomerService customerService;

    public void save() {

        customerService.save();

    }

}
2.2.1.2. setter方法注入
@Controller("customerController")

public class CustomerController {

    private CustomerService customerService;

    // 如果将@Autowired放在方法的上面,意思就是将对象注入到该方法的参数

    // 意味着,spring会自动根据参数类型匹配容器中对应的对象给这个方法

    // 能够使用@Autowired注解的方法必须是有参数的

    @Autowired

    public void setCustomerService(CustomerService customerService) {

        // 问题:加了@Autowired注解的方法在什么时候执行?

        // 加了@Autowired注解的方法在创建完spring容器之后就会立即执行

        System.out.println("-setCustomerService被执行了-");

        this.customerService = customerService;

    }

    public void save() {

        customerService.save();

    }

}
2.2.1.3. 构造器注入
@Controller("customerController")

public class CustomerController {

    private CustomerService customerService;

    /*

    * 方式三 : 构造器注入

    * 使用注解的IOC创建bean的情况下

    * 默认bean中有什么样的构造器,spring就调用那个构造器去创建对应的bean对象

    * 并且会自动注入构造器中对应类型参数的对象

    *

    * 问题: 如果构造函数有多个,默认会无参构造

    * 解决方案:只提供有参构造

    *

     * 问题: 如果构造函数的参数类型对应的bean有多个,会抛出异常

    * org.springframework.beans.factory.NoUniqueBeanDefinitionException 不是唯一的bean异常

    * 解决方案: 在参数前面 使用 @Qualifier("service1") 注解

    * 从多个bean 获取指定 id 对应的bean即可

    */

    public CustomerController(@Qualifier("customerService") CustomerService customerService) {

        System.out.println("-CustomerController构造器被执行了-");

        this.customerService = customerService;

    }

    public void save() {

        customerService.save();

    }

}
2.2.2. @Qualifier注解
@Qualifier注解:用于指定注入的对象名,使用@Autowired注入对象时,@Autowired没有指定对象名的属性,只能通过@Qualifier注解来指定对象名。
value属性:指定注入Spring容器中对应对象名的对象。
@Controller("customerController")

public class CustomerController {

    @Autowired

    @Qualifier("customerService")

    private CustomerService customerService;

    public void save() {

        customerService.save();

    }

}
2.2.3. @Resource注解
@Resource注解是Spring框架支持Sun官方制定的JSR-250标准注入对象的实现。
JSR-250就是Sun公司制定,对注入的对象的标准。
@Resource功能等同@Autowired + @Qualifier等同配置文件标签<proprty name="..." ref="...">
@Resource注解:用于给引用注入容器的对象,可以通过name属性指定对象名。
注意事项:@Resource只能使用字段和setter注入,不能使用构造注入。
2.2.3.1. 字段注入
@Controller("customerController")

public class CustomerController {

    // 类型+id注入

    @Resource(name = "customerService")

    private CustomerService customerService;

    public void save() {

        customerService.save();

    }

}
2.2.3.2. setter方法注入
@Controller("customerController")

public class CustomerController {

    private CustomerService customerService;

    // 类型+id

    @Resource(name = "customerService")

    public void setCustomerService(CustomerService customerService) {

        this.customerService = customerService;

    }

    public void save() {

        customerService.save();

    }

}
2.2.4. @Value注解
property标签中的value属性只能注入基本数据类型、包装类型、String类型。
@Value注解:注入基本数据类型以及它们的包装类和String类型数据的,支持${}注入properties文件的键值对,等同 <proprty name="..." value="${Key}" />。
2.2.4.1. 案例代码
--db.properties文件(在src路径下创建)
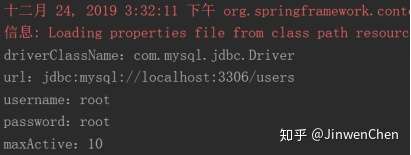
jdbc.driverClassName=com.mysql.jdbc.Driver

jdbc.url=jdbc:mysql://localhost:3306/users

jdbc.username=root

jdbc.password=root

jdbc.macActive=10
--在applicationContext.xml配置文件中加载db.properties
<?xml version="1.0" encoding="UTF-8"?>

<beans xmlns="http://www.springframework.org/schema/beans"

       xmlns:xsi="http://www.w3.org/2001/XMLSchema-instance"

       xmlns:context="http://www.springframework.org/schema/context"

       xsi:schemaLocation="http://www.springframework.org/schema/beans

       http://www.springframework.org/schema/beans/spring-beans.xsd

       http://www.springframework.org/schema/context

       http://www.springframework.org/schema/context/spring-context.xsd">

    <!-- 声明扫描包及其子包的类,如果发现有组件注解的类,就创建对象并加入到容器中去 -->

    <context:component-scan base-package="org.cjw" />

    <!-- 加载classpath下的db.properties配置文件 -->

    <context:property-placeholder location="classpath:db.properties"/>

</beans>
--UserDaoImpl代码
@Repository

public class UserDaoImpl {

    /**

     * @Value(value="")

     * 可以从Spring容器读取 .properties 配置文件内容

     * value :配置文件的对应的key -->使用 ${key} 获取

     * 程序运行中自动将 properties的key对应的value值获取出来设置给字段

     */

    @Value("${jdbc.driverClassName}")

    private String driverClassName;

    @Value("${jdbc.url}")

    private String url;

    @Value("${jdbc.username}")

    private String username;

    @Value("${jdbc.password}")

    private String password;

    @Value("${jdbc.maxActive}")

    private String maxActive;

    public void testValueAnnotation() {

        System.out.println("driverClassName:" + driverClassName);

        System.out.println("url:" + url);

        System.out.println("username:" + username);

        System.out.println("password:" + password);

        System.out.println("maxActive:" + maxActive);

    }

}
--测试代码
@Test

public void testXml() {

    ClassPathXmlApplicationContext context = new ClassPathXmlApplicationContext("applicationContext.xml");

    UserDaoImpl userDaoImpl = context.getBean(UserDaoImpl.class);

    userDaoImpl.testValueAnnotation();

}
--测试结果
模拟注册功能(使用注解方式)
3.1. DAO层代码
public interface UserDao {
void register(User user);
}
@Repository
public class UserDaoImpl implements UserDao {
@Override
public void register(User user) {
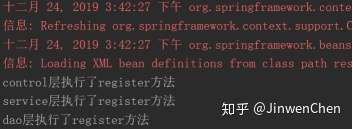
System.out.println("dao层执行了register方法");
}
}
3.2. Service层代码
public interface UserService {

    void register(User user);

}

@Service

public class UserServiceImpl implements UserService {

    @Resource(name = "userDaoImpl")

    private UserDao userDao;

    @Override

    public void register(User user) {

        System.out.println("service层执行了register方法");

        userDao.register(user);

    }

}
3.3. 表现层代码
@Controller

public class UserController {

    @Autowired

    @Qualifier("userServiceImpl")

    private UserService userService;

    public void register() {

        System.out.println("control层执行了register方法");

        User user = new User();

        userService.register(user);

    }

}
3.4. 测试代码
@Test

public void testXml() {

    ClassPathXmlApplicationContext context = new ClassPathXmlApplicationContext("applicationContext.xml");

    UserController userController = context.getBean(UserController.class);

    userController.register();

}
3.5. 测试结果
3.6. applicationContext.xml
配置文件(只需要配置一个包扫描即可)
<?xml version="1.0" encoding="UTF-8"?>

<beans xmlns="http://www.springframework.org/schema/beans"

       xmlns:xsi="http://www.w3.org/2001/XMLSchema-instance"

       xmlns:context="http://www.springframework.org/schema/context"

       xsi:schemaLocation="http://www.springframework.org/schema/beans

       http://www.springframework.org/schema/beans/spring-beans.xsd

       http://www.springframework.org/schema/context

       http://www.springframework.org/schema/context/spring-context.xsd">

    <!-- 声明扫描包及其子包的类,如果发现有组件注解的类,就创建对象并加入到容器中去 -->

    <context:component-scan base-package="org.cjw" />

</beans>
纯注解配置
4.1. 问题
我们发现,之所以我们现在离不开xml配置文件,是因为我们有一句很关键的配置:
<context:component-scan base-package="cn.zj.spring" />
如果他要是也能用注解配置,那么我们就可以脱离xml文件了。
通过@Configuration注解和@ComponentScan注解
模拟注册功能(纯注解方式)
5.1. 说明
需求:创建一个配置类使用@Configuration注解和@ComponentScan注解替换xml文件。
5.2. 第一步:创建一个Java项目
创建一个Java项目,导入必须的jar包以及编写好需要的类结构。代码目录如下:
5.3. 第二步:在classpath下创建db.properties配置文件
jdbc.driverClassName=com.mysql.jdbc.Driver

jdbc.url=jdbc:mysql://localhost:3306/users

jdbc.username=root

jdbc.password=root

jdbc.maxActive=10
5.4. 第三步:编写配置类代码
--通过该配置类的代码替换掉Spring配置文件
@Configuration // xml配置文件

@PropertySource("classpath:db.properties") // 代替了<contenxt:property-placeholder/>

@ComponentScan(basePackages = "org.cjw") // 代替了<contenxt:component-scan/>

public class SpringConfig {

    @Value("${jdbc.driverClassName}") // 代替了<property>

    private String driverClassName;

    @Value("${jdbc.url}")

    private String url;

    @Value("${jdbc.username}")

    private String username;

    @Value("${jdbc.password}")

    private String password;

    @Value("${jdbc.maxActive}")

    private String maxActive;

    @Bean(name = "dataSource")  // 代替了<bean/>

    public DataSource getDataSource() {

        DruidDataSource dataSource = new DruidDataSource();

        dataSource.setDriverClassName(driverClassName);

        dataSource.setUrl(url);

        dataSource.setUsername(username);

        dataSource.setPassword(password);

        dataSource.setMaxActive(Integer.valueOf(maxActive));

        return dataSource;

    }

}
5.5. 第四步:编写三层代码
5.5.1. 表示层
@Controller

public class UserController {

    @Autowired

    @Qualifier("userServiceImpl")

    private UserService userService;

    public void register() {

        System.out.println("control层register方法执行了");

        User user = new User();

        userService.register(user);

    }

}
5.5.2. 服务层
public interface UserService {

    void register(User user);

}

@Service

public class UserServiceImpl implements UserService {

    @Resource(name = "userDaoImpl")

    private UserDao userDao;

    @Override

    public void register(User user) {

        System.out.println("service层register方法执行了");

        userDao.register(user);

    }

}
5.5.3. 持久层
public interface UserDao {

    void register(User user);

}

@Repository

public class UserDaoImpl implements UserDao {

    @Autowired

    private DataSource dataSource;

    @Override

    public void register(User user) {

        try {

            System.out.println("dao层register方法执行了");

            Connection conn = dataSource.getConnection();

            System.out.println(conn);

        } catch (SQLException e) {

            e.printStackTrace();

        }

    }

}
5.6. 第五步:测试代码
@Test

public void testRegister() {

    ApplicationContext context = new AnnotationConfigApplicationContext(SpringConfig.class);

    UserController userController = context.getBean(UserController.class);

    userController.register();

}
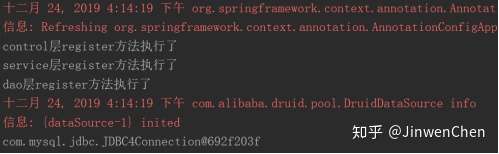
5.7. 第六步:测试结果
输出组件类调用方法的输出值,配置成功。
Spring的测试
6.1. 传统的测试
存在问题:
每个测试都要重新启动Spring容器,启动容器的开销大,测试效率低下。
不应该是测试代码管理Spring容器,应该是Spring容器在管理测试代码。
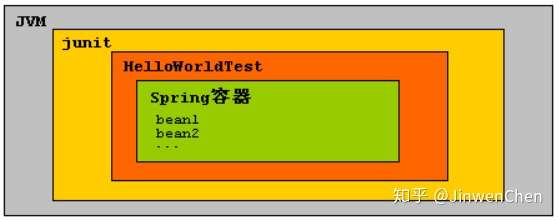
6.1.1. 正确使用Spring的测试
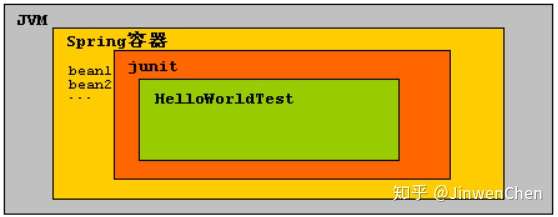
6.2. 如何使用Spring测试
6.2.1. 导入spring测试的jar包

Spring测试必须保证单元测试的最低版本是4.12版本,如果使用的IDE版本很低,那么IDE自带的单元测试版本可能低于4.12,那么需要开发者手动导入单元测试的jar包。
如果使用Spring测试,必须使用两个注解:
@RunWith注解:表示先启动Spring容器,把junit运行在Spring容器中。
@ContextConfiguration注解:加载资源文件,默认从src(源目录)下面加载。
6.2.2. XML方式的配置
@ContextConfiguration(value)
value属性: 读取classpath下的配置文件。
PS:只要是spring读取配置文件,都必须加上classpath:前缀。
@RunWith(SpringJUnit4ClassRunner.class)

@ContextConfiguration("classpath:applicationContext.xml")

public class UserControllerTest {

    @Autowired

    private ApplicationContext context;

    public void testRegister() {

        UserController userController = context.getBean(UserController.class);

        userController.register();

    }

}
6.2.3. 纯注解方式的配置
@ContextConfiguration(classes)
classes 属性: 读取配置类。
@RunWith(SpringJUnit4ClassRunner.class)

@ContextConfiguration(classes = SpringConfig.class)

public class UserControllerTest {

    @Autowired

    private ApplicationContext context;

    public void testRegister() {

        UserController userController = context.getBean(UserController.class);

        userController.register();

    }

}
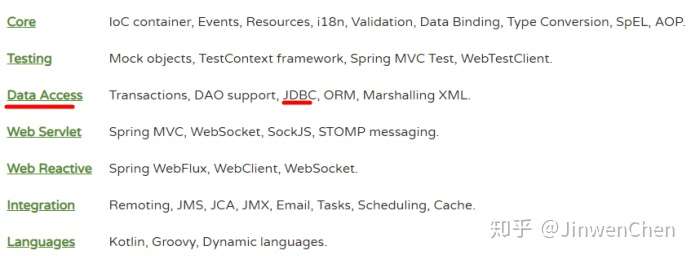
Spring的JDBC操作
Spring框架也支持JDBC,对JDBC只进行了薄薄的一层封装。
问题: Java开发已经有JDBC,为什么Spring还要支持JDBC操作呢?
最重要的原因: Spring操作JDBC能自动管理事务。
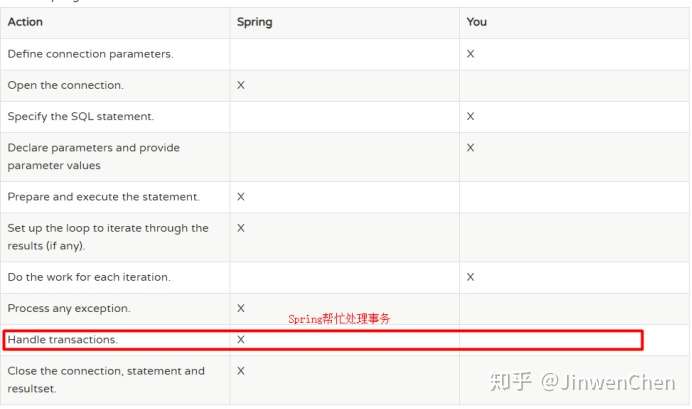
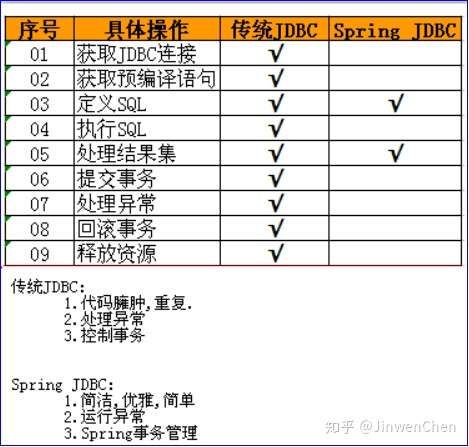
原生的JDBC一套代码下来,很沉重,很多的代码都是相同、相似的,因此可以将这些代码进行封装,仅仅把那些复杂多变的代码交由开发者来完成,如sql语句的编写、结果集的处理,这就是SpringJDBC,仅仅只是对原生JDBC进行一层薄薄的封装、并且自动管理事务。但是结果集的处理部分还是交由开发者来完成,而且结果集的处理代码编写是非常头痛的,所以在目前javaWeb开发中,持久层的处理并没有使用SpringJDBC,而是使用半自动映射的MyBatis框架或者全自动映射的Hibernate。
7.1. 前期准备
操作数据部分使用SpringJDBC,其他部分业务逻辑代码不变。
--创建数据库 spring_jdbc
--创建数据表 t_user
CREATE TABLE `t_user` (

  `id` int(11) NOT NULL AUTO_INCREMENT,

  `name` varchar(20) DEFAULT NULL,

  `email` varchar(50) DEFAULT NULL,

  PRIMARY KEY (`id`)

) ENGINE=InnoDB DEFAULT CHARSET=utf8;
--创建对应的domain对象
package org.cjw.pojo;

public class User {

    private Integer id;

    private String name;

    private String email;

    // 省略get、set、toString、有参构造、无参构造方法

}
--创建DAO层
@Repository

public class UserDaoImpl implements UserDao {

    @Override

    public void save(User user) {}

    @Override

    public void delete(Integer id) {}

    @Override

    public void update(User user) {}

    @Override

    public User findById(Integer id) {

        return null;

    }

}
--创建Service层
@Service

public class UserServiceImpl implements UserService {

    @Resource(name = "userDaoImpl")

    private UserDao userDao;

    @Override

    public void save(User user) {

        userDao.save(user);

    }

    @Override

    public void delete(Integer id) {

        userDao.delete(id);

    }

    @Override

    public void update(User user) {

        userDao.update(user);

    }

    @Override

    public User findById(Integer id) {

        return userDao.findById(id);

    }

}
--测试代码(XML方式)
@RunWith(SpringJUnit4ClassRunner.class)

@ContextConfiguration("classpath:applicationContext.xml")

public class UserServiceTest {

    @Autowired

    private UserService userService;

    @Test

    public void testSave() {

        User user = new User(null, "赵六", "zhaoliu@qq.com");

        userService.save(user);

    }

    @Test

    public void testDelete() {

        userService.delete(4);

    }

    @Test

    public void testUpdate() {

        User user = new User(2, "lisi", "lisi123123@qq.com");

        userService.update(user);

    }

    @Test

    public void testFindById() {

        User user = userService.findById(1);

        System.out.println(user);

    }

}
--ApplicationContext.xml配置
<?xml version="1.0" encoding="UTF-8"?>

<beans xmlns="http://www.springframework.org/schema/beans"

       xmlns:xsi="http://www.w3.org/2001/XMLSchema-instance"

       xmlns:context="http://www.springframework.org/schema/context"

       xsi:schemaLocation="http://www.springframework.org/schema/beans

       http://www.springframework.org/schema/beans/spring-beans.xsd

       http://www.springframework.org/schema/context

       http://www.springframework.org/schema/context/spring-context.xsd">

    <context:property-placeholder location="classpath:db.properties"/>

    <bean id="dataSource"

          class="com.alibaba.druid.pool.DruidDataSource"

          init-method="init" destroy-method="close">

        <property name="driverClassName" value="${jdbc.driverClassName}"/>

        <property name="url" value="${jdbc.url}"/>

        <property name="username" value="${jdbc.username}"/>

        <property name="password" value="${jdbc.password}"/>

        <property name="maxActive" value="${jdbc.maxActive}"/>

    </bean>

</beans>
--测试代码(注解方式)
@RunWith(SpringJUnit4ClassRunner.class)

@ContextConfiguration(classes = SpringConfig.class)

public class UserServiceTest {

    @Autowired

    private UserService userService;

    @Test

    public void testSave() {

        User user = new User(null, "赵六", "zhaoliu@qq.com");

        userService.save(user);

    }

    @Test

    public void testDelete() {

        userService.delete(4);

    }

    @Test

    public void testUpdate() {

        User user = new User(2, "lisi", "lisi123123@qq.com");

        userService.update(user);

    }

    @Test

    public void testFindById() {

        User user = userService.findById(1);

        System.out.println(user);

    }

}
--配置类SpringConfig
@Configuration // xml配置文件

@PropertySource("classpath:db.properties") // 代替了<contenxt:property-placeholder/>

@ComponentScan(basePackages = "org.cjw") // 代替了<contenxt:component-scan/>

public class SpringConfig {

    @Value("${jdbc.driverClassName}") // 代替了<property>

    private String driverClassName;

    @Value("${jdbc.url}")

    private String url;

    @Value("${jdbc.username}")

    private String username;

    @Value("${jdbc.password}")

    private String password;

    @Value("${jdbc.maxActive}")

    private String maxActive;

    @Bean(name = "dataSource")  // 代替了<bean/>

    public DataSource getDataSource() {

        DruidDataSource dataSource = new DruidDataSource();

        dataSource.setDriverClassName(driverClassName);

        dataSource.setUrl(url);

        dataSource.setUsername(username);

        dataSource.setPassword(password);

        dataSource.setMaxActive(Integer.valueOf(maxActive));

        return dataSource;

    }

}
7.2. JDBCTemplate模板类
Spring提供对应的模板类可以直接操作数据库。

如果使用JDBC就使用JDBCTemplate类(将数据库的基本操作方法已经封装好了,直接调用即可)。
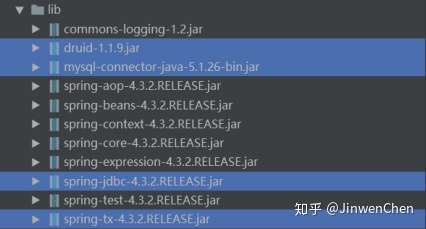
7.2.1. 导入相关jar包
mysql-connector-java-5.x.jar:MySQL驱动包
spring-jdbc-4.3.2.RELEASE.jar:支持JDBC
spring-tx-4.3.2.RELEASE.jar:支持事务
druid1.1.9.jar:连接池
7.2.2. 配置文件配置JDBCTemplate
--Xml方式配置
<!-- 配置jdbcTemplate 模板类  -->

<bean id="jdbcTemplate" class="org.springframework.jdbc.core.JdbcTemplate">

    <!-- setter方法注入数据源 -->

    <property name="dataSource" ref="dataSource" />

</bean>
--注解方式
@Bean

public JdbcTemplate getJdbcTemplate() {

    JdbcTemplate jdbcTemplate = new JdbcTemplate(getDataSource());

    return jdbcTemplate;

}
7.2.3. Dao层代码
@Repository

public class UserDaoImpl implements UserDao {

    @Autowired

    private JdbcTemplate jdbcTemplate;

    @Override

    public void save(User user) {

        jdbcTemplate.update("insert into t_user (name, email) values (?, ?)", user.getName(), user.getEmail());

    }

    @Override

    public void delete(Integer id) {

        jdbcTemplate.update("delete from t_user where id = ?", id);

    }

    @Override

    public void update(User user) {

        jdbcTemplate.update("update t_user set name = ?, email = ? where id = ?", user.getName(), user.getEmail(), user.getId());

    }

    @Override

    public User findById(Integer id) {

        User user = jdbcTemplate.queryForObject("select * from t_user where id = ?", new Object[]{id}, new RowMapper<User>() {

            @Override

            public User mapRow(ResultSet rs, int i) throws SQLException {

                User user = new User();

                user.setId(rs.getInt("id"));

                user.setName(rs.getString("name"));

                user.setEmail(rs.getString("email"));

                return user;

            }

        });

        return user;

    }

}
小结
Spring的IOC和DI的配置可以使用XML配置,也可以注解配置。
内容:使用注解配置。
- 注解配置IOC (控制反转,将对象的创建权交给Spring)-重点
(1) @Component 通用IOC 组件,试用任意Spring对象管理
(2) @Controller 主要在表现层使用
(3) @Service 业务层使用
(4) @Repository DAO层使用
(5) 必须在xml配置包扫描的位置<context:component-scan base-package=”cn.zj.spring”>
(6) Scope 设置对象的生命周期(作用范围)
① Singleton 单例 默认
② Prototype 多例
③ Request Web开发一次请求有效
④ Session Web开发一次会话有效
(7) PostConstructor 初始化方法
(8) PreDestory 销毁方法
- 注解配置DI (依赖注入)注入对象的属性(值,集合,引用)-重点
(1) @Autowired + @Qualifier Spring 框架提供
① 字段注入
② Setter注入
③ 构造器注入
(2) @Resource JavaEE 官方的规范
① 字段注入
② Setter注入
③ 没有构造器注入
- Spring纯注解配置-重点
纯注解配置替代xml配置,但是所有配置依然存在,只是配置方式变换成在类上面贴注解的形式(未来的趋势)--SpringBoot(纯注解)
- Spring测试
(1) 为了更方便的开发Spring程序
- SpringJDBC
(1) 优点:主要能够让Spring自动控制事务
(2) JdbcTemplate 模板类进行数据表的增删改查
【Spring Framework】Spring入门教程(三)使用注解配置的更多相关文章
- Spring框架入门之基于Java注解配置bean
Spring框架入门之基于Java注解配置bean 一.Spring bean配置常用的注解 常用的有四个注解 Controller: 用于控制器的注解 Service : 用于service的注解 ...
- 无废话ExtJs 入门教程三[窗体:Window组件]
无废话ExtJs 入门教程三[窗体:Window组件] extjs技术交流,欢迎加群(201926085) 1.代码如下: 1 <!DOCTYPE html PUBLIC "-//W3 ...
- PySide——Python图形化界面入门教程(三)
PySide——Python图形化界面入门教程(三) ——使用内建新号和槽 ——Using Built-In Signals and Slots 上一个教程中,我们学习了如何创建和建立交互widget ...
- Elasticsearch入门教程(三):Elasticsearch索引&映射
原文:Elasticsearch入门教程(三):Elasticsearch索引&映射 版权声明:本文为博主原创文章,遵循CC 4.0 BY-SA版权协议,转载请附上原文出处链接和本声明. 本文 ...
- RabbitMQ入门教程(三):Hello World
原文:RabbitMQ入门教程(三):Hello World 版权声明:本文为博主原创文章,遵循CC 4.0 BY-SA版权协议,转载请附上原文出处链接和本声明. 本文链接:https://blog. ...
- JasperReports入门教程(三):Paramters,Fields和Detail基本组件介绍
JasperReports入门教程(三):Paramter,Field和Detail基本组件介绍 前言 前两篇博客带领大家进行了入门,做出了第一个例子.也解决了中文打印的问题.大家跟着例子也做出了de ...
- Spring Cloud 入门教程(三): 配置自动刷新
之前讲的配置管理, 只有在应用启动时会读取到GIT的内容, 之后只要应用不重启,GIT中文件的修改,应用无法感知, 即使重启Config Server也不行. 比如上一单元(Spring Cloud ...
- Spring Boot2 快速入门教程-到上手
Spring Boot2 教程合集 入门 纯 Java 代码搭建 SSM 环境 创建一个 Spring Boot 项目的三种方法 理解 Spring Boot 项目中的 parent 基础配置 配置文 ...
- 笔记63 Spring Boot快速入门(三)
SpringBoot中使用JSP Springboot的默认视图支持是Thymeleaf,但是Thymeleaf还没开始学,熟悉的还是jsp,所以要让Springboot支持 jsp. 一.在pom. ...
- Spring(十五):通过注解配置 Bean
在ClassPath中扫描组件 1)组件扫描(component scanning):Spring能够从classpath下自动扫描,侦测和实例化具有特定注解的组件: 2)特定组件包含: --- @C ...
随机推荐
- 谷粒 | 18 | Hystrix熔断器
Spring Cloud调用接口过程 Spring Cloud 在接口调用上,大致会经过如下几个组件配合: Feign ----->Hystrix ->Ribbon ->Http C ...
- 2020GACTF部分wp
GACTF misc 签到 给了二维码图 切割再拼上就行 crymisc 给了一个crymisc.docx 无法打开 用file看一下 把后缀名改成zip然后解压 这里奇怪的是用winzip解压会提示 ...
- 如何系统学习C 语言(下)之 文件篇
我们所编写的程序源代码以及编译生成的可执行文件都属于文件.所以文件的实质就是存储在外部存储介质上的一段连续的二进制数据. c 语言程序对文件的处理采用文件流的形式,程序运行在内存中,而文件是存储在外部 ...
- 菜鸡的Java笔记 第二十四 - java 接口的基本定义
1.接口的基本定义以及使用形式 2.与接口有关的设计模式的初步认识 3.接口与抽象类的区别 接口与抽象类相比,接口的使用几率是最高的,所有的 ...
- 【Linux】解压分卷压缩的zip文件
例如linux.zip.001, linux.zip.002, linux.zip.003. 1. cat linux.zip* > linux.zip #合并为一个zip包. 2. unzip ...
- [loj3175]排列鞋子
贪心与最近的鞋子匹配(大小相同且方向相反),记$a_{x}$表示第x双鞋子的左位置,$b_{x}$表示右位置 若$a_{x}>b_{x}$,那么可以交换这两双鞋子并令答案+1,所以不妨设$a_{ ...
- 发布项目到maven中央仓库
https://www.xiaominfo.com/2017/04/25/swagger-bootstrap-ui-issue-maven-central/?tdsourcetag=s_pcqq_ai ...
- Jenkins系列-权限管理
在实际工作中,存在多个团队都需要Jenkins来实现持续交付,但是又希望不同团队之间进行隔离,每个项目有自己的view, 只能看到自己项目的jenkins job. 但是,jenkins默认的权限管理 ...
- PIC18 bootloader之UART bootloader
了解更多关于bootloader 的C语言实现,请加我Q扣: 1273623966 (验证信息请填 bootloader),欢迎咨询或定制bootloader(在线升级程序). 应客户要求, 将PIC ...
- DotNetty实现WebSocket的简单使用
工作中项目是物联网项目的,管理平台又是bs架构. 如果用 Socket 的话,Web 端还需要转发,就全部统一采用了 WebSocket . DotNet 平台上的 WebSocket 实现有很多种, ...