
Spring5源码解析_IOC之容器的基本实现
前言:
在分析源码之前,我们简单回顾一下SPring核心功能的简单使用:
容器的基本用法
Bean是Spring最核心的东西,Spring就像是一个大水桶,而Bean就是水桶中的水,水桶脱离了水就没有了什么用处,我们简单看一下Bean的定义,代码如下:
package com.vipbbo.spring.Bean;

/**

 * @author paidaxing

 */

public class MyTestBean {

    private String name = "paidaxing";

    public String getName() {

        return name;

    }

    public void setName(String name) {

        this.name = name;

    }

}
源码很简单,Bean没有特别之处,Spring的目的就是让我们的Bean成为一个纯粹的POJO,这就是Spring追求的,接下来就是在配置文件中定义这个Bean,配置文件如下:
<?xml version="1.0" encoding="UTF-8"?>

<beans xmlns="http://www.springframework.org/schema/beans"

       xmlns:xsi="http://www.w3.org/2001/XMLSchema-instance"

       xsi:schemaLocation="http://www.springframework.org/schema/beans http://www.springframework.org/schema/beans/spring-beans.xsd">

    <bean id="myTestBean" class="com.vipbbo.spring.Bean.MyTestBean"/>

</beans>
在上面的配置中我们可以看到Bean的声明方式,在Spring中的Bean定义有N种属性,但是只要像上面这样简单的声明就可以使用了。
测试代码如下:
public class AppTest {

    @Test

    public void MyTestBean(){

//        ApplicationContext ac = new ClassPathXmlApplicationContext("spring-beans.xml");

        BeanFactory bf = new XmlBeanFactory( new ClassPathResource("spring-beans.xml"));

        MyTestBean myTestBean = (MyTestBean) bf.getBean("myTestBean");

        System.out.println(myTestBean.getName());

    }

}
测试结果截图

注意:
其实直接使用BeanFactory作为容器对于Spring的使用并不多见,因为企业级应用项目中大多会使用的是ApplicationContext(后面我们会讲两者的区别,这里只是测试)
功能分析
接下来我们分析测试类代码中完成的功能:
- 读取配置文件spring-beans.xml
- 根据spring-beans.xml中的配置找到对应的类的配置,并且实例化
- 调用实例化后的实例
下图是一个最简单spring功能架构,如果想完成我们预想的功能,至少需要3个类:

ConfigReader:用于读取及验证配置文件,我们配置文件里面的东西,首先要做的就是读取,然后放在内存中
ReflectionUtil:用于根据配置文中的配置进行反射实例化,比如在上例中spring-beans.xml出现的<bean id="myTestBean" class="com.vipbbo.spring.bean.MyTestBean"/>,我们就可以根据com.vipbbo.spring.bean.MyTestBean进行实例化。
APP:用于完成整个逻辑的关联。
源码工程查看
spring的源码中用于实现上面功能的是spring-beans这个工程,所以我们接下来看这个工程,当然spring-core也是必须的。
spring-beans包的层次结构
我们先看看beans工程的源码结构,如下图所示:

说明:
- src/main/java 用于展现Spring的主要逻辑
- src/main/resource 用于存放系统的配置文件
- src/test/java 用于对主要逻辑进行单元测试
- src/test/resource 用于存放测试用的配置文件
核心类的介绍
接下来我们先来了解一下spring-beans最核心的两个类:DefaultListableBeanFactory和XmlBeanDefinitionReader
DefaultListableBeanFactory
首先XMLBeanFactory继承自DefaultListableBeanFactory,而DefaultListableBeanFactory是整个Bean加载的核心部分,是Spring注册以及加载Bean的默认实现;而对于XMLBeanFactory与DefaultBeanFactory不同的地方其实是在XmlBeanFactory中使用了自定义XML读取器XmlBeanDefinitionReader,实现了个性化的BeanDefinitionReader读取;
DefaultListableBeanFactory继承自AbstractAutowireCapableBeanFactory并实现了ConfigurableListableBeanFactory以及BeanDefinitionRegistry几口。以下是ConfigurableListableBeanFactory的层次结构图如下相关类图
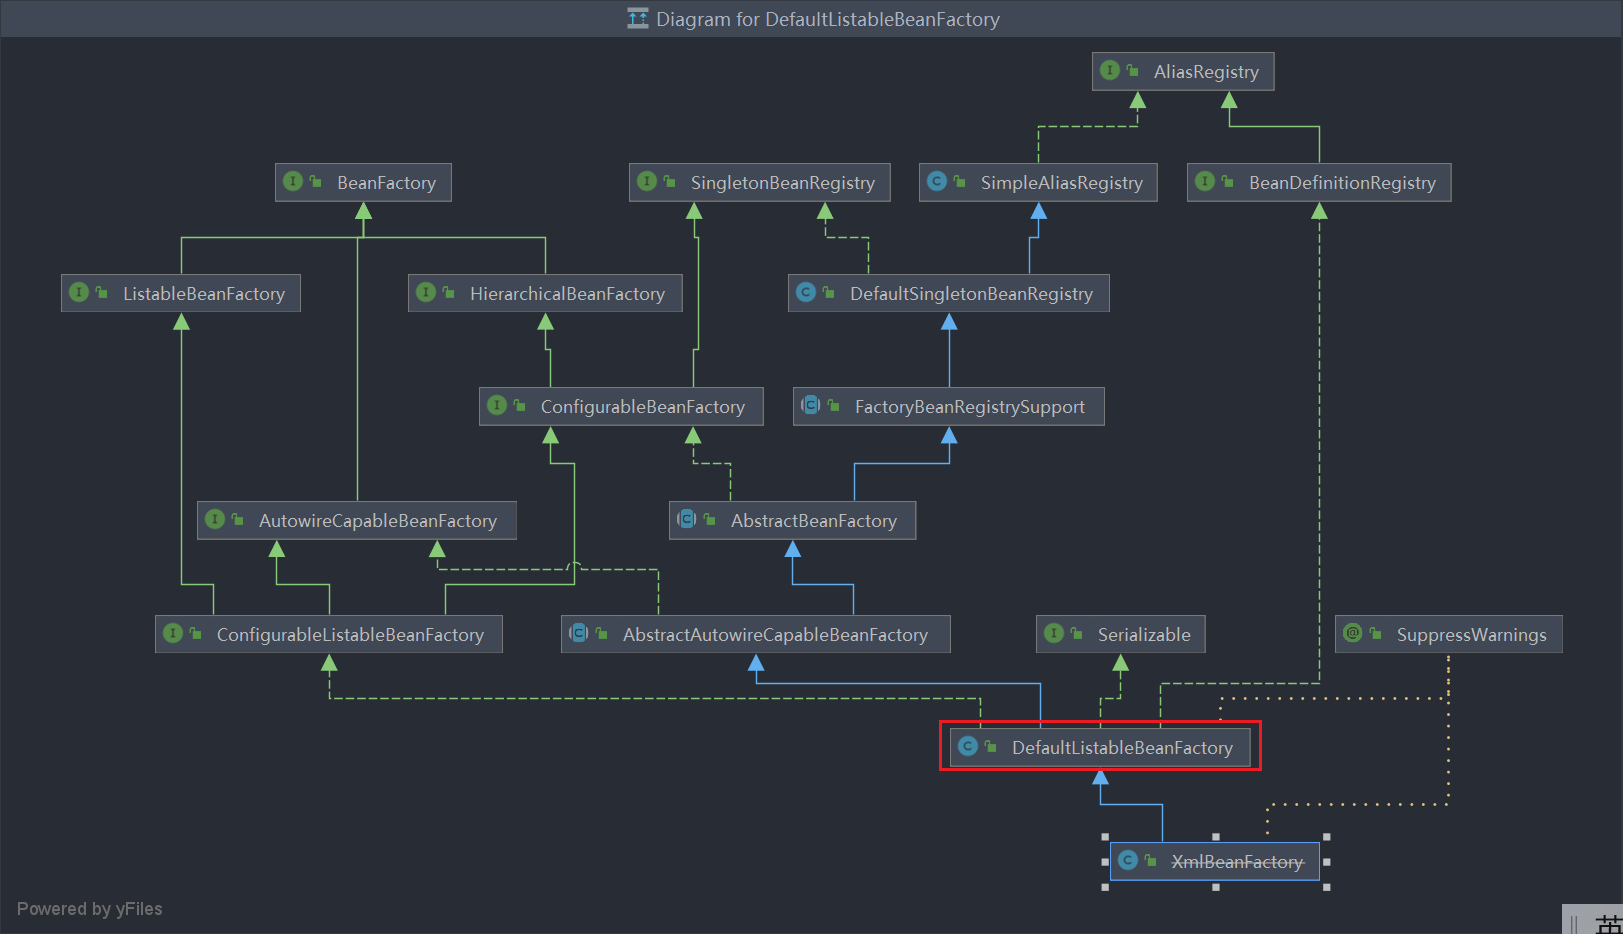
**上面类图中各个类及接口的作用如下:**
- AliasRegistry:定义对alias的简单增删改操作
- SimpleAlisaRegistry:主要使用map作为alias的缓存,并对接口AliasRegistry进行实现
- SingletonBeanRegistry:定义对单例的注册及获取
- BeanFactory:定义Bean及Bean的各种属性
- BeanDefinitionRegistry:定义对BeanDefinition的各种增删改操作
- DefaultSingletonBeanRegistry:默认对几口SingletonBeanRegistry各个函数的实现
- HierarchicalBeanFactory:继承BeanFactory,也就是在BeanFactory定义的功能的基础上增加了对parentFactory的支持
- ListableBeanFactory:根据各种条件获取Bean的配置清单
- FactoryBeanRegistrySupport:在DefaultSingletonBeanRegistry基础上增加了对FactoryBean的特殊处理功能
- ConfigurableBeanFactory:提供Factory的各种方法
- AbstractBeanFactory:综合FactoryBeanRegistrySupport和ConfiguableBeanFactory的功能
- AutowireCapableBeanFactory:提供创建Bean、自动注入、初始化以及应用Bean的后处理器
- AbstractAutowireCapableBeanFactory:综合AbstractBeanFactory并对接口AutowireCapableBeanFactory进行实现
- ConfiurableListableBeanFactory:BeanFactory配置清单,指定忽略类型及接口等
- DefaultListableBeanFactory:综合上面所有的功能,主要是对Bean注册后的处理
XmlBeanFactory对DefaultListableBeanFactory类进行了扩展,主要用于从XML文档中读取BeanDefinition,对于注册及获取Bean都是使用从父类DefaultListableBeanFactory继承的方法去实现,而唯独与父类不同的个性化实现就是增加了XmlBeanDefinitionReader类型的reader属性。在XmlBeanFactory中主要使用reader属性对资源文件进行读取和注册。
XmlBeanDefinitionReader
XML配置文件的读取是Spring中的重要功能,因为Spring的大部分功能都是以配置作为切入点的,可以从XmlBeanDefinitionReader中梳理以下资源文件读取,解析及注册的大致脉络,首先看看各个类的功能:
ResourceLoader:定义资源加载器,主要应用于根据给定的资源文件地址返回对应的Resource
BeanDefinitonReader:主要定义资源文件读取并转换为BeanDefinition的各个功能
EnvironmentCapable:定义获取Environment方法
DocumentLoader:定义从资源文件加载到转换为Documen的功能
AbstractBeanDefinitonReader:对EnvironmentCapable、BeanDefinitonReader类定义的功能进行实现
BeanDefinitionDocumentReader:定义读取Document并注册BeanDefinition功能
BeanDefinitionParserDelegate:定义解析Element的各种方法
整个XML配置文件读取的大致流程,在XmlBeanDefinitionReader中主要包含以下几步处理:
- 通过继承自
AbstractBeanDefinitionReader中的方法,来使用ResourceLoader将资源文件路径转换为对应的Resource文件 - 通过
DocumentLoader对Resource文件进行转换,将Resource文件转换为Document文件 - 通过实现接口
BeanDefinitionDocumentReader的DefaultBeanDefinitionDocumentReader类对Document进行解析,并使用BeanDefinitionParserDelegate对Element进行解析

容器的基础XmlBeanFactory
通过上面的内容我们已经对Spring的容器已经有了大致的了解,接下来我们详细探索每个步骤的详细实现,紧接着我们要分析的功能都是基于如下代码:
BeanFactory bf = new XmlBeanFactory( new ClassPathResource("spring-beans.xml"));
首先调用ClassPathResource的构造函数来构造Resource资源文件的实例对象,这样后续的资源处理就可以用Resource提供的各种服务来操作了。有了Resource后就可以对BeanFactory进行初始化操作,那配置文件是怎么封装的呢?我们简单看一下:
配置文件的封装
Spring的配置文件读取是通过ClassPathResource进行封装的,Spring对其内部使用到的资源实现了自己的抽象结构:
Resource接口来封装底层资源,源码如下:
public interface Resource extends InputStreamSource {

    Boolean exists();

    default Boolean isReadable() {

        return exists();

    }

    default Boolean isOpen() {

        return false;

    }

    default Boolean isFile() {

        return false;

    }

    URL getURL() throws IOException;

    URI getURI() throws IOException;

    File getFile() throws IOException;

    default ReadableByteChannel readableChannel() throws IOException {

        return Channels.newChannel(getInputStream());

    }

    long contentLength() throws IOException;

    long lastModified() throws IOException;

    Resource createRelative(String relativePath) throws IOException;

    @Nullable

        String getFilename();

    String getDescription();

}
InputStreamSource源码:
public interface InputStreamSource {

    /**

     * Return an {@link InputStream} for the content of an underlying resource.

     * <p>It is expected that each call creates a <i>fresh</i> stream.

     * <p>This requirement is particularly important when you consider an API such

     * as JavaMail, which needs to be able to read the stream multiple times when

     * creating mail attachments. For such a use case, it is <i>required</i>

     * that each {@code getInputStream()} call returns a fresh stream.

     * @return the input stream for the underlying resource (must not be {@code null})

     * @throws java.io.FileNotFoundException if the underlying resource doesn't exist

     * @throws IOException if the content stream could not be opened

     */

    InputStream getInputStream() throws IOException;

}
InputStreamSource封装任何能返回InputStream的类,例如File、ClassPath下的资源和ByteArray等,它只有一个方法定义:getInputStream(),该方法返回一个新的InputStream对象。
Resource接口抽象了所有Spring内部使用到的底层资源:File、URL、ClassPath等。首先,它先定义了3个判断当前资源状态的方法:存在性(exits)、可读性(isReadable)、是否处于打开状态(isOpen),另外,Resource接口还提供了不同资源到URL、URI、File类型的转换,以及获取lastModified属性,文件名(不带路径信息的文件名,getFileName())的方法,为了便于操作,Resource还提供了基于当前资源创建一个相对资源的方法:createRelative(),还提供了getDescription()方法用于在错误处理中打印信息。
对于不同来源的资源文件都有相对应的Resource实现:文件(FileSystemResource)、Calsspath资源(ClassPathResource)、URL资源(UrlResource)、InputStream资源(InputStreamResource)、Byte数组(ByteArrayResource)等,相关类图如下:

在日常开发中我们可以直接使用Spring提供的类来加载资源文件,比如在希望加载资源文件时可以使用下面的代码:
Resource resource = new ClassPathResource("spring-beans.xml");

try {

    InputStream inputStream = resource.getInputStream();

}

catch (IOException e) {

    e.printStackTrace();

}
有了Resource接口便可以对所有资源文件进行统一处理,至于实现,也是非常简单的,以getInputStream为例,ClassPathResource中实现的方式便是通过class或者classloader提供的底层方法进行调用,而对于FileSystemResource其实更简单,直接使用FileInputStream对文件进行实例化。
- 看源码(
ClassPathResource.java)- 方法getInputStream
@Override

public InputStream getInputStream() throws IOException {

    InputStream is;

    if (this.clazz != null) {

        is = this.clazz.getResourceAsStream(this.path);

    } else if (this.classLoader != null) {

        is = this.classLoader.getResourceAsStream(this.path);

    } else {

        is = ClassLoader.getSystemResourceAsStream(this.path);

    }

    if (is == null) {

        throw new FileNotFoundException(getDescription() + " cannot be opened because it does not exist");

    }

    return is;

}
- 看源码(
FileSystemResource.java)- 方法getInputStream
@Override

public InputStream getInputStream() throws IOException {

    try {

        return Files.newInputStream(this.filePath);

    }

    catch (NoSuchFileException ex) {

        throw new FileNotFoundException(ex.getMessage());

    }

}
当Resource相关类完成了对配置文件进行封装后,配置文件的读取工作就全权交给了XmlBeanDefinitionReader来进行处理了。接下来就入到XmlBeanFactory的初始化过程了,XmlBeanFactory的初始化有若干办法,Spring提供了很多构造函数,在这里分析的是使用Resource实例作为构造函数参数的办法,代码如下:
public class XmlBeanFactory extends DefaultListableBeanFactory {

    // 提供了XmlBeanDefinitionReader类型的 reader属性

    private final XmlBeanDefinitionReader reader = new XmlBeanDefinitionReader(this);

    public XmlBeanFactory(Resource resource) throws BeansException {

        this(resource, null);

    }

    public XmlBeanFactory(Resource resource, BeanFactory parentBeanFactory) throws BeansException {

        super(parentBeanFactory);

        this.reader.loadBeanDefinitions(resource);

    }

}
上面函数中的代码this.reader.loadBeanDefinitions(resource)才是资源加载的真正实现,但是在XmlBeanDefinitionReader加载数据前还有一个调用父类构造函数初始化的过程super(parentBeanFactory),我们按照代码层级进行跟踪,首先跟踪到如下父类代码:
- 看源码(
DefaultListableBeanFactory.java)
public DefaultListableBeanFactory(@Nullable BeanFactory parentBeanFactory) {

    super(parentBeanFactory);

}
然后继续跟踪,继续跟踪到父类AbstractAutowireCapableBeanFactory的构造函数中:
- 看源码(
AbstractAutowireCapableBeanFactory.java)
public AbstractAutowireCapableBeanFactory(@Nullable BeanFactory parentBeanFactory) {

    this();

    setParentBeanFactory(parentBeanFactory);

}
public AbstractAutowireCapableBeanFactory() {

    super();

    ignoreDependencyInterface(BeanNameAware.class);

    ignoreDependencyInterface(BeanFactoryAware.class);

    ignoreDependencyInterface(BeanClassLoaderAware.class);

    if (NativeDetector.inNativeImage()) {

        this.instantiationStrategy = new SimpleInstantiationStrategy();

    } else {

        this.instantiationStrategy = new CglibSubclassingInstantiationStrategy();

    }

}
这里需要特别注意一下ignoreDependencyInterface方法,ignoreDependencyInterface的主要功能就是指自动装配(autowiring)的时候忽略的类。那么这样做的目的是什么?会产生什么样的结果呢?
举例来说:
当A中有属性B,那么当Spring在获取A的Bean的时候如果其属性B还没有初始化,那么Spring会自动初始化B;这也是Spring提供的一个重要特性。
但是在某些情况下,B不会被初始化,其中的一种情况就是B实现二零
BeanNameAware接口。Spring中是这样介绍的:自动装配时忽略给定的依赖接口,典型应用是通过其它方式解析Application上下文注册依赖,类似于BeanFactory通过BeanFactoryAware进行注入或者ApplicationContext通过ApplicationContextAware进行注入。调用ignoreDependencyInterface方法后,被忽略的接口会存储在BeanFactory的名为
ignoredDependencyInterfaces的Set集合中
- 看源码(
AbstractAutowireCapableBeanFactory.java)public abstract class AbstractAutowireCapableBeanFactory extends AbstractBeanFactory
implements AutowireCapableBeanFactory {
/**
* Dependency interfaces to ignore on dependency check and autowire, as Set of
* Class objects. By default, only the BeanFactory interface is ignored.
*/
private final Set<Class<?>> ignoredDependencyInterfaces = new HashSet<>();
// 省略...
public void ignoreDependencyInterface(Class<?> ifc) {
this.ignoredDependencyInterfaces.add(ifc);
}
// 省略...
}
ignoredDependencyInterfaces集合在同类中被使用仅在一处:(isExcludedFromDependencyCheck方法中)
protected Boolean isExcludedFromDependencyCheck(PropertyDescriptor pd) {

    return (AutowireUtils.isExcludedFromDependencyCheck(pd) ||

                    this.ignoredDependencyTypes.contains(pd.getPropertyType()) ||

                    AutowireUtils.isSetterDefinedInInterface(pd, this.ignoredDependencyInterfaces));

}
而ignoredDependencyInterface的真正作用还得看AutowireUtils类的isSetterDefinedInInterface方法
- 看源码(
AutowireUtils.java)
public static Boolean isSetterDefinedInInterface(PropertyDescriptor pd, Set<Class<?>> interfaces) {

    // 获取Bean中某个属性对象在Bean类中的setter方法

    Method setter = pd.getWriteMethod();

    if (setter != null) {

        // 获取Bean的类型

        Class<?> targetClass = setter.getDeclaringClass();

        for (Class<?> ifc : interfaces) {

            // ifc.isAssignableFrom(targetClass) Bean类型是否是接口的实现类,

            // ClassUtils.hasMethod(ifc, setter) 接口中是否有入参和Bean类型完全相同的setter方法

            if (ifc.isAssignableFrom(targetClass) && ClassUtils.hasMethod(ifc, setter)) {

                return true;

            }

        }

    }

    return false;

}
ignoreDependencyInterface方法并不是让我们在自动装配时直接忽略实现了该接口的依赖。这个方法的真正意思是忽略该接口的实现类中和接口setter方法入参类型相同的依赖。
举个例子:首先定义一个要被忽略的接口:
步骤一 :定义一个要被忽略的接口。
public interface IgnoreInterface {

    void setList(List<String> list);

    void setSet(Set<String> set);

}
步骤二:然后需要实现该接口,在实现类中注意要有setter方法入参相同类型的域对象,在例子中就是List< String>和Set< String>。
public class IgnoreInterfaceImpl implements IgnoreInterface{

    private List<String> list;

    private Set<String> set;

    @Override

    public void setList(List<String> list) {

        this.list = list;

    }

    @Override

    public void setSet(Set<String> set) {

        this.set = set;

    }

    public List<String> getList() {

        return list;

    }

    public Set<String> getSet() {

        return set;

    }

}
步骤三:定义xml配置文件
<?xml version="1.0" encoding="UTF-8"?>

<beans xmlns="http://www.springframework.org/schema/beans"

       xmlns:xsi="http://www.w3.org/2001/XMLSchema-instance"

       xsi:schemaLocation="http://www.springframework.org/schema/beans

       http://www.springframework.org/schema/beans/spring-beans.xsd"

       default-autowire="byType">

    <bean id="list" class="java.util.ArrayList">

        <constructor-arg>

            <list>

                <value>foo</value>

                <value>bar</value>

            </list>

        </constructor-arg>

    </bean>

    <bean id="set" class="java.util.HashSet">

        <constructor-arg>

            <list>

                <value>foo</value>

                <value>bar</value>

            </list>

        </constructor-arg>

    </bean>

    <bean id="ignoreInterface" class="com.vipbbo.spring.bean.IgnoreInterfaceImpl"/>

    <!--如果要使用后置处理器来进行忽略自动装配的类 不可以使用 XmlBeanFactory 方式加载配置文件 如果使用 XmlBeanFactory 可忽略本行代码 -->

    <!--关于mlBeanFactory 和 ApplicationContext 区别我在文章 【spring源码阅读一】有提过-->

    <bean id="customBeanFactoryPostProcessor" class="com.vipbbo.spring.bean.IgnoreAutowiringProcessor"/>

</beans>
步骤四:最后调用ignoreDependencyInterface()方法
public class AppTestIgnoredepencytype {

    @Test

    public void TestIgnore(){

        BeanFactory bf = new XmlBeanFactory( new ClassPathResource("spring-ignore.xml"));

        ((ConfigurableListableBeanFactory) bf ).ignoreDependencyInterface(IgnoreInterface.class);

        IgnoreInterfaceImpl bean = (IgnoreInterfaceImpl) bf.getBean(IgnoreInterface.class);

        System.out.println(bean.getList());

        System.out.println(bean.getSet());

    }

}
使用了ignoreDependencyInterface()方法运行截图:

未使用ignoreDependencyInterface()方法运行截图:
将
((ConfigurableListableBeanFactory) bf ).ignoreDependencyInterface(IgnoreInterface.class);注掉即可

关于这个ignoreDependencyInterface()方法也可参考以下篇文章:
https://blog.csdn.net/xyjy11/article/details/113776587?utm_medium=distribute.pc_relevant.none-task-blog-2defaultbaidujs_title~default-0.no_search_link&spm=1001.2101.3001.4242.1
default-autowire和@Autowired在这里解释的相对完整
我们最初的理解是在自动装配时忽略该接口的实现,实际上是在自动装配时忽略该接口实现类中和setter方法入参相同的类型,也就是忽略该接口实现类中存在依赖外部的Bean属性注入。
典型应用
就是BeanFactoryAware和ApplicationContextAware接口。接下来我们看一下它们源码:
- 看源码(
BeanFactoryAware.java)
public interface BeanFactoryAware extends Aware {

    void setBeanFactory(BeanFactory beanFactory) throws BeansException;

}
继续追踪ApplicationContextAware接口:
- 看源码(
ApplicationContextAware.java)
public interface ApplicationContextAware extends Aware {

    void setApplicationContext(ApplicationContext applicationContext) throws BeansException;

}
在Spring源码中存在不同的地方忽略了这两个接口
例如在类AbstractApplicationContext中
beanFactory.ignoreDependencyInterface(ApplicationContextAware.class);

在类AbstractAutowireCapableBeanFactory中
ignoreDependencyInterface(BeanFactoryAware.class);

由此使我们的BeanFactoryAware接口实现类在自动装配的时候不能够被注入BeanFactory对象的依赖:
例如:
public class MyBeanFactoryAware implements BeanFactoryAware {

    /**

     * 自动装配时忽略注入

     */

    private BeanFactory beanFactory;

    @Override

        public void setBeanFactory(BeanFactory beanFactory) throws BeansException {

        this.beanFactory = beanFactory;

    }

    public BeanFactory getBeanFactory() {

        return beanFactory;

    }

}
ApplicationContextAware接口实现类中的ApplicationContext对象的依赖也是不能注入
public class MyApplicationContextAware implements ApplicationContextAware {

    /**

     * 自动装配时被忽略注入

     */

    private ApplicationContext applicationContext;

    @Override

        public void setApplicationContext(ApplicationContext applicationContext) throws BeansException {

        this.applicationContext = applicationContext;

    }

    public ApplicationContext getApplicationContext() {

        return applicationContext;

    }

}
Spring这样做的目的其实很简单,就是使ApplicationContextAware和BeanFactoryAware中的ApplicationContext或BeanFactory依赖在自动装配时被忽略,而统一由框架设置依赖,如ApplicationContextAware接口设置会在ApplicationContextAwareProcessor类中完成,源码如下:
- 看源码(
ApplicationContextAwareProcessor.java)
private void invokeAwareInterfaces(Object bean) {

    if (bean instanceof EnvironmentAware) {

        ((EnvironmentAware) bean).setEnvironment(this.applicationContext.getEnvironment());

    }

    if (bean instanceof EmbeddedValueResolverAware) {

        ((EmbeddedValueResolverAware) bean).setEmbeddedValueResolver(this.embeddedValueResolver);

    }

    if (bean instanceof ResourceLoaderAware) {

        ((ResourceLoaderAware) bean).setResourceLoader(this.applicationContext);

    }

    if (bean instanceof ApplicationEventPublisherAware) {

        ((ApplicationEventPublisherAware) bean).setApplicationEventPublisher(this.applicationContext);

    }

    if (bean instanceof MessageSourceAware) {

        ((MessageSourceAware) bean).setMessageSource(this.applicationContext);

    }

    if (bean instanceof ApplicationStartupAware) {

        ((ApplicationStartupAware) bean).setApplicationStartup(this.applicationContext.getApplicationStartup());

    }

    if (bean instanceof ApplicationContextAware) {

        ((ApplicationContextAware) bean).setApplicationContext(this.applicationContext);

    }

}
Spring通过这种方式保证了ApplicationContextAware和BeanFactoryAware中的容器保证是生成该Bean的容器
Bean加载
在之前XmlBeanFactory构造函数中调用了XmlBeanDefinitionReader类型的reader属性提供的方法
this.reader.loadBeanDefinitions(resource),而这句代码则是整个资源加载的切入点,这个方法的时序图如下:

我们来简单梳理一下上述时序图的处理过程:
- 封装资源文件,当进入XmlBeanDefinitionReader后首先对参数Resource使用EncodedResource类进行封装
- 获取输入流,从Resource中获取对应的InputStream并构造InputSource
- 通过构造的InputSource实例和Resource实例继续调用函数doLoadBeanDefinitions,loadBeanDefinitons函数具体实现过程源码如下:
- 看源码(
XmlBeanDefinitionReader.java)
public int loadBeanDefinitions(EncodedResource encodedResource) throws BeanDefinitionStoreException {

    Assert.notNull(encodedResource, "EncodedResource must not be null");

    if (logger.isTraceEnabled()) {

        logger.trace("Loading XML bean definitions from " + encodedResource);

    }

    Set<EncodedResource> currentResources = this.resourcesCurrentlyBeingLoaded.get();

    if (!currentResources.add(encodedResource)) {

        throw new BeanDefinitionStoreException(

                            "Detected cyclic loading of " + encodedResource + " - check your import definitions!");

    }

    try (InputStream inputStream = encodedResource.getResource().getInputStream()) {

        InputSource inputSource = new InputSource(inputStream);

        if (encodedResource.getEncoding() != null) {

            inputSource.setEncoding(encodedResource.getEncoding());

        }

        return doLoadBeanDefinitions(inputSource, encodedResource.getResource());

    }

    catch (IOException ex) {

        throw new BeanDefinitionStoreException(

                            "IOException parsing XML document from " + encodedResource.getResource(), ex);

    }

    finally {

        currentResources.remove(encodedResource);

        if (currentResources.isEmpty()) {

            this.resourcesCurrentlyBeingLoaded.remove();

        }

    }

}
EccodedResource的作用是对资源文件的编码进行处理的,其中的主要逻辑体现在getReader()方法中,当设置了编码属性的时候Spring会使用相应的编码作为输入流的编码,在构造好了encodedResource对象后,再次转入了服用方法loadBeanDefinitions(new EncodedResource(resource)),这个方法内部才是真正的数据准备阶段,主要函数doLoadBeanDefinitions源代码如下:
- 看源码(
XmlBeanDefinitionReader.java)
protected int doLoadBeanDefinitions(InputSource inputSource, Resource resource)

            throws BeanDefinitionStoreException {

    try {

        // 获取 Document 实例

        Document doc = doLoadDocument(inputSource, resource);

        // 根据 Document 实例注册 Bean 信息

        int count = registerBeanDefinitions(doc, resource);

        if (logger.isDebugEnabled()) {

            logger.debug("Loaded " + count + " bean definitions from " + resource);

        }

        return count;

    }

    // 省略......

}
核心部分就是Try中的两行代码,如上图所示。
- 调用
doLoadDocument()方法,根据xml文件获取Document实例 - 根据Document实例注册Bean信息
其实咋doLoadDocument()方法中还获取了xml文件的验证方式,如下:
- 看源码(
XmlBeanDefinitionReader.java)
protected Document doLoadDocument(InputSource inputSource, Resource resource) throws Exception {

    return this.documentLoader.loadDocument(inputSource, getEntityResolver(), this.errorHandler,

                    getValidationModeForResource(resource), isNamespaceAware());

}
- 源码解析:
从上述代码中我们看到通过getValidationModeForResource()获取了指定资源的xml的验证模式,所以doLoadDocument()主要做了三件事
- 调用 **getValidationModeForResource() **获取 xml 文件的验证模式
- 调用 loadDocument() 根据 xml 文件获取相应的 Document 实例。
- 调用 registerBeanDefinitions() 注册 Bean 实例。
获取XML的验证模式
DTD和XSD区别
DTO(Document Type Definition)即文档定义类型,是一种XML约束模式语言,是XML文件的校验机制,属于XML文件组成的一部分。DTO是一种保证XML文档格式正确的有效方法,可以通过比较XML文档和DTO文件来看文档是否符合规范,元素和标签使用是否正确,一个DTO文档包含:元素的定义规则,元素间关系的定义规则,元素可以使用的属性,可使用的实体或符合规则。
使用DTO验证模式的时候需要在XML文件的头部声明,以下是在Spring中使用DTO声明方式的代码:
<?xml version="1.0" encoding="UTF-8"?>

<!DOCTYPE beans PUBLIC "-//Spring//DTD BEAN 2.0//EN" "http://www.Springframework.org/dtd/Spring-beans-2.0.dtd">
XML Schema语言就是XSD(XML Schemas Definition)。XML Schema描述了XML文档的结构,可以用一个指定的XML Schema来验证某个XML文档,以检查该XML文档是否符合其要求,文档设计者可以通过XML Schema指定一个XML文档所允许的结构和内容,并可根据此来检查一个XML文档是否有效。
在使用XML Schema 文档对XML实例文档进行校验,除了要声明命名空间外(xmlns="http://www.springframework.org/schema/beans"),还必须指定该名称空间所对应的XML,它包含两个部分:
一部分是名称空间的URL
另外一部分就是该名称空间所标识的XML Schema文件位置或URL地址(xsi:schemaLocation="http://www.springframework.org/schema/beans")
如下案例:
<?xml version="1.0" encoding="UTF-8"?>

<beans xmlns="http://www.springframework.org/schema/beans"

       xmlns:xsi="http://www.w3.org/2001/XMLSchema-instance"

       xsi:schemaLocation="http://www.springframework.org/schema/beans http://www.springframework.org/schema/beans/spring-beans.xsd">

    <bean id="myTestBean" class="com.vipbbo.spring.bean.MyTestBean"/>

</beans>
验证模式的获取
在Spring中,是通过上面所提到的getValidationModeForResource()方法来获取对应资源的验证模式,其源码如下:
- 看源码(
XmlBeanDefinitionReader.java)
protected int getValidationModeForResource(Resource resource) {

    int validationModeToUse = getValidationMode();

    if (validationModeToUse != VALIDATION_AUTO) {

        return validationModeToUse;

    }

    int detectedMode = detectValidationMode(resource);

    if (detectedMode != VALIDATION_AUTO) {

        return detectedMode;

    }

    // Hmm, we didn't get a clear indication... Let's assume XSD,

    // since apparently no DTD declaration has been found up until

    // detection stopped (before finding the document's root tag).

    return VALIDATION_XSD;

}
- 源码解析
如上所示:方法的实现其实还是很简单的,如果设定了验证模式则使用设定的验证模式(可以通过使用XmlBeanDefinitonReader中的setValidationMode方法进行设定),否则使用自动检测模式。而自动检测验证模式的功能是在函数delectValidationMode方法中,而在此方法中又将自动检测验证模式下的工作委托给了专门处理类XmlValidationModeDetector的validationModeDetector方法,具体源码如下:
- 看源码(
XmlValidationModeDetector.java)
public int detectValidationMode(InputStream inputStream) throws IOException {

    // Peek into the file to look for DOCTYPE.

    try (BufferedReader reader = new BufferedReader(new InputStreamReader(inputStream))) {

        Boolean isDtdValidated = false;

        String content;

        while ((content = reader.readLine()) != null) {

            content = consumeCommentTokens(content);

            if (this.inComment || !StringUtils.hasText(content)) {

                continue;

            }

            if (hasDoctype(content)) {

                isDtdValidated = true;

                break;

            }

            if (hasOpeningTag(content)) {

                // End of meaningful data...

                break;

            }

        }

        return (isDtdValidated ? VALIDATION_DTD : VALIDATION_XSD);

    }

    catch (CharConversionException ex) {

        // Choked on some character encoding...

        // Leave the decision up to the caller.

        return VALIDATION_AUTO;

    }

}
- 源码分析
从源码中我们可以看到,主要是通过读取XML文件的内容,判断内容中是否包含有DOCTYPE
,如果是则为DTD,否则为XSD,当然只会读取到第一个<处,因为验证模式一定会在第一个<之前。如果当中出现了CharConversionException 异常,则为XSD模式。
获取Document
经过了验证模式准备的步骤就可以进行Document加载了,对于文档的读取委托给了DocumentLoader去执行,这里的DocumentLoader是个接口,而真正调用的是DefaultDocumentLoader,源码如下:
- 看源码(
DefaultDocumentLoader)
@Override

public Document loadDocument(InputSource inputSource, EntityResolver entityResolver,

            ErrorHandler errorHandler, int validationMode, Boolean namespaceAware) throws Exception {

    DocumentBuilderFactory factory = createDocumentBuilderFactory(validationMode, namespaceAware);

    if (logger.isTraceEnabled()) {

        logger.trace("Using JAXP provider [" + factory.getClass().getName() + "]");

    }

    DocumentBuilder builder = createDocumentBuilder(factory, entityResolver, errorHandler);

    return builder.parse(inputSource);

}
- 源码分析
首先我们看到先创建了DocumentBuilderFactory,再通过DocumentBuilderFactory创建DocumentBuilder,进而解析InputSource来返回的Document对象,对于参数entityResolver,传入是通过XmlBeanDefinitionReader类的doLoadDocument函数中的getEntityResolver()方法获取的返回值,源码如下:
- 看源码(
XmlBeanDefinitionReader)
protected EntityResolver getEntityResolver() {

    if (this.entityResolver == null) {

        // Determine default EntityResolver to use.

        ResourceLoader resourceLoader = getResourceLoader();

        if (resourceLoader != null) {

            this.entityResolver = new ResourceEntityResolver(resourceLoader);

        } else {

            this.entityResolver = new DelegatingEntityResolver(getBeanClassLoader());

        }

    }

    return this.entityResolver;

}
为什么要说这个entityResolver呢?它究竟是做什么用的呢?接下来我们详细的说一下:
EntityResolver的用法
对于解析一个XML,SAX(simple API for XML:简单的XML的应用程序接口)首先读取该XML文档上的声明,根据声明去寻找相应的DTD定义,以便对文档进行一个验证,默认的寻找规则,即通过网络(实现上就是声明DTD的URI地址来下载相应的DTO声明,并进行认证。下载的过程是一个漫长的过程,而且当网络中断或不可用时,这里会报错,就是因为相应的DTD声明没有找到的原因。)
EntityResolver的作用是项目本身就可以提供一个如何寻找DTD声明的方法,即由程序来实现寻找DTD声明的过程,比如将DTD文件放到项目中某处,在实现时直接将此文档读取并返回给SAX即可,在EntityResolver的接口只有一个方法声明,源码如下:
- 看源码(
EntityResolver.java)
public interface EntityResolver {

    public abstract InputSource resolveEntity (String publicId,

                                                   String systemId)

            throws SAXException, IOException;

}
- 源码分析
从上面源码中我们可以看到它接收两个参数publicId、systemId,并返回一个InputSource对象,以特定配置文件来进行讲解:
- 如果在解析验证模式为XSD的配置文件,代码如下:
<?xml version="1.0" encoding="UTF-8"?>

<beans xmlns="http://www.springframework.org/schema/beans"

       xmlns:xsi="http://www.w3.org/2001/XMLSchema-instance"

       xsi:schemaLocation="http://www.springframework.org/schema/beans http://www.springframework.org/schema/beans/spring-beans.xsd">

  <!-- 省略......-->

</beans>
运行测试类我们再ResourceEntityResolver类中Debugger一下
测试类如下:
public class AppTest {

    @Test

    public void MyTestBean(){

        BeanFactory bf = new XmlBeanFactory( new ClassPathResource("spring-beans.xml"));

    }

}
Debugger运行可以看到它读取到了两个参数
- publicId : null
- systemId :
http://www.springframework.org/schema/beans/spring-beans.xsd

- 如果解析验证模式为DTD的配置文件,代码如下
xml:
<?xml version="1.0" encoding="UTF-8"?>

<!DOCTYPE beans PUBLIC "-//SPRING//DTD BEAN 2.0//EN"

		"http://www.springframework.org/dtd/spring-beans-2.0.dtd">

<beans>

</beans>
测试类:
public class AppTest {

    @Test

    public void MyTestBean(){

        //        BeanFactory bf = new XmlBeanFactory( new ClassPathResource("spring-beans.xml"));

        BeanFactory bf = new XmlBeanFactory( new ClassPathResource("xml-DTD.xml"));

    }

}
运行测试类获得到如下两个参数:
publicId:
-//SPRING//DTD BEAN 2.0//ENsystemId:
http://www.springframework.org/dtd/spring-beans-2.0.dtd
运行结果截图:

Tips:关于xml解析的DTD方式等相关知识点可以查看这两篇文章:
关于校验文件我们一般都放置在自己的工程里面,如果把URL转换为自己工程里对应的地址文件呢?会是一个什么样的结果?以加载DTD文件为例来看看Spring是如何实现的,根据之前Spring中通过getEntityResolver()方法对EntityResolver的获取,我们知道,Spring中使用DelegatingEntityResolver类为EntityResolver的实现类,resolveEntity实现方法如下:
- 看源码(
DelegatingEntityResolver.java)
@Override

@Nullable

public InputSource resolveEntity(@Nullable String publicId, @Nullable String systemId)

            throws SAXException, IOException {

    if (systemId != null) {

        if (systemId.endsWith(DTD_SUFFIX)) {

            return this.dtdResolver.resolveEntity(publicId, systemId);

        } else if (systemId.endsWith(XSD_SUFFIX)) {

            return this.schemaResolver.resolveEntity(publicId, systemId);

        }

    }

    // Fall back to the parser's default behavior.

    return null;

}
- 源码分析
从上面的源码中我们可以看到不同的验证模式是由不同的解析器解析,比如加载DTD类型的BeansDtdResolver的resolveEntity是直接截取systemId最后的xx.dtd然后去当前路径下寻找,而加载XSD类型的PluggableSchemaResolver类的resolveEntity是默认到META-INF/spring.schemas文件中找到systemI对应的XSD文件并加载。如下图所示:

BeanDtdResolver的解析过程如下:
- 看源码(
BeansDtdResolver.java)
@Override

@Nullable

public InputSource resolveEntity(@Nullable String publicId, @Nullable String systemId) throws IOException {

    if (logger.isTraceEnabled()) {

        logger.trace("Trying to resolve XML entity with public ID [" + publicId +

                            "] and system ID [" + systemId + "]");

    }

    if (systemId != null && systemId.endsWith(DTD_EXTENSION)) {

        int lastPathSeparator = systemId.lastIndexOf('/');

        int dtdNameStart = systemId.indexOf(DTD_NAME, lastPathSeparator);

        if (dtdNameStart != -1) {

            String dtdFile = DTD_NAME + DTD_EXTENSION;

            if (logger.isTraceEnabled()) {

                logger.trace("Trying to locate [" + dtdFile + "] in Spring jar on classpath");

            }

            try {

                Resource resource = new ClassPathResource(dtdFile, getClass());

                InputSource source = new InputSource(resource.getInputStream());

                source.setPublicId(publicId);

                source.setSystemId(systemId);

                if (logger.isTraceEnabled()) {

                    logger.trace("Found beans DTD [" + systemId + "] in classpath: " + dtdFile);

                }

                return source;

            }

            catch (FileNotFoundException ex) {

                if (logger.isDebugEnabled()) {

                    logger.debug("Could not resolve beans DTD [" + systemId + "]: not found in classpath", ex);

                }

            }

        }

    }

    // Fall back to the parser's default behavior.

    return null;

}
- 源码分析
从上面的代码我们可以明显的看到加载DTD类型的BeanDtdResolver类的resolveEntity()方法只是对systemId进行了简单的校验(从最后一个/开始(systemId.lastIndexOf('/'),内容中是否包含spring-beans),然后构造了一个InputSource并设置publicId,systemId,然后返回。紧接着我们看一下PluggableSchemaResolver解析过程:
- 看原版吗(
PluggableSchemaResolver.java)
@Override

@Nullable

public InputSource resolveEntity(@Nullable String publicId, @Nullable String systemId) throws IOException {

    if (logger.isTraceEnabled()) {

        logger.trace("Trying to resolve XML entity with public id [" + publicId +

                            "] and system id [" + systemId + "]");

    }

    if (systemId != null) {

        String resourceLocation = getSchemaMappings().get(systemId);

        if (resourceLocation == null && systemId.startsWith("https:")) {

            // Retrieve canonical http schema mapping even for https declaration

            resourceLocation = getSchemaMappings().get("http:" + systemId.substring(6));

        }

        if (resourceLocation != null) {

            Resource resource = new ClassPathResource(resourceLocation, this.classLoader);

            try {

                InputSource source = new InputSource(resource.getInputStream());

                source.setPublicId(publicId);

                source.setSystemId(systemId);

                if (logger.isTraceEnabled()) {

                    logger.trace("Found XML schema [" + systemId + "] in classpath: " + resourceLocation);

                }

                return source;

            }

            catch (FileNotFoundException ex) {

                if (logger.isDebugEnabled()) {

                    logger.debug("Could not find XML schema [" + systemId + "]: " + resource, ex);

                }

            }

        }

    }

    // Fall back to the parser's default behavior.

    return null;

}
- 源码分析
首先我们从上面可以看到先调用了方法getSchemaMappings()获取了一个映射表(systemId 与其在本地的对照关系),然后根据传入的systemId获取该systemId在本地路径下的resourceLocation,最后根据resourceLocation构造InputSource对象,映射表如下图所示:(部分)

解析及注册BeanDefinitions
当文件转换成Document后,接下来就是对Bean的提取和注册了,当程序已经拥有了XML文档文件的Document实例对象时,就会被引入到XmlBeanDefinitionReader类的registerBeanDefinitions这个方法:
- 看源码(
XmlBeanDefinitonReader.java)
public int registerBeanDefinitions(Document doc, Resource resource) throws BeanDefinitionStoreException {

    BeanDefinitionDocumentReader documentReader = createBeanDefinitionDocumentReader();

    int countBefore = getRegistry().getBeanDefinitionCount();

    documentReader.registerBeanDefinitions(doc, createReaderContext(resource));

    return getRegistry().getBeanDefinitionCount() - countBefore;

}
- 源码分析
从上面源码中我们可以看到有两个参数Document doc, Resource resource,其中的doc参数即是上节说的document,而BeanDefinitionDocumentReader是一个接口,而实例化的工作是在createBeanDefinitionDocumentReader方法中完成的。而通过此方法,BeanDefinitionDocumentReader真正的类型已经是DefaultBeanDefinitionDocumentReader,进入到DefaultBeanDefinitionDocumentReader后,发现这个方法的重要目的之一就是提取doc.getDocumentElement(),以便于再次将doc.getDocumentElement()作为参数继续BeanDefinition的注册,源码如下:
- 看源码(
DefaultBeanDefinitionDocumentReader.java)
protected void doRegisterBeanDefinitions(Element root) {

    BeanDefinitionParserDelegate parent = this.delegate;

    this.delegate = createDelegate(getReaderContext(), root, parent);

    if (this.delegate.isDefaultNamespace(root)) {

        String profileSpec = root.getAttribute(PROFILE_ATTRIBUTE);

        if (StringUtils.hasText(profileSpec)) {

            String[] specifiedProfiles = StringUtils.tokenizeToStringArray(

                                    profileSpec, BeanDefinitionParserDelegate.MULTI_VALUE_ATTRIBUTE_DELIMITERS);

            // We cannot use Profiles.of(...) since profile expressions are not supported

            // in XML config. See SPR-12458 for details.

            if (!getReaderContext().getEnvironment().acceptsProfiles(specifiedProfiles)) {

                if (logger.isDebugEnabled()) {

                    logger.debug("Skipped XML bean definition file due to specified profiles [" + profileSpec +

                                                    "] not matching: " + getReaderContext().getResource());

                }

                return;

            }

        }

    }

    preProcessXml(root);

    parseBeanDefinitions(root, this.delegate);

    postProcessXml(root);

    this.delegate = parent;

}
我们看到首先要解析profile属性,然后才开始XML的读取,具体的代码如下:
- 看源码(
DefaultBeanDefinitionDocumentReader.java)
protected void parseBeanDefinitions(Element root, BeanDefinitionParserDelegate delegate) {

    if (delegate.isDefaultNamespace(root)) {

        NodeList nl = root.getChildNodes();

        for (int i = 0; i < nl.getLength(); i++) {

            Node node = nl.item(i);

            if (node instanceof Element) {

                Element ele = (Element) node;

                if (delegate.isDefaultNamespace(ele)) {

                    parseDefaultElement(ele, delegate);

                } else {

                    delegate.parseCustomElement(ele);

                }

            }

        }

    } else {

        delegate.parseCustomElement(root);

    }

}
- 源码分析
从上面我们可以看到最后的解析工作就存在两行代码parseDefaultElement(ele, delegate);和delegate.parseCustomElement(root);
我们知道在Spring中有两种方式去声明Bean:
- 配置文件式声明:
<bean id="myTestBean" class="com.vipbbo.spring.bean.MyTestBean"/> - 自定义注解方式:
<tx:annotation-driven>
两种方式的读取和解析都存在较大差异,所以采用不同的解析方法。如果根节点或者子节点采用默认命名空间的话,则调用parseDefaultElement()进行解析,否则则使用delegate.parseCustomElement() ;方法进行自定义解析。
那么是如何判断是否是默认空间还是自定义命名空间呢?Spring其实使用的node.getNamespaceURI()获取命名空间(这个方法是在isDefaultNamespace函数里面),并与Spring中固定的命名空间http://www.springframework.org/schema/beans进行对比,如果一致则认为是默认,否则就认为是自定义。
Profile的用法
通过profile标记不同的环境,可以通过设置spring.profiles.actice和spring.profiles.default激活指定的profile环境。
如果设置了active,default便失去了作用。如果两个都没有设置,那么带有profiles的Bean都不会生成。
<!-- 开发环境配置文件 -->

<beans profile="development">

    <context:property-placeholder

            location="classpath*:config_common/*.properties, classpath*:config_development/*.properties"/>

</beans>

<!-- 测试环境配置文件 -->

<beans profile="test">

    <context:property-placeholder

            location="classpath*:config_common/*.properties, classpath*:config_test/*.properties"/>

</beans>

<!-- 生产环境配置文件 -->

<beans profile="production">

    <context:property-placeholder

            location="classpath*:config_common/*.properties, classpath*:config_production/*.properties"/>

</beans>
配置web.xml
<!-- 多环境配置 在上下文context-param中设置profile.default的默认值 -->

<context-param>

    <param-name>spring.profiles.default</param-name>

    <param-value>production</param-value>

</context-param>

<!-- 多环境配置 在上下文context-param中设置profile.active的默认值 -->

<!-- 设置active后default失效,web启动时会加载对应的环境信息 -->

<context-param>

    <param-name>spring.profiles.active</param-name>

    <param-value>test</param-value>

</context-param>
通过上述配置便可在启动的时候按照spring.profiles.active的属性值来进行切换了。
整理不易,如果对你有所帮助欢迎点赞关注
微信搜索【码上遇见你】获取更多精彩内容
Spring5源码解析_IOC之容器的基本实现的更多相关文章
- Spring5源码解析1-从启动容器开始
从启动容器开始 最简单的启动spring的代码如下: @Configuration @ComponentScan public class AppConfig { } public class Mai ...
- Spring5源码解析-Spring框架中的单例和原型bean
Spring5源码解析-Spring框架中的单例和原型bean 最近一直有问我单例和原型bean的一些原理性问题,这里就开一篇来说说的 通过Spring中的依赖注入极大方便了我们的开发.在xml通过& ...
- Spring5源码解析-论Spring DispatcherServlet的生命周期
Spring Web框架架构的主要部分是DispatcherServlet.也就是本文中重点介绍的对象. 在本文的第一部分中,我们将看到基于Spring的DispatcherServlet的主要概念: ...
- Spring5源码解析系列一——IoC容器核心类图
基本概念梳理 IoC(Inversion of Control,控制反转)就是把原来代码里需要实现的对象创建.依赖,反转给容器来帮忙实现.我们需要创建一个容器,同时需要一种描述来让容器知道要创建的对象 ...
- spring源码解析之IOC容器(二)------加载和注册
上一篇跟踪了IOC容器对配置文件的定位,现在我们继续跟踪代码,看看IOC容器是怎么加载和注册配置文件中的信息的.开始之前,首先我们先来了解一下IOC容器所使用的数据结构-------BeanDefin ...
- Spring5源码解析5-ConfigurationClassPostProcessor (上)
接上回,我们讲到了refresh()方法中的invokeBeanFactoryPostProcessors(beanFactory)方法主要在执行BeanFactoryPostProcessor和其子 ...
- Spring5源码解析2-register方法注册配置类
接上回已经讲完了this()方法,现在来看register(annotatedClasses);方法. // new AnnotationConfigApplicationContext(AppCon ...
- 一文带你解读Spring5源码解析 IOC之开启Bean的加载,以及FactoryBean和BeanFactory的区别。
前言 通过往期的文章我们已经了解了Spring对XML配置文件的解析,将分析的信息组装成BeanDefinition,并将其保存到相应的BeanDefinitionRegistry中,至此Spring ...
- ReactiveCocoa源码解析(二) Bag容器的代码实现
今天博客我接着上篇博客的内容来,上篇博客我们详细的看了ReactiveSwift中的Observer已经Event的代码实现.接下来我们来看一下ReactiveSwift中的结构体Bag的实现.Bag ...
随机推荐
- echo -e "\033[字背景颜色;字体颜色m字符串\033[0m
格式: echo -e "\033[字背景颜色;字体颜色m字符串\033[0m" 例如: echo -e "\033[41;36m something here \033 ...
- 使用cookie记录用户上次访问网页的时间,并返回到页面
package com.hopetesting.cookie;import javax.servlet.ServletException;import javax.servlet.annotation ...
- C# .exe和.dll文件图标资源提取工具
Windows 可执行文件(.exe)和动态库文件(.dll)图标资源提取工具 GitHub 功能 图标资源预览 图标资源导出(仅支持导出 PNG 格式) 代码 获取图标资源使用了 Win32 API ...
- Mysql资料 Binlog
目录 一.简介 二.开启binlog及相关参数 开启 相关操作 三.查看binlog日志 使用mysqlbinlog自带查看命令法 mysql加载方式查询 四.恢复数据 五.命令参数 一.简介 MyS ...
- 用 WinUI 3 开发了一个摸鱼应用
1. 开发了一个摸鱼 App 我做了一个简单的 App:摸鱼. 如上图所示,这个 App 就只有一个按钮,点击后假装开始 Windows Update,然后用户就可以光明正大地摸鱼了. 不要小看摸鱼, ...
- React中使用 react-router-dom 路由传参的三种方式详解【含V5.x、V6.x】!!!
路由传值的三种方式(v5.x) params参数 //路由链接(携带参数): <Link to='/demo/test/tom/18'}>详情</Link> //或 <L ...
- 谷歌protobuf(protocol-buffers)各种开发语言数据类型转换说明
官方文档:https://developers.google.cn/protocol-buffers/docs/proto proto2 proto3
- JAVA判断IP是否是内网IP
/** * 私有IP: * A类 10.0.0.0-10.255.255.255 * B类 172.16.0.0-172.31.255.255 * C类 192.168.0.0-192. ...
- JAVA判断是否是微信内置浏览器,是否是在微信内打开
/** * 通过请求头判断是否是微信内置浏览器,是否是在微信内打开 * @param request * @return */ @RequestMapping(value = "/hello ...
- c++之一个方便的日志库
概述 本文演示环境: win10 + vs2017 日志,我用的很少,通常是用作动态库调试使用. 日志记录下来,基本就没看过,除非模块出现了问题. 使用cmake管理的项目 使用C++封装了C语言读写 ...