Netty 框架学习 —— 单元测试
EmbeddedChannel 概述
ChannelHandler 是 Netty 程序的关键元素,所以彻底地测试它们应该是你的开发过程中的一个标准部分,EmbeddedChannel 是 Netty 专门为改进针对 ChannelHandler 的单元测试而提供的。Netty 提供了它所谓的 Embedded 传输,这个传输是 EmbeddedChannel 的功能,提供了通过 ChannelPipeline 传播事件的简便方法
这个方法是:将入站数据或者出站数据写入到 EmbeddedChannel 中,然后检查是否有任何东西到达 CHannelPipeline 的尾端。通过这种方式,你可以确定消息是否已经被编码或者解码过,以及是否触发了任何 ChannelHandler 动作
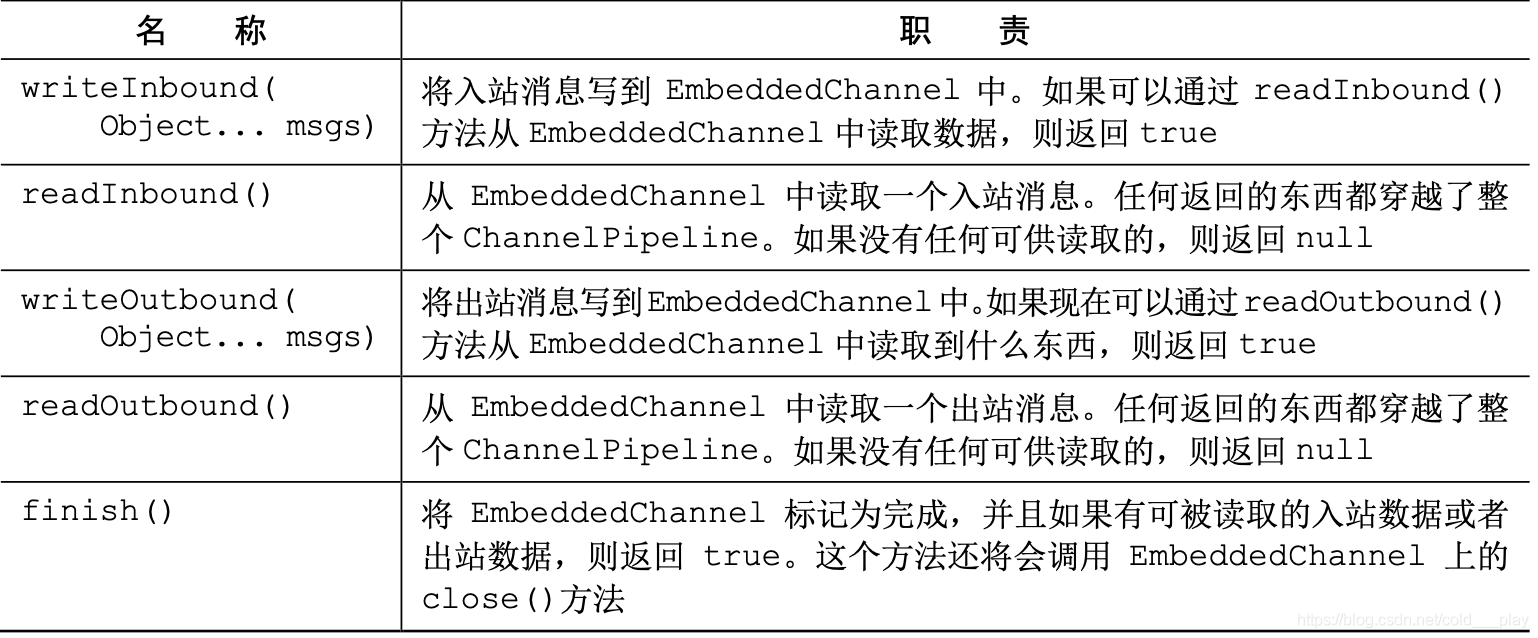
下表列出了 EmbeddedChannel 的相关方法
入站数据由 ChannelInboundHandler 处理,代表从远程节点读取的数据。出站数据由 ChannelOutboundHandler 处理,代表将要写到远程节点的数据。根据你要测试的 ChannelHandler,你可以使用 Inbound() 或者 Outbound() 方法对,或者兼而有之
下图展示了使用 EmbeddedChannel 的方法,数据是如何流经 ChannelPipeline 的。 你可以使用 writeOutbound()方法将消息写到 Channel 中,并通过 ChannelPipeline 沿 着出站的方向传递。随后,你可以使用 readOutbound()方法来读取已被处理过的消息,以确 定结果是否和预期一样。类似地,对于入站数据,你需要使用 writeInbound()和 readInbound() 方法

使用 EmbeddedChannel 测试 ChannelHandler
1. 测试入站消息
下述代码展示了一个简单的 ByteToMessageDecoder 实现,给定足够的数据,这个实现将产生固定大小的帧。如果没有足够的数据可供读取,它将等待下一个数据块的到来,并将再次检查是否能够产生一个新的帧
public class FixedLengthFrameDecoder extends ByteToMessageDecoder {

    // 指定要生成的帧的长度

    private final int frameLength;

    public FixedLengthFrameDecoder(int frameLength) {

        if (frameLength <= 0) {

            throw new IllegalArgumentException("frameLength must be a positive integer:" + frameLength);

        }

        this.frameLength = frameLength;

    }

    @Override

    protected void decode(ChannelHandlerContext ctx, ByteBuf in, List<Object> out) throws Exception {

        //检查是否有足够的字节可以被读取,以生成下一个帧

        while (in.readableBytes() >= frameLength) {

            //从 ByteBuf 中读取一个新帧

            ByteBuf buf = in.readBytes(frameLength);

            //将该帧添加到已被解码的消息列表中

            out.add(buf);

        }

    }

}
下述代码展示了使用 EmbeddedChannel 的对于前面代码的测试
public class FixedLengthFrameDecoderTest {

    @Test

    public void testFrameDecoded() {

        //创建一个 ByteBuf,并存储 9 字节

        ByteBuf buf = Unpooled.buffer();

        for (int i = 0; i < 9; i++) {

            buf.writeByte(i);

        }

        ByteBuf input = buf.duplicate();

        EmbeddedChannel channel = new EmbeddedChannel(new FixedLengthFrameDecoder(3));

        //将数据写入 EmbeddedChannel

        System.out.println(channel.writeInbound(input.retain()));//true

        //标记 Channel 为已完成状态

        System.out.println(channel.finish());//true

        //读取所生成的消息,并且验证是否有 3 帧,其中每帧都为 3 字节

        ByteBuf read = channel.readInbound();

        System.out.println(buf.readSlice(3).equals(read));// true

        read = channel.readInbound();

        System.out.println(buf.readSlice(3).equals(read));// true

        read.release();

        read = channel.readInbound();

        System.out.println(buf.readSlice(3).equals(read));// true

        read.release();

        System.out.println(channel.readInbound() == null);// true

        buf.release();

    }

    @Test

    public void testFramesDescode2() {

        ByteBuf buf = Unpooled.buffer();

        for (int i = 0; i < 9; i++) {

            buf.writeByte(i);

        }

        ByteBuf input = buf.duplicate();

        EmbeddedChannel channel = new EmbeddedChannel(new FixedLengthFrameDecoder(3));

        //返回 false,因为没有一个完整的可供读取的帧

        System.out.println(channel.writeInbound(input.readBytes(2)));// false

        System.out.println(channel.writeInbound(input.readBytes(7)));// true

        System.out.println(channel.finish());// true

        ByteBuf read = channel.readInbound();

        System.out.println(buf.readSlice(3) == read);// false

        read.release();

        read = channel.readInbound();

        System.out.println(buf.readSlice(3) == read);// false

        read.release();

        read = channel.readInbound();

        System.out.println(buf.readSlice(3) == read);// false

        read.release();

        System.out.println(channel.readInbound() == null);// true

        buf.release();

    }

}
2. 测试入站消息
测试出站消息的处理过程和刚才所看到的类似,在下面的例子中,我们将会展示如何使用 EmbeddedChannel 来测试另一个编码器形式的 ChannelOutboundHandler,编码器是一种将一种消息格式转换为另一种的组件
该示例将会按照下列方式工作:
- 持有 AbsIntegerEncoder 的 EmbeddedChannel 将会以 4 字节的负整数的形式写出站数据
- 编码器将从传入的 ByteBuf 中读取每个负整数,并将会调用 Math.abs() 方法来获取其绝对值
- 编码器将会把每个负整数的绝对值写到 ChannelPipeline 中
下述代码展示了这个逻辑
public class AbsIntegerEncoder extends MessageToMessageEncoder<ByteBuf> {

    @Override

    protected void encode(ChannelHandlerContext ctx, ByteBuf msg, List<Object> out) throws Exception {

        while (msg.readableBytes() >= 4) {

            //从输入的 ByteBuf 中读取下一个整数,并且计算其绝对值

            int value = Math.abs(msg.readInt());

            //将该整数写入到编码消息的 List 中

            out.add(value);

        }

    }

}
使用 EmbeddedChannel 来测试代码
public class AbsIntegerEncoderTest {

    @Test

    public void testEncoded() {

        ByteBuf buf = Unpooled.buffer();

        for (int i = 1; i < 10; i++) {

            buf.writeInt(i * -1);

        }

        // 创建一个 EmbeddedChanel,并安装一个要测试的 AbsIntegerEncoder

        EmbeddedChannel channel = new EmbeddedChannel(new AbsIntegerEncoder());

        // 写入 ByteBuf,调用 readOutbound() 方法将会产生数据

        System.out.println(channel.writeOutbound(buf));

        System.out.println(channel.finish());

        channel.readOutbound();

        for (int i = 1; i < 10; i++) {

            int temp = channel.readOutbound();

            System.out.println(temp);

        }

        System.out.println(channel.readOutbound() == null);

    }

}
下面是代码中执行的步骤。
- 将 4 字节的负整数写到一个新的 ByteBuf 中
- 创建一个 EmbeddedChannel,并为它分配一个 AbsIntegerEncoder
- 调用 EmbeddedChannel 上的 writeOutbound()方法来写入该 ByteBuf
- 标记该 Channel 为已完成状态
- 从 EmbeddedChannel 的出站端读取所有的整数,并验证是否只产生了绝对值
测试异常处理
应用程序通常需要执行比转换数据更加复杂的任务。例如,你可能需要处理格式不正确的输 入或者过量的数据。在下一个示例中,如果所读取的字节数超出了某个特定的限制,我们将会抛出一个 TooLongFrameException,这是一种经常用来防范资源被耗尽的方法
实现的代码如下
// 扩展 ByteToMessageDecoder 以将入站字节码为消息

public class FrameChunkDecoder extends ByteToMessageDecoder {

    private final int maxFrameSize;

    public FrameChunkDecoder(int maxFrameSize) {

        this.maxFrameSize = maxFrameSize;

    }

    @Override

    protected void decode(ChannelHandlerContext ctx, ByteBuf in, List<Object> out) throws Exception {

        int readableBytes = in.readableBytes();

        if (readableBytes > maxFrameSize) {

            // 如果该帧太大,则丢弃它并抛出一个 TooLongFrameException

            in.clear();

            throw new TooLongFrameException();

        }

        // 否则,从 ByteBuf 中读取一个新的帧

        ByteBuf buf = in.readBytes(readableBytes);

        // 该帧添加到解码消息的List中

        out.add(buf);

    }

}
再使用 EmbeddedChannel 来测试这段代码
public class FrameChunkDecoderTest {

    @Test

    public void testFramesDecoded() {

        ByteBuf buf = Unpooled.buffer();

        for (int i = 0; i < 9; i++) {

            buf.writeByte(i);

        }

        ByteBuf input = buf.duplicate();

        // 创建一个 EmbeddedChannel,并向其安装一个帧大小为 3 字节的 FixedLengthFrameDecoder

        EmbeddedChannel channel = new EmbeddedChannel(new FrameChunkDecoder(3));

        System.out.println(channel.writeInbound(input.readBytes(2)));

        try {

            // 写入一个 4 字节大小的帧,并捕获预期的异常

            channel.writeInbound(input.readBytes(4));

        } catch (TooLongFrameException e) {

            e.printStackTrace();

        }

        // 写入剩余的 2 字节,会产生一个有效帧

        System.out.println(channel.writeInbound(input.readBytes(3)));//true

        System.out.println(channel.finish());

        // 读取产生的消息,并且验证值

        ByteBuf read = channel.readInbound();

        System.out.println(read.equals(buf.readSlice(2)));//true

        read.release();

        read = channel.readInbound();

        System.out.println(read.equals(buf.skipBytes(4).readSlice(3)));//true

        read.release();

        buf.release();

    }

}
Netty 框架学习 —— 单元测试的更多相关文章
- Netty 框架学习 —— 引导
概述 前面我们学习了 ChannelPipeline.ChannelHandler 和 EventLoop 之后,接下来的问题是:如何将它们组织起来,成为一个可实际运行的应用程序呢?答案是使用引导(B ...
- Netty 框架学习 —— 编解码器框架
编解码器 每个网络应用程序都必须定义如何解析在两个节点之间来回传输的原始字节,以及如何将其和目标应用程序的数据格式做相互转换.这种转换逻辑由编解码器处理,编解码器由编码器和解码器组成,它们每种都可以将 ...
- Netty 框架学习 —— 第一个 Netty 应用
概述 在本文,我们将编写一个基于 Netty 实现的客户端和服务端应用程序,相信通过学习该示例,一定能更全面的理解 Netty API 该图展示的是多个客户端同时连接到一台服务器.客户端建立一个连接后 ...
- Netty 框架学习 —— EventLoop 和线程模型
EventLoop 接口 Netty 是基于 Java NIO 的,因此 Channel 也有其生命周期,处理一个连接在其生命周期内发生的事件是所有网络框架的基本功能.通常来说,我们使用一个线程来处理 ...
- Netty 框架学习 —— 预置的 ChannelHandler 和编解码器
Netty 为许多提供了许多预置的编解码器和处理器,几乎可以开箱即用,减少了在烦琐事务上话费的时间和精力 空闲的连接和超时 检测空闲连接以及超时对于释放资源来说至关重要,Netty 特地为它提供了几个 ...
- Netty 框架学习 —— Netty 组件与设计
Channel.EventLoop 和 ChannelFuture 这一节将对 Channel.EventLoop 和 ChannelFuture 类进行讨论,它们组合在一起,可以被认为是 Netty ...
- Netty 框架学习 —— 传输
概述 流经网络的数据总是具有相同的类型:字节,这些字节如何传输主要取决于我们所说的网络传输.用户并不关心传输的细节,只在乎字节是否被可靠地发送和接收 如果使用 Java 网络编程,你会发现,某些时候当 ...
- Netty 框架学习 —— ByteBuf
概述 网络数据的基本单位总是字节,Java NIO 提供了 ByteBuffer 作为它的字节容器,但这个类的使用过于复杂.Netty 的 ByteBuf 具有卓越的功能性和灵活性,可以作为 Byte ...
- Netty 框架学习 —— ChannelHandler 与 ChannelPipeline
ChannelHandler 1. Channel 生命周期 Channel 的生命周期状态如下: 状态 描述 ChannelUnregistered Channel 已经被创建,但还未注册到 Eve ...
随机推荐
- .NET 反射(Reflection)
这节讲一下.NET 中的一个技术:反射(Reflection). 反射是一种很重要的技术,它可以在程序运行时,动态的获取类的实例,并调用实例中的任何方法.它就像一面镜子,映射出一个类的所有细节. ...
- 『政善治』Postman工具 — 11、Postman中对Cookie的操作
目录 1.关联接口说明 2.测试关联接口实现步骤 3.补充:Postman中将请求转换成代码 上一篇文章说明了Postman中关于Cookie的相关操作,还是以Cookie举例,来说明下一在Postm ...
- 网络编程-UDP的服务器和客户端----keep on going never give up
1 //**************************************服务器********************************************** 2 #inclu ...
- java基础——何为方法
方法 java中方法时语句的集合,他们在一起执行一个功能 方法时解决一类问题的步骤的有序组合 方法包含于与类或者对象中 方法在程序中被创建,在其他地方被引用 设计方法的原则:保持其原子性. 就是一个方 ...
- [bug] redis-cli连接时出现Could not connect to Redis at 127.0.0.1:6379: Connection refused
参考 https://www.geek-share.com/detail/2684728161.html
- Linux进阶之LAMP和LNMP动态网站搭建
一.什么是LAMP LAMP=Linux Apache Mysql/MariaDB PHP/Perl/Python 这些软件都是开源免费的软件,几个程序各自是独立的,经常为了达到我们需要的效果而协同工 ...
- Linux中级之负载均衡(lvs,nginx,haproxy)、中间件
一.负载均衡的概念 1.系统的扩展方式: scale up:向上扩展 scale out:向外扩展 2.集群类型: LB(Load Balancing).HA(high availability) ...
- 3.21-22 od、tee
3.21 od:按不同进制显示文件 od命令用于输出文件的八进制.十六进制或者其他格式编码的字节,通常用于显示或查看文件中不能直接显示在终端的字符. -A 地址进制 按指定的进制 ...
- 拉仇恨!webhook + 企业微信给同事做了个代码提交监听工具
本文案例收录在 https://github.com/chengxy-nds/Springboot-Notebook 大家好,我是小富~ 最近接个任务,用webhook做了个代码提交监听功能,就是有人 ...
- 如何让Android 支持HEIF 图片解码和加载(免费的方法)
字节跳动火山引擎ImageX提供了一种能力,可以支持客户端android 直接解码HEIF 和HEIC图片,经过测试发现,可以免费使用: 一.阅前准备 HEIF图片格式是什么? 高效率图像格式(Hig ...