Netty 框架学习 —— 单元测试
EmbeddedChannel 概述
ChannelHandler 是 Netty 程序的关键元素,所以彻底地测试它们应该是你的开发过程中的一个标准部分,EmbeddedChannel 是 Netty 专门为改进针对 ChannelHandler 的单元测试而提供的。Netty 提供了它所谓的 Embedded 传输,这个传输是 EmbeddedChannel 的功能,提供了通过 ChannelPipeline 传播事件的简便方法
这个方法是:将入站数据或者出站数据写入到 EmbeddedChannel 中,然后检查是否有任何东西到达 CHannelPipeline 的尾端。通过这种方式,你可以确定消息是否已经被编码或者解码过,以及是否触发了任何 ChannelHandler 动作
下表列出了 EmbeddedChannel 的相关方法
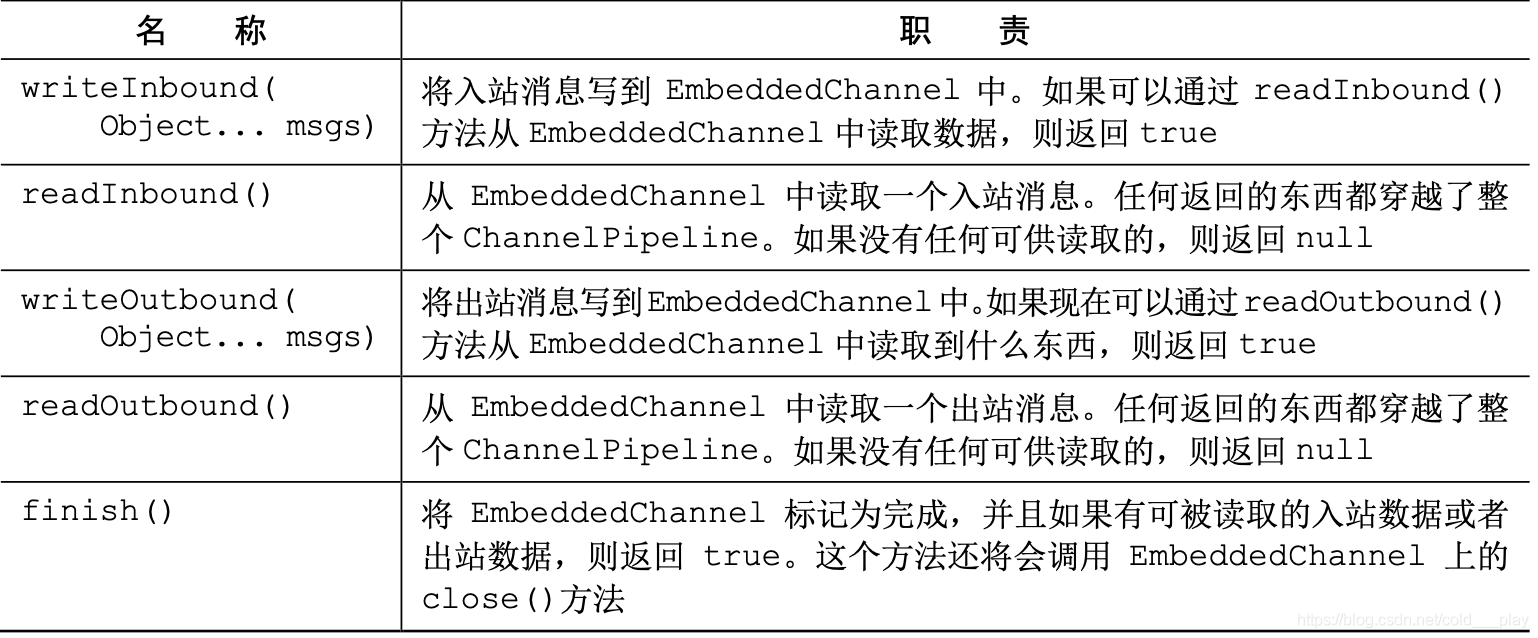
入站数据由 ChannelInboundHandler 处理,代表从远程节点读取的数据。出站数据由 ChannelOutboundHandler 处理,代表将要写到远程节点的数据。根据你要测试的 ChannelHandler,你可以使用 Inbound() 或者 Outbound() 方法对,或者兼而有之
下图展示了使用 EmbeddedChannel 的方法,数据是如何流经 ChannelPipeline 的。 你可以使用 writeOutbound()方法将消息写到 Channel 中,并通过 ChannelPipeline 沿 着出站的方向传递。随后,你可以使用 readOutbound()方法来读取已被处理过的消息,以确 定结果是否和预期一样。类似地,对于入站数据,你需要使用 writeInbound()和 readInbound() 方法

使用 EmbeddedChannel 测试 ChannelHandler
1. 测试入站消息
下述代码展示了一个简单的 ByteToMessageDecoder 实现,给定足够的数据,这个实现将产生固定大小的帧。如果没有足够的数据可供读取,它将等待下一个数据块的到来,并将再次检查是否能够产生一个新的帧
public class FixedLengthFrameDecoder extends ByteToMessageDecoder {

    // 指定要生成的帧的长度

    private final int frameLength;

    public FixedLengthFrameDecoder(int frameLength) {

        if (frameLength <= 0) {

            throw new IllegalArgumentException("frameLength must be a positive integer:" + frameLength);

        }

        this.frameLength = frameLength;

    }

    @Override

    protected void decode(ChannelHandlerContext ctx, ByteBuf in, List<Object> out) throws Exception {

        //检查是否有足够的字节可以被读取,以生成下一个帧

        while (in.readableBytes() >= frameLength) {

            //从 ByteBuf 中读取一个新帧

            ByteBuf buf = in.readBytes(frameLength);

            //将该帧添加到已被解码的消息列表中

            out.add(buf);

        }

    }

}
下述代码展示了使用 EmbeddedChannel 的对于前面代码的测试
public class FixedLengthFrameDecoderTest {

    @Test

    public void testFrameDecoded() {

        //创建一个 ByteBuf,并存储 9 字节

        ByteBuf buf = Unpooled.buffer();

        for (int i = 0; i < 9; i++) {

            buf.writeByte(i);

        }

        ByteBuf input = buf.duplicate();

        EmbeddedChannel channel = new EmbeddedChannel(new FixedLengthFrameDecoder(3));

        //将数据写入 EmbeddedChannel

        System.out.println(channel.writeInbound(input.retain()));//true

        //标记 Channel 为已完成状态

        System.out.println(channel.finish());//true

        //读取所生成的消息,并且验证是否有 3 帧,其中每帧都为 3 字节

        ByteBuf read = channel.readInbound();

        System.out.println(buf.readSlice(3).equals(read));// true

        read = channel.readInbound();

        System.out.println(buf.readSlice(3).equals(read));// true

        read.release();

        read = channel.readInbound();

        System.out.println(buf.readSlice(3).equals(read));// true

        read.release();

        System.out.println(channel.readInbound() == null);// true

        buf.release();

    }

    @Test

    public void testFramesDescode2() {

        ByteBuf buf = Unpooled.buffer();

        for (int i = 0; i < 9; i++) {

            buf.writeByte(i);

        }

        ByteBuf input = buf.duplicate();

        EmbeddedChannel channel = new EmbeddedChannel(new FixedLengthFrameDecoder(3));

        //返回 false,因为没有一个完整的可供读取的帧

        System.out.println(channel.writeInbound(input.readBytes(2)));// false

        System.out.println(channel.writeInbound(input.readBytes(7)));// true

        System.out.println(channel.finish());// true

        ByteBuf read = channel.readInbound();

        System.out.println(buf.readSlice(3) == read);// false

        read.release();

        read = channel.readInbound();

        System.out.println(buf.readSlice(3) == read);// false

        read.release();

        read = channel.readInbound();

        System.out.println(buf.readSlice(3) == read);// false

        read.release();

        System.out.println(channel.readInbound() == null);// true

        buf.release();

    }

}
2. 测试入站消息
测试出站消息的处理过程和刚才所看到的类似,在下面的例子中,我们将会展示如何使用 EmbeddedChannel 来测试另一个编码器形式的 ChannelOutboundHandler,编码器是一种将一种消息格式转换为另一种的组件
该示例将会按照下列方式工作:
- 持有 AbsIntegerEncoder 的 EmbeddedChannel 将会以 4 字节的负整数的形式写出站数据
- 编码器将从传入的 ByteBuf 中读取每个负整数,并将会调用 Math.abs() 方法来获取其绝对值
- 编码器将会把每个负整数的绝对值写到 ChannelPipeline 中
下述代码展示了这个逻辑
public class AbsIntegerEncoder extends MessageToMessageEncoder<ByteBuf> {

    @Override

    protected void encode(ChannelHandlerContext ctx, ByteBuf msg, List<Object> out) throws Exception {

        while (msg.readableBytes() >= 4) {

            //从输入的 ByteBuf 中读取下一个整数,并且计算其绝对值

            int value = Math.abs(msg.readInt());

            //将该整数写入到编码消息的 List 中

            out.add(value);

        }

    }

}
使用 EmbeddedChannel 来测试代码
public class AbsIntegerEncoderTest {

    @Test

    public void testEncoded() {

        ByteBuf buf = Unpooled.buffer();

        for (int i = 1; i < 10; i++) {

            buf.writeInt(i * -1);

        }

        // 创建一个 EmbeddedChanel,并安装一个要测试的 AbsIntegerEncoder

        EmbeddedChannel channel = new EmbeddedChannel(new AbsIntegerEncoder());

        // 写入 ByteBuf,调用 readOutbound() 方法将会产生数据

        System.out.println(channel.writeOutbound(buf));

        System.out.println(channel.finish());

        channel.readOutbound();

        for (int i = 1; i < 10; i++) {

            int temp = channel.readOutbound();

            System.out.println(temp);

        }

        System.out.println(channel.readOutbound() == null);

    }

}
下面是代码中执行的步骤。
- 将 4 字节的负整数写到一个新的 ByteBuf 中
- 创建一个 EmbeddedChannel,并为它分配一个 AbsIntegerEncoder
- 调用 EmbeddedChannel 上的 writeOutbound()方法来写入该 ByteBuf
- 标记该 Channel 为已完成状态
- 从 EmbeddedChannel 的出站端读取所有的整数,并验证是否只产生了绝对值
测试异常处理
应用程序通常需要执行比转换数据更加复杂的任务。例如,你可能需要处理格式不正确的输 入或者过量的数据。在下一个示例中,如果所读取的字节数超出了某个特定的限制,我们将会抛出一个 TooLongFrameException,这是一种经常用来防范资源被耗尽的方法
实现的代码如下
// 扩展 ByteToMessageDecoder 以将入站字节码为消息

public class FrameChunkDecoder extends ByteToMessageDecoder {

    private final int maxFrameSize;

    public FrameChunkDecoder(int maxFrameSize) {

        this.maxFrameSize = maxFrameSize;

    }

    @Override

    protected void decode(ChannelHandlerContext ctx, ByteBuf in, List<Object> out) throws Exception {

        int readableBytes = in.readableBytes();

        if (readableBytes > maxFrameSize) {

            // 如果该帧太大,则丢弃它并抛出一个 TooLongFrameException

            in.clear();

            throw new TooLongFrameException();

        }

        // 否则,从 ByteBuf 中读取一个新的帧

        ByteBuf buf = in.readBytes(readableBytes);

        // 该帧添加到解码消息的List中

        out.add(buf);

    }

}
再使用 EmbeddedChannel 来测试这段代码
public class FrameChunkDecoderTest {

    @Test

    public void testFramesDecoded() {

        ByteBuf buf = Unpooled.buffer();

        for (int i = 0; i < 9; i++) {

            buf.writeByte(i);

        }

        ByteBuf input = buf.duplicate();

        // 创建一个 EmbeddedChannel,并向其安装一个帧大小为 3 字节的 FixedLengthFrameDecoder

        EmbeddedChannel channel = new EmbeddedChannel(new FrameChunkDecoder(3));

        System.out.println(channel.writeInbound(input.readBytes(2)));

        try {

            // 写入一个 4 字节大小的帧,并捕获预期的异常

            channel.writeInbound(input.readBytes(4));

        } catch (TooLongFrameException e) {

            e.printStackTrace();

        }

        // 写入剩余的 2 字节,会产生一个有效帧

        System.out.println(channel.writeInbound(input.readBytes(3)));//true

        System.out.println(channel.finish());

        // 读取产生的消息,并且验证值

        ByteBuf read = channel.readInbound();

        System.out.println(read.equals(buf.readSlice(2)));//true

        read.release();

        read = channel.readInbound();

        System.out.println(read.equals(buf.skipBytes(4).readSlice(3)));//true

        read.release();

        buf.release();

    }

}
Netty 框架学习 —— 单元测试的更多相关文章
- Netty 框架学习 —— 引导
概述 前面我们学习了 ChannelPipeline.ChannelHandler 和 EventLoop 之后,接下来的问题是:如何将它们组织起来,成为一个可实际运行的应用程序呢?答案是使用引导(B ...
- Netty 框架学习 —— 编解码器框架
编解码器 每个网络应用程序都必须定义如何解析在两个节点之间来回传输的原始字节,以及如何将其和目标应用程序的数据格式做相互转换.这种转换逻辑由编解码器处理,编解码器由编码器和解码器组成,它们每种都可以将 ...
- Netty 框架学习 —— 第一个 Netty 应用
概述 在本文,我们将编写一个基于 Netty 实现的客户端和服务端应用程序,相信通过学习该示例,一定能更全面的理解 Netty API 该图展示的是多个客户端同时连接到一台服务器.客户端建立一个连接后 ...
- Netty 框架学习 —— EventLoop 和线程模型
EventLoop 接口 Netty 是基于 Java NIO 的,因此 Channel 也有其生命周期,处理一个连接在其生命周期内发生的事件是所有网络框架的基本功能.通常来说,我们使用一个线程来处理 ...
- Netty 框架学习 —— 预置的 ChannelHandler 和编解码器
Netty 为许多提供了许多预置的编解码器和处理器,几乎可以开箱即用,减少了在烦琐事务上话费的时间和精力 空闲的连接和超时 检测空闲连接以及超时对于释放资源来说至关重要,Netty 特地为它提供了几个 ...
- Netty 框架学习 —— Netty 组件与设计
Channel.EventLoop 和 ChannelFuture 这一节将对 Channel.EventLoop 和 ChannelFuture 类进行讨论,它们组合在一起,可以被认为是 Netty ...
- Netty 框架学习 —— 传输
概述 流经网络的数据总是具有相同的类型:字节,这些字节如何传输主要取决于我们所说的网络传输.用户并不关心传输的细节,只在乎字节是否被可靠地发送和接收 如果使用 Java 网络编程,你会发现,某些时候当 ...
- Netty 框架学习 —— ByteBuf
概述 网络数据的基本单位总是字节,Java NIO 提供了 ByteBuffer 作为它的字节容器,但这个类的使用过于复杂.Netty 的 ByteBuf 具有卓越的功能性和灵活性,可以作为 Byte ...
- Netty 框架学习 —— ChannelHandler 与 ChannelPipeline
ChannelHandler 1. Channel 生命周期 Channel 的生命周期状态如下: 状态 描述 ChannelUnregistered Channel 已经被创建,但还未注册到 Eve ...
随机推荐
- java使用户EasyExcel导入导出excel
使用alibab的EasyExce完成导入导出excel 一.准备工作 1.导包 <!-- poi 相关--> <dependency> <groupId>org. ...
- Vue(1):用Vue-cli构建Vue3项目
使用Vue-cli构建Vue3项目 1.检查node版本 node -v 以上node版本位14.15.0满足Vue3项目的创建条件(Vu3需要node 版本8以上) 为什么需要安装node? vue ...
- 从0开始fastjson漏洞分析
关于fastjson漏洞利用参考:https://www.cnblogs.com/piaomiaohongchen/p/10799466.html fastjson这个漏洞出来了很久,一直没时间分析, ...
- MySQL字段默认值设置详解
前言: 在 MySQL 中,我们可以为表字段设置默认值,在表中插入一条新记录时,如果没有为某个字段赋值,系统就会自动为这个字段插入默认值.关于默认值,有些知识还是需要了解的,本篇文章我们一起来学习下字 ...
- [源码解析] 并行分布式框架 Celery 之 容错机制
[源码解析] 并行分布式框架 Celery 之 容错机制 目录 [源码解析] 并行分布式框架 Celery 之 容错机制 0x00 摘要 0x01 概述 1.1 错误种类 1.2 失败维度 1.3 应 ...
- php中输出函数的区别
isset() .empty()与is_null的区别 1.当变量未定义时,is_null() 和"参数本身"是不允许作为参数判断的,会报Notice警告错误: 2.empty , ...
- Dart 2.13 版现已发布
作者 / Kevin Moore & Michael Thomsen Dart 2.13 版现已发布,其中新增了类型别名功能,这是目前用户呼声第二高的语言功能.Dart 2.13 还改进了 D ...
- 【MySQL】MySQL-front等客户端连接MySQL_8.0等失败的解决办法
ALTER USER 'root'@'localhost' IDENTIFIED BY '新的密码' PASSWORD EXPIRE NEVER; ALTER USER 'root'@'localho ...
- 统一UOS操作系统 修改源地址
统一UOS操作系统 修改源地址 问题: 执行apt-get update的时候提示: root@sugon-PC:/etc/apt# apt-get update -y错误:1 https://uos ...
- CentOS 7 调整home大小
把/home内容备份,然后将/home文件系统所在的逻辑卷删除,扩大/root文件系统,新建/home: tar cvf /tmp/home.tar /home #备份/home umount /ho ...