
(数据科学学习手札119)Python+Dash快速web应用开发——多页面应用
本文示例代码已上传至我的
Github仓库https://github.com/CNFeffery/DataScienceStudyNotes
1 简介
这是我的系列教程Python+Dash快速web应用开发的第十六期,在过往所有的教程及案例中,我们所搭建的Dash应用的访问地址都是单一的,是个单页面应用,即我们所有的功能都排布在同一个url之下。
而随着我们所编写的Dash应用功能的日趋健全和复杂,单一url的内容组织方式无法再很好的满足需求,也不利于构建逻辑清晰的web应用。
因此我们需要在Dash应用中引入路由的相关功能,即在当前应用主域名下,根据不同的url来渲染出具有不同内容的页面,就像我们日常使用的绝大多数网站那样。
而今天的教程,我们就将一起学习在Dash中编写多url应用并进行路由控制的常用方法。
 图1
图1
2 编写多页面Dash应用
2.1 Location()的基础使用
要想在Dash中实现url路由功能,首先我们需要捕获到浏览器中地址栏对应的url是什么,这在Dash中可以通过在app.layout中构建一个可以持续监听当前Dash应用url信息的部件来实现。
我们使用官方依赖库dash_core_components中的Location()部件来实现上述功能,它的核心参数或属性有href、pathname、search和hash,让我们通过下面的例子来直观的了解它们各自记录了地址栏url中的哪些信息:
app1.py
import dash

import dash_core_components as dcc

import dash_html_components as html

import dash_bootstrap_components as dbc

from dash.dependencies import Input, Output

app = dash.Dash(__name__)

app.layout = dbc.Container(

    [

        dcc.Location(id='url'),

        html.Ul(id='output-url')

    ],

    style={

        'paddingTop': '100px'

    }

)

@app.callback(

    Output('output-url', 'children'),

    [Input('url', 'href'),

     Input('url', 'pathname'),

     Input('url', 'search'),

     Input('url', 'hash')]

)

def show_location(href, pathname, search, hash):

    return (

        html.Li(f'当前href为:{href}'),

        html.Li(f'当前pathname为:{pathname}'),

        html.Li(f'当前search为:{search}'),

        html.Li(f'当前hash为:{hash}'),

    )

if __name__ == '__main__':

    app.run_server(debug=True)
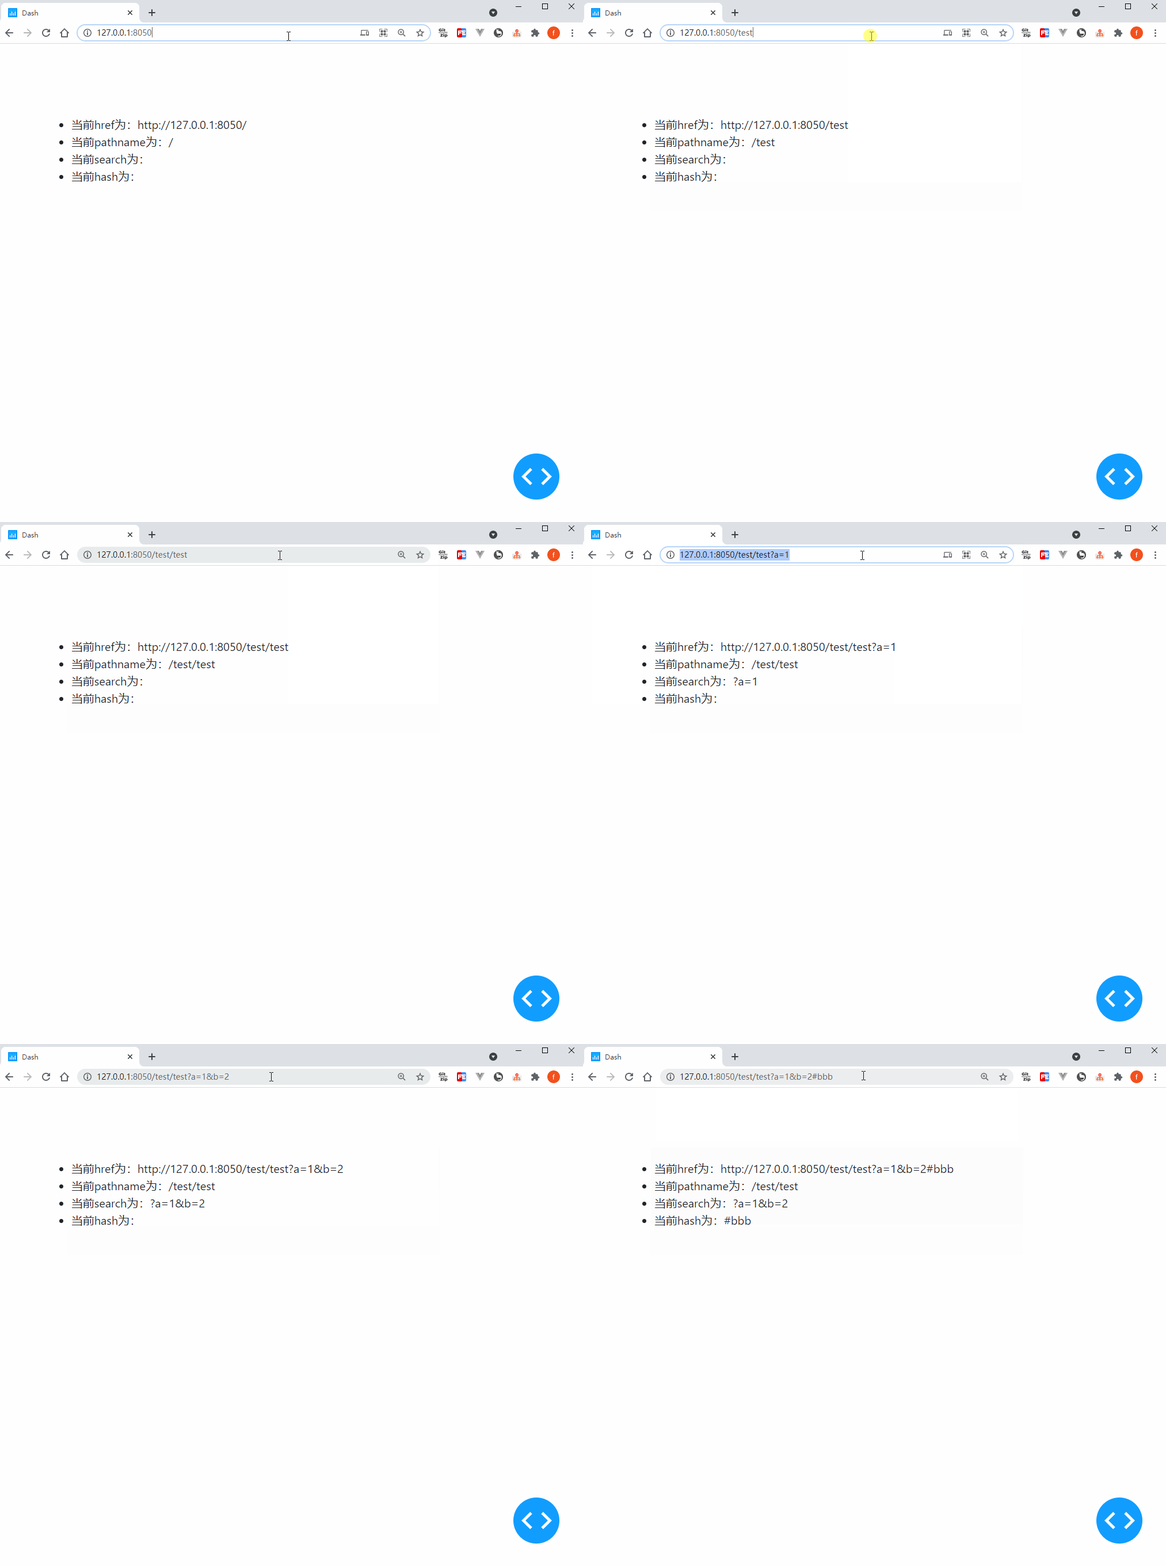 图2
图2
因此在Dash中编写多url应用的核心策略是利用埋点Location()捕获到地址栏对应信息的变化,并以这些信息作为回调函数的输入,来输出相应的页面内容变化,让我们从下面这个简单的例子中get上述这一套流程的运作方式:
app2.py
import dash

import dash_core_components as dcc

import dash_html_components as html

import dash_bootstrap_components as dbc

from dash.dependencies import Input, Output

app = dash.Dash(__name__)

app.layout = dbc.Container(

    [

        dcc.Location(id='url', refresh=False),

        dbc.Row(

            [

                dbc.Col(

                    [

                        html.A('页面A', href='/pageA'),

                        html.Br(),

                        html.A('页面B', href='/pageB'),

                        html.Br(),

                        html.A('页面C', href='/pageC'),

                    ],

                    width=2,

                    style={

                        'backgroundColor': '#eeeeee'

                    }

                ),

                dbc.Col(

                    html.H3(id='render-page-content'),

                    width=10

                )

            ]

        )

    ],

    style={

        'paddingTop': '20px',

        'height': '100vh',

        'weight': '100vw'

    }

)

@app.callback(

    Output('render-page-content', 'children'),

    Input('url', 'pathname')

)

def render_page_content(pathname):

    if pathname == '/':

        return '欢迎来到首页'

    elif pathname == '/pageA':

        return '欢迎来到页面A'

    elif pathname == '/pageB':

        return '欢迎来到页面B'

    elif pathname == '/pageC':

        return '欢迎来到页面C'

    else:

        return '当前页面不存在!'

if __name__ == '__main__':

    app.run_server(debug=True)
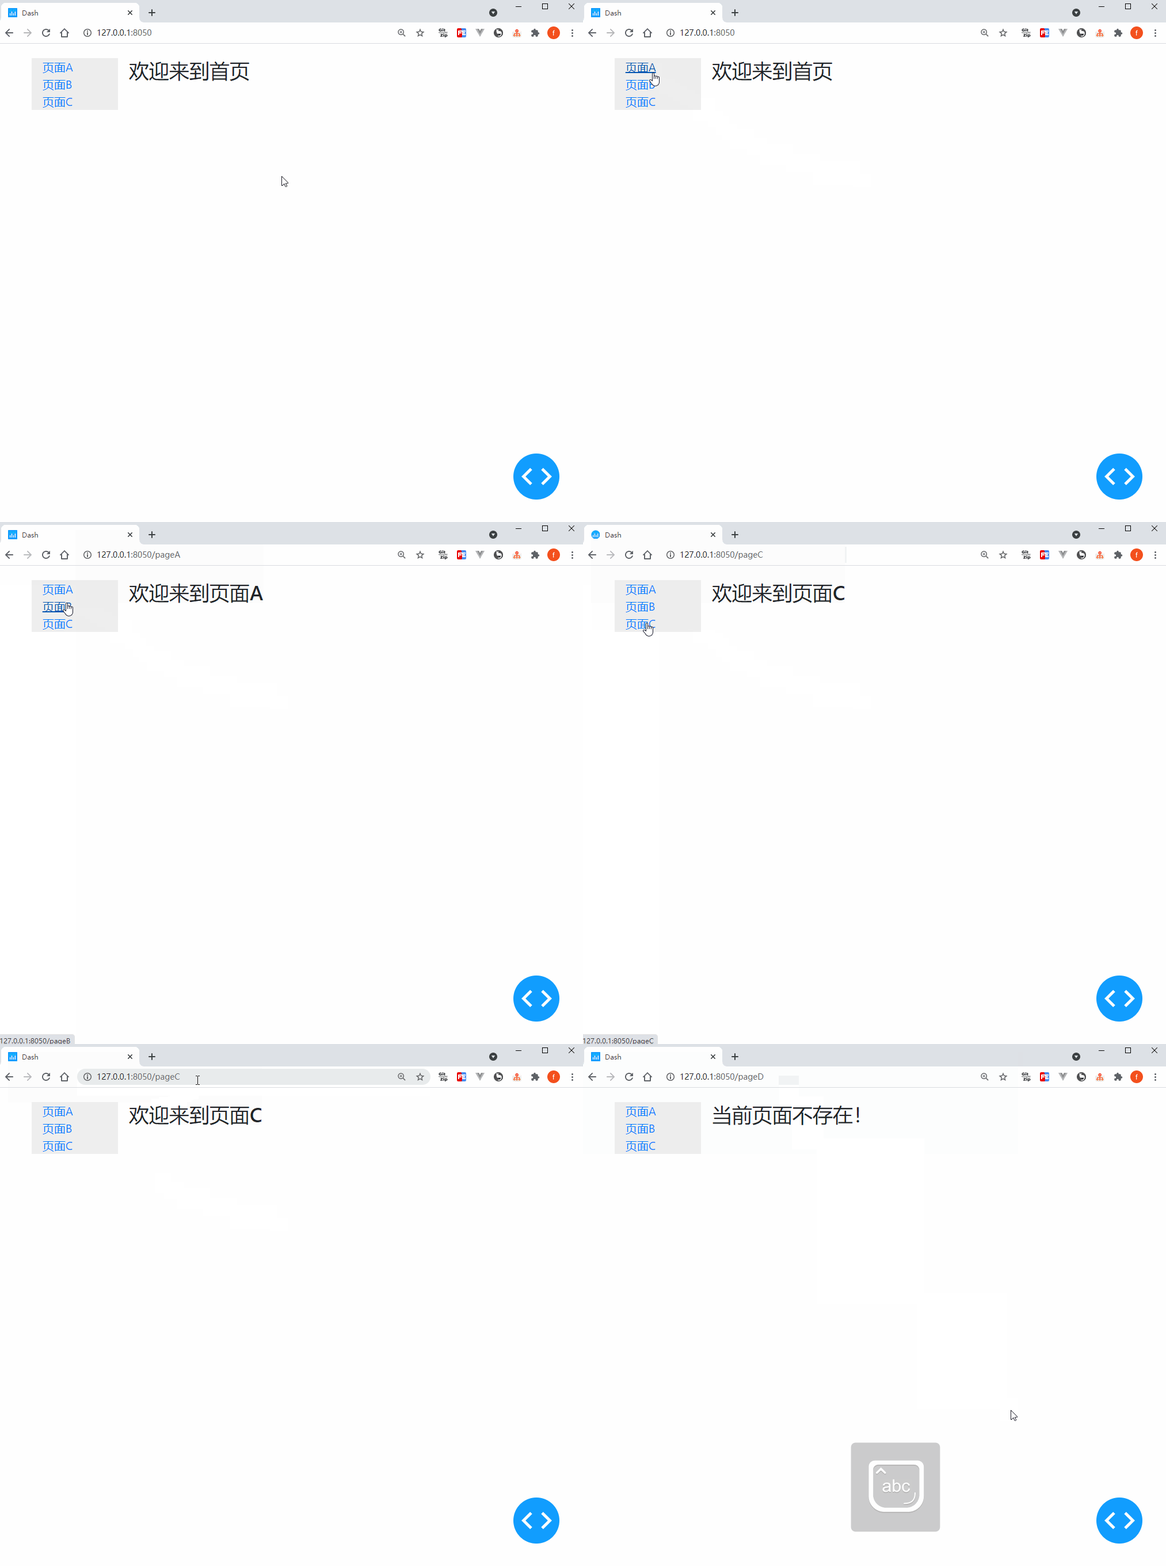 图3
图3
2.2 利用Location()实现页面重定向
在上一小节我们对dcc.Location()的基础用法进行了介绍,而它的功能可不止监听url变化这么简单,我们还可以利用它在Dash中实现重定向,使用方式简单一句话描述就是将Location()作为对应回调的输出(记住一定要定义id属性),这样地址栏url会在回调完成后对应跳转。
让我们通过下面这个简单的例子来get这个技巧:
app3.py
import dash

import dash_core_components as dcc

import dash_html_components as html

import dash_bootstrap_components as dbc

from dash.dependencies import Input, Output

app = dash.Dash(__name__)

app.layout = dbc.Container(

    [

        html.Div(id='redirect-url-container'),

        dbc.Button('跳转到页面A', id='jump-to-pageA', style={'marginRight': '10px'}),

        dbc.Button('跳转到页面B', id='jump-to-pageB'),

    ],

    style={

        'paddingTop': '100px'

    }

)

@app.callback(

    Output('redirect-url-container', 'children'),

    [Input('jump-to-pageA', 'n_clicks'),

     Input('jump-to-pageB', 'n_clicks')],

)

def jump_to_target(a_n_clicks, b_n_clicks):

    ctx = dash.callback_context

    if ctx.triggered[0]['prop_id'] == 'jump-to-pageA.n_clicks':

        return dcc.Location(id='redirect-url', href='/pageA')

    elif ctx.triggered[0]['prop_id'] == 'jump-to-pageB.n_clicks':

        return dcc.Location(id='redirect-url', href='/pageB')

    return dash.no_update

if __name__ == '__main__':

    app.run_server(debug=True)
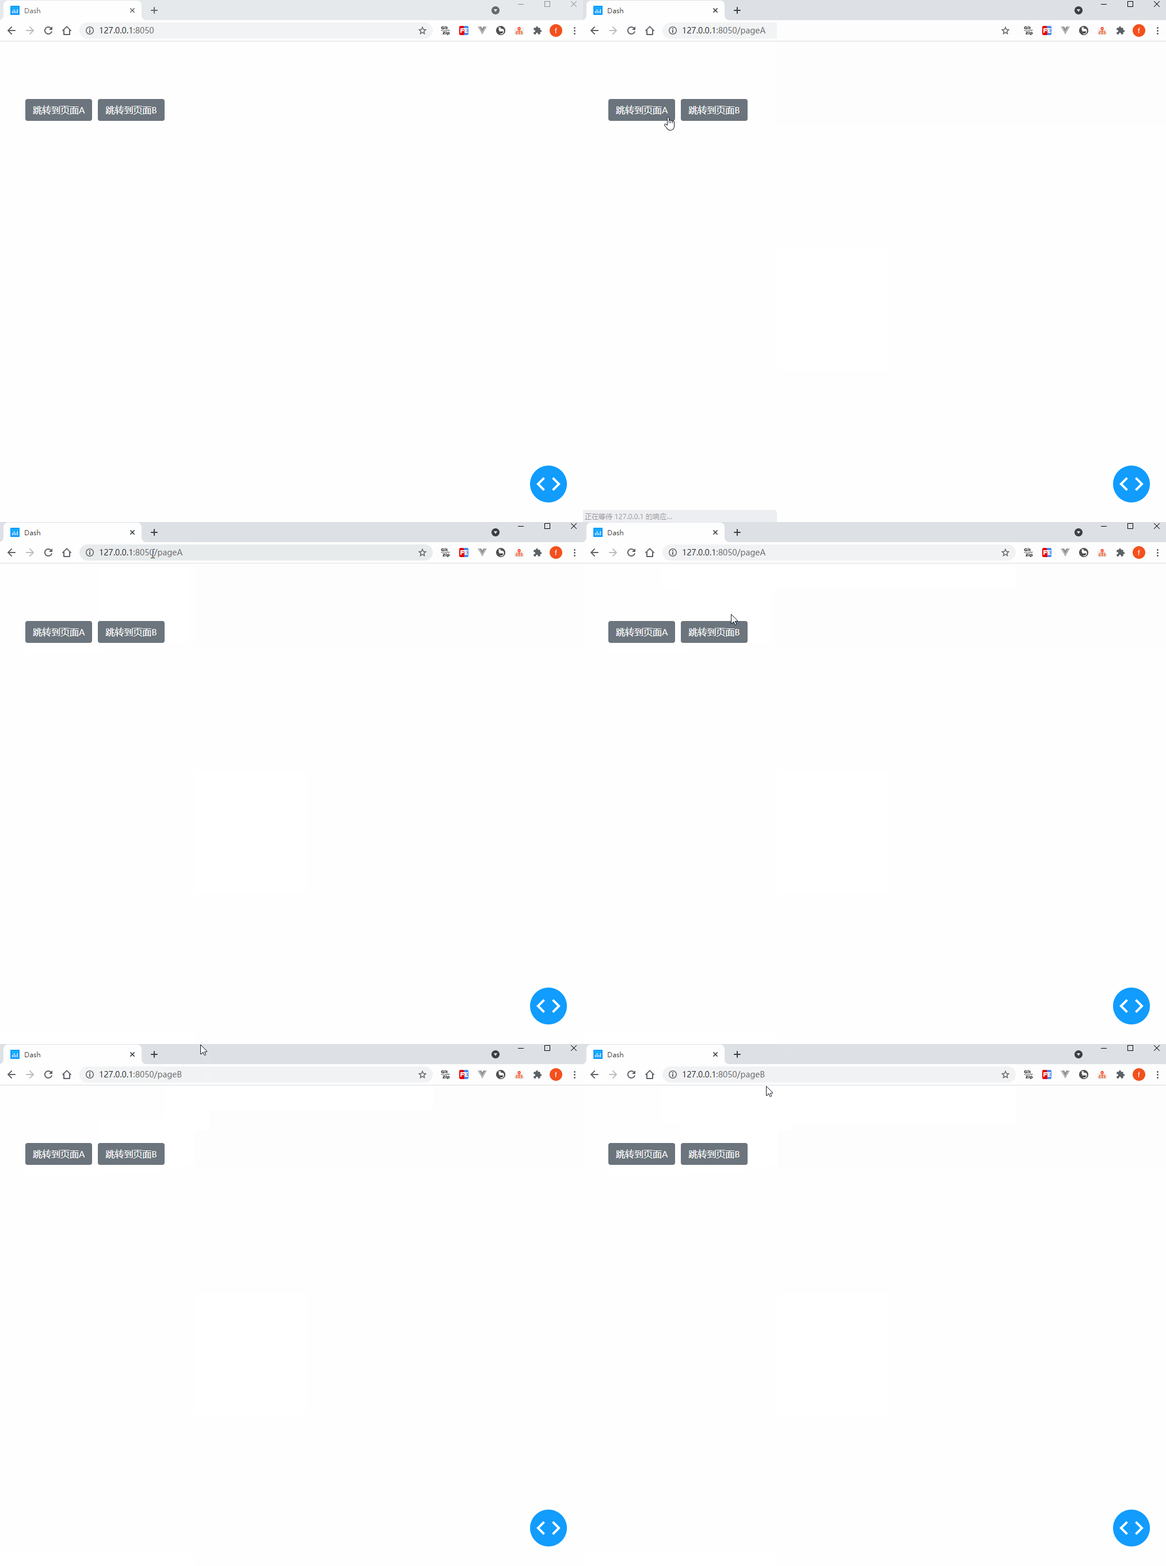 图4
图4
2.3 用Link()实现“无缝”页面切换
你应该注意到了,在Dash中利用Location()和普通的A()部件实现跳转时,页面在跳转后会整体刷新,这会一定程度上破坏整个web应用的整体体验。
而dash_core_components中的Link()部件则是很好的替代,它的基础属性与A()无异,但额外的refresh参数默认为False,会在点击后进行Dash应用内跳转时无缝切换,页面不会整体刷新:
app4.py
import dash

import dash_core_components as dcc

import dash_html_components as html

import dash_bootstrap_components as dbc

from dash.dependencies import Input, Output

app = dash.Dash(__name__)

app.layout = dbc.Container(

    [

        dcc.Location(id='url'),

        dcc.Link('页面A', href='/pageA', refresh=True),

        html.Br(),

        dcc.Link('页面B', href='/pageB'),

        html.Hr(),

        html.H1(id='render-page-content')

    ],

    style={

        'paddingTop': '100px'

    }

)

@app.callback(

    Output('render-page-content', 'children'),

    Input('url', 'pathname')

)

def render_page_content(pathname):

    if pathname == '/':

        return '欢迎来到首页'

    elif pathname == '/pageA':

        return '欢迎来到页面A'

    elif pathname == '/pageB':

        return '欢迎来到页面B'

    elif pathname == '/pageC':

        return '欢迎来到页面C'

    else:

        return '当前页面不存在!'

if __name__ == '__main__':

    app.run_server(debug=True)
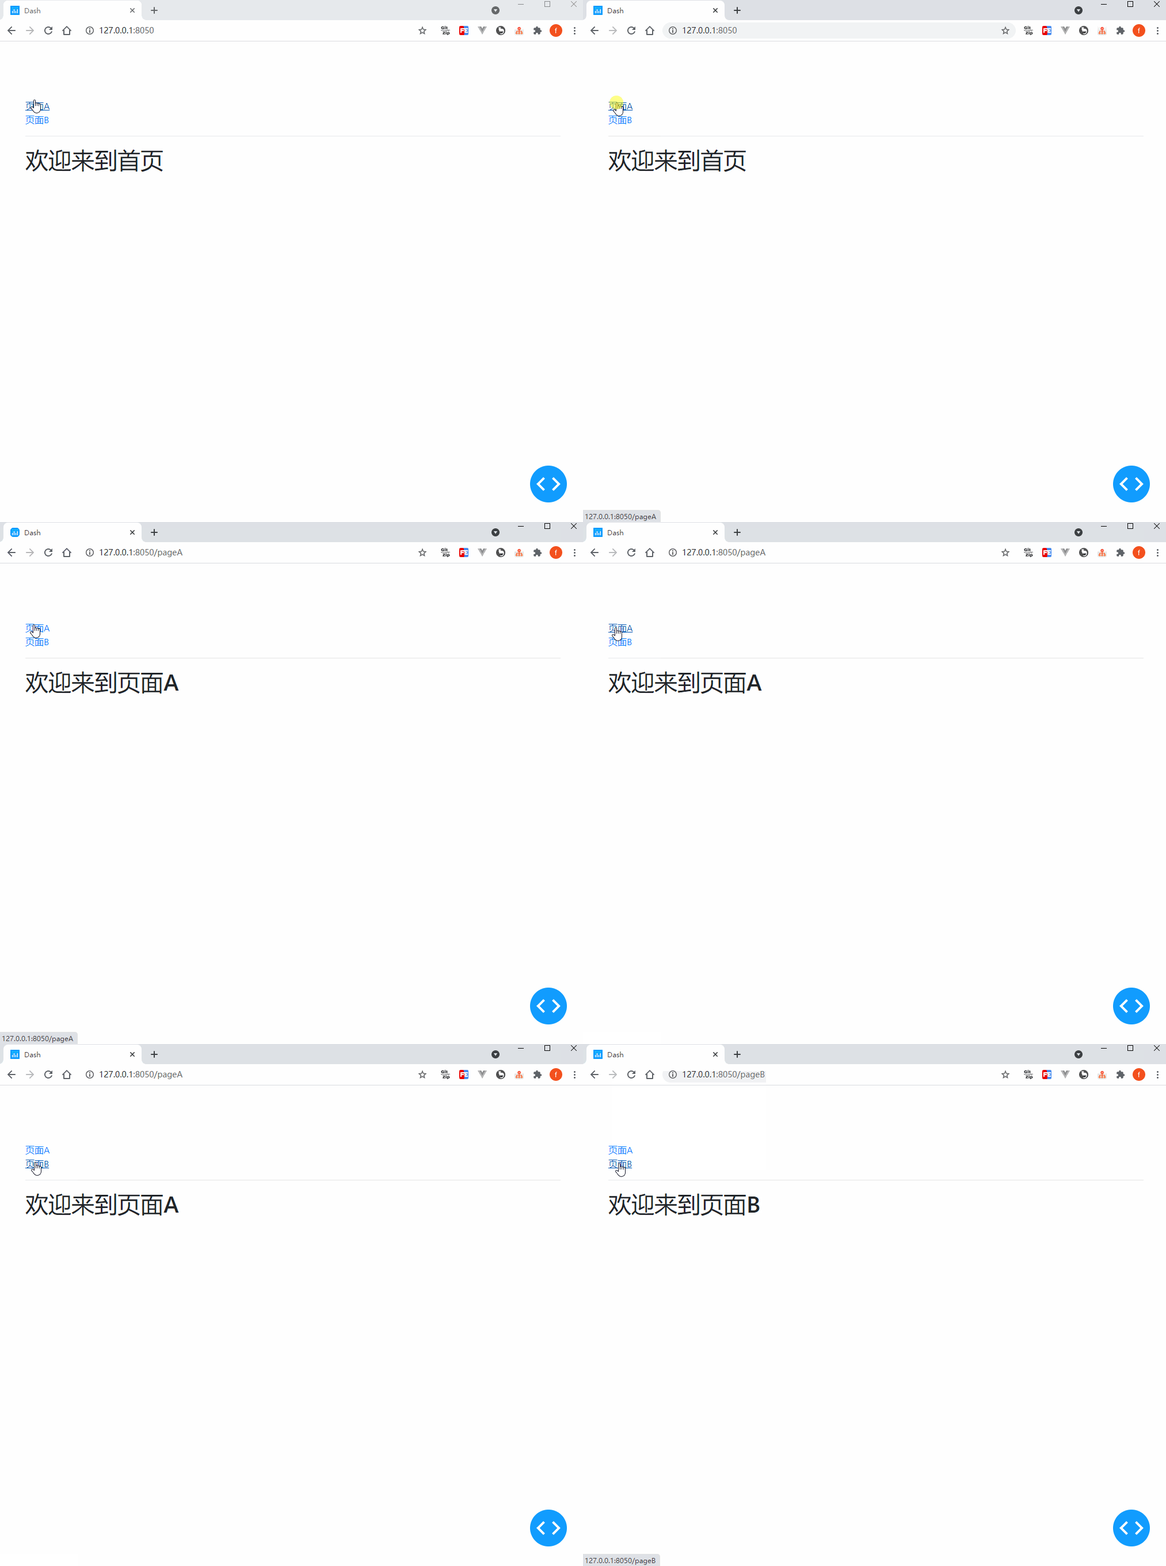 图5
图5
类似的功能还有dash_bootstrap_components中的NavLink(),用法与Link()相似,这里就不再赘述。
3 动手开发个人博客网站
掌握了今天的知识之后,我们来用Dash开发一个简单的个人博客网站,思路是在Location()监听url变化的前提下,后台利用网络爬虫从我的博客园Dash主题下爬取相应的网页内容,并根据用户访问来渲染出对应的文章:
app5.py
import dash

import dash_core_components as dcc

import dash_html_components as html

import dash_bootstrap_components as dbc

import dash_dangerously_set_inner_html  # 用于直接渲染html源码字符串

from dash.dependencies import Input, Output

import re

from html import unescape

import requests

from lxml import etree

app = dash.Dash(__name__, suppress_callback_exceptions=True)

app.layout = html.Div(

    dbc.Spinner(

        dbc.Container(

            [

                dcc.Location(id='url'),

                html.Div(

                    id='page-content'

                )

            ],

            style={

                'paddingTop': '30px',

                'paddingBottom': '50px',

                'borderRadius': '10px',

                'boxShadow': 'rgb(0 0 0 / 20%) 0px 13px 30px, rgb(255 255 255 / 80%) 0px -13px 30px'

            }

        ),

        fullscreen=True

    )

)

@app.callback(

    Output('article-links', 'children'),

    Input('url', 'pathname')

)

def render_article_links(pathname):

    response = requests.get('https://www.cnblogs.com/feffery/tag/Dash/',

                            headers={

                                'User-Agent': 'Mozilla/5.0 (Windows NT 10.0; Win64; x64) AppleWebKit/537.36 (KHTML, like Gecko) Chrome/89.0.4389.114 Safari/537.36'

                            })

    tree = etree.HTML(response.text)

    posts = [

        (href, title.strip())

        for href, title in zip(

            tree.xpath("//div[@class='postTitl2']/a/@href"),

            tree.xpath("//div[@class='postTitl2']/a/span/text()")

        )

    ]

    return [

        html.Li(

            dcc.Link(title, href=f'/article-{href.split("/")[-1]}', target='_blank')

        )

        for href, title in posts

    ]

@app.callback(

    Output('page-content', 'children'),

    Input('url', 'pathname')

)

def render_article_content(pathname):

    if pathname == '/':

        return [

            html.H2('博客列表:'),

            html.Div(

                id='article-links',

                style={

                    'width': '100%'

                }

            )

        ]

    elif pathname.startswith('/article-'):

        response = requests.get('https://www.cnblogs.com/feffery/p/%s.html' % re.findall('\d+', pathname)[0])

        tree = etree.HTML(response.text)

        return (

            html.H3(tree.xpath("//title/text()")[0].split(' - ')[0]),

            html.Em('作者:费弗里'),

            dash_dangerously_set_inner_html.DangerouslySetInnerHTML(

                unescape(etree.tostring(tree.xpath('//div[@id="cnblogs_post_body"]')[0]).decode())

            )

        )

    return dash.no_update

if __name__ == '__main__':

    app.run_server(debug=True)
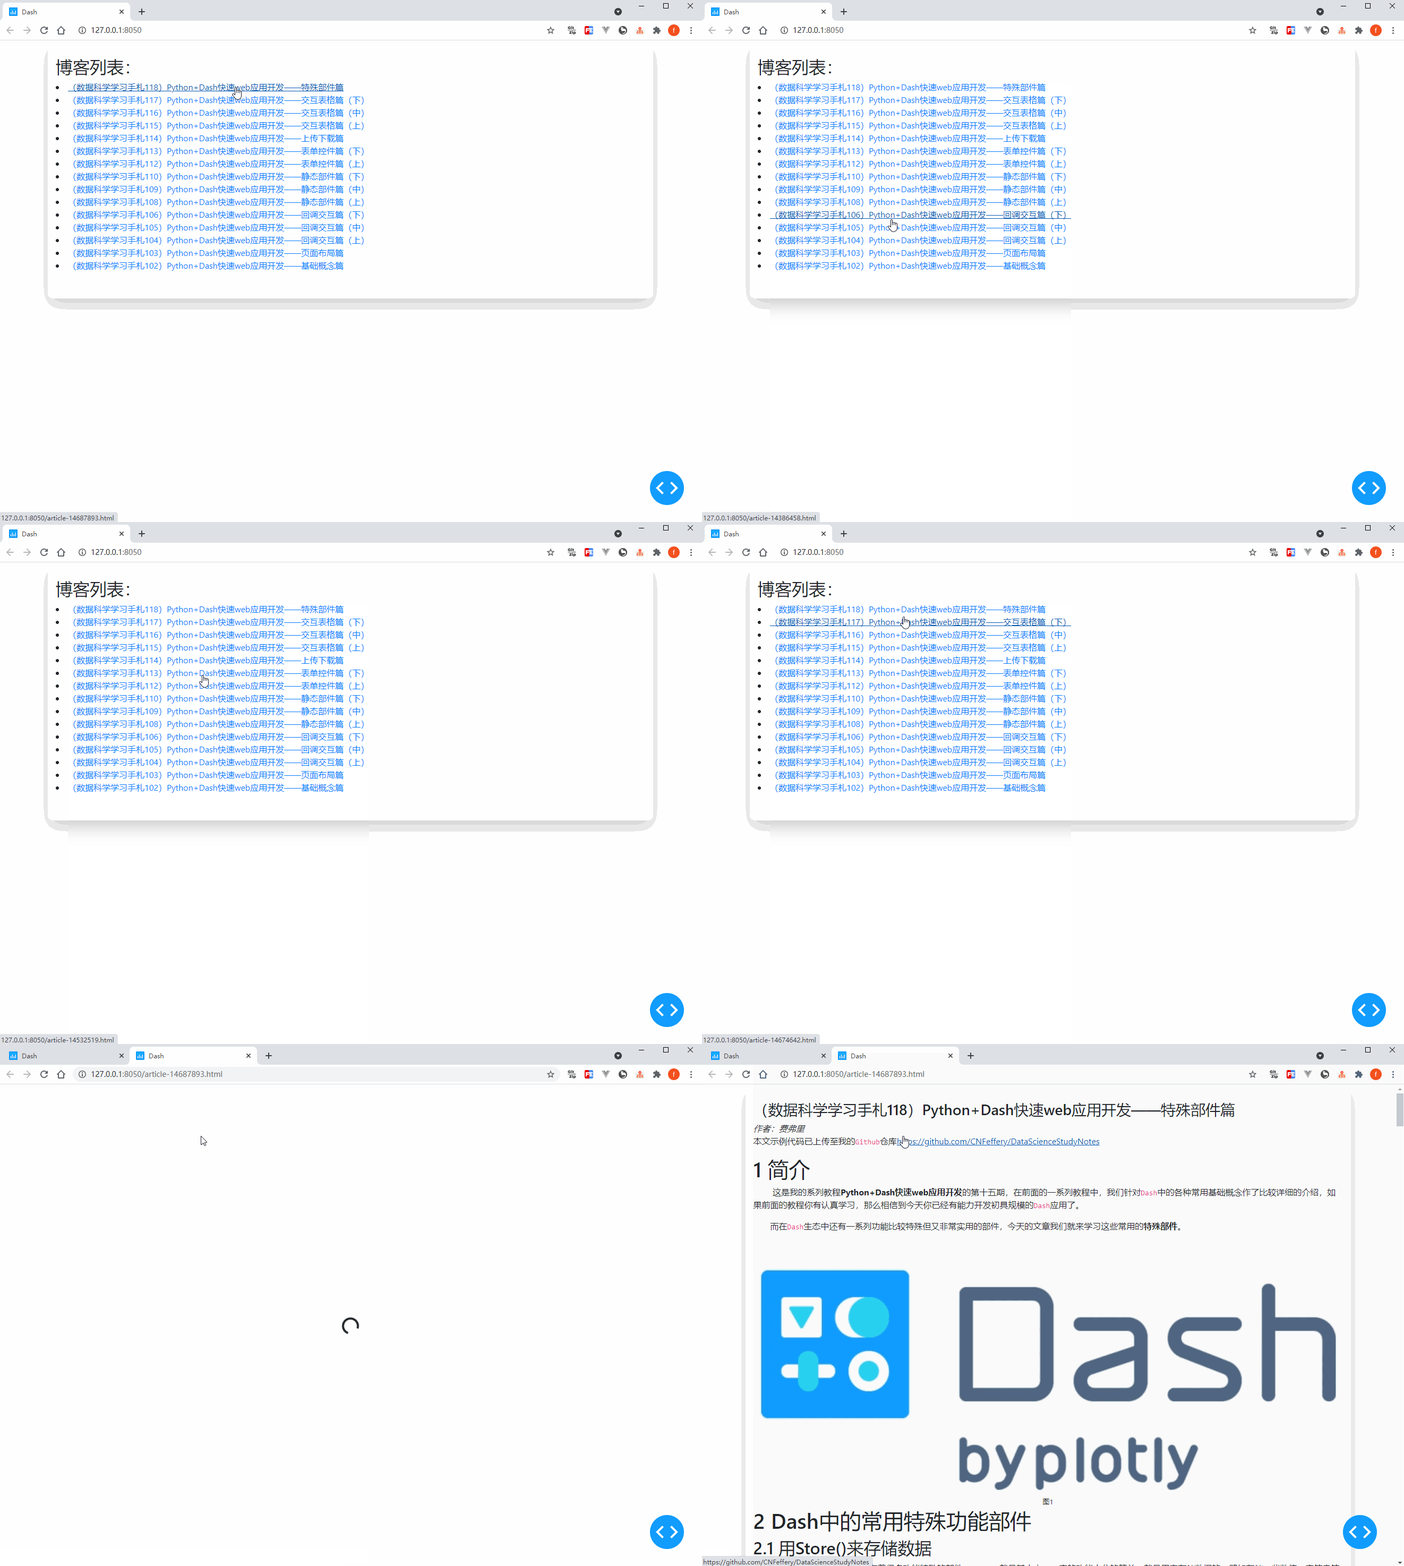 图6
图6
按照类似的思路,你可以随心所欲地开发自己的多页面应用,进一步丰富完善你的Dash应用功能。
以上就是本文的全部内容,欢迎在评论区发表你的意见和想法。
(数据科学学习手札119)Python+Dash快速web应用开发——多页面应用的更多相关文章
- (数据科学学习手札102)Python+Dash快速web应用开发——基础概念篇
本文示例代码与数据已上传至我的Github仓库https://github.com/CNFeffery/DataScienceStudyNotes 1 简介 这是我的新系列教程Python+Dash快 ...
- (数据科学学习手札108)Python+Dash快速web应用开发——静态部件篇(上)
本文示例代码已上传至我的Github仓库https://github.com/CNFeffery/DataScienceStudyNotes 1 简介 这是我的系列教程Python+Dash快速web ...
- (数据科学学习手札109)Python+Dash快速web应用开发——静态部件篇(中)
本文示例代码已上传至我的Github仓库https://github.com/CNFeffery/DataScienceStudyNotes 1 简介 这是我的系列教程Python+Dash快速web ...
- (数据科学学习手札112)Python+Dash快速web应用开发——表单控件篇(上)
本文示例代码已上传至我的Github仓库https://github.com/CNFeffery/DataScienceStudyNotes 1 简介 这是我的系列教程Python+Dash快速web ...
- (数据科学学习手札115)Python+Dash快速web应用开发——交互表格篇(上)
本文示例代码已上传至我的Github仓库https://github.com/CNFeffery/DataScienceStudyNotes 1 简介 这是我的系列教程Python+Dash快速web ...
- (数据科学学习手札116)Python+Dash快速web应用开发——交互表格篇(中)
本文示例代码已上传至我的Github仓库https://github.com/CNFeffery/DataScienceStudyNotes 1 简介 这是我的系列教程Python+Dash快速web ...
- (数据科学学习手札117)Python+Dash快速web应用开发——交互表格篇(下)
本文示例代码已上传至我的Github仓库https://github.com/CNFeffery/DataScienceStudyNotes 1 简介 这是我的系列教程Python+Dash快速web ...
- (数据科学学习手札118)Python+Dash快速web应用开发——特殊部件篇
本文示例代码已上传至我的Github仓库https://github.com/CNFeffery/DataScienceStudyNotes 1 简介 这是我的系列教程Python+Dash快速web ...
- (数据科学学习手札120)Python+Dash快速web应用开发——整合数据库
本文示例代码已上传至我的Github仓库https://github.com/CNFeffery/DataScienceStudyNotes 1 简介 这是我的系列教程Python+Dash快速web ...
随机推荐
- docker轻量级监控-sysdig
sysdig Sysdig = system(系统)+dig(挖掘).Sysdig 是一个开源系统发掘工具,用于系统级别的勘察和排障,可以把它看作一系列Linux系统工具的组合,主要包括: strac ...
- Redis缓存中的常见问题
缓存穿透:是指查询一个Redis和数据库中都不存在的数据. 问题:查询一个Redis和数据库中都不存在的数据,大量请求去访问数据库,导致数据库宕机. 解决办法: 1.根据id查询,如果id是自增的,将 ...
- MySQL如何搭建主库从库(Docker)
目录 MySQL主从搭建 一.主从配置原理 二.操作步骤 1.创建主库和从库容器 2.启动主从库容器 3.远程连接并操作主从库 4.测试主从同步 MySQL主从搭建 一.主从配置原理 mysql主从配 ...
- Django批量插入数据和分页器
目录 一.ajax结合sweetalert实现删除按钮动态效果 二.bulk_create批量插入数据 1. 一条一条插入 2. 批量插入 三.自定义分页器 一.ajax结合sweetalert实现删 ...
- CentOS rpm常用功能记录
CentOS7主要有rpm和yum这两种包软件的管理.两者有功能上的区别,其中主要区别是:yum使用简单但需要联网,yum会去网上包源去获取所需要的软件包.而rpm的需要做的事情就更细一些,比如我们需 ...
- 漫漫Java路1—基础知识2—注释和命名规则
## 注释 1. 单行注释 ```java //这是一个注释 ``` 2. 多行注释 ```java /* 这是一个注释 */ ``` 3. 文档注释 ```java /** * * * */ ``` ...
- redhat配置问题
redhat开机自动连接网络配置 vim /etc/sysconfig/network-scripts/ifcfg-eth0 将 ONBOOT=no 更改为 yes 即可 redhat配置 yum ...
- P3796 【模板】AC自动机(加强版) 题解(Aho-Corasick Automation)
题目链接 AC自动机 解题思路 AC自动机模板题. 刚学AC自动机,写一篇博客增强理解. AC自动机最关键的一点在于,\(fail\)失配指针的构造. \(fail\)指针指向的地方,是匹配出现错误后 ...
- (数据科学学习手札112)Python+Dash快速web应用开发——表单控件篇(上)
本文示例代码已上传至我的Github仓库https://github.com/CNFeffery/DataScienceStudyNotes 1 简介 这是我的系列教程Python+Dash快速web ...
- 2019 GDUT Rating Contest I : Problem G. Back and Forth
题面: G. Back and Forth Input file: standard input Output file: standard output Time limit: 1 second Mem ...