Spring5 概述及Spring IOC学习
Spring Framework 5
1. Spring框架
1.1 Spring框架概述
1.2 主要内容
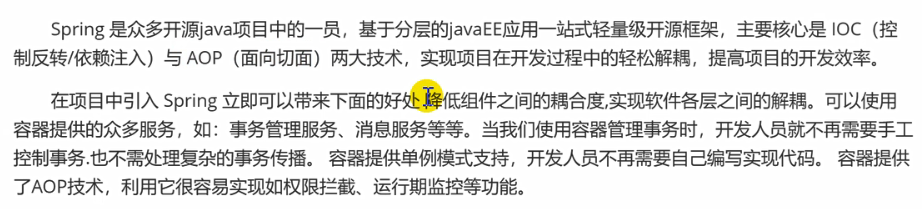
Spring框架是一个开源的JavaEE的应用程序
主要核心是 IOC(控制反转)和AOP(面向切面编程) 两大技术。
主要学习内容:
- Spring IOC (控制反转和依赖注入) Inversion of Control
- Spring AOP Aspect Oriented Programming
- Spring JDBC + 事务
2. Spring作用
Dao层:
JDBC操作
对应的框架:Mybatis
Service层:
业务逻辑十分复杂,Spring框架不是针对Service层的业务逻辑,目前没有适合的框架
Controller层:
Servlet(接收请求 响应数据 地址配置 页面转发)
对应框架:Spring MVC
Spring基于分布式的应用程序
- 基于轻量级的框架(引入的依赖和jar包少,体积小,可以独立使用)
配置管理
Bean对象的实例化——IOC
- 可以集成第三方的框架
Mybatis、Hibernate框架(持久层框架)
Spring MVC
Spring Security权限
Quartz时钟框架(定时任务处理)
- 自带服务
Mail邮件发送
定时任务处理-定时调度(定时短信、定时任务)
消息处理(异步处理)
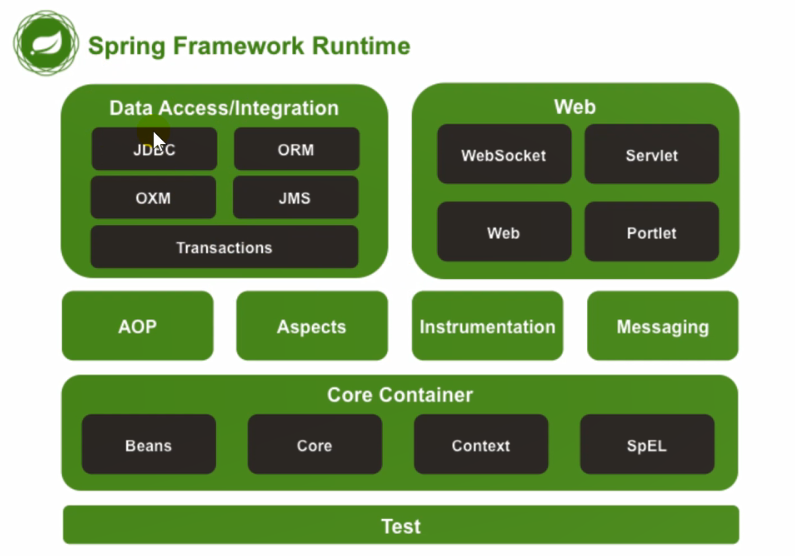
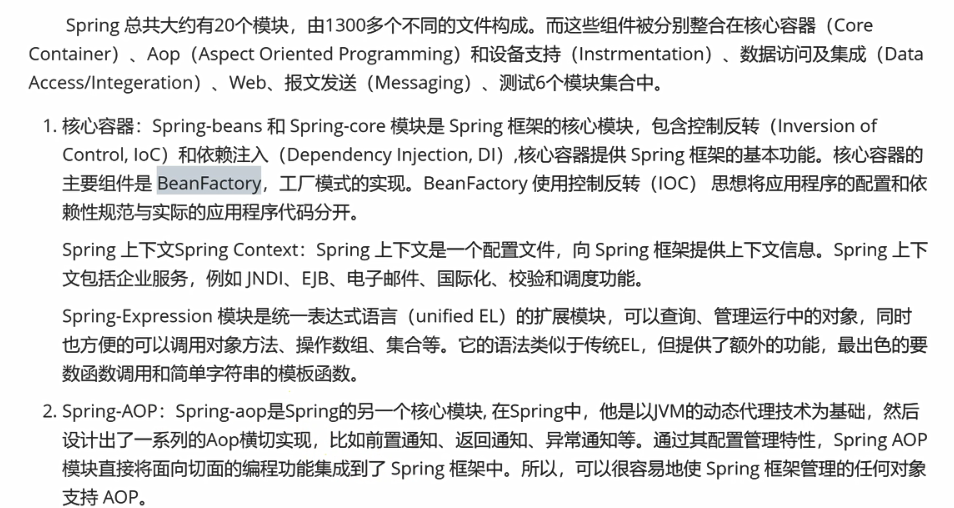
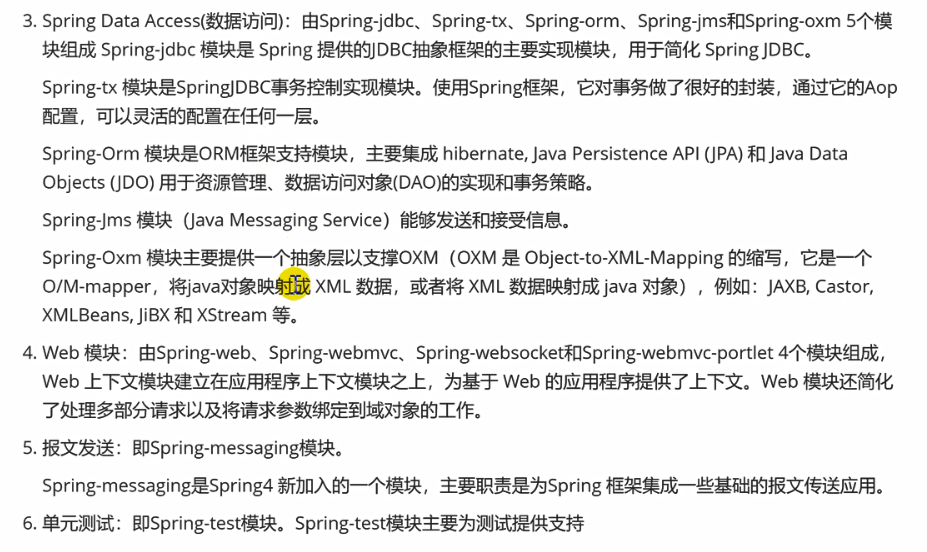
3. Spring模块划分
Spring IOC模块: Bean对象的实例化Bean的创建
Spring AOP模块:动态代理面向切面编程
Spring JDBC + 事务模块
Spring Web模块
4. Spring IOC
4.1 主要内容
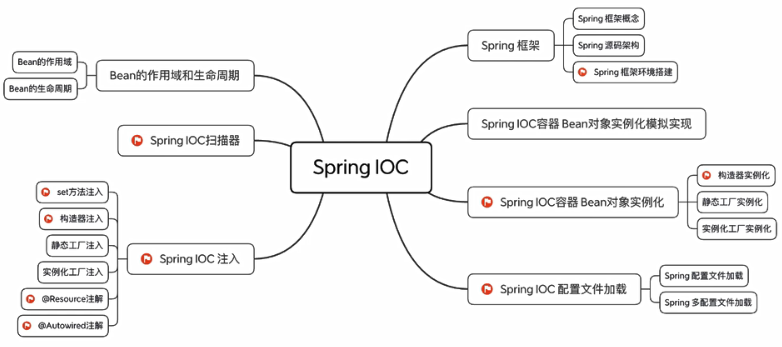
IOC底层原理、IOC接口(BeanFactory)、IOC操作Bean管理(基于XML、基于注解)
4.2 IOC概念和原理
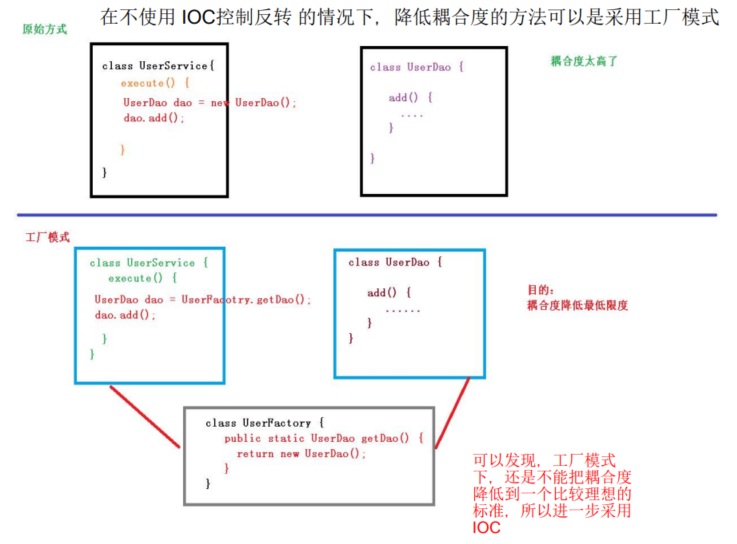
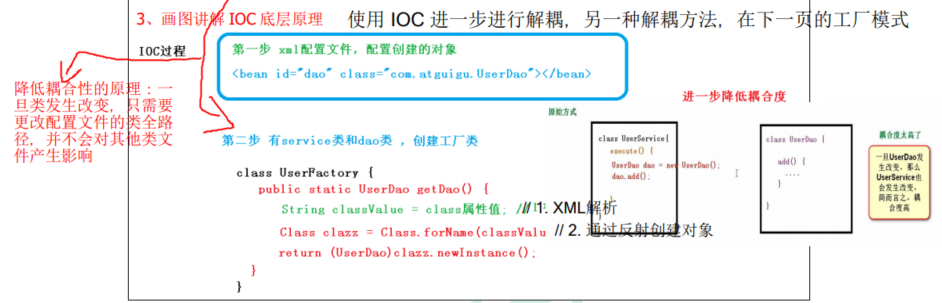
IOC,即控制反转,是用来降低代码之间的耦合度,通过将对象的创建和对象之间的调用过程,交给Spring来进行管理,从而达到解耦的目的。
IOC底层原理,主要涉及到xml解析、工厂模式、反射。
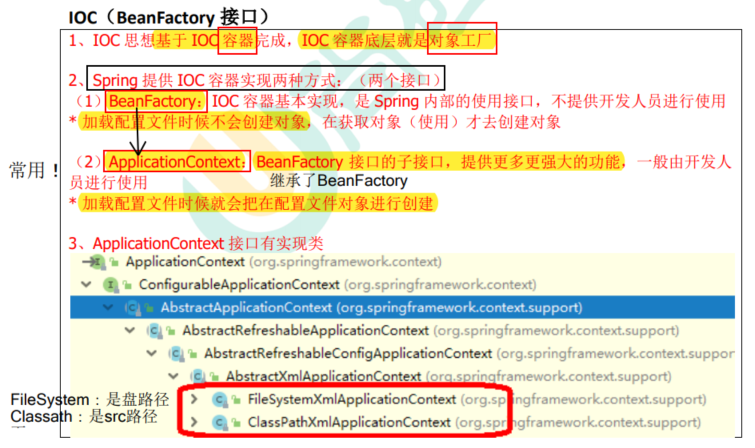
4.3 IOC容器:BeanFactory接口
4.4 IOC操作Bean管理
Bean管理指的是两个操作:
1. Spring创建对象:
通过配置文件或注解方法进行对象的创建。
2. Spring注入属性:
不直接调用类对象内部的set方法设置属性值,而是通过xml配置文件或注解的方法。
而这两个操作是基于xml配置文件方式或基于注解方式实现。
4.5 IOC操作Bean管理——基于xml方式
4.5.1 Bean对象实例化
4.5.1.1 构造器实例化*
默认使用方式,通过默认构造器创建,则空构造方法必须存在,否则创建失败,即提供有参构造器的同时,必须提供无参构造器。
1. 定义Bean属性对象类
定义一个User类,此Bean对象需要提供无参构造器。
public class User { // 没有有参构造方法,class使用默认构造器,无需显示声明无参构造器

    // 创建属性

    private String name;

    private String brother;

    private Emp emp;

    public void setName(String name) {

        this.name = name;

    }

    public void setBrother(String brother) {

        this.brother = brother;

    }

    // Test

    public void printTest() {

        System.out.println("This is a Test");

    }

    @Override

    public String toString() {

        return "User{" +

                "name='" + name + '\'' +

                ", brother='" + brother + '\'' +

                ", emp=" + emp +

                '}';

    }

    public void setEmp(Emp emp) {

        this.emp = emp;

    }

    public Emp getEmp() {

        return emp;

    }

}
2. 设置配置xml文件
使用bean标签创建对象
<?xml version="1.0" encoding="UTF-8"?>
<beans xmlns="http://www.springframework.org/schema/beans"
xmlns:xsi="http://www.w3.org/2001/XMLSchema-instance"
xsi:schemaLocation="http://www.springframework.org/schema/beans http://www.springframework.org/schema/beans/spring-beans.xsd">
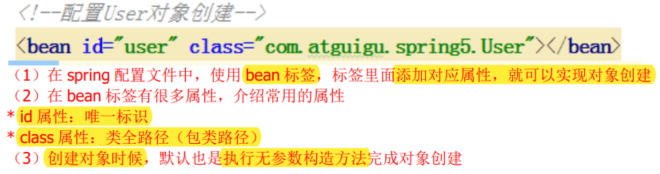
<!--配置User对象创建-->
<bean id="user" class="com.atguigu.spring5.User"></bean>
</beans>
3. 获取实例化对象
        // 1. 加载spring配置文件

        ApplicationContext classPathXmlApplicationContext =

                new ClassPathXmlApplicationContext("UserBean.xml");

        // 2. 获取配置创建的对象(两种方法)

        User user = (User) classPathXmlApplicationContext.getBean("user"); // 需要类型转换

        User user1 = classPathXmlApplicationContext.getBean("user", User.class); // 无需类型转换

        // 3. 测试

        user.printTest();

		user1.printTest();

/**

* This is a Test

* This is a Test

*/
4.5.1.2 静态工厂实例化(了解)
1. 定义Bean属性对象类
public class TypeService {

    public void printTest() {

        System.out.println("TypeService:printTest!");

    }

}
2. 定义静态工厂类
public class StaticFactory {

    // 定义对应的静态方法

    public static TypeService createService() {

        return new TypeService();

    }

}
3. 设置配置xml文件
<?xml version="1.0" encoding="UTF-8"?>

<beans xmlns="http://www.springframework.org/schema/beans"

       xmlns:xsi="http://www.w3.org/2001/XMLSchema-instance"

       xsi:schemaLocation="http://www.springframework.org/schema/beans http://www.springframework.org/schema/beans/spring-beans.xsd">

    <!--

        静态工厂实例化:

            1. 定义工厂类及对应的静态方法

            2. 配置bean对象对应的工厂类及静态方法

            class:静态工厂类的路径

            factory-method:静态工厂类中实例化bean对象的静态方法

    -->

    <bean id="typeService" class="com.atguigu.factorybean.StaticFactory" factory-method="createService"></bean>

</beans>
4. 测试
public class Test {

    public static void main(String[] args) {

        // 静态工厂实例化

        ClassPathXmlApplicationContext context = new ClassPathXmlApplicationContext("UserBean.xml");

        TypeService typeService = context.getBean("typeService", TypeService.class);

        typeService.printTest();

    }

}

TypeService:printTest!

构造器实例化是在IOC容器中创建了一个对象,而静态工厂实例化中的对象实例创建则由对应的静态方法实现。
即:
    public static TypeService createService() {

        // 在对象创建前,可以进行一些操作

        return new TypeService();

    }
这样做的好处就是,在Bean对象实例化创建之前,可以添加一些逻辑操作。
4.5.1.3 实例化工厂实例化(了解)
注:
- 工厂方法为非静态方法
- 需要配置工厂bean,并在业务bean中配置factory-bean,factory-methods属性
1. 定义Bean属性对象类
public class UserService {

    public void printTest() {

        System.out.println("UserService:printTest!");

    }

}
2. 定义实例化工厂类
public class InstanceFactory {

    // 定义方法,返回实例化对象

    public UserService createUserService() { // 并不是静态方法

        return new UserService();

    }

}
3. 设置配置xml文件
    <!--

        实例化工厂

            1. 定义实例化工厂bean

            2. 配置bean对象,引用工厂bean,并指定工厂创建方法(方法为非静态)

    -->

    <bean id="instanceFactory" class="com.atguigu.factorybean.InstanceFactory"></bean>

    <bean id="userService" factory-bean="instanceFactory" factory-method="createUserService"></bean>
4. 测试
        UserService userService = context.getBean("userService", UserService.class);

        userService.printTest();
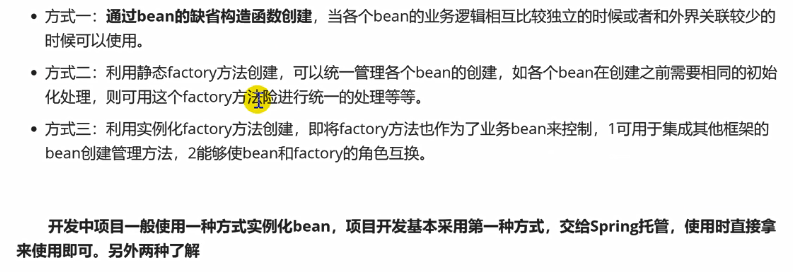
4.5.1.4 Spring三种实例化Bean的方法比较
4.5.2 Bean对象属性注入
DI:依赖注入,就是注入属性。(Dependency Injection,注入属性是在创建对象的基础上完成的)
推荐使用set方法注入
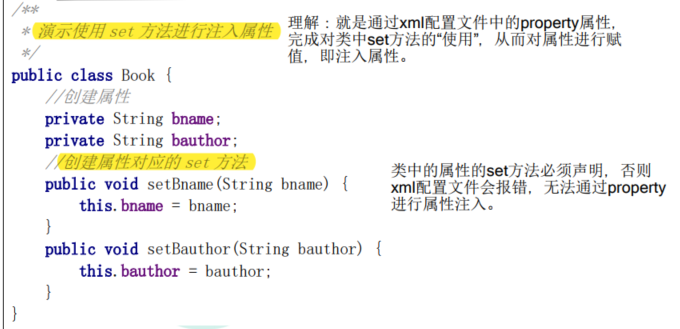
4.5.2.1. set方法注入(无参构造注入属性)
1. 业务对象 JavaBean注入
- 属性字段提供set方法
配置文件的bean标签中设置property标签
一定要先在配置文件中,配置对象创建,再配置属性
<?xml version="1.0" encoding="UTF-8"?>

<beans xmlns="http://www.springframework.org/schema/beans"

       xmlns:xsi="http://www.w3.org/2001/XMLSchema-instance"

       xsi:schemaLocation="http://www.springframework.org/schema/beans http://www.springframework.org/schema/beans/spring-beans.xsd">

    <!--配置Book对象创建-->

    <bean id="book" class="com.atguigu.spring5.Book">

        <!-- 使用property,用set方法完成注入属性(其实就是无参构造) -->

        <property name="bname" value="《Java编程思想》"></property>

        <property name="bauthor" value="老外"></property>

    </bean>

</beans>
- 测试方法
    	// 1. 加载spring配置文件

        ApplicationContext classPathXmlApplicationContext = new ClassPathXmlApplicationContext("BookBean.xml");

        // 2. 获取配置创建的对象

        Book book = (Book) classPathXmlApplicationContext.getBean("book");
2. 字面量注入
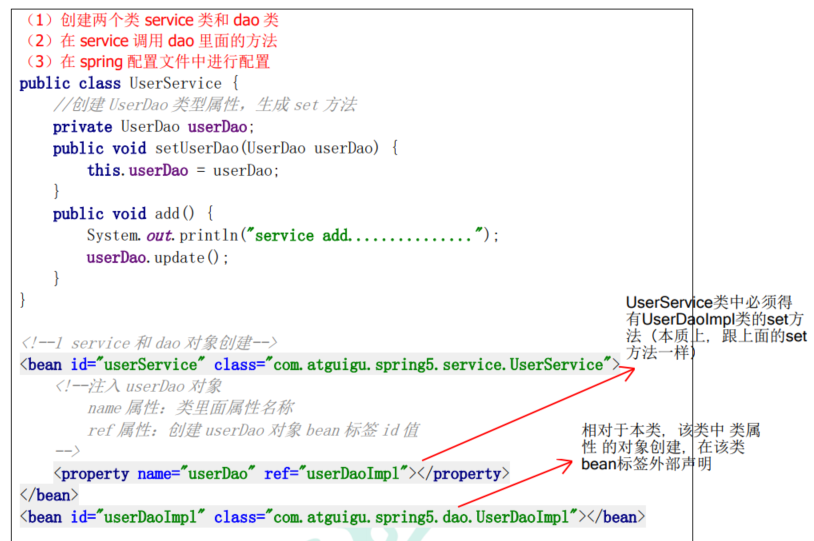
3. 外部对象Bean注入
当前类中,其中有属性值需要创建一个外部类的实例,可以通过在配置文件中先创建对象,然后在注入属性操作中,完成引用。
也可以使用构造器构造注入,见4.5.2.2
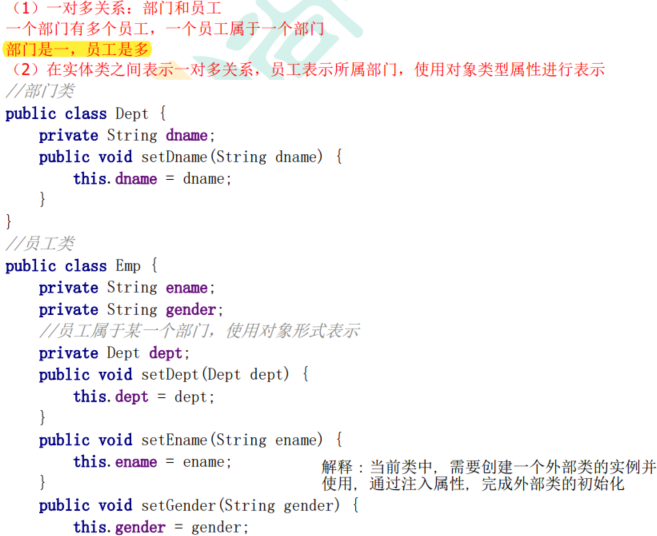
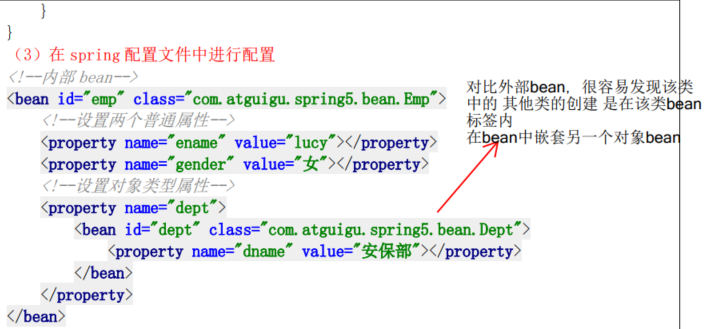
4. 内部对象Bean注入
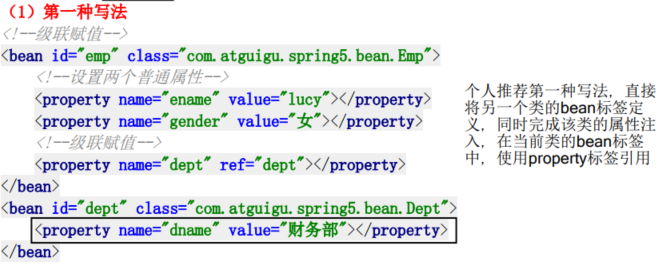
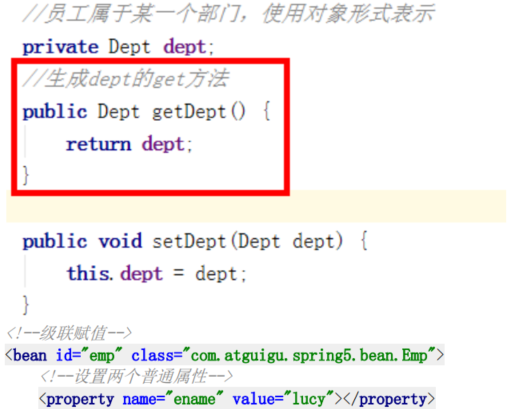
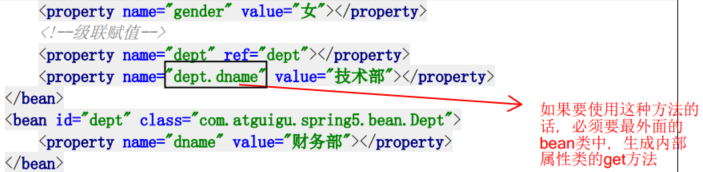
5. 级联赋值
第一种写法:
第二种写法:
级联赋值
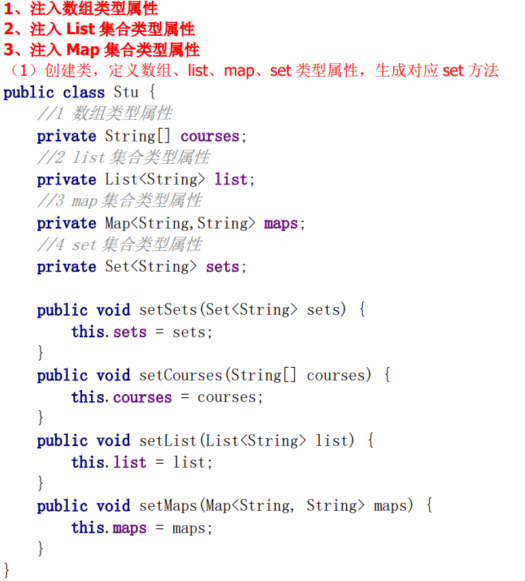
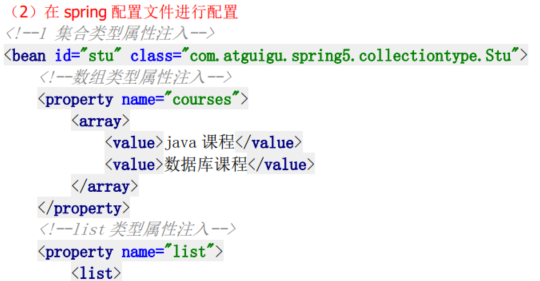
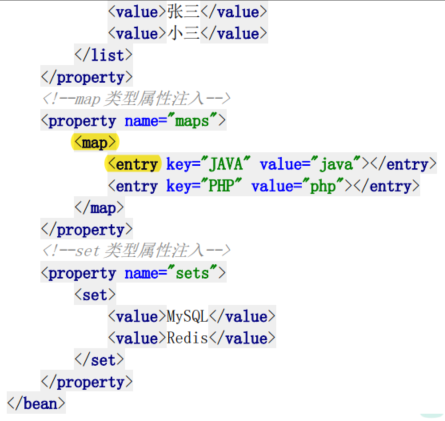
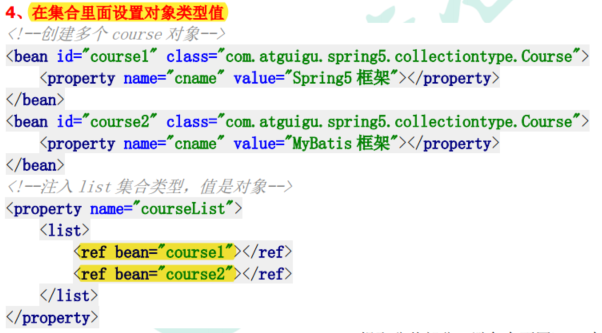
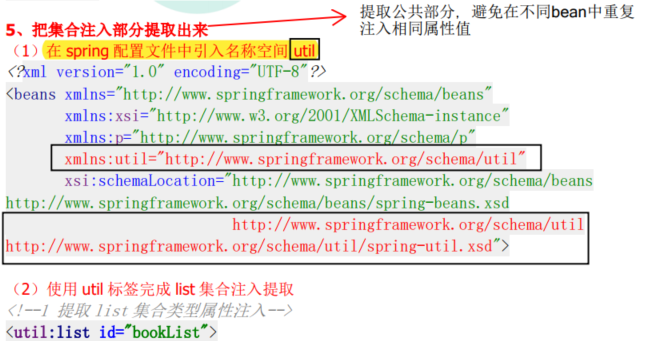
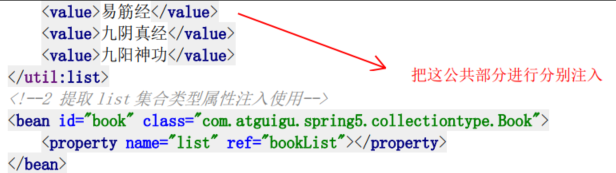
6. 集合类型注入
4.5.3 构造器构造(有参构造注入属性)
1. 单个或多个Bean对象作为参数
编写两个Java Bean对象类
TypeService类:
public class TypeService {

    public void printTest() {

        System.out.println("TypeService:printTest!");

    }

}
UserService类:
public class UserService {

    public void printTest() {

        System.out.println("UserService:printTest!");

    }

}
调用外部对象Bean类的构造器类
ConService类:
public class ConService {

    private TypeService typeService;

    private UserService userService;

    /* 构造器注入 */

    public ConService(TypeService typeService, UserService userService) {

        this.typeService = typeService;

        this.userService = userService;

    }

    // 测试方法

    public void print() {

        typeService.printTest();

        userService.printTest();

    }

}
配置Spring配置xml文件
使用constructor-arg标签,如果不使用的话,则配置文件是默认通过无参构造器进行创建对象的。
<?xml version="1.0" encoding="UTF-8"?>

<beans xmlns="http://www.springframework.org/schema/beans"

       xmlns:xsi="http://www.w3.org/2001/XMLSchema-instance"

       xsi:schemaLocation="http://www.springframework.org/schema/beans http://www.springframework.org/schema/beans/spring-beans.xsd">

    <!--

        构造器注入

            设置构造器所需要的参数

            通过constructor-arg标签设置构造器的参数

                name:属性名称

                ref:要注入的bean对象对应的bean标签的id属性值

     !-->

    <bean id="conService" class="com.atguigu.service.ConService"> <!-- 必须有有参构造器,否则报错 -->

        <constructor-arg name="typeService" ref="typeService"></constructor-arg> <!-- 有参构造器参数 -->

        <constructor-arg name="userService" ref="userService"></constructor-arg> <!-- 有参构造器参数 -->

    </bean>

    <bean id="typeService" class="com.atguigu.service.TypeService"></bean> <!-- 创建对象 -->

    <bean id="userService" class="com.atguigu.service.UserService"></bean> <!-- 创建对象 -->

</beans>
测试
public class TestCon {

    public static void main(String[] args) {

        // 1. Spring加载配置文件,创建对象

        ClassPathXmlApplicationContext context = new ClassPathXmlApplicationContext("ConConfig.xml");

        // 2. 获取实例对象

        ConService conService = context.getBean("conService", ConService.class);

        // 3. 调用conService测试方法

        conService.print();

    }

}

/*

TypeService:printTest!

UserService:printTest!

*/
2. Bean对象和常用属性作为参数
在前面的基础上,对ConService类添加一个name属性,如下:
public class ConService {

    private TypeService typeService;

    private UserService userService;

    private String name;

    /* 构造器注入 */

    public ConService(TypeService typeService, UserService userService, String name) {

        this.typeService = typeService;

        this.userService = userService;

        this.name = name;

    }

    // 测试方法

    public void print() {

        typeService.printTest();

        userService.printTest();

        System.out.println("name:" + name);

    }

}
然后改一下xml配置文件如下:
    <!--

        构造器注入

            设置构造器所需要的参数

            通过constructor-arg标签设置构造器的参数

                name:属性名称

                ref:要注入的bean对象对应的bean标签的id属性值

                value:数据具体的值

                index:参数的位置(从0开始)

     !-->

    <bean id="conService" class="com.atguigu.service.ConService"> <!-- 必须有有参构造器,否则报错 -->

        <constructor-arg name="typeService" ref="typeService"></constructor-arg> <!-- 有参构造器参数 -->

        <constructor-arg name="userService" ref="userService"></constructor-arg> <!-- 有参构造器参数 -->

        <!--  <constructor-arg index="2" value="David"></constructor-arg>  -->

        <constructor-arg name="name" value="David"></constructor-arg> <!-- 常用属性注入 -->

    </bean>

    <bean id="typeService" class="com.atguigu.service.TypeService"></bean> <!-- 创建对象 -->

    <bean id="userService" class="com.atguigu.service.UserService"></bean> <!-- 创建对象 -->
3. 循环依赖问题
循环依赖问题产生的原因:
Bean对象是通过构造器进行注入的,之间彼此相互依赖对方注入对象,则会导致bean无法实例化。
Java代码展示:
public class RoleService {

    private AccountService accountService;

    public RoleService(AccountService accountService) {

        this.accountService = accountService;

    }

}
public class AccountService {

    private RoleService roleService;

    public AccountService(RoleService roleService) {

        this.roleService = roleService;

    }

    public void print() {

        System.out.println("AccountService");

    }

}
xml配置文件:此时并没有报错!
<?xml version="1.0" encoding="UTF-8"?>

<beans xmlns="http://www.springframework.org/schema/beans"

       xmlns:xsi="http://www.w3.org/2001/XMLSchema-instance"

       xsi:schemaLocation="http://www.springframework.org/schema/beans http://www.springframework.org/schema/beans/spring-beans.xsd">

    <bean id="accountService" class="com.atguigu.service.AccountService">

        <constructor-arg name="roleService" ref="roleService"></constructor-arg>

    </bean>

    <bean id="roleService" class="com.atguigu.service.RoleService">

        <constructor-arg name="accountService" ref="accountService"></constructor-arg>

    </bean>

</beans>
测试:
public class TestAccountRole {

    public static void main(String[] args) {

        ClassPathXmlApplicationContext context = new ClassPathXmlApplicationContext("AccountRole.xml");

        AccountService accountService = context.getBean("accountService", AccountService.class);

        accountService.print();

    }

}
报错:
Error creating bean with name 'accountService' defined in class path resource [AccountRole.xml]: Cannot resolve reference to bean 'roleService' while setting constructor argument
Error creating bean with name 'roleService' defined in class path resource [AccountRole.xml]: Cannot resolve reference to bean 'accountService' while setting constructor argument;
解决方案:
使用set方法注入,替代构造器注入。
为什么?首先,因为使用构造器方法注入Bean对象属性,会先将构造器的参数对象进行实例化,这样就容易陷入死循环中。而set方法进行对象属性注入,IOC容器会先将各个用bean标签修饰的对象注入实例化,实例化创建成功后,才会通过set方法,将对象实例传给其他对象实例中。
public class AccountService {

    private RoleService roleService;

//    // 构造器注入

//    public AccountService(RoleService roleService) {

//        this.roleService = roleService;

//    }

    // set方法进行属性注入

    public void setRoleService(RoleService roleService) {

        this.roleService = roleService;

    }

    public void print() {

        System.out.println("AccountService");

    }

}

public class RoleService {

    private AccountService accountService;

//    // 构造器注入

//    public RoleService(AccountService accountService) {

//        this.accountService = accountService;

//    }

    public void setAccountService(AccountService accountService) {

        this.accountService = accountService;

    }

}
xml配置文件:
<?xml version="1.0" encoding="UTF-8"?>

<beans xmlns="http://www.springframework.org/schema/beans"

       xmlns:xsi="http://www.w3.org/2001/XMLSchema-instance"

       xsi:schemaLocation="http://www.springframework.org/schema/beans http://www.springframework.org/schema/beans/spring-beans.xsd">

<!--    <bean id="accountService" class="com.atguigu.service.AccountService">-->

<!--        <constructor-arg name="roleService" ref="roleService"></constructor-arg>-->

<!--    </bean>-->

<!--    <bean id="roleService" class="com.atguigu.service.RoleService">-->

<!--        <constructor-arg name="accountService" ref="accountService"></constructor-arg>-->

<!--    </bean>-->

    <!--

        如果出现循环依赖,需要通过set注入解决

     -->

    <bean id="accountService" class="com.atguigu.service.AccountService">

        <property name="roleService" ref="roleService"></property>

    </bean>

    <bean id="roleService" class="com.atguigu.service.RoleService">

        <property name="accountService" ref="accountService"></property>

    </bean>

</beans>
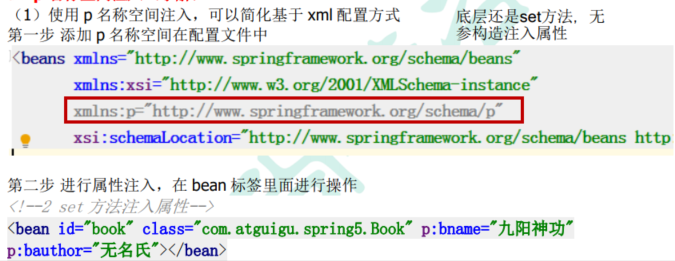
4.5.4 p名称空间注入(了解)
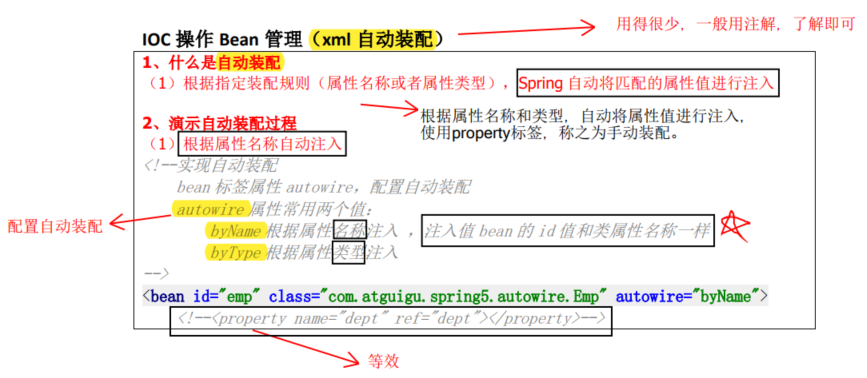
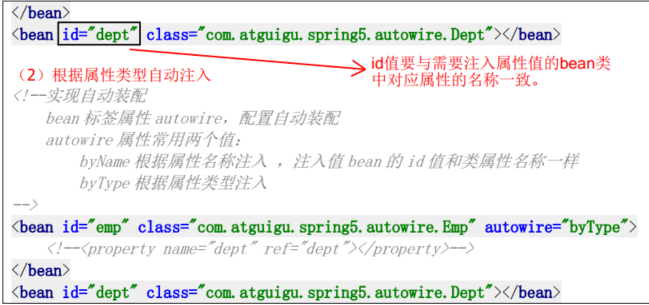
4.5.5 xml自动装配(了解)
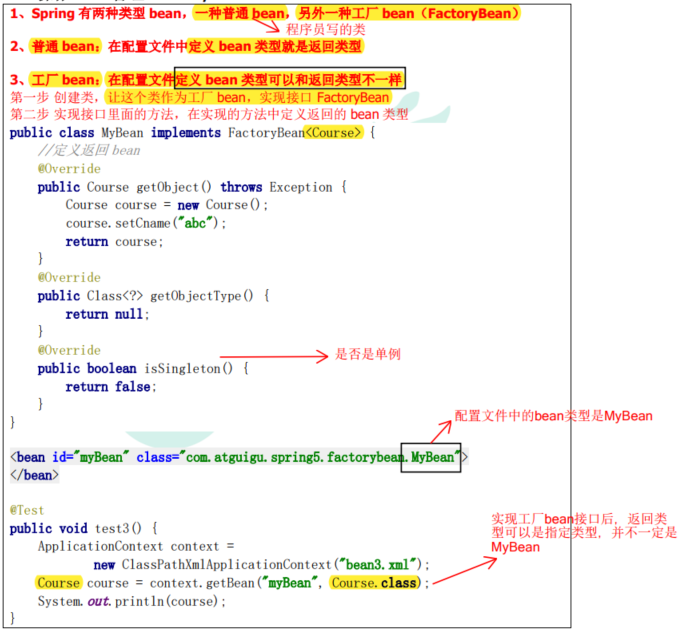
4.6 Bean的两种类型
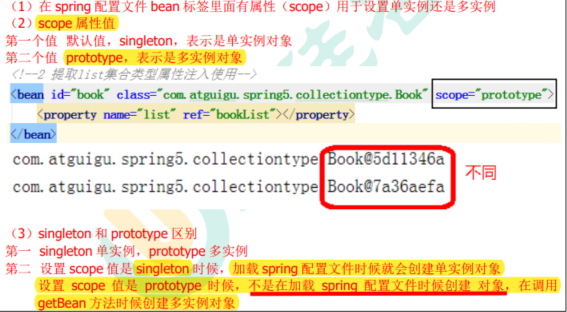
4.7 Bean的作用域
- 在Spring里面,可以设置创建bean的实例是单实例还是多实例。
- 在Spring里面,默认情况下,bean是单实例对象。
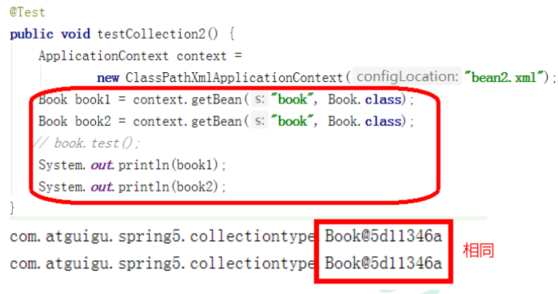
也就是说,在IOC容器里面,只创建了一个实例对象,当需要被调用的时候,就返回索引。
如何设置单实例还是多实例
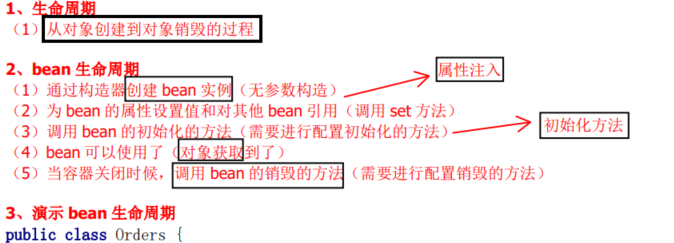
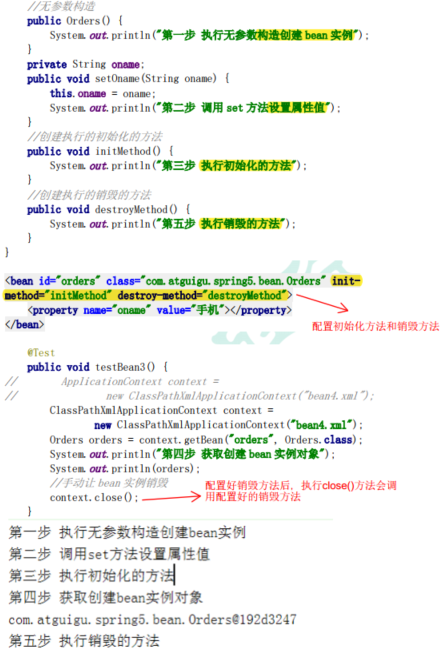
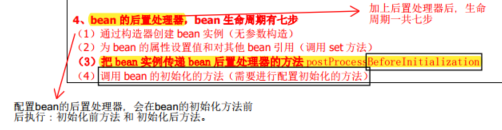
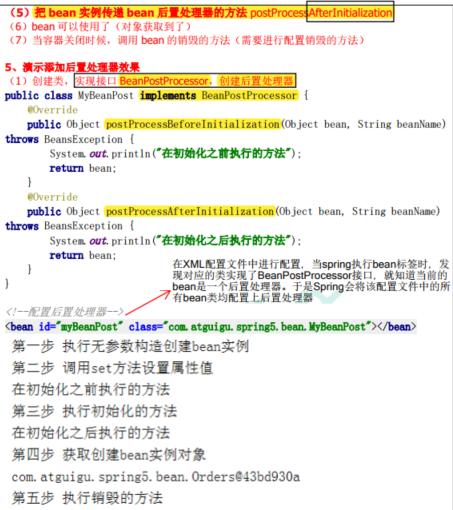
4.8 Bean生命周期
4.9 配置外部数据库属性文件
引入外部属性文件配置数据库连接池
创建外部属性文件,properties格式文件,写数据库信息
配置文件中,名称加一个前缀,是为了防止出现重名冲突。
prop.driverClass=com.mysql.cj.jdbc.Driver

prop.url=jdbc:mysql://localhost:3306/school

prop.userName=root

prop.userPwd=zouwenhao
把properties属性文件引入到Spring配置文件中
引入contex名称空间
<?xml version="1.0" encoding="UTF-8"?>

<beans xmlns="http://www.springframework.org/schema/beans"

       xmlns:xsi="http://www.w3.org/2001/XMLSchema-instance"

       xmlns:context="http://www.springframework.org/schema/context"

       xsi:schemaLocation="http://www.springframework.org/schema/beans http://www.springframework.org/schema/beans/spring-beans.xsd

       http://www.springframework.org/schema/context">

    <!--引入数据库配置文件-->

    <context:property-placeholder location="classpath:jdbc.properties"></context:property-placeholder>

    <!--配置数据库连接池-->

    <bean id="dataSource" class="com.alibaba.druid.pool.DruidDataSource">

        <property name="driverClassName" value="${prop.driverClass}"></property>

        <property name="url" value="${prop.url}"></property>

        <property name="username" value="${prop.userName}"></property>

        <property name="password" value="${prop.userPwd}"></property>

    </bean>

</beans>
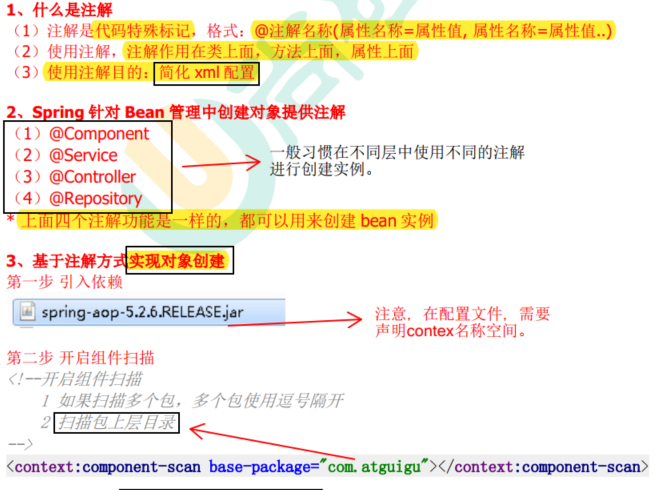
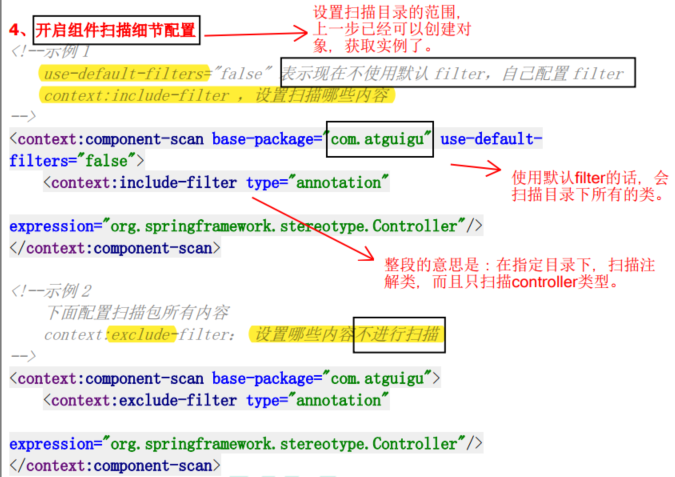
4.10 IOC操作Bean管理——基于注解方法(重点)
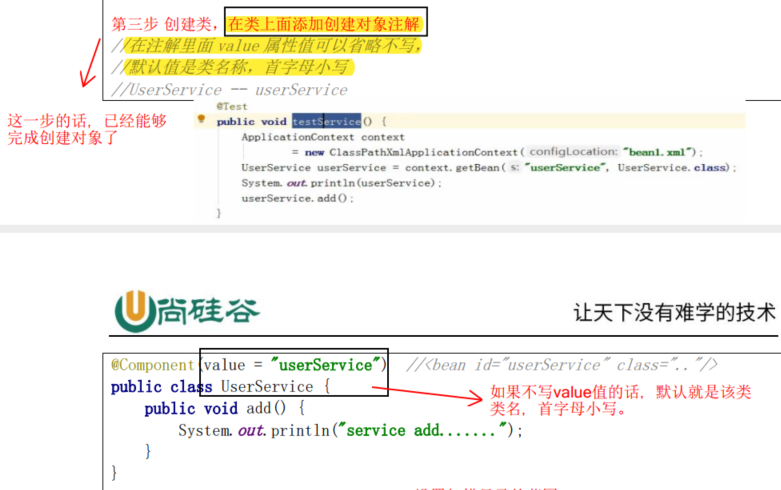
4.10.1 基于注解方式实现Bean对象实例化
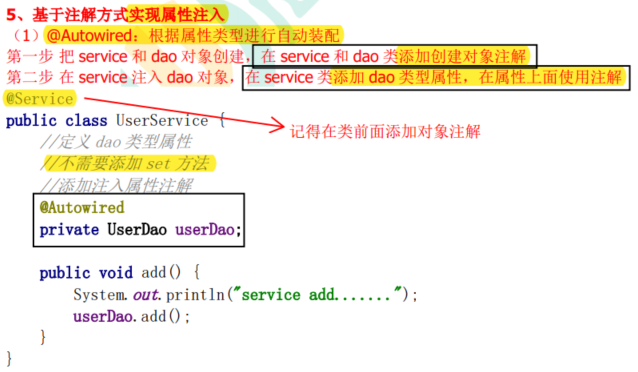
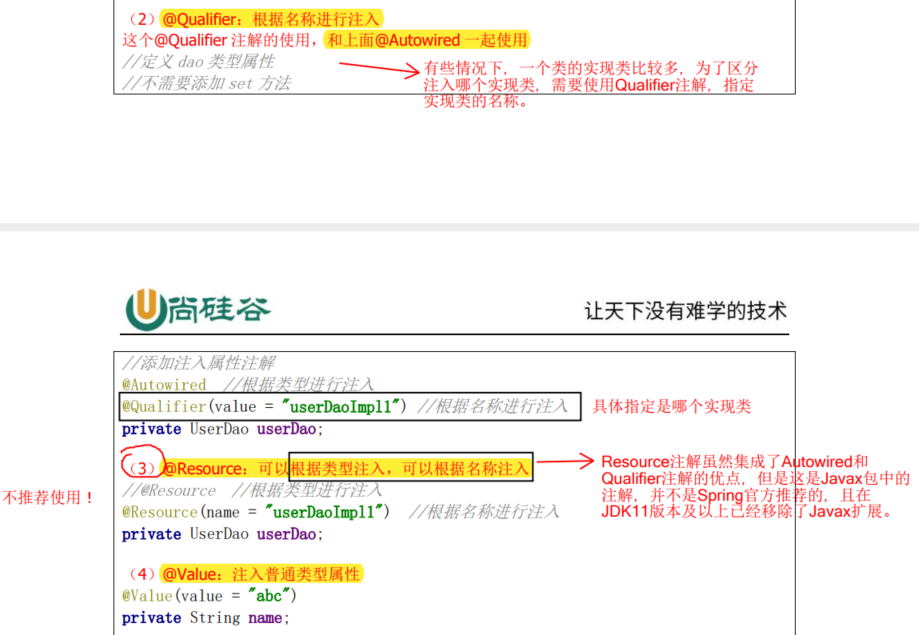
4.10.2 基于注解方式实现属性注入
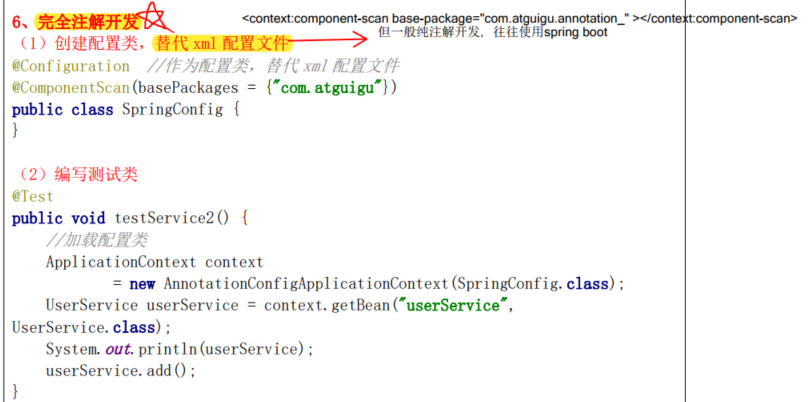
4.10.3 完全注解开发
Spring5 概述及Spring IOC学习的更多相关文章
- Spring IOC学习
IoC基础 控制反转IoC(Inversion of Control),是一种设计思想,DI(依赖注入)是实现IoC的一种方法,也有人认为DI只是IoC的另一种说法.没有IoC的程序中我们使用面向对象 ...
- Spring IOC之Bean 概述
1.Bean概述 一个Spring IOC容器管理一个或者多个bean.这些bean是根据你提供给容器的配置数据信息创建的,例如XML形式的的定义. 在容器内部,这些bean的定义表示为BeanDef ...
- 零基础学习java------37---------mybatis的高级映射(单表查询,多表(一对一,一对多)),逆向工程,Spring(IOC,DI,创建对象,AOP)
一. mybatis的高级映射 1 单表,字段不一致 resultType输出映射: 要求查询的字段名(数据库中表格的字段)和对应的java类型的属性名一致,数据可以完成封装映射 如果字段和jav ...
- Spring IOC及AOP学习总结
一.Spring IOC体系学习总结: Spring中有两个容器体系,一类是BeanFactory.还有一类是ApplicationContext.BeanFactory提供了基础的容器功能.Appl ...
- 菜鸟学习spring IOC有感
一.spring IOC思想引入 事实上对于刚開始学习的人来说,在学习IOC的时候确实有点困难,主要是掌握其思想方面存在一丢丢的障碍,可是假设可以跨过这个障碍,则可以高速掌握当中的思想了.单从字 ...
- Spring IOC核心源码学习
1. 初始化 大致单步跟了下Spring IOC的初始化过程,整个脉络很庞大,初始化的过程主要就是读取XML资源,并解析,最终注册到Bean Factory中: 在完成初始化的过程后,Bean们就在B ...
- 框架源码系列六:Spring源码学习之Spring IOC源码学习
Spring 源码学习过程: 一.搞明白IOC能做什么,是怎么做的 1. 搞明白IOC能做什么? IOC是用为用户创建.管理实例对象的.用户需要实例对象时只需要向IOC容器获取就行了,不用自己去创建 ...
- 【转】Spring学习---Spring IoC容器的核心原理
[原文] Spring的两个核心概念:IoC和AOP的雏形,Spring的历史变迁和如今的生态帝国. IoC和DI的基本概念 IoC(控制反转,英文含义:Inverse of Control)是Spr ...
- Spring框架学习之IOC(二)
Spring框架学习之IOC(二) 接着上一篇的内容,下面开始IOC基于注解装配相关的内容 在 classpath 中扫描组件 <context:component-scan> 特定组件包 ...
随机推荐
- docker详细
镜像(image) 容器(container) 启动,删除,停止 仓库(repository) docker images
- SubsamplingScaleImageView 源码解析
一开始没打算分析 SubsamplingScaleImageView 这个开源的图片浏览器的,因为这个库在我们 App 中使用了,觉得自己对这个库还是比较熟悉的,结果某天再看看到源码介绍的时候,才发现 ...
- File与IO基础
IO流的作用:持久化到磁盘 File类的使用 File类基本概念 文件和文件夹都是用File类来表示. File类是内存层面的对象,内存中创建出来的File对象不一定有一个真实存在的文件或文件夹,但是 ...
- [TopCoder2014Final]FrozenStandings 解法探究
https://vjudge.net/problem/TopCoder-13460 简要题意:给出 \(n\) 段从 \(1\) 到 \(n\) 编号的等长区间,保证区间的端点互不相同.区间可以选取其 ...
- .NET6控制台程序使用quartz.net
1.新建一个名为"ConsoleQuartz"的.NET6控制台程序. 2.nuget中安装Quartz和Quartz.Plugins,这2个DLL. 3.新建一个HelloQua ...
- C语言 字符串指针和字符串数组使用区别
字符串指针和字符串数组使用区别 1 #include <stdio.h> 2 #include <string.h> 3 #include <stdlib.h> 4 ...
- EXCEL excel中运用ctrl+D、ctrl+enter、ctrl+E批量填充数据
在excel中,利用鼠标拖动可以快速向下或者向右填充序列或者复制单元格.但是利用快捷键也可以实现多种填充方式,本文就为大家介绍一些ctrl系列快捷键的填充,一起来看看吧. 封面tu 一,ctrl+D/ ...
- ubuntu安装配置ssh-connect to host localhost port 22: Connection refused
在安装ssh,经常出现 ssh: connect to host localhost port 22: Connection refused 从以下几点去检查: 1.是否安装ssh-server: 打 ...
- (亿级流量)分布式防重复提交token设计
大型互联网项目中,很多流量都达到亿级.同一时间很多的人在使用,而每个用户提交表单的时候都可能会出现重复点击的情况,此时如果不做好控制,那么系统将会产生很多的数据重复的问题.怎样去设计一个高可用的防重复 ...
- keybd_event模拟键盘按键,mouse_event怎么用
从 模仿UP主,用Python实现一个弹幕控制的直播间! - 蛮三刀酱 - 博客园 (cnblogs.com) 知道了 PyAutoGUI: * Moving the mouse and clicki ...