
FastDFS搭建
a、上传安装时需要的文件
①:FastDFS_v5.05.tar.gz

②:fastdfs-nginx-module_v1.16.tar.gz

③:libfastcommon-1.0.7.tar.gz

④:nginx-1.8.0.tar.gz
b、安装FastDFS之前,先安装libevent
[root@localhost /]# yum -y install libevent
c、安装 libfastcommon-1.0.7.tar.gz 工具包
①:[root@localhost ~]# tar -zxvf libfastcommon-1.0.7

②:[root@localhost libfastcommon-1.0.7]# ./make.sh

③:[root@localhost libfastcommon-1.0.7]# ./make.sh install

④:把/usr/lib64/libfastcommon.so文件向/usr/lib/下复制一份

   [root@localhost lib64]# cp /user/lib64/libfastcommon.so /user/lib
d、安装Tracker服务
①:[root@localhost ~]# tar -zxvf FastDFS_v5.05.tar.gz

②:[root@localhost FastDFS]# ./make.sh

③:[root@localhost FastDFS]# ./make.sh install

  安装后在/usr/bin/目录下有以fdfs开头的文件都是编译出来的,配置文件都放到/etc/fdfs文件夹

④:把/root/FastDFS/conf目录下的所有的配置文件都复制到/etc/fdfs下

   [root@localhost ~]# cp /root/FastDFS/conf /etc/fdfs -r
⑤:配置tracker服务。修改/etc/fdfs/tracker.conf文件。
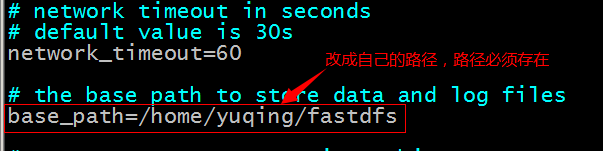
⑥:启动tracker:/usr/bin/fdfs_trackerd /etc/fdfs/tracker.conf
  重启使用命令:/usr/bin/fdfs_trackerd /etc/fdfs/tracker.conf restart
e、安装storage服务
①:如果是在不同的服务器安装,第四步的1~4需要重新执行

②:配置storage服务。修改/etc/fdfs/storage.conf文件
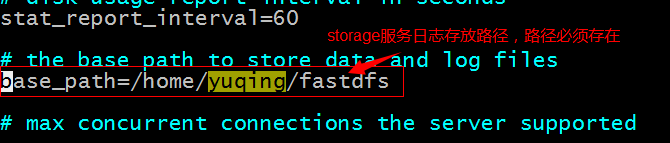
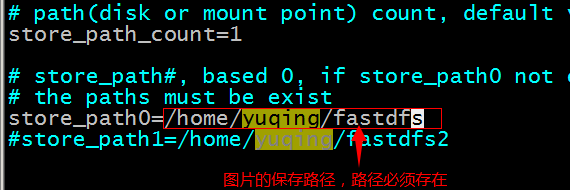

f、测试服务
①:修改配置文件/etc/fdfs/client.conf
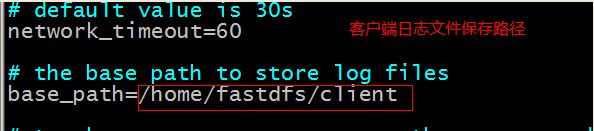

②:测试

[root@localhost FastDFS]# /usr/bin/fdfs_test /etc/fdfs/client.conf upload anti-steal.jpg
g、搭建nginx提供http服务
①:[root@localhost ~]# tar -zxvf fastdfs-nginx-module_v1.16.tar.gz

②:[root@localhost ~]# tar -zxvf nginx-1.8.0.tar.gz

③:修改/root/fastdfs-nginx-module/src/config文件,把其中的local去掉

④:对nginx重新config

[root@localhost nginx-1.8.0]#

./configure \

--prefix=/usr/local/nginx \

--pid-path=/var/run/nginx/nginx.pid \

--lock-path=/var/lock/nginx.lock \

--error-log-path=/var/log/nginx/error.log \

--http-log-path=/var/log/nginx/access.log \

--with-http_gzip_static_module \

--http-client-body-temp-path=/var/temp/nginx/client \

--http-proxy-temp-path=/var/temp/nginx/proxy \

--http-fastcgi-temp-path=/var/temp/nginx/fastcgi \

--http-uwsgi-temp-path=/var/temp/nginx/uwsgi \

--http-scgi-temp-path=/var/temp/nginx/scgi \

--add-module=/root/fastdfs-nginx-module/src

⑤:[root@localhost nginx-1.8.0]# make

   [root@localhost nginx-1.8.0]# make install

⑥:把/root/fastdfs-nginx-module/src/mod_fastdfs.conf文件复制到/etc/fdfs目录下


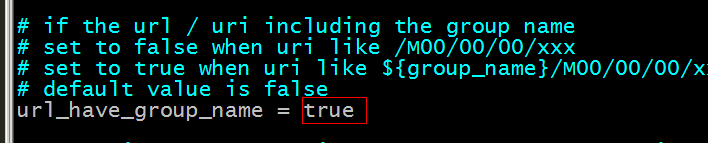

⑦:nginx的配置

  在nginx的配置文件中添加一个Server:

  server {

          listen       80;

          server_name  192.168.0.11;

          location /group1/M00/{

                  #root /home/FastDFS/fdfs_storage/data;

                  ngx_fastdfs_module;

          }

  }

⑧:将libfdfsclient.so拷贝至/usr/lib下

[root@localhost sbin]# cp /usr/lib64/libfdfsclient.so /usr/lib/
⑨:启动nginx
[root@localhost sbin]# ./nginx
h、启动FastDFS
①:启动tracker:  /usr/bin/fdfs_trackerd /etc/fdfs/tracker.conf

②:启动storage: /usr/bin/fdfs_storaged /etc/fdfs/storage.conf
致此结束……

关注我的公众号,精彩内容不能错过
FastDFS搭建的更多相关文章
- FastDFS搭建分布式文件系统
FastDFS搭建分布式文件系统 1. 什么是分布式文件系统 分布式文件系统(Distributed File System)是指文件系统管理的物理存储资源不一定直接连接在本地节点上,而是通过计算机网 ...
- [转帖]使用fastdfs搭建文件管理系统
使用fastdfs搭建文件管理系统 https://www.jianshu.com/p/4e80069c84d3 今天同事说他们的系统用到了这个分布式文件管理系统. 一.FastDFS介绍 FastD ...
- FastDFS搭建单机图片服务器(二)
防丢失转载:https://blog.csdn.net/MissEel/article/details/80856194 根据 分布式文件系统 - FastDFS 在 CentOS 下配置安装部署 和 ...
- FastDFS搭建单机图片服务器(一)
防丢失转载:https://blog.csdn.net/MissEel/article/details/80856194 根据 分布式文件系统 - FastDFS 在 CentOS 下配置安装部署 和 ...
- FastDFS搭建及java整合代码【转】
FastDFS软件介绍 1.什么是FastDFS FastDFS是用C语言编写的一款开源的分布式文件系统.FastDFS为互联网量身定制,充分考虑了冗余备份.负载均衡.线性扩容等机制,并注重高可用.高 ...
- Centos7下用FastDFS搭建图片服务器
1.所用到的工具: 1.FastDFS_v5.05.tar 2.fastdfs-nginx-module_v1.16.tar 3.libfastcommonV1.0.7.tar 4.nginx-1.1 ...
- FastDFS 搭建
#FastDFS安装方式 安装必要插件:libevent (此次搭建方案采用libevent 1.4.13) wget http://fastdfs.googlecode.com/files/F ...
- Centos7 FastDFS 搭建
安装libfastcommon 首先第一步是安装libfastcommon,我这里将libfastcommon上传到的/opt目录下,直接解压: yum -y install gcc-c++ yum ...
- FastDFS搭建文件管理系统
参考:https://www.cnblogs.com/chiangchou/p/fastdfs.html 目录: 一:FastDFS介绍 1:简介: FastDFS 是一个开源的高性能分布式文件系统( ...
随机推荐
- centos 7 默认图形界面(或者字符界面)启动
1.切换到管理员用户 2.systemctl get-default命令获取当前模式(可以省去) 3.systemctl set-default graphical.target 修改启动模式(修改为 ...
- sphinx-doc的中文搜索
第一,你的系统需要安装jieba类库, pip install jieba 第二,接下来修改sphinx的conf.py文件,为项目设置为中文的搜索配置. # Language to be used ...
- Windows 10 IoT Core 17093 for Insider 版本更新
新特性: General bug fixes Enabled Miracast on Dragonboard. 已知的一些问题: F5 driver deployment from Visual ...
- C/C++ 多线程机制
一.C/C++多线程操作说明 C/C++多线程基本操作如下: 1. 线程的建立结束 2. 线程的互斥和同步 3. 使用信号量控制线程 4. 线程的基本属性配置 在C/C++代码编写时,使用多线程机制, ...
- 实现简易Promise
概述 异步编程离不开promise, async, 事件响应这些东西,为了更好地异步编程,我打算探究一下promise的实现原理,方法是自己实现一个简易的promise. 根据promise mdn上 ...
- Kali学习笔记30:身份认证与命令执行漏洞
文章的格式也许不是很好看,也没有什么合理的顺序 完全是想到什么写一些什么,但各个方面都涵盖到了 能耐下心看的朋友欢迎一起学习,大牛和杠精们请绕道 实验环境: Kali机器:192.168.163.13 ...
- [Postman]代理(16)
代理服务器充当内部网络和Internet之间的安全屏障,使Internet上的其他人无法访问内部网络上的信息. 什么是代理? 在基本网络中,客户端向服务器发出请求,服务器发回响应. 代理服务器是充当计 ...
- 边学边做,简单的 GraphQL 实例
项目中有功能要调用 API,对方 API 用的是 GraphQL 实现,就简单学了下,感叹技术进步真快,Facebook 发明的这玩意儿咋这么牛逼,使前端开发人员变得主动起来,想要什么接口.返回什么结 ...
- ubuntu下opencv的版本切换及遇到的问题解决
默认使用opencv 3.2的时候,使用SVM的时候,系统报错如下: error: ‘class MySVM’ has no member named ‘decision_func’ 解决方法:要把系 ...
- iOS学习——(转)iOS中关于通知的使用
在移动端开打过程中,经常会用到通知和推送,例如有短信来了需要通知提示,手机横屏了需要通知提示,插上耳机了需要通知提示等等,我们可以根据这些通知采取对应的动作.iOS系统自身定义了很对通知,但是在开发过 ...