selenium python 一些操作和定位收集
(—)滚动条操作
selenium_webdriver(python)控制浏览器滚动条
selenium+Python(select定位)
Selenium+Python常见定位方法
selenium_webdriver(python)元素定位详解
#(1)使用JS操作浏览器(右侧竖向)滚动条

time.sleep(3)#最好等个几秒

#将滚动条移动到页面的顶部

js="var q=document.documentElement.scrollTop=0"

driver.execute_script(js)

#页面内嵌窗口浏览条滚动

js="var q=document.getElementById('id').scrollTop=1000"

driver.execute_script(js)

time.sleep(3)

# 通过按向下键将页面滚动条拖到底部

driver.find_element_by_xpath("xpath").send_keys(Keys.DOWN)

#(2)使用JS操作浏览器(底部横向)滚动条

#这个是全页面的

js = "window.scrollTo(210,550);" #(x, y)

x:代表横向坐标

y:代表纵向坐标

#(3)当我们需要定位的元素是动态元素,或者我们不确定它在哪时,可以先找到这个元素然后再使用JS操作

target = driver.find_element_by_id('id')

driver.execute_script("arguments[0].scrollIntoView();", target)
使用xpath解决一切复杂的定位。
find_element_by_xpath("//span[text()='APPRMIN']")

find_elements_by_xxx 会返回一个所有符合条件的element组成的列表,通过element.text属性获取文本

texts = list(ele.text for ele in find_elements_by_xpath("//span[@class='tree_title']"))
======以下是Select定位====
1、Select元素
1.打开百度-设置-搜索设置界面,如下图所示
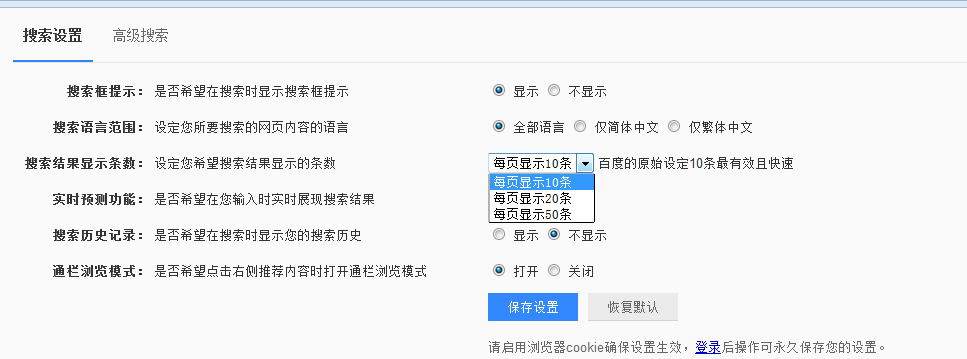
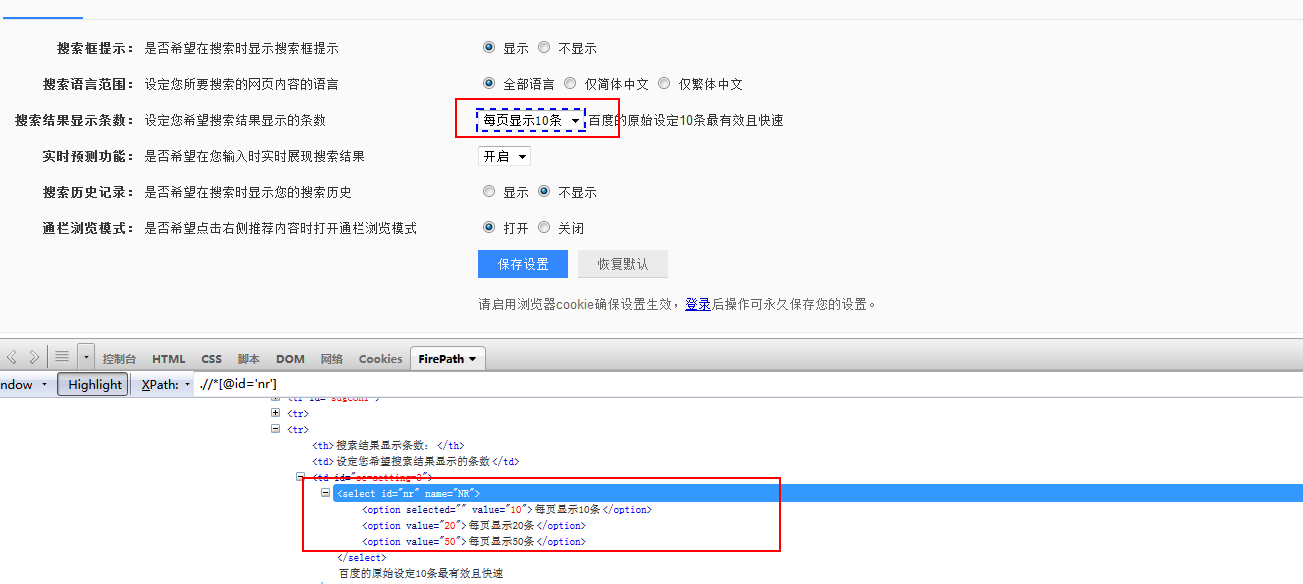
2.箭头所指位置,就是 select 选项框,打开页面元素定位,下方红色框框区域,可以看到 select 标签属性:
<select id="nr" name="NR">
3.选项有三个
<option selected="" value="10">每页显示 10 条</option>
<option value="20">每页显示 20 条</option>
<option value="50">每页显示 50 条</option>
2、定位select
定位select有多种方法,下面进行一一介绍
2.1 二次定位
1.定位 select 里的选项有多种方式,这里先介绍一种简单的方法:二次定位
2.基本思路,先定位 select 框,再定位 select 里的选项
完整代码如下:
|
1
2
3
4
5
6
7
8
9
10
11
12
13
14
15
|
# coding:utf-8from selenium import webdriverfrom selenium.webdriver.common.action_chains import ActionChainsdriver = webdriver.Firefox()driver.get("https://www.baidu.com/")driver.implicitly_wait(20)mouse = driver.find_element_by_link_text("设置")ActionChains(driver).move_to_element(mouse).perform()driver.find_element_by_link_text("搜索设置").click()s = driver.find_element_by_id("nr")s.find_element_by_xpath("//option[@value='50']").click()# 二次定位另外一种写法driver.find_element_by_id("nr").find_element_by_xpath("//option[@value='50']").click() |
3.还有另外一种写法也是可以的,把最下面两步合并成为一步:
driver.find_element_by_id("nr").find_element_by_xpath("//option[@value='50']").click()
2.2 直接定位
1.有很多小伙伴说 firebug 只能定位到 select 框,还能定位里面的选项。
2.用 direbug 定位到 select 后,下方查看元素属性地方,点 select 标签前面的+号,就可以展开里面的选项内容了。
3.然后自己写 xpath 定位或者 css,一次性直接定位到 option 上的内容。
完整代码如下:
|
1
2
3
4
5
6
7
8
9
10
11
12
13
|
# coding:utf-8from selenium import webdriverfrom selenium.webdriver.common.action_chains import ActionChainsdriver = webdriver.Firefox()driver.get("https://www.baidu.com/")driver.implicitly_wait(20)mouse = driver.find_element_by_link_text("设置")ActionChains(driver).move_to_element(mouse).perform()driver.find_element_by_link_text("搜索设置").click()# 直接点位driver.find_element_by_xpath(".//*[@id='nr']/option[2]").click() |
2.3 Select 模块(index)点位
1.除了上面介绍的两种简单的方法定位到 select 选项,selenium 还提供了更高级的玩法,导入 Select 模块。直接根据属性或索引定位。
2.先要导入 select 方法:
from selenium.webdriver.support.select import Select
3.然后通过 select 选项的索引来定位选择对应选项(从 0 开始计数),如选择第三个选项:select_by_index(2)
完整代码如下:
|
1
2
3
4
5
6
7
8
9
10
11
12
13
14
15
|
# coding:utf-8from selenium import webdriverfrom selenium.webdriver.common.action_chains import ActionChainsfrom selenium.webdriver.support.select import Selectdriver = webdriver.Firefox()driver.get("https://www.baidu.com/")driver.implicitly_wait(20)mouse = driver.find_element_by_link_text("设置")ActionChains(driver).move_to_element(mouse).perform()driver.find_element_by_link_text("搜索设置").click()# 通过索引:select_by_index()s = driver.find_element_by_id("nr")Select(s).select_by_index(2) |
2.4 Select 模块(value)定位
1.Select 模块里面除了 index 的方法,还有一个方法,通过选项的 value值来定位。每个选项,都有对应的 value 值,如
<select id="nr" name="NR">
<option selected="" value="10">每页显示 10 条</option>
<option value="20">每页显示 20 条</option>
<option value="50">每页显示 50 条</option>
2.第二个选项对应的 value 值就是“20”:select_by_value(2)
完整代码如下:
|
1
2
3
4
5
6
7
8
9
10
11
12
13
14
15
|
# coding:utf-8from selenium import webdriverfrom selenium.webdriver.common.action_chains import ActionChainsfrom selenium.webdriver.support.select import Selectdriver = webdriver.Firefox()driver.get("https://www.baidu.com/")driver.implicitly_wait(20)mouse = driver.find_element_by_link_text("设置")ActionChains(driver).move_to_element(mouse).perform()driver.find_element_by_link_text("搜索设置").click()# 通过value定位:select_by_value()s = driver.find_element_by_id("nr")Select(s).select_by_value(20) |
2.5 Select 模块(text)定位
1.Select 模块里面还有一个更加高级的功能,可以直接通过选项的文本内容来定位。
2.定位“每页显示 50 条”:select_by_visible_text("每页显示 50 条")
完整代码如下:
|
1
2
3
4
5
6
7
8
9
10
11
12
13
14
15
|
# coding:utf-8from selenium import webdriverfrom selenium.webdriver.common.action_chains import ActionChainsfrom selenium.webdriver.support.select import Selectdriver = webdriver.Firefox()driver.get("https://www.baidu.com/")driver.implicitly_wait(20)mouse = driver.find_element_by_link_text("设置")ActionChains(driver).move_to_element(mouse).perform()driver.find_element_by_link_text("搜索设置").click()# 通过select_by_visible_text定位s = driver.find_element_by_id("nr")Select(s).select_by_visible_text("每页显示50条") |
3.Select 模块其它方法
1.select 里面方法除了上面介绍的三种,还有更多的功能如下

select_by_index() :通过索引定位
select_by_value() :通过 value 值定位
select_by_visible_text() :通过文本值定位
deselect_all() :取消所有选项
deselect_by_index() :取消对应 index 选项
deselect_by_value() :取消对应 value 选项
deselect_by_visible_text() :取消对应文本选项
first_selected_option() :返回第一个选项
all_selected_options() :返回所有的选项
selenium python 一些操作和定位收集的更多相关文章
- selenium+python自动化之元素定位
自动化按步骤拆分的话,可以分为四步操作:定位元素,操作元素,获取返回结果,断言(返回结果与期望结果是否一致),最后自动出测试报告.本篇接下来讲基本的八种元素定位方法.说的通俗一点,就是教大家找对象. ...
- selenium + python(鼠标操作)
关于最近学习selenium自动化测试鼠标操作的一些总结 常见的鼠标操作
- selenium python (八)定位frame中的对象
#!/usr/bin/python# -*- coding: utf-8 -*-__author__ = 'zuoanvip'#在测试过程中经常遇到frame嵌套的应用,加入页面上有A.B两个fram ...
- selenium python (六)定位一组对象
checkbox源码: <html><head><meta http-equiv="content-type" content="text/ ...
- selenium+python自动化之xpath定位
在上一篇简单的介绍了用工具查看目标元素的xpath地址,工具查看比较死板,不够灵活,有时候直接复制粘贴会定位不到.这个时候就需要自己手动的去写xpath了,这一篇详细讲解xpath的一些语法. 什么是 ...
- selenium+python自动化之CSS定位
一.css:属性定位 1.css可以通过元素的id.class.标签这三个常规属性直接定位到 2.如下是百度输入框的的html代码: <input id="kw" class ...
- selenium+python元素操作
1.判断元素的属性if i.get_attribute('type') == 'checkbox' 2.获取当前窗口的坐标 driver.get_window_position 获取当前窗口的长宽 d ...
- selenium python 第一个脚本
为什么选择python?我的回答很简单,简单易学,功能强大! 下面看看python和selenium 2的结合是什么样子吧 一.第一个selenium python脚本: #coding = utf- ...
- selenium中元素操作之浏览器窗口滚动&网页日期控件操作(js操作)(五)
js的滚动条scrollIntoView() Arguments[] - python与js之间的羁绊 1.移动到元素element对象的“底端”,与当前窗口的“底部”对齐: driver.execu ...
随机推荐
- 解决Ubuntu 16.04 上Android Studio2.3上面运行APP时提示DELETE_FAILED_INTERNAL_ERROR Error while Installing APKs的问题
本人工作环境:Ubuntu 16.04 LTS + Android Studio 2.3 AVD启动之后,运行APP,报错提示: DELETE_FAILED_INTERNAL_ERROR Error ...
- angularJs 2-quickstart学习记录
angular官网文档 我尝试文档中下载<快速起步>种子的方法进行quickstart. cd quickstart npm install npm start npm install 这 ...
- Python从入门到精通之Second!
初识Python基础! -基础 -扩展名可以是任意的,但是导入模块时,如果不是.py文件就会报错. -两种执行方式 1.python解释器 文件名.py 文件路径 -Li ...
- windows安装zookeeper
ZooKeeper是一个分布式的,开放源码的分布式应用程序协调服务,是Google的Chubby一个开源的实现,是Hadoop和Hbase的重要组件.它是一个为分布式应用提供一致性服务的软件,提供的功 ...
- LAPM 相关实验01
目录 lab1 静态.动态资源的区别lab2 部署phpMyadminlab3 部署wordpresslab4 编译安装php-Xcache加速器lab5 fcgi实现lamp lab1 静态.动态资 ...
- 前端 javascript
---恢复内容开始--- JavaScript JavaScript:是一门编译型的语言,比python语言还要弱类型的语言 JavaScript 分为三个部分:Ecmascript.dom.bom ...
- Python的基本数据类型
数据类型常用函数 type(a)-得到变量a的数据类型 isinstance(a,str)-判断a是否是字符串类型 Python中有五个标准数据类型 数字Number 字符串String 数组List ...
- 画PCB之电流与线宽的关系
来源:(多图) 超强整理!PCB设计之电流与线宽的关系http://www.51hei.com/bbs/dpj-39134-1.html 关于PCB线宽和电流的经验公式,关系表和软件网上都很多,本文把 ...
- Requests+正则表达式抓取猫眼电影TOP100
spider.py # -*- coding:utf-8 -*- import requests import re import json import codecs from requests.e ...
- ServiceStack.Redis记录
一.事务 (一)AcquireLock方法 1.说明:申请对一个Key加锁(期间其他对象不能访问). 2.带using的使用,或带过期时间参数,否则锁不会自动释放. using (RedisCache ...