selenium python 一些操作和定位收集
(—)滚动条操作
selenium_webdriver(python)控制浏览器滚动条
selenium+Python(select定位)
Selenium+Python常见定位方法
selenium_webdriver(python)元素定位详解
#(1)使用JS操作浏览器(右侧竖向)滚动条

time.sleep(3)#最好等个几秒

#将滚动条移动到页面的顶部

js="var q=document.documentElement.scrollTop=0"

driver.execute_script(js)

#页面内嵌窗口浏览条滚动

js="var q=document.getElementById('id').scrollTop=1000"

driver.execute_script(js)

time.sleep(3)

# 通过按向下键将页面滚动条拖到底部

driver.find_element_by_xpath("xpath").send_keys(Keys.DOWN)

#(2)使用JS操作浏览器(底部横向)滚动条

#这个是全页面的

js = "window.scrollTo(210,550);" #(x, y)

x:代表横向坐标

y:代表纵向坐标

#(3)当我们需要定位的元素是动态元素,或者我们不确定它在哪时,可以先找到这个元素然后再使用JS操作

target = driver.find_element_by_id('id')

driver.execute_script("arguments[0].scrollIntoView();", target)
使用xpath解决一切复杂的定位。
find_element_by_xpath("//span[text()='APPRMIN']")

find_elements_by_xxx 会返回一个所有符合条件的element组成的列表,通过element.text属性获取文本

texts = list(ele.text for ele in find_elements_by_xpath("//span[@class='tree_title']"))
======以下是Select定位====
1、Select元素
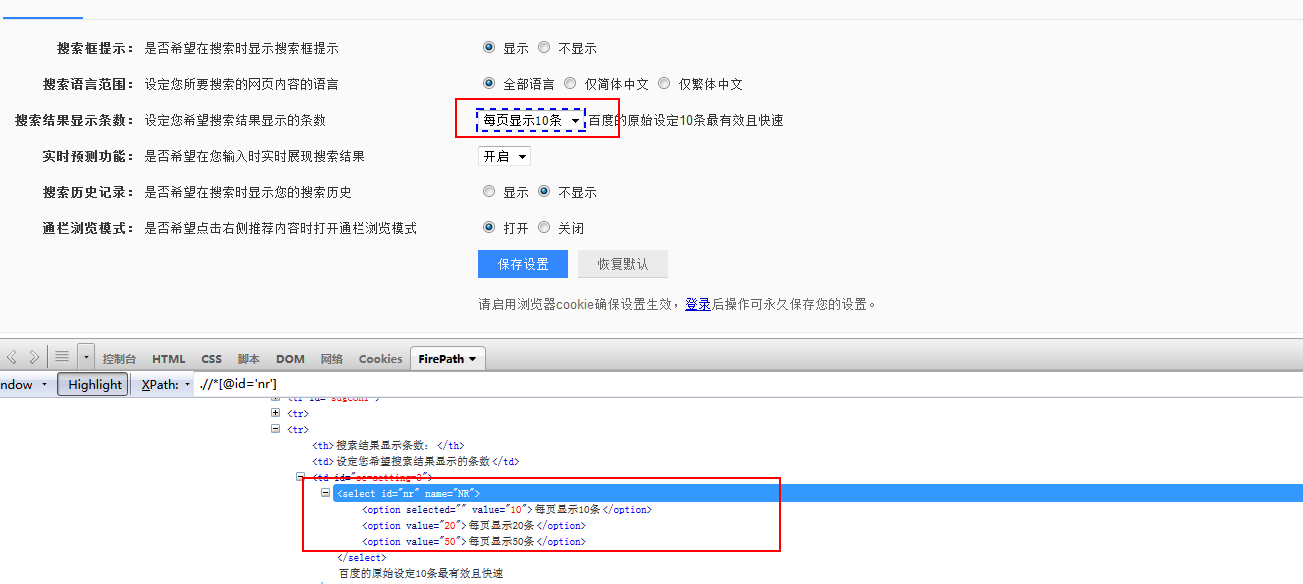
1.打开百度-设置-搜索设置界面,如下图所示
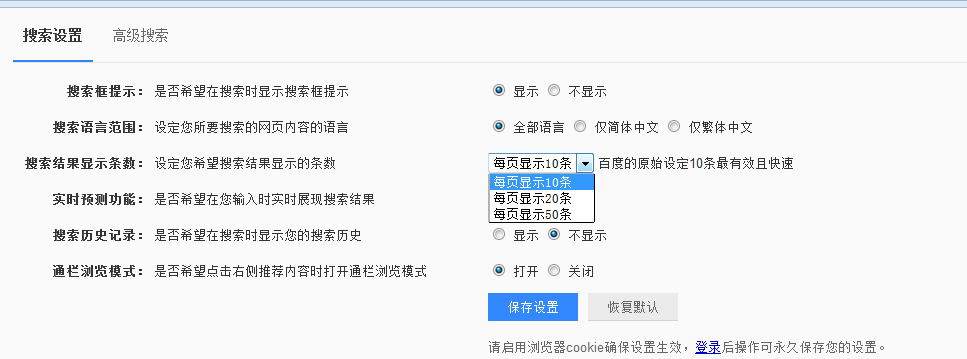
2.箭头所指位置,就是 select 选项框,打开页面元素定位,下方红色框框区域,可以看到 select 标签属性:
<select id="nr" name="NR">
3.选项有三个
<option selected="" value="10">每页显示 10 条</option>
<option value="20">每页显示 20 条</option>
<option value="50">每页显示 50 条</option>
2、定位select
定位select有多种方法,下面进行一一介绍
2.1 二次定位
1.定位 select 里的选项有多种方式,这里先介绍一种简单的方法:二次定位
2.基本思路,先定位 select 框,再定位 select 里的选项
完整代码如下:
|
1
2
3
4
5
6
7
8
9
10
11
12
13
14
15
|
# coding:utf-8from selenium import webdriverfrom selenium.webdriver.common.action_chains import ActionChainsdriver = webdriver.Firefox()driver.get("https://www.baidu.com/")driver.implicitly_wait(20)mouse = driver.find_element_by_link_text("设置")ActionChains(driver).move_to_element(mouse).perform()driver.find_element_by_link_text("搜索设置").click()s = driver.find_element_by_id("nr")s.find_element_by_xpath("//option[@value='50']").click()# 二次定位另外一种写法driver.find_element_by_id("nr").find_element_by_xpath("//option[@value='50']").click() |
3.还有另外一种写法也是可以的,把最下面两步合并成为一步:
driver.find_element_by_id("nr").find_element_by_xpath("//option[@value='50']").click()
2.2 直接定位
1.有很多小伙伴说 firebug 只能定位到 select 框,还能定位里面的选项。
2.用 direbug 定位到 select 后,下方查看元素属性地方,点 select 标签前面的+号,就可以展开里面的选项内容了。
3.然后自己写 xpath 定位或者 css,一次性直接定位到 option 上的内容。
完整代码如下:
|
1
2
3
4
5
6
7
8
9
10
11
12
13
|
# coding:utf-8from selenium import webdriverfrom selenium.webdriver.common.action_chains import ActionChainsdriver = webdriver.Firefox()driver.get("https://www.baidu.com/")driver.implicitly_wait(20)mouse = driver.find_element_by_link_text("设置")ActionChains(driver).move_to_element(mouse).perform()driver.find_element_by_link_text("搜索设置").click()# 直接点位driver.find_element_by_xpath(".//*[@id='nr']/option[2]").click() |
2.3 Select 模块(index)点位
1.除了上面介绍的两种简单的方法定位到 select 选项,selenium 还提供了更高级的玩法,导入 Select 模块。直接根据属性或索引定位。
2.先要导入 select 方法:
from selenium.webdriver.support.select import Select
3.然后通过 select 选项的索引来定位选择对应选项(从 0 开始计数),如选择第三个选项:select_by_index(2)
完整代码如下:
|
1
2
3
4
5
6
7
8
9
10
11
12
13
14
15
|
# coding:utf-8from selenium import webdriverfrom selenium.webdriver.common.action_chains import ActionChainsfrom selenium.webdriver.support.select import Selectdriver = webdriver.Firefox()driver.get("https://www.baidu.com/")driver.implicitly_wait(20)mouse = driver.find_element_by_link_text("设置")ActionChains(driver).move_to_element(mouse).perform()driver.find_element_by_link_text("搜索设置").click()# 通过索引:select_by_index()s = driver.find_element_by_id("nr")Select(s).select_by_index(2) |
2.4 Select 模块(value)定位
1.Select 模块里面除了 index 的方法,还有一个方法,通过选项的 value值来定位。每个选项,都有对应的 value 值,如
<select id="nr" name="NR">
<option selected="" value="10">每页显示 10 条</option>
<option value="20">每页显示 20 条</option>
<option value="50">每页显示 50 条</option>
2.第二个选项对应的 value 值就是“20”:select_by_value(2)
完整代码如下:
|
1
2
3
4
5
6
7
8
9
10
11
12
13
14
15
|
# coding:utf-8from selenium import webdriverfrom selenium.webdriver.common.action_chains import ActionChainsfrom selenium.webdriver.support.select import Selectdriver = webdriver.Firefox()driver.get("https://www.baidu.com/")driver.implicitly_wait(20)mouse = driver.find_element_by_link_text("设置")ActionChains(driver).move_to_element(mouse).perform()driver.find_element_by_link_text("搜索设置").click()# 通过value定位:select_by_value()s = driver.find_element_by_id("nr")Select(s).select_by_value(20) |
2.5 Select 模块(text)定位
1.Select 模块里面还有一个更加高级的功能,可以直接通过选项的文本内容来定位。
2.定位“每页显示 50 条”:select_by_visible_text("每页显示 50 条")
完整代码如下:
|
1
2
3
4
5
6
7
8
9
10
11
12
13
14
15
|
# coding:utf-8from selenium import webdriverfrom selenium.webdriver.common.action_chains import ActionChainsfrom selenium.webdriver.support.select import Selectdriver = webdriver.Firefox()driver.get("https://www.baidu.com/")driver.implicitly_wait(20)mouse = driver.find_element_by_link_text("设置")ActionChains(driver).move_to_element(mouse).perform()driver.find_element_by_link_text("搜索设置").click()# 通过select_by_visible_text定位s = driver.find_element_by_id("nr")Select(s).select_by_visible_text("每页显示50条") |
3.Select 模块其它方法
1.select 里面方法除了上面介绍的三种,还有更多的功能如下

select_by_index() :通过索引定位
select_by_value() :通过 value 值定位
select_by_visible_text() :通过文本值定位
deselect_all() :取消所有选项
deselect_by_index() :取消对应 index 选项
deselect_by_value() :取消对应 value 选项
deselect_by_visible_text() :取消对应文本选项
first_selected_option() :返回第一个选项
all_selected_options() :返回所有的选项
selenium python 一些操作和定位收集的更多相关文章
- selenium+python自动化之元素定位
自动化按步骤拆分的话,可以分为四步操作:定位元素,操作元素,获取返回结果,断言(返回结果与期望结果是否一致),最后自动出测试报告.本篇接下来讲基本的八种元素定位方法.说的通俗一点,就是教大家找对象. ...
- selenium + python(鼠标操作)
关于最近学习selenium自动化测试鼠标操作的一些总结 常见的鼠标操作
- selenium python (八)定位frame中的对象
#!/usr/bin/python# -*- coding: utf-8 -*-__author__ = 'zuoanvip'#在测试过程中经常遇到frame嵌套的应用,加入页面上有A.B两个fram ...
- selenium python (六)定位一组对象
checkbox源码: <html><head><meta http-equiv="content-type" content="text/ ...
- selenium+python自动化之xpath定位
在上一篇简单的介绍了用工具查看目标元素的xpath地址,工具查看比较死板,不够灵活,有时候直接复制粘贴会定位不到.这个时候就需要自己手动的去写xpath了,这一篇详细讲解xpath的一些语法. 什么是 ...
- selenium+python自动化之CSS定位
一.css:属性定位 1.css可以通过元素的id.class.标签这三个常规属性直接定位到 2.如下是百度输入框的的html代码: <input id="kw" class ...
- selenium+python元素操作
1.判断元素的属性if i.get_attribute('type') == 'checkbox' 2.获取当前窗口的坐标 driver.get_window_position 获取当前窗口的长宽 d ...
- selenium python 第一个脚本
为什么选择python?我的回答很简单,简单易学,功能强大! 下面看看python和selenium 2的结合是什么样子吧 一.第一个selenium python脚本: #coding = utf- ...
- selenium中元素操作之浏览器窗口滚动&网页日期控件操作(js操作)(五)
js的滚动条scrollIntoView() Arguments[] - python与js之间的羁绊 1.移动到元素element对象的“底端”,与当前窗口的“底部”对齐: driver.execu ...
随机推荐
- 【机器学习】K均值算法(II)
k聚类算法中如何选择初始化聚类中心所在的位置. 在选择聚类中心时候,如果选择初始化位置不合适,可能不能得出我们想要的局部最优解. 而是会出现一下情况: 为了解决这个问题,我们通常的做法是: 我们选取K ...
- JavaBean动作元素
用动作标签创建Javabeans实例 <jsp:useBean id="实例对象名" class="com.po.Users(类全名)" scope=&q ...
- ffmpeg源码编译安装(Compile ffmpeg with source) Part 1 : 通用部分
本页内容包含了在Unix/Linux中用源码包编译的通用的结构 可能不仅仅适用于ffmpeg 为啥使用源码包编译 编译源码可以扩展功能, 实现相对于自己平台的最优化, 还可以自定义的修改 概述 大部分 ...
- [f]聊天的时间格式化
代码如下: 参数: t: 时间戳, type:返回格式(1:IM界面,其他:会话列表) function formartTime(t, type) { var oldtime = new Date(t ...
- 避免docker异常重启容器挂掉的解决方法
Docker 升级或者重启容器不会被停掉然后重启的解决方法 在/etc/systemd/system/multi-user.target.wants/docker.service文件下添加配置 注意: ...
- MQTT
1.IBM提出,适用于IOT,订阅和发布模式. 2.订阅和发布模式:这种模式是异步的形式,有些类似于邮件接发的形式,发送者将邮件发至代理,接收者如果没同时接收,也不影响发送者的二次发送. 3.主题模式 ...
- jwt vs session 以rails 为例 (翻译部分)
原文地址:https://pragmaticstudio.com/tutorials/rails-session-cookies-for-api-authentication 普通方式: 令牌为基础的 ...
- [ 10.05 ]CF每日一题系列—— 962B贪心和思维?
Description: 非 * 号的地方可以放A或B,不能AA或BB,一共有a个A,b个B,问你最多放几个 Solution: 1.模拟一下,找连续空位长度,如果长度为奇数,则我可以有一个位置放任意 ...
- Flask框架(一)
from flask import Flask app = Flask(__name__) @app.route('/') def index(): return '<h1>hello w ...
- Android-Java-普通类与抽象类(覆盖)&方法重载
覆盖都是子类与父类之间 & 接口与实现类之间 才会产生:覆盖 有很多名称,覆盖,复写,重写 都是一个意思: 注意:重载都是方法之间 方法同名 不同参数,就属于重载: 普通类-覆盖: 描述An ...