【10分钟学Spring】:@Profile、@Conditional实现条件化装配
根据不同的环境来装配不同的bean
企业级开发中,我们一般有多种环境,比如开发环境、测试环境、UAT环境和生产环境。而系统中有些配置是和环境强相关的,比如数据库相关的配置,与其他外部系统的集成等。
如何才能实现一个部署包适用于多种环境呢?
Spring给我们提供了一种解决方案,这便是条件化装配bean的机制。最重要的是这种机制是在运行时决定该注入适用于哪个环境的bean对象,不需要重新编译构建。
下面使用Spring的profile机制实现dataSource对象的条件化装配。
1、给出开发环境、测试环境、生产环境dataSource的不同实现类
说明:此处只为演示条件化装配bean,不做真实数据源对象模拟。
public interface DataSource {

    void show();

}

public class DevDataSource implements DataSource{

    public DevDataSource(){

        show();

    }

    public void show() {

        System.out.println("开发环境数据源对象");

    }

}

public class TestDataSource implements DataSource{

    public TestDataSource() {

        show();

    }

    public void show() {

        System.out.println("测试环境数据源对象");

    }

}

public class ProDataSource implements DataSource{

    public ProDataSource() {

        show();

    }

    public void show() {

        System.out.println("生产环境数据源对象");

    }

}
2、使用profile配置条件化bean
其实profile的原理就是将不同的bean定义绑定到一个或多个profile之中,在将应用部署到不同的环境时,确保对应的profile处于激活状态即可。
这里我们使用JavaConfig的方式配置profile bean
@Configuration

public class DataSourceConfig {

    @Bean

    @Profile("dev")

    public DataSource devDataSource(){

        return new DevDataSource();

    }

    @Bean

    @Profile("test")

    public DataSource testDataSource(){

        return new TestDataSource();

    }

    @Bean

    @Profile("pro")

    public DataSource proDataSource(){

        return new ProDataSource();

    }

}
可以看到我们使用了@Profile注解,将不同环境的bean绑定到了不同的profile中。
3、激活profile
只要上面的两步还不行,我们还必须激活profile,这样Spring会依据激活的哪个profile,来创建并装配对应的bean对象。
激活profile需要两个属性。
spring.profiles.active

spring.profiles.default
可以在web.xml中配置Web应用的上下文参数,来激活profile属性。比如在web.xml中增加如下配置来激活dev的profile:
    <context-param>

        <param-name>spring.profiles.active</param-name>

        <param-value>dev</param-value>

    </context-param>
4、测试条件化装配
使用@ActiveProfiles注解在测试类中激活指定profile。
@RunWith(SpringJUnit4ClassRunner.class)

@ContextConfiguration(classes = {DataSourceConfig.class})

@ActiveProfiles("dev")

public class TestConditionDataSource {

    @Autowired

    private DataSource dataSource;

    @Test

    public void testDataSource(){

        Assert.assertNotNull(dataSource);

    }

}
输出:
开发环境数据源对象
我们profile换成生产环境的pro试下,
@RunWith(SpringJUnit4ClassRunner.class)

@ContextConfiguration(classes = {DataSourceConfig.class})

@ActiveProfiles("pro")

public class TestConditionDataSource {

    @Autowired

    private DataSource dataSource;

    @Test

    public void testDataSource(){

        Assert.assertNotNull(dataSource);

    }

}
输出:
生产环境数据源对象
通过spring的profile机制,我们实现了不同环境dataSource数据源对象的条件化装配。比较简单,就两步:1、使用@Profile注解为不同的bean配置profile(当然这里也可以是xml的方式),2、根据不同环境激活不同的profile。
使用@Conditional注解实现条件化的bean
Spring 4.0引入的新注解@Conditional注解,它可以用到带有@Bean注解的方法上,如果给定的条件计算结果为true,就会创建这个bean,否则不创建。
1、我们创建一个helloWorld对象
public class HelloWorld {

    public void sayHello(){

        System.out.println("conditional 装配helloworld");

    }

}
2、创建配置类
在该配置类中我们首先使用了@PropertySource注解加载了属性文件hello.properties,其次可以看到在helloWorld的bean配置中,除了@Bean注解外,多了一个@Conditional注解,不错,@Conditional注解是我们实现条件化装配bean的核心注解。
@Conditional注解中有一个HelloWorldConditional类,该类定义了我们创建该bean对象的条件。
@Configuration

@PropertySource("classpath:hello.properties")

public class HelloWorldConfig {

    @Bean

    @Conditional(HelloWorldConditional.class)

    public HelloWorld helloWorld(){

        return new HelloWorld();

    }

}
3、创建条件类HelloWorldConditional,需要实现Condition接口。
实现了Condition接口,重写了matches方法,在该方法中我们检测了环境变量中是否有hello属性,如果有就创建。没有则忽略。
注意:hello.properties中属性会存储到spring的Environment对象中,因此我们可以检测到其中的属性是否存在。
public class HelloWorldConditional implements Condition {

    public boolean matches(ConditionContext conditionContext, AnnotatedTypeMetadata annotatedTypeMetadata) {

        return conditionContext.getEnvironment().containsProperty("hello");

    }

}
4、测试条件装配
public class HelloWorldConditionTest {

    public static void main(String[] args) {

        ApplicationContext applicationContext = new AnnotationConfigApplicationContext(HelloWorldConfig.class);

        HelloWorld helloWorld = applicationContext.getBean("helloWorld",HelloWorld.class);

        helloWorld.sayHello();

    }

}
开始,我们在hello.properties中增加一条属性,
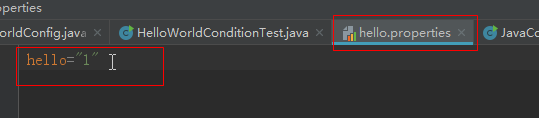
运行测试示例,会输出:
conditional 装配helloworld
说明此时,bean已成功装配。
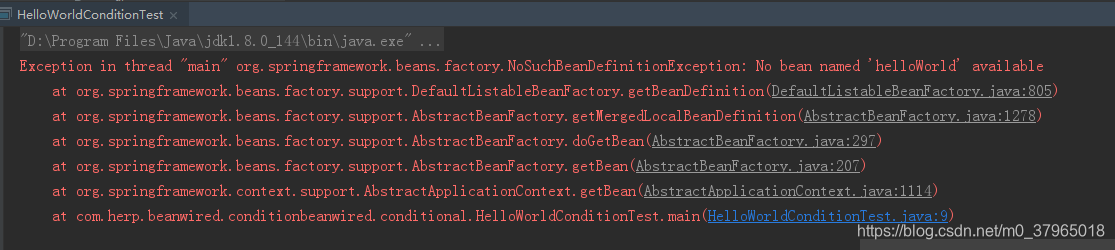
如果我们注释掉hello.properties的这行属性。再次运行示例,则会提示bean不存在。

提示没有“helloWorld”的bean对象,说明了条件不满足不会创建bean对象。
总结
Spring条件化装配bean的两种方式,第一种是使用profile机制,在bean的配置类中使用@profile注解,标识哪些bean对应哪个profile配置,然后在web.xml或Servlet启动参数中配置激活哪个profile来实现条件装配;第二种是使用@Conditional注解,在带有@Bean注解的方法上增加@Conditional注解,在注解属性值中提供一个实现了Condition接口的类(该类会重写matches方法,定义具体的创建条件)。<完>

【10分钟学Spring】:@Profile、@Conditional实现条件化装配的更多相关文章
- 【10分钟学Spring】:(一)初识Spring框架
简介 Spring是一个轻量级的企业级的Java开发框架.主要是用来替代原来更加重量级的企业级Java技术,比如EJB(Enterprise JavaBean).Java数据对象(Java Data ...
- 【10分钟学Spring】:(二)一文搞懂spring依赖注入(DI)
Spring最基础的特性就是创建bean.管理bean之间的依赖关系.下面通过具体实例演示该如何装配我们应用中的bean. Spring提供了三种主要的装配机制 在xml中进行显示的配置 在Java中 ...
- spring对bean的高级装配之基于@Conditional条件化装配
上篇介绍了如何基于profile来条件化创建bean,spring会根据profile的激活状态来进行创建;这篇介绍如何基于spring4.0引入的@Conditional和Condition接口来更 ...
- Spring入门(六):条件化的bean
1. 概念 默认情况下,Spring中定义的bean在应用程序启动时会全部装配,不管当前运行的是哪个环境(Dev,QA或者Prod),也不管当前运行的是什么系统(Windows或者Linux),但有些 ...
- 带你学够浪:Go语言基础系列 - 10分钟学方法和接口
文章每周持续更新,原创不易,「三连」让更多人看到是对我最大的肯定.可以微信搜索公众号「 后端技术学堂 」第一时间阅读(一般比博客早更新一到两篇) 对于一般的语言使用者来说 ,20% 的语言特性就能够满 ...
- 这是我见过最简单的博客文只有一张图,Python基础10分钟学完
- 10分钟了解 pandas - pandas官方文档译文 [原创]
10 Minutes to pandas 英文原文:https://pandas.pydata.org/pandas-docs/stable/10min.html 版本:pandas 0.23.4 采 ...
- Spring Boot自动配置与Spring 条件化配置
SpringBoot自动配置 SpringBoot的自动配置是一个运行时(应用程序启动时)的过程,简化开发时间,无需浪费时间讨论具体的Spring配置,只需考虑如何利用SpringBoot的自动配置即 ...
- MT【164】条件化简
(2017北大优特测试第9题) 已知实数 \(a_i\)(\(i=1,2,3,4,5\))满足 \((a_1-a_2)^2+(a_2-a_3)^2+(a_3-a_4)^2+(a_4-a_5)^2=1\ ...
随机推荐
- C函数库stdio.h概况
库变量 size_t 这是无符号整数类型,它是 sizeof 关键字的结果. FILE 这是一个适合存储文件流信息的对象类型. fpos_t 这是一个适合存储文件中任何位置的对象类 ...
- CSPS模拟 93
恰饭的时候lsc说我颓颓废废是要ak的前兆 所以我rp掉光了=.= T1 思维一片混乱 T2 只会n^3 发现决策单调性,但没想全 只知道$determin(l,r)>=determin(l,r ...
- javascript 作用域链及性能优化
在JavaScript中,函数也是对象,实际上,JavaScript里一切都是对象.函数对象和其它对象一样,拥有可以通过代码访问的属性和一系列仅供JavaScript引擎访问的内部属性.其中一个内部属 ...
- Xshell6配置ssh免密码登录虚拟机
首先先说明一下有密码的,涉及到root登陆权限的问题: 1.用超级管理员身份登录,修改 vi /etc/ssh/sshd_config, 找到 把其中的permitRootLogin 修改成: # ...
- ARM7中断的理解
谈谈对中断的理解? 中断是计算机中处理异步事件的重要机制 中断触发的方式: 1)中断源级设置 按键:(CPU之外的硬件) 设置中 ...
- 开启docker中的mongodb认证授权
前言: 开启MongoDB服务后,默认是没有权限验证的.直接通过IP加端口就可以远程访问数据库,并对数据库进行任意操作.下面介绍一下如何开启docker中MongoDB的权限认证. 安装完MongoD ...
- 前端Leader你应该知道的NPM包管理机制
npm install 命令 首先总结下npm 安装一个模块包的常用命令. /* 模块依赖会写入 dependencies 节点 */ npm install moduleName npm insta ...
- 网络编程--UDP通讯
UTP传输 public class Send1 { public static void main(String[] args) throws Exception { Scanner sc=new ...
- Javascript模块化开发2——Gruntfile.js详解
一.grunt模块简介 grunt插件,是一种npm环境下的自动化工具.对于需要反复重复的任务,例如压缩.编译.单元测试.linting等,自动化工具可以减轻你的劳动,简化你的工作.grunt模块根据 ...
- Python3.7.1学习(一):redis的连接和简单使用
1.python 利用 redis 第三方库 首先安装:pip install redis 2.reids的连接 Redis使用StrictRedis对象来管理对一个redis server 的所有连 ...