Maven打包的三种方式
Maven可以使用mvn package指令对项目进行打包,如果使用Java -jar xxx.jar执行运行jar文件,会出现"no main manifest attribute, in xxx.jar"(没有设置Main-Class)、ClassNotFoundException(找不到依赖包)等错误。
要想jar包能直接通过java -jar xxx.jar运行,需要满足:
1、在jar包中的META-INF/MANIFEST.MF中指定Main-Class,这样才能确定程序的入口在哪里;
2、要能加载到依赖包。
使用Maven有以下几种方法可以生成能直接运行的jar包,可以根据需要选择一种合适的方法。
方法一:使用maven-jar-plugin和maven-dependency-plugin插件打包
在pom.xml中配置:
- <build>
- <plugins>
- <plugin>
- <groupId>org.apache.maven.plugins</groupId>
- <artifactId>maven-jar-plugin</artifactId>
- <version>2.6</version>
- <configuration>
- <archive>
- <manifest>
- <addClasspath>true</addClasspath>
- <classpathPrefix>lib/</classpathPrefix>
- <mainClass>com.xxg.Main</mainClass>
- </manifest>
- </archive>
- </configuration>
- </plugin>
- <plugin>
- <groupId>org.apache.maven.plugins</groupId>
- <artifactId>maven-dependency-plugin</artifactId>
- <version>2.10</version>
- <executions>
- <execution>
- <id>copy-dependencies</id>
- <phase>package</phase>
- <goals>
- <goal>copy-dependencies</goal>
- </goals>
- <configuration>
- <outputDirectory>${project.build.directory}/lib</outputDirectory>
- </configuration>
- </execution>
- </executions>
- </plugin>
- </plugins>
- </build>
maven-jar-plugin用于生成META-INF/MANIFEST.MF文件的部分内容,<mainClass>com.xxg.Main</mainClass>指定MANIFEST.MF中的Main-Class,<addClasspath>true</addClasspath>会在MANIFEST.MF加上Class-Path项并配置依赖包,<classpathPrefix>lib/</classpathPrefix>指定依赖包所在目录。
例如下面是一个通过maven-jar-plugin插件生成的MANIFEST.MF文件片段:
- Class-Path: lib/commons-logging-1.2.jar lib/commons-io-2.4.jar
- Main-Class: com.xxg.Main
只是生成MANIFEST.MF文件还不够,maven-dependency-plugin插件用于将依赖包拷贝到<outputDirectory>${project.build.directory}/lib</outputDirectory>指定的位置,即lib目录下。
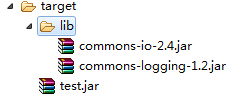
配置完成后,通过mvn package指令打包,会在target目录下生成jar包,并将依赖包拷贝到target/lib目录下,目录结构如下:
指定了Main-Class,有了依赖包,那么就可以直接通过java -jar xxx.jar运行jar包。
这种方式生成jar包有个缺点,就是生成的jar包太多不便于管理,下面两种方式只生成一个jar文件,包含项目本身的代码、资源以及所有的依赖包。
方法二:使用maven-assembly-plugin插件打包
在pom.xml中配置:
- <build>
- <plugins>
- <plugin>
- <groupId>org.apache.maven.plugins</groupId>
- <artifactId>maven-assembly-plugin</artifactId>
- <version>2.5.5</version>
- <configuration>
- <archive>
- <manifest>
- <mainClass>com.xxg.Main</mainClass>
- </manifest>
- </archive>
- <descriptorRefs>
- <descriptorRef>jar-with-dependencies</descriptorRef>
- </descriptorRefs>
- </configuration>
- </plugin>
- </plugins>
- </build>
打包方式:
- mvn package assembly:single
打包后会在target目录下生成一个xxx-jar-with-dependencies.jar文件,这个文件不但包含了自己项目中的代码和资源,还包含了所有依赖包的内容。所以可以直接通过java -jar来运行。
此外还可以直接通过mvn package来打包,无需assembly:single,不过需要加上一些配置:
- <build>
- <plugins>
- <plugin>
- <groupId>org.apache.maven.plugins</groupId>
- <artifactId>maven-assembly-plugin</artifactId>
- <version>2.5.5</version>
- <configuration>
- <archive>
- <manifest>
- <mainClass>com.xxg.Main</mainClass>
- </manifest>
- </archive>
- <descriptorRefs>
- <descriptorRef>jar-with-dependencies</descriptorRef>
- </descriptorRefs>
- </configuration>
- <executions>
- <execution>
- <id>make-assembly</id>
- <phase>package</phase>
- <goals>
- <goal>single</goal>
- </goals>
- </execution>
- </executions>
- </plugin>
- </plugins>
- </build>
其中<phase>package</phase>、<goal>single</goal>即表示在执行package打包时,执行assembly:single,所以可以直接使用mvn package打包。
不过,如果项目中用到spring Framework,用这种方式打出来的包运行时会出错,使用下面的方法三可以处理。
方法三:使用maven-shade-plugin插件打包
在pom.xml中配置:
- <build>
- <plugins>
- <plugin>
- <groupId>org.apache.maven.plugins</groupId>
- <artifactId>maven-shade-plugin</artifactId>
- <version>2.4.1</version>
- <executions>
- <execution>
- <phase>package</phase>
- <goals>
- <goal>shade</goal>
- </goals>
- <configuration>
- <transformers>
- <transformer implementation="org.apache.maven.plugins.shade.resource.ManifestResourceTransformer">
- <mainClass>com.xxg.Main</mainClass>
- </transformer>
- </transformers>
- </configuration>
- </execution>
- </executions>
- </plugin>
- </plugins>
- </build>
配置完成后,执行mvn package即可打包。在target目录下会生成两个jar包,注意不是original-xxx.jar文件,而是另外一个。和maven-assembly-plugin一样,生成的jar文件包含了所有依赖,所以可以直接运行。
如果项目中用到了Spring Framework,将依赖打到一个jar包中,运行时会出现读取XML schema文件出错。原因是Spring Framework的多个jar包中包含相同的文件spring.handlers和spring.schemas,如果生成一个jar包会互相覆盖。为了避免互相影响,可以使用AppendingTransformer来对文件内容追加合并:
- <build>
- <plugins>
- <plugin>
- <groupId>org.apache.maven.plugins</groupId>
- <artifactId>maven-shade-plugin</artifactId>
- <version>2.4.1</version>
- <executions>
- <execution>
- <phase>package</phase>
- <goals>
- <goal>shade</goal>
- </goals>
- <configuration>
- <transformers>
- <transformer implementation="org.apache.maven.plugins.shade.resource.ManifestResourceTransformer">
- <mainClass>com.xxg.Main</mainClass>
- </transformer>
- <transformer implementation="org.apache.maven.plugins.shade.resource.AppendingTransformer">
- <resource>META-INF/spring.handlers</resource>
- </transformer>
- <transformer implementation="org.apache.maven.plugins.shade.resource.AppendingTransformer">
- <resource>META-INF/spring.schemas</resource>
- </transformer>
- </transformers>
- </configuration>
- </execution>
- </executions>
- </plugin>
- </plugins>
- </build>
自己代码中的shade+assembly:
pom.xml:
         <plugin>

                 <groupId>org.apache.maven.plugins</groupId>

                 <artifactId>maven-shade-plugin</artifactId>

                 <dependencies>

                     <dependency>

                         <groupId>org.springframework.boot</groupId>

                         <artifactId>spring-boot-maven-plugin</artifactId>

                         <version>1.5.17.RELEASE</version>

                     </dependency>

                 </dependencies>

                 <configuration>

                     <shadedArtifactAttached>true</shadedArtifactAttached>

                     <keepDependenciesWithProvidedScope>true</keepDependenciesWithProvidedScope>

                     <createDependencyReducedPom>false</createDependencyReducedPom>

                     <finalName>demo-web-server-shade</finalName>

                     <filters>

                         <filter>

                             <artifact>*:*</artifact>

                             <excludes>

                                 <exclude>META-INF/*.SF</exclude>

                                 <exclude>META-INF/*.DSA</exclude>

                                 <exclude>META-INF/*.RSA</exclude>

                             </excludes>

                         </filter>

                     </filters>

                 </configuration>

                 <executions>

                     <execution>

                         <phase>package</phase>

                         <goals>

                             <goal>shade</goal>

                         </goals>

                         <configuration>

                             <transformers>

                                 <transformer

                                     implementation="org.apache.maven.plugins.shade.resource.AppendingTransformer">

                                     <resource>META-INF/spring.handlers</resource>

                                 </transformer>

                                 <transformer

                                     implementation="org.springframework.boot.maven.PropertiesMergingResourceTransformer">

                                     <resource>META-INF/spring.factories</resource>

                                 </transformer>

                                 <transformer

                                     implementation="org.apache.maven.plugins.shade.resource.AppendingTransformer">

                                     <resource>META-INF/spring.schemas</resource>

                                 </transformer>

                                 <transformer

                                     implementation="org.apache.maven.plugins.shade.resource.ServicesResourceTransformer" />

                                 <transformer

                                     implementation="org.apache.maven.plugins.shade.resource.ManifestResourceTransformer">

                                     <mainClass>com.my.demo.httpserver.WebServerApplication</mainClass>

                                 </transformer>

                             </transformers>

                         </configuration>

                     </execution>

                 </executions>

             </plugin>

             <plugin>

                 <groupId>org.apache.maven.plugins</groupId>

                 <artifactId>maven-assembly-plugin</artifactId>

                 <executions>

                     <execution>

                         <id>assemble</id>

                         <goals>

                             <goal>single</goal>

                         </goals>

                         <phase>package</phase>

                         <configuration>

                             <descriptors>

                                 <descriptor>assembly.xml</descriptor>

                             </descriptors>

                         </configuration>

                     </execution>

                 </executions>

             </plugin>
assembly.xml:
 <?xml version="1.0" encoding="utf-8"?>

<assembly>

  <id>assembly</id>

  <includeBaseDirectory>false</includeBaseDirectory>

  <formats>

    <format>zip</format>

  </formats>

  <fileSets>

    <!-- <fileSet>

      <directory>src/main/resources/bin</directory>

      <includes>

        <include>start.sh</include>

        <include>env.sh</include>

        <include>stop.sh</include>

      </includes>

      <fileMode>0755</fileMode>

      <outputDirectory>/</outputDirectory>

    </fileSet> -->

    <fileSet>

      <directory>src/main/resources/configsec</directory>

      <includes>

        <include>important.properties</include>

      </includes>

      <outputDirectory>configsec/</outputDirectory>

    </fileSet>

    <fileSet>

      <directory>src/main/resources/lib</directory>

      <includes>

        <include>quasar-core-0.7.9-jdk8.jar</include>

      </includes>

      <outputDirectory>/</outputDirectory>

    </fileSet>

  </fileSets>

  <files>

    <file>

      <source>${project.build.directory}/demo-web-server-shade.jar</source>

      <outputDirectory>/</outputDirectory>

    </file>

  </files>

</assembly>
转自:https://blog.csdn.net/daiyutage/article/details/53739452
参考资料:
https://yq.aliyun.com/articles/308777
maven-shade-plugin:https://my.oschina.net/u/2377110/blog/1584205
maven-assembly-plugin:https://www.jianshu.com/p/14bcb17b99e0 https://blog.csdn.net/liupeifeng3514/article/details/79777976
Maven打包的三种方式的更多相关文章
- Maven打包的三种方式(转)
Maven可以使用mvn package指令对项目进行打包,如果使用Java -jar xxx.jar执行运行jar文件,会出现"no main manifest attribute, in ...
- idea执行maven命令的三种方式
前言: java开发的IDE工具idea默认会提供maven生命周期的图形化执行,但是如果我们需要定制化的执行命令的时候,就需要使用手动执行maven命令的方式,今天就和大家讲一下idea手动执行ma ...
- Maven打jar包的三种方式
Maven打jar包的三种方式 不包含依赖jar包 该方法打包的jar,不包含依赖的jar包,也没有指定入口类. <build> <plugins> <plugin> ...
- (转)maven怎么 引入(或引用/使用) 自定义(或本地/第三方) jar的三种方式 图文教程 方法二最简单
转:https://blog.csdn.net/wabiaozia/article/details/52798194 准备工作: 假如我有一个自定义jar是:123456.jar,下载地址http:/ ...
- Maven中解决jar包冲突的三种方式
首先我们在idea中创建一个maven工程,我们只关注pom.xml以及External Libraries中导入的jar包 导入spring-beans.jar <dependency> ...
- dubbo服务运行的三种方式
dubbo服务运行,也就是让生产服务的进程一直启动.如果生产者进程挂掉,也就不存在生产者,消费者不能进行消费. Dubbo服务运行的三种方式如下:1.使用Servlet容器运行(Tomcat.Jett ...
- Hadoop Hive概念学习系列之hive三种方式区别和搭建、HiveServer2环境搭建、HWI环境搭建和beeline环境搭建(五)
说在前面的话 以下三种情况,最好是在3台集群里做,比如,master.slave1.slave2的master和slave1都安装了hive,将master作为服务端,将slave1作为服务端. 以 ...
- 三种方式上传文件-Java
前言:负责,因为该项目他(jetty嵌入式开始SpringMvc)实现文件上传的必要性,并拥有java文件上传这一块还没有被曝光.并 Http 更多晦涩协议.因此,这种渐进的方式来学习和实践上载文件的 ...
- 在Linux安装配置Tomcat 并部署web应用 ( 三种方式 )
系统版本:centos6.5版本 java版本:1.7 一.准备工作 1.java -version 检查是否有java环境,没有则需要去安装并配置到环境变量中. 2.下载tomcat包,下载地址:h ...
随机推荐
- 常用dos命令(3)
网络命令 ping 进行网络连接测试.名称解析 ftp 文件传输 net 网络命令集及用户管理 telnet 远程登陆 ipconfig显示.修改TCP/IP设置 msg 给用户发送消息 arp 显示 ...
- clojure 环境搭建
以下是clojure 基础环境搭建的几种方式 mac brew install clojure linux curl -O https://download.clojure.org/install/l ...
- Android 开发基础入门篇: 生成带有签名的apk安装包
说明: 软件默认生成的安装包没有签名,现在手机安装APP的时候要求,安装包必须有签名才可以 默认生成的APK位置 现在生成带有签名的APK 我一般放到当前工程根目录,然后文件名字 key 有些时候需要 ...
- 2-OpenResty 安装使用(Windows)
下载 OpenResty 1. https://gitee.com/yang456/LearnOpenResty.git 2. http://openresty.org/cn/download.h ...
- selenium--加载浏览器配置
前戏 在我们之前写的自动化脚本中,不知道大家有没有发现,每次打开的都是一个新的浏览器(相当于新安装的).但是有时候,我们想打开的是我们配置好的浏览器.我在之前的公司做web自动化的时候,由于我们的网站 ...
- 学习Linux要知道的知识点总结
1 如何查看Linux的user和hostname? (1)打开终端查看 终端左侧的root@zlkj:~$,前面的root为user - 用户名,后面的zlkj为hostname - 主机名. (2 ...
- 5 系统的软中断CPU升高,一般处理办法?
还是需要多动手,一个一个问题个被get!
- go 语言的一个赋值操作
最近在看client-go源码,在源码的\tools\caches\store.go文件中有一行代码不得其解(如下标黄内容),它将一个struct赋值给了一个interface type Store ...
- thinkPHP5如何使用rabbitmq
thinkPHP5如何使用rabbitmq? 安装好 tp5 的 rabbitmq 扩展后,在项目根目录文件添加文件 rabbitmq.php 引导启动 rabbitmq. <?php defi ...
- python 将列表里的字典元素合并为一个字典
python 将列表里的字典元素合并为一个字典 版权声明:本文为博主原创文章,遵循 CC 4.0 BY-SA 版权协议,转载请附上原文出处链接和本声明. 本文链接:https://blog.csdn. ...