Nancy之Pipelines三兄弟(Before After OnError)
一、简单描述
Before:如果返回null,拦截器将主动权转给路由;如果返回Response对象,则路由不起作用。
After : 没有返回值,可以在这里修改或替换当前的Response。
OnError : 返回值与Before相似,引发的错误或异常时的控制代码可以写在这里。
这三兄弟的大致作用,看名字,也可以这样简单的理解:
Before:处理之前要干的事。(返回null,继续处理;返回Response对象,不再做要干的那件事,换做Response对象要干的事)
After : 处理之后要干的事。
OnError : 处理出错了要干的事。
这三兄弟在NancyModule中的定义如下
 public AfterPipeline After { get; set; }

 public BeforePipeline Before { get; set; }

 public ErrorPipeline OnError { get; set; }
而这三个Pipeline分别继承了
AsyncNamedPipelineBase<TAsyncDelegate, TSyncDelegate>和NamedPipelineBase<TDelegate>
所以与他们有关的就主要包含在5个类中!具体的放在最后来看一下!
二、简单用法
我们可以在Module中直接使用Before/After/OnError这三个
也可以在Bootstrapper中重写RequestStartup或者ApplicationStartup来实现
当然也可以自定义,只要实现IRequestStartup或者IApplicationStartup接口也可以完成相应的工作
下面我们就分别来说明一下
用法一:直接在Module中使用
定义一个BaseModule,具体如下:
     public class BaseModule : NancyModule

     {

         public BaseModule()

         {

             //写法一

             Before += ctx => {

                 System.Diagnostics.Debug.WriteLine("BaseModule---Before");

                 return null;

             };

             After += ctx => {

                 System.Diagnostics.Debug.WriteLine("BaseModule---After");

             };

             OnError += (ctx, ex) => {

                 System.Diagnostics.Debug.WriteLine("BaseModule---OnError");

                 System.Diagnostics.Debug.WriteLine(ex.ToString());

                 return null;

             };

             //写法二

             //Before += MyBefore;

             //After += MyAfter;

             //OnError += MyOnError;

         }

         private Response MyBefore(NancyContext ctx)

         {

             System.Diagnostics.Debug.WriteLine("BaseModule---Before----写法二");

             return null;

         }

         private void MyAfter(NancyContext ctx)

         {

             System.Diagnostics.Debug.WriteLine("BaseModule---After----写法二");

         }

         private Response MyOnError(NancyContext ctx, Exception ex)

         {

             System.Diagnostics.Debug.WriteLine("BaseModule---OnError----写法二");

             System.Diagnostics.Debug.WriteLine(ex.ToString());

             return null;

         }

     }
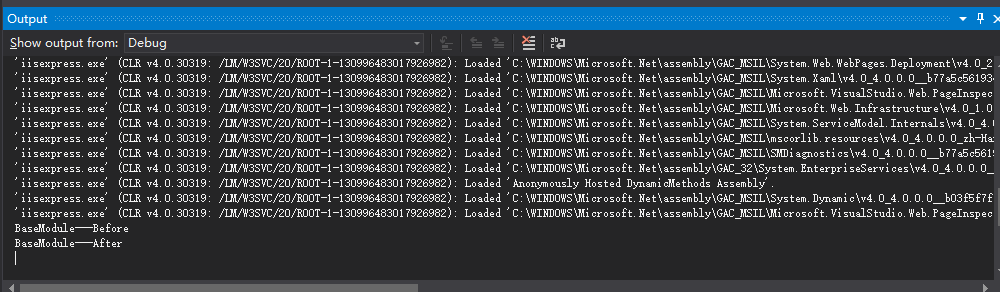
在BaseModule中,用了两种不同的形式来对Before、After、OnError进行处理,
都只是打印出一些简单的信息,看这些输出的信息,可以帮助理解内部执行的顺序!
可以看到,Before和OnError是Response类型的,After是void类型的
在这三兄弟的具体处理中,要根据实际情况来定(当然,你想就打印出一些东西也没问题,毕竟我们还是可以把这些东西写进日记嘛)!
下面定义一个HomeModule,具体如下:
     public class HomeModule : BaseModule

     {

         public HomeModule()

         {

             Get["/"] = _ => "Catcher Wong";

             Get["/err"] = _ => { throw new Exception("there're some errors"); };

         }

     }
其中,当我们访问http://localhost:port时,会显示我们的文字,访问http://localhost:port/err时,会抛出我们设定异常!
运行起来,看看我们的Output(输出)窗口
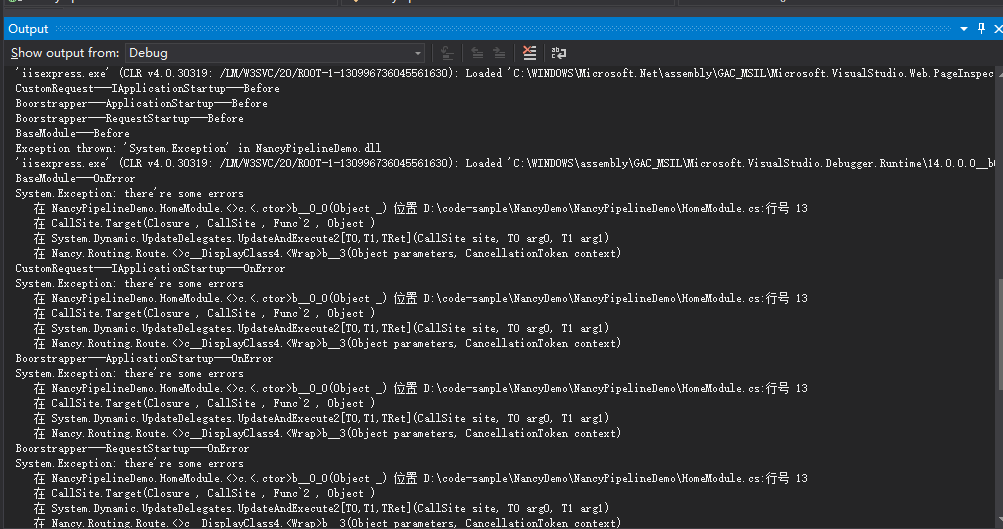
访问http://localhost:port/err时的情况
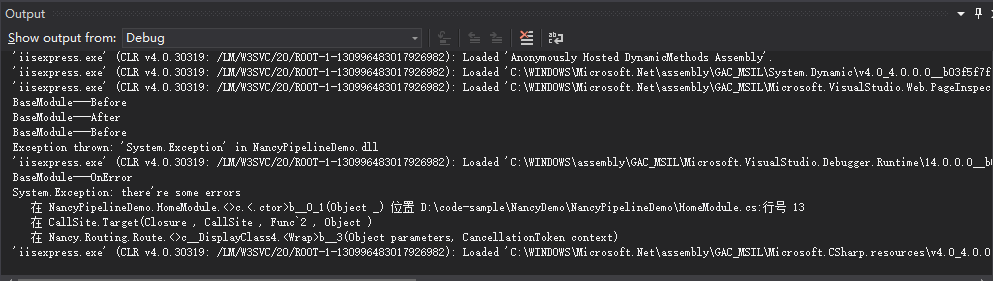
出现异常后并没有去执行After!!执行完OnError之后就结束了。
同样的,用写法二也是如此!
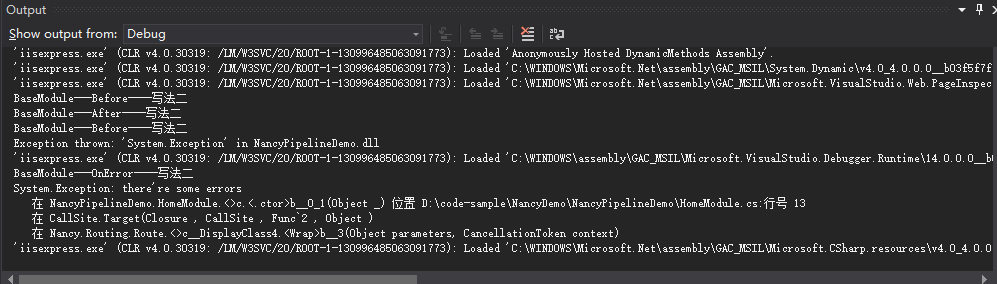
基本一致的效果。
用法二:在bootstrapper中重写RequestStartup或者ApplicationStartup
先来看看重写RequestStartup
     public class Bootstrapper : DefaultNancyBootstrapper

     {

         protected override void RequestStartup(TinyIoCContainer container, IPipelines pipelines, NancyContext context)

         {

             base.RequestStartup(container, pipelines, context);

             pipelines.BeforeRequest += ctx => {

                 System.Diagnostics.Debug.WriteLine("Boorstrapper---RequestStartup---Before");

                 return null;

             };

             pipelines.AfterRequest += ctx => {

                 System.Diagnostics.Debug.WriteLine("Boorstrapper---RequestStartup---After");

             };

             pipelines.OnError += (ctx,ex) => {

                 System.Diagnostics.Debug.WriteLine("Boorstrapper---RequestStartup---OnError");

                 System.Diagnostics.Debug.WriteLine(ex.ToString());

                 return null;

             };

         }

     }
我们同样是输出相应的信息,运行前,把我们BaseModule中“三兄弟”的注释掉

再来看看重写ApplicationStartup
      public class Bootstrapper : DefaultNancyBootstrapper

     {

         protected override void ApplicationStartup(TinyIoCContainer container, IPipelines pipelines)

         {

             base.ApplicationStartup(container, pipelines);

             pipelines.BeforeRequest += MyBeforeRequest;

             pipelines.AfterRequest += MyAfterRequest;

             pipelines.OnError += MyOnErroe;

         }

         private Response MyBeforeRequest(NancyContext ctx)

         {

             System.Diagnostics.Debug.WriteLine("Boorstrapper---ApplicationStartup---Before");

             return null;

         }

         private void MyAfterRequest(NancyContext ctx)

         {

             System.Diagnostics.Debug.WriteLine("Boorstrapper---ApplicationStartup---After");

         }

         private Response MyOnErroe(NancyContext ctx, Exception ex)

         {

             System.Diagnostics.Debug.WriteLine("Boorstrapper---ApplicationStartup---OnError");

             System.Diagnostics.Debug.WriteLine(ex.ToString());

             return null;

         }

     }
我们同样是输出相应的信息,运行前,把我们BaseModule和RequestStartup中“三兄弟”的注释掉

用法三:自定义用法(Nancy中有很多东西可以自定义,这个很灵活,很nice!)
下面来看看自定就要怎么使用!
     public class CustomRequest : IApplicationStartup

     {

         public void Initialize(IPipelines pipelines)

         {

             pipelines.BeforeRequest.AddItemToEndOfPipeline(ctx =>

             {

                 System.Diagnostics.Debug.WriteLine("CustomRequest---IApplicationStartup---Before");

                 return null;

             });

             pipelines.AfterRequest.AddItemToEndOfPipeline(ctx =>

             {

                 System.Diagnostics.Debug.WriteLine("CustomRequest---IApplicationStartup---After");

             });

             pipelines.OnError.AddItemToEndOfPipeline((ctx, ex) =>

             {

                 System.Diagnostics.Debug.WriteLine("CustomRequest---IApplicationStartup---OnError");

                 System.Diagnostics.Debug.WriteLine(ex.ToString());

                 return null;

             });

         }

     }
我们自定义一个CustomRequest让它实现IApplicationStartup接口即可!
剩下的就是实现Before、After、OnError的处理!!
把之前的相关处理注释掉,运行。
效果如下:
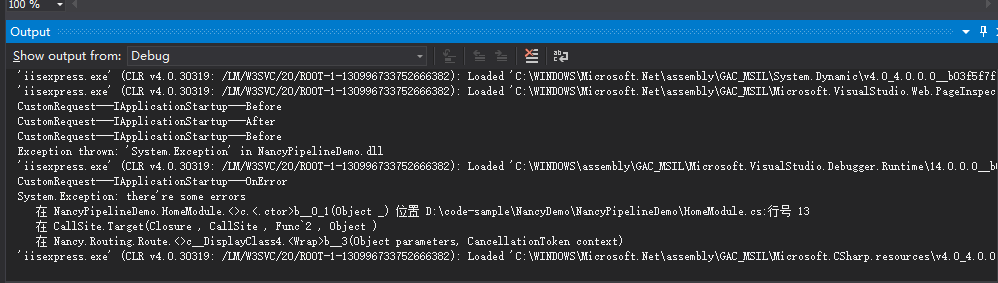
现在是否很清晰呢?
Before 的执行顺序 IApplicationStartup > ApplicationStartup > RequestStartup > BaseModule
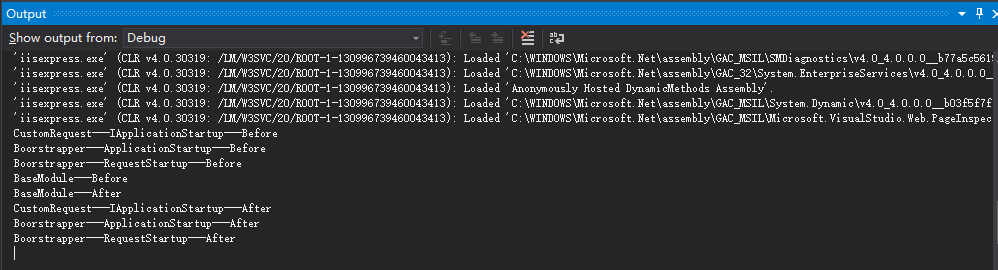
与OnError的处理顺序一样!!
三、内部实现的简单分析
前面也提到了,这三兄弟的实现主要有这几个类
BeforePipeline、AfterPipeline、ErrorPipeline以及抽象类NamedPipelineBase、AsyncNamedPipelineBase
NancyModule中也有相应的Before、After、OnError定义!
先来看看BeforePipeline吧
BeforePipeline是实现了AsyncNamedPipelineBase这个抽象类
里面有用到 implicit operator ,不熟悉的可以参考
有一个重写的Wrap方法,用于把同步的包装成异步的形式
         protected override PipelineItem<Func<NancyContext, CancellationToken, Task<Response>>> Wrap(PipelineItem<Func<NancyContext, Response>> pipelineItem)

         {

             var syncDelegate = pipelineItem.Delegate;

             Func<NancyContext, CancellationToken, Task<Response>> asyncDelegate = (ctx, ct) =>

             {

                 var tcs = new TaskCompletionSource<Response>();

                 try

                 {

                     var result = syncDelegate.Invoke(ctx);

                     tcs.SetResult(result);

                 }

                 catch (Exception e)

                 {

                     tcs.SetException(e);

                 }

                 return tcs.Task;

             };

             return new PipelineItem<Func<NancyContext, CancellationToken, Task<Response>>>(pipelineItem.Name, asyncDelegate);

         }
其他的大致都可以总结成下面这句代码:
pipeline.AddItemToEndOfPipeline(xxxx);
把xxxx添加到管道中的末尾去。
同样的,AfterPipeline与ErrorPipeline也是相类似的,
不同的是ErrorPipeline实现的是NamedPipelineBase这个抽象类,
没有那个Wrap方法,多了一个dynamic的Invoke方法
         public dynamic Invoke(NancyContext context, Exception ex)

         {

             dynamic returnValue = null;

             using (var enumerator = this.PipelineDelegates.GetEnumerator())

             {

                 while (returnValue == null && enumerator.MoveNext())

                 {

                     returnValue = enumerator.Current.Invoke(context, ex);

                 }

             }

             return returnValue;

         }
这个Invoke方法的作用是:依次调用每个管道项目,直到有管道项目被返回或者所有管道项目都已经被调用了!
两个NamePipelineBase(同步和异步)都定义了一个pipelineItems(要执行的管道项目集合)
还有众多虚方法!!大部分是插入的,还有一个删除的。
其中插入可分为在Pipeline的开始和结尾插入,以及是否要替换已存在的同名的Pipeline
下面的是比较重要的一个方法InsertItemAtPipelineIndex
同步的
          public virtual void InsertItemAtPipelineIndex(int index, PipelineItem<TDelegate> item, bool replaceInPlace = false)

         {

             var existingIndex = this.RemoveByName(item.Name);

             var newIndex = (replaceInPlace && existingIndex != -) ? existingIndex : index;

             this.pipelineItems.Insert(newIndex, item);

         }
异步的
         public virtual void InsertItemAtPipelineIndex(int index, PipelineItem<TAsyncDelegate> item, bool replaceInPlace = false)

         {

             var existingIndex = this.RemoveByName(item.Name);

             var newIndex = (replaceInPlace && existingIndex != -) ? existingIndex : index;

             this.pipelineItems.Insert(newIndex, item);

         }
最后来看看我们在Bootstrapper和自定义用到的IPipelines
     public interface IPipelines

     {

         BeforePipeline BeforeRequest { get; set; }

         AfterPipeline AfterRequest { get; set; }

         ErrorPipeline OnError { get; set; }

     }
十分简单的定义!
Nancy之Pipelines三兄弟(Before After OnError)的更多相关文章
- 好用的排名函数~ROW_NUMBER(),RANK(),DENSE_RANK() 三兄弟
排名函数三兄弟,一看名字就知道,都是为了排名而生!但是各自有各自的特色!以下一个例子说明问题!(以下栗子没有使用Partition By 的关键字,整个结果集进行排序) RANK 每个值一个排名,同样 ...
- sql语句中----删除表数据的"三兄弟"
说到删除表数据的关键字,大家记得最多的可能就是delete了 然而我们做数据库开发,读取数据库数据.对另外的两兄弟用得就比较少了 现在来介绍另外两个兄弟,都是删除表数据的,其实也是很容易理解的 老大- ...
- Promise的三兄弟:all(), race()以及allSettled()
摘要: 玩转Promise. 原文:Promise 中的三兄弟 .all(), .race(), .allSettled() 译者:前端小智 Fundebug经授权转载,版权归原作者所有. 从ES6 ...
- 一网打尽 @ExceptionHandler、HandlerExceptionResolver、@controlleradvice 三兄弟!
把 @ExceptionHandler.HandlerExceptionResolver.@controlleradvice 三兄弟放在一起来写更有比较性.这三个东西都是用来处理异常的,但是它们使用的 ...
- 设计模式系列之工厂模式三兄弟(Factory Pattern)
说明:设计模式系列文章是读刘伟所著<设计模式的艺术之道(软件开发人员内功修炼之道)>一书的阅读笔记.个人感觉这本书讲的不错,有兴趣推荐读一读.详细内容也可以看看此书作者的博客https:/ ...
- Mysql 中写操作时保驾护航的三兄弟!
这期的文章主要是讲述写操作过程中涉及到的三个日志文件,看过前几期的话可能你或多或少已经有些了解了(或者从别的地方也了解过).比如整个写操作过程中用到的两阶段提交,又或者是操作过程中涉及到的日志文件,但 ...
- 站长管理服务器必读:Ftp、Ftps与Sftp三兄弟的不同与区别以及部署全指引
文章标题: 站长管理服务器必读:Ftp.Ftps与Sftp三兄弟的不同与区别以及部署全指引 关键字 : ftp,sftp,freesshd,ftps 文章分类: 教程 创建时间: 2020年3月23日 ...
- Nancy总结(三)Nancy资料介绍
Nancy 是一个轻量级用于构建基于 HTTP 的 Web 服务,可以基于 .NET 和 Mono 平台构建轻量级基于 HTTP 的Web 服务.它更多的是借鉴了Ruby的一些特性和Ruby的MVC ...
- .NET Nancy 详解(三) Respone 和 ViewEngine
我们在ASP.NET MVC中可以返回各种类型的ActionResult(以下图片来自于园友--待补..) 在Nancy 中本着简单粗暴的原则,使用方式略有不同.这期我们使用的版本是Nancy的第一个 ...
随机推荐
- SQL Server出现错误: 4014
SQL Server出现错误: 4014 线下的测试机器老是报错,从errorlog里看到大量的4014错误 A fatal error occurred , output error: ). 错误: ...
- .NET面试题系列[0] - 写在前面
.NET面试题系列目录 .NET面试题系列[1] - .NET框架基础知识(1) .NET面试题系列[2] - .NET框架基础知识(2) .NET面试题系列[3] - C# 基础知识(1) .NET ...
- ReactJS入门(三)—— 顶层API
本文基本跟着官方文档把API都走一遍,但会有实例来解释应该怎么用,木有比我更详细的API文档咯. React.createClass 参数:CONFIG(object) 创建一个ReactClass( ...
- Kruskal 最小生成树算法
对于一个给定的连通的无向图 G = (V, E),希望找到一个无回路的子集 T,T 是 E 的子集,它连接了所有的顶点,且其权值之和为最小. 因为 T 无回路且连接所有的顶点,所以它必然是一棵树,称为 ...
- 使用Unity3D的设计思想实现一个简单的C#赛车游戏场景
最近看了看一个C#游戏开发的公开课,在该公开课中使用面向对象思想与Unity3D游戏开发思想结合的方式,对一个简单的赛车游戏场景进行了实现.原本在C#中很方便地就可以完成的一个小场景,使用Unity3 ...
- EasyPR--一个开源的中文车牌识别系统
我正在做一个开源的中文车牌识别系统,Git地址为:https://github.com/liuruoze/EasyPR. 我给它取的名字为EasyPR,也就是Easy to do Plate Reco ...
- MySQL RANGE分区
200 ? "200px" : this.width)!important;} --> 介绍 RANGE分区基于一个给定的连续区间范围,早期版本RANGE主要是基于整数的分区 ...
- Rxjava异常处理
异常处理 在Rxjava订阅的Observable有时会抛出异常,在RxJava中有两大类策略,一个是准备备用的Observable,在发生异常时将subscriber订阅到新的Observable上 ...
- ExtJs布局详解
序言 1.百度百科上说:ExtJs功能丰富,无人能出其右.无论是界面之美,还是功能之强,extjs都高居榜首. 2.呵呵,界面之美当是少不了布局的,这篇文章我写layout的七种布局.(extjs是4 ...
- 深入学习jQuery节点操作
× 目录 [1]创建节点 [2]插入节点 [3]删除节点[4]复制节点[5]替换节点[6]包裹节点 前面的话 DOM节点操作包括创建节点.插入节点.移除节点.替换节点和复制节点.jQuery也有类似的 ...