ROS2 在WIN10下测试和安装
博客参考:https://blog.csdn.net/cocoiehl/article/details/83351307 和 https://blog.csdn.net/weixin_38294178/article/details/78844744
ROS2官方安装引导: https://index.ros.org/doc/ros2/Installation/Crystal/Windows-Install-Binary/
TIPS: 设置choco后续软件的安装位置,可以设置环境变量ChocolateyInstall,变量值为安装路径即可。
首先创建桌面命令行快捷方式 -- 桌面右键新建一个快捷方式
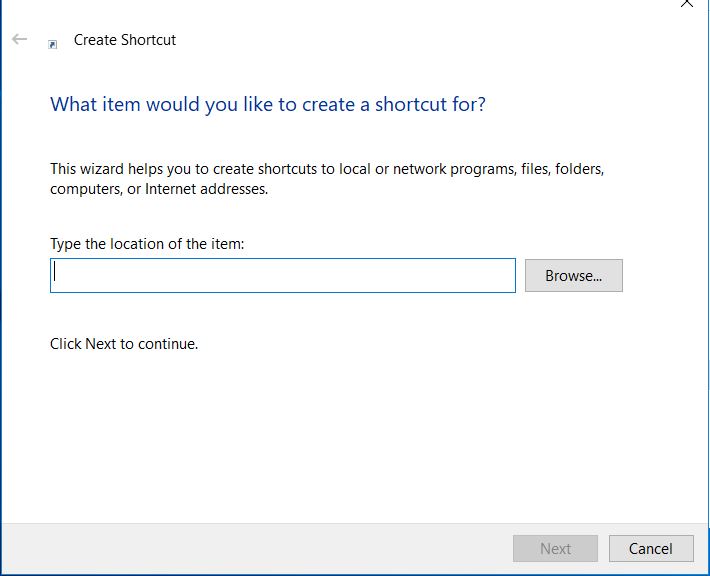
C:\Windows\System32\cmd.exe /k "C:\Program Files (x86)\Microsoft Visual Studio\2017\Professional\Common7\Tools\VsDevCmd.bat" -arch=amd64 -host_arch=amd64
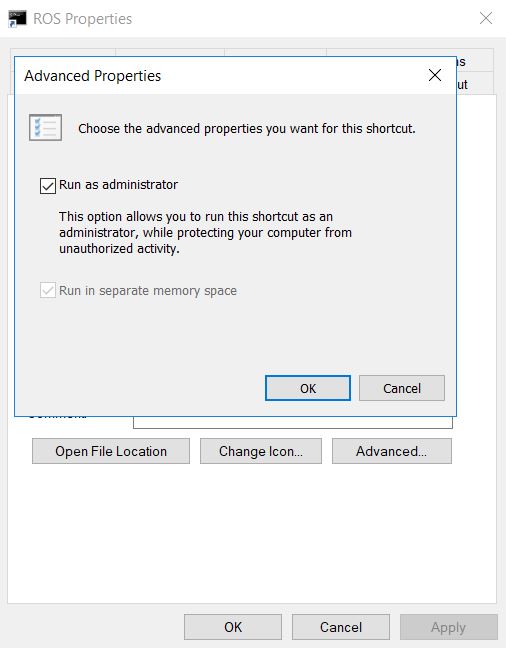
右键快捷方式,选择高级选项,设置管理员权限运行
1. 安装Chocolatey
管理员权限打开命令行窗口,输入如下指令即可完成Chocolatey的安装,安装目录为 C:\ProgramData\chocolatey\bin\chocolatey.exe
@"%SystemRoot%\System32\WindowsPowerShell\v1.0\powershell.exe" -NoProfile -InputFormat None -ExecutionPolicy Bypass -Command "iex ((New-Object System.Net.WebClient).DownloadString('https://chocolatey.org/install.ps1'))" && SET "PATH=%PATH%;%ALLUSERSPROFILE%\chocolatey\bin"
指令会将Chocolatey所在的安装目录设置为全局路径(C:\ProgramData\chocolatey\bin),所以命令行输入chocolatey 或者 choco -?会有相应的打印信息
2. Chocolatey 安装python
choco install python
3. 安装OpenSSL
Download an OpenSSL installer from this page. Scroll to the bottom of the page and download Win64 OpenSSL v1.0.2.不要下载Win32 or Light versions. 安装好之后,设置换进变量信息
setx -m OPENSSL_CONF C:\OpenSSL-Win64\bin\openssl.cfg
Path中添加OpenSSL路径信息
C:\OpenSSL-Win64\bin\
4. 安装 Visual Studio
1. 安装 VS2015, 如果使用Ardent or earlier
2. 安装VS2017, 如果使用Bouncy or a nightly
Warning

Visual Studio 2017 v15.8 seems to have a compiler bug preventing from building some ROS 2 packages. Please try installing an older version of Visual Studio 2017.

Microsoft provides a free of charge version of Visual Studio 2017, named Community, which can be used to build applications that use ROS 2:

https://visualstudio.microsoft.com/downloads/

Make sure that the Visual C++ features are installed. An easy way to make sure they’re installed is to select the Desktop development with C++ workflow during the install.
5. 安装DDS Implementations
ROS 2 builds on top of DDS. It is compatible with multiple DDS or RTPS (the DDS wire protocol) vendors.
The package you downloaded has been built with optional support for multiple vendors: eProsima FastRTPS, Adlink OpenSplice, and (as of ROS 2 Bouncy) RTI Connext as the middleware options. Run-time support for eProsima’s Fast RTPS is included bundled by default. If you would like to use one of the other vendors you will need to install their software separately.
Adlink OpenSplice
If you want to use OpenSplice, you will need to download the latest supported version. * For ROS 2 Crystal version 6.9.181126OSS-HDE-x86_64.win-vs2017 or later is required. * For ROS 2 Bouncy version 6.7.180404OSS-HDE-x86_64.win-vs2017 or later is required.
Download the latest supported version For ROS 2 releases up to and including Ardent, extract it but do not do anything else at this point. For ROS 2 releases later than Ardent, set the OSPL_HOME environment variable to the unpacked directory that contains the release.bat script.
RTI Connext
To use RTI Connext DDS there are options available for university, purchase or evaluation
After installing, run RTI launcher and point it to your license file.
Set the NDDSHOME environment variable:
set "NDDSHOME=C:\Program Files\rti_connext_dds-5.3.1"
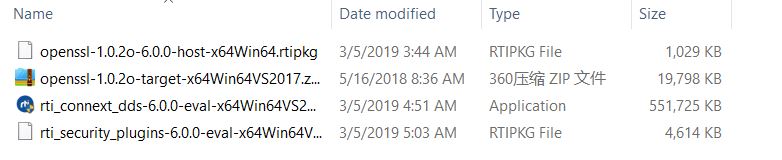
RTI Connext需要注册账号,之后会将注册使用的License发到邮箱,按照邮箱的Instruction安装即可或者https://www.rti.com/free-trial/dds-files。
下载完成解压之后,得到如下文件
6. 安装OpenCV
Some of the examples require OpenCV to be installed.
You can download a precompiled version of OpenCV 3.4.1 from https://github.com/ros2/ros2/releases/download/opencv-archives/opencv-3.4.1-vc15.VS2017.zip
Assuming you unpacked it to C:\opencv, type the following on a Command Prompt (requires Admin privileges):
setx -m OpenCV_DIR C:\opencv
Since you are using a precompiled ROS version, we have to tell it where to find the OpenCV libraries. You have to extend the PATH variable to c:\opencv\x64\vc15\bin
In ardent and earlier
These releases used OpenCV 2. You can download a precompiled version of OpenCV 2.4.13.2 from https://github.com/ros2/ros2/releases/download/release-beta2/opencv-2.4.13.2-vc14.VS2015.zip
Since you are using a precompiled ROS version, we have to tell it where to find the OpenCV libraries. Assuming you were extracting OpenCV to c:\ you have to extend your PATH variable to
c:\opencv-2.4.13.2-vc14.VS2015\x64\vc14\bin
7. 安装一些依赖
There are a few dependencies not available in the Chocolatey package database. In order to ease the manual installation process, we provide the necessary Chocolatey packages.
As some chocolatey packages rely on it, we start by installing CMake
choco install -y cmake
You will need to append the CMake bin folder C:\Program Files\CMake\bin to your PATH.
Please download these packages from this GitHub repository.
asio.1.12.1.nupkg
eigen-3.3.4.nupkg
tinyxml-usestl.2.6.2.nupkg
tinyxml2.6.0.0.nupkg
log4cxx.0.10.0.nupkg
Once these packages are downloaded, open an administrative shell and execute the following command:
choco install -y -s <PATH\TO\DOWNLOADS\> asio eigen tinyxml-usestl tinyxml2 log4cxx
Please replace <PATH\TO\DOWNLOADS> with the folder you downloaded the packages to.
You must also install some python dependencies for command-line tools:
python -m pip install -U catkin_pkg empy lark-parser opencv-python pyparsing pyyaml setuptools
RQt dependencies
python -m pip install -U pydot PyQt5
SROS2 dependencies
python -m pip install -U lxml
8. 下载ROS2
Go the releases page: https://github.com/ros2/ros2/releases
Download the latest package for Windows, e.g.,
ros2-package-windows-AMD64.zip.Notes:
there may be more than one binary download option which might cause the file name to differ.
[ROS Bouncy only] To download the ROS 2 debug libraries you’ll need to download
ros2-bouncy-windows-Debug-AMD64.zip
Unpack the zip file somewhere (we’ll assume
C:\dev\ros2).Note (Ardent and earlier): There seems to be an issue where extracting the zip file with 7zip causes RViz to crash on startup. Extract the zip file using the Windows explorer to prevent this.
9. 设置ROS2运行环境
Start a command shell and source the ROS 2 setup file to set up the workspace:
call C:\dev\ros2\local_setup.bat
For ROS 2 releases up to and including Ardent, if you downloaded a release with OpenSplice support you must additionally source the OpenSplice setup file manually (this is done automatically for ROS 2 releases later than Ardent; this step can be skipped). It is normal that the previous command, if nothing else went wrong, outputs “The system cannot find the path specified.” exactly once. Only do this step after you have sourced the ROS 2 setup file:
call "C:\opensplice69\HDE\x86_64.win64\release.bat"
10. Demo运行测试
In a command shell, set up the ROS 2 environment as described above and then run a talker:
ros2 run demo_nodes_cpp talker
Start another command shell and run a listener:
ros2 run demo_nodes_py listener
You should see the talker saying that it’s Publishing messages and the listener saying I heardthose messages. Hooray!
If you have installed support for an optional vendor, see this page for details on how to use that vendor.
Troubleshooting
If at one point your example would not start because of missing dll’s, please verify that all libraries from external dependencies such as OpenCV are located inside your
PATHvariable.If you forget to call the
local_setup.batfile from your terminal, the demo programs will most likely crash immediately.
Build your own packages
If you would like to build your own packages, refer to the tutorial "Using Colcon to build packages".
Questions
1. failed to create process
ros2 run demo_nodes_cpp talker
命令行窗口直接打印
failed to create process.
解决方案参考: https://www.gitmemory.com/issue/ros2/ros2/525/490069329
ros2-script.py the first line (shebang line) demands that the script is run with C:\Python37\Python_d.exe
2. the ordinal 4689 could not be located in the dynamic link library fastrtps-1.7.dll
解决方法:libeay32.dll 和 ssleay32.dll to install\bin (OpenSSL内动态库)
3. 更多问题查询 https://github.com/ros2/ros2/issues
VS2017 编写ROS2 参考博客 https://blog.csdn.net/zwwang2014/article/details/84839579
ROS2 在WIN10下测试和安装的更多相关文章
- Win10下Tensorflow的安装
Win10下Tensorflow的安装 1. Tensorflow简介 TensorFlow是谷歌基于DistBelief进行研发的第二代人工智能学习系统,其命名来源于本身的运行原理.Tensor(张 ...
- win10下使用nodejs安装及webstorm创建express项目的指导
title: win10下使用nodejs安装 win10下使用nodejs安装及webstorm创建express项目的指导 windows下nvm的安装 熟悉linux下nodejs开发的朋友应该 ...
- win10下Ubuntu18.04安装的简单教程
win10下Ubuntu18.04安装的简单教程 操作系统:windows 软件:Vmware15. 一.下载 Ubuntu18.04镜像 Ubuntu18.04镜像下载 ...
- win10下用Anaconda安装TensorFlow | 后附JetBrains测试
从意识上认识Anaconda(音标:[ˌænəˈkɑ:ndə])/(拼读:安娜康达). Anaconda:水蟒的意思,如图logo像不像水蟒.其最后五个字母是conda(包管理器),而Anaconda ...
- win10下通过Anaconda安装TensorFlow-GPU1.3版本,并配置pycharm运行Mnist手写识别程序
折腾了一天半终于装好了win10下的TensorFlow-GPU版,在这里做个记录. 准备安装包: visual studio 2015: Anaconda3-4.2.0-Windows-x86_64 ...
- win10 下使用虚拟机安装ubuntu及其网络配置
通过虚拟机安装ubuntu 我的机器是64位的win10系统,使用的虚拟机VMware workstation 12 pro 安装的是ubuntu 14.04, 网上教程很多,很详细也有有效 win1 ...
- win10 下的anaconda3 安装(2019.06.04最新)
最近电脑重装系统后,安装anaconda 发现有一些新的变动,容易出现一些新的问题,现在记录下来.(现在根据清华镜像的最新公告,清华anaconda 已经恢复,可以直接换成清华镜像的源了) 1 安装 ...
- win10下使用UEFI安装Linux Mint18
基本的配置: 型号:HP G4-2045TX CPU:i3-2370 硬盘:一块120G的SSD装了win10,efi引导:另外一块500G的HDD没有装系统,GPT格式,分了4个区 内存:6G 想法 ...
- win10下JDK的安装与环境变量配置
1.到官网下载最新版本的JDK http://www.oracle.com/technetwork/java/javase/downloads/index.html 2.安装JDK,同安装其他软件一样 ...
随机推荐
- linux cgroups简介(上)
Linux CGroups简介 1.CGroups是什么 与Linux namespace对比来看,Linux namespace用来限制进程的运行范围或者运行环境的可见性,比如:uts限制进程读取到 ...
- (九)Kubernetes 存储卷
Kubernetes存储卷概述 Pod本身具有生命周期,这就带了一系列的问题,第一,当一个容器损坏之后,kubelet会重启这个容器,但是文件会丢失-这个容器会是一个全新的状态:第二,当很多容器在同一 ...
- Codeforces Round #601 (Div. 2) E2. Send Boxes to Alice (Hard Version)
Codeforces Round #601 (Div. 2) E2. Send Boxes to Alice (Hard Version) N个盒子,每个盒子有a[i]块巧克力,每次操作可以将盒子中的 ...
- OSI七层模型数据流
前段时间去学习了思科网络基础CCNA的知识,与我们运维所需的网络基础大同小异,当然其包容性要大很多.我们主要来看下网络方面的内容: 网络七层模型 七层网络模型是我们进行网络间通信的基本理论依据,由上至 ...
- 开机没有deepin启动项的解决办法
增加efi/deepin/grubx64.efi的启动项 问题描述 打开电脑,进入bios没有deepin启动项 解决办法 进入bios setup,选择boot sourquense,选择uefi, ...
- python正则表达式(8)--分组、后向引用、前(后)向断言
无名.有名分组 (1)正则表达式—无名分组 从正则表 达式的左边开始看,看到的第一个左括号“(”表示表示第一个分组,第二个表示第二个分组, 依次类推. 需要注意的是,有一个隐含的全局分组(就是索引号为 ...
- Helm 安装使用
简介 很多人都使用过Ubuntu下的ap-get或者CentOS下的yum, 这两者都是Linux系统下的包管理工具.采用apt-get/yum,应用开发者可以管理应用包之间的依赖关系,发布应用:用户 ...
- spring相关—AOP编程—切入点、连接点
1 切入点表达式 1.1 作用 通过表达式的方式定位一个或多个具体的连接点. 1.2 语法细节 ①切入点表达式的语法格式 execution([权限修饰符] [返回值类型] [简单类名/全类名] [方 ...
- 20-2 树莓派搭建服务器 Tornado Web服务器
Drive.google.com/drive/folders/1ahbeoEHkjxoo4NV1wReOmpoRWbl448z- 1.Tornado简介 Tornado一款使用 Python 编写的, ...
- java 面向对象2
1. 类是对某一类事物的抽象描述,而对象用于表示现实中该类事物的个体. 玩具模型是类: 玩具是对象: ★局部变量和成员变量的区别: 区别一:定义的位置不同 定义在类中的变量是成员变量 定义在方法中或 ...