
将PCM格式存储成WAV格式文件
将PCM格式存储成WAV格式文件
WAV比PCM多44个字节(在文件头位置多)
摘自:https://blog.csdn.net/u012173922/article/details/78849076
前言:无论是文字,图像还是声音,都必须以一种特定的格式组织和存储起来,这样才能让显示器或播放器知道以怎样的一种方式去解析这些数据。
把PCM格式的数据存储成WAV格式数据的思路:先写头部,再写数据块。
WAV格式可以分成两个部分:
1.文件头,存储一些重要的参数信息,比如采样率,声道数,量化精度等等。
2.数据块,原始的PCM数据。
想要了解WAV格式的可以点击这里 点击打开链接
下面是WAV文件结构图
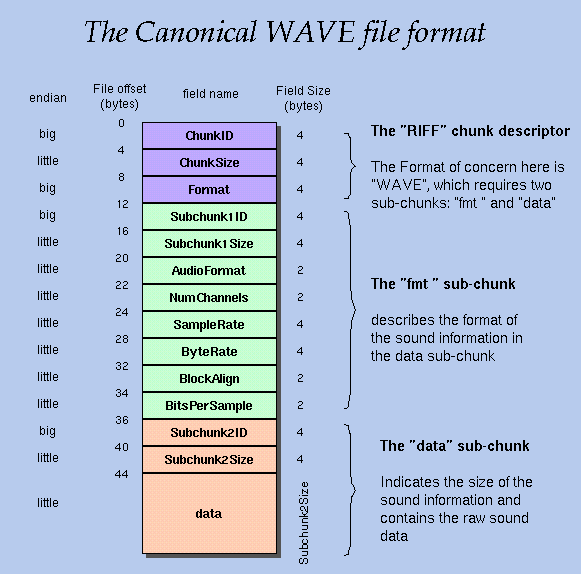
我们需要简单来说明一下这张图的结构:
可以分成三个部分:
第一部分RIFF : ChunkID 存储了“RIFF”字段,表示这是一个“RIFF”格式的文件。
ChunkSize 记录整个wav文件的字节数。
Format 存储了“WAVE”字段,表示这是一个wav文件。
第二部分fmt: 这部分的内容主要是记录一些关键参数,比如采样率,声道数,量化精度等等。
Subchunk1 ID 存储了“fmt”字段
Subchunk1 Size 存储“fmt”字段的长度
AudioFormat 存储 量化精度
Num Channels 存储声道数
SampleRate 存储采样率
ByteRate 存储比特率 SampleRate * NumChannels * BitsPerSample/8
BlockAlign == NumChannels * BitsPerSample/8
BitsPerSample 8 bits = 8, 16 bits = 16, etc.
第三部分data : 主要描述数据块
Subchunk2 ID 存储“data”字段
Subchunk2Size 记录存储的二进制原始音频数据的长度
data 存储二进制原始音频数据
我在网上找了一段wav写入头部的代码,亲测成功
-
byte[] header = new byte[44];
-
//RIFF WAVE Chunk
-
// RIFF标记占据四个字节
-
header[0] = 'R';
-
header[1] = 'I';
-
header[2] = 'F';
-
header[3] = 'F';
-
//数据大小表示,由于原始数据为long型,通过四次计算得到长度
-
header[4] = (byte) (totalDataLen & 0xff);
-
header[5] = (byte) ((totalDataLen >> 8) & 0xff);
-
header[6] = (byte) ((totalDataLen >> 16) & 0xff);
-
header[7] = (byte) ((totalDataLen >> 24) & 0xff);
-
//WAVE标记占据四个字节
-
header[8] = 'W';
-
header[9] = 'A';
-
header[10] = 'V';
-
header[11] = 'E';
-
//FMT Chunk
-
header[12] = 'f';
-
// 'fmt '标记符占据四个字节
-
header[13] = 'm';
-
header[14] = 't';
-
header[15] = ' ';//过渡字节
-
//数据大小
-
header[16] = 16; // 4 bytes: size of 'fmt ' chunk
-
header[17] = 0;
-
header[18] = 0;
-
header[19] = 0;
-
//编码方式 10H为PCM编码格式
-
header[20] = 1; // format = 1
-
header[21] = 0;
-
//通道数
-
header[22] = (byte) channels;
-
header[23] = 0;
-
//采样率,每个通道的播放速度
-
header[24] = (byte) (longSampleRate & 0xff);
-
header[25] = (byte) ((longSampleRate >> 8) & 0xff);
-
header[26] = (byte) ((longSampleRate >> 16) & 0xff);
-
header[27] = (byte) ((longSampleRate >> 24) & 0xff);
-
//音频数据传送速率,采样率*通道数*采样深度/8
-
header[28] = (byte) (byteRate & 0xff);
-
header[29] = (byte) ((byteRate >> 8) & 0xff);
-
header[30] = (byte) ((byteRate >> 16) & 0xff);
-
header[31] = (byte) ((byteRate >> 24) & 0xff);
-
// 确定系统一次要处理多少个这样字节的数据,确定缓冲区,通道数*采样位数
-
header[32] = (byte) (1 * 16 / 8);
-
header[33] = 0;
-
//每个样本的数据位数
-
header[34] = 16;
-
header[35] = 0;
-
//Data chunk
-
header[36] = 'd';//data标记符
-
header[37] = 'a';
-
header[38] = 't';
-
header[39] = 'a';
-
//数据长度
-
header[40] = (byte) (totalAudioLen & 0xff);
-
header[41] = (byte) ((totalAudioLen >> 8) & 0xff);
-
header[42] = (byte) ((totalAudioLen >> 16) & 0xff);
-
header[43] = (byte) ((totalAudioLen >> 24) & 0xff);
-
out.write(header, 0, 44);
解决了最困难的点,下面的工作就好实现了。
下面是完成的代码:
-
private void writeWav() {
-
fileTarget = new File(file, "audiotest.pcm");
-
fileWav = new File(file, "audiotest.wav");
-
-
if (!fileTarget.exists()) {
-
Log.e("tag", "目标文件不存在");
-
return;
-
}
-
DataInputStream dataInputStream = null;
-
DataOutputStream dataOutputStream = null;
-
try {
-
dataInputStream = new DataInputStream(new BufferedInputStream(new FileInputStream(fileTarget)));
-
dataOutputStream = new DataOutputStream(new BufferedOutputStream(new FileOutputStream(fileWav)));
-
int len = dataInputStream.available();
-
long totalAudioLen = 0;
-
long totalDataLen = totalAudioLen + 36;
-
long longSampleRate = 44100;
-
int channels = 1;
-
long byteRate = 16 * longSampleRate * channels / 8;
-
//写wav头部
-
writeWavHeader(dataOutputStream, totalAudioLen, totalDataLen, longSampleRate, channels, byteRate);
-
byte[] bytes = new byte[bufferSize];
-
int lenthg = -1;
-
while ((lenthg = dataInputStream.read(bytes)) != -1) {
-
dataOutputStream.write(bytes, 0, lenthg);
-
}
-
} catch (FileNotFoundException e) {
-
e.printStackTrace();
-
} catch (IOException e) {
-
e.printStackTrace();
-
} finally {
-
try {
-
dataInputStream.close();
-
dataOutputStream.close();
-
} catch (IOException e) {
-
e.printStackTrace();
-
}
-
}
-
}
-
private byte[] writeWavHeader(DataOutputStream dataOutputStream, long totalAudioLen, long totalDataLen, long longSampleRate,
-
int channels, long byteRate) throws IOException {
-
byte[] header = new byte[44];
-
//RIFF WAVE Chunk
-
// RIFF标记占据四个字节
-
header[0] = 'R';
-
header[1] = 'I';
-
header[2] = 'F';
-
header[3] = 'F';
-
//数据大小表示,由于原始数据为long型,通过四次计算得到长度
-
header[4] = (byte) (totalDataLen & 0xff);
-
header[5] = (byte) ((totalDataLen >> 8) & 0xff);
-
header[6] = (byte) ((totalDataLen >> 16) & 0xff);
-
header[7] = (byte) ((totalDataLen >> 24) & 0xff);
-
//WAVE标记占据四个字节
-
header[8] = 'W';
-
header[9] = 'A';
-
header[10] = 'V';
-
header[11] = 'E';
-
//FMT Chunk
-
header[12] = 'f';
-
// 'fmt '标记符占据四个字节
-
header[13] = 'm';
-
header[14] = 't';
-
header[15] = ' ';//过渡字节
-
//数据大小
-
header[16] = 16; // 4 bytes: size of 'fmt ' chunk
-
header[17] = 0;
-
header[18] = 0;
-
header[19] = 0;
-
//编码方式 10H为PCM编码格式
-
header[20] = 1; // format = 1
-
header[21] = 0;
-
//通道数
-
header[22] = (byte) channels;
-
header[23] = 0;
-
//采样率,每个通道的播放速度
-
header[24] = (byte) (longSampleRate & 0xff);
-
header[25] = (byte) ((longSampleRate >> 8) & 0xff);
-
header[26] = (byte) ((longSampleRate >> 16) & 0xff);
-
header[27] = (byte) ((longSampleRate >> 24) & 0xff);
-
//音频数据传送速率,采样率*通道数*采样深度/8
-
header[28] = (byte) (byteRate & 0xff);
-
header[29] = (byte) ((byteRate >> 8) & 0xff);
-
header[30] = (byte) ((byteRate >> 16) & 0xff);
-
header[31] = (byte) ((byteRate >> 24) & 0xff);
-
// 确定系统一次要处理多少个这样字节的数据,确定缓冲区,通道数*采样位数
-
header[32] = (byte) (1 * 16 / 8);
-
header[33] = 0;
-
//每个样本的数据位数
-
header[34] = 16;
-
header[35] = 0;
-
//Data chunk
-
header[36] = 'd';//data标记符
-
header[37] = 'a';
-
header[38] = 't';
-
header[39] = 'a';
-
//数据长度
-
header[40] = (byte) (totalAudioLen & 0xff);
-
header[41] = (byte) ((totalAudioLen >> 8) & 0xff);
-
header[42] = (byte) ((totalAudioLen >> 16) & 0xff);
-
header[43] = (byte) ((totalAudioLen >> 24) & 0xff);
-
dataOutputStream.write(header, 0, 44);
-
return header;
-
}
站在巨人的肩膀上
请多多指点
接下来一篇文章我会将带来 如何解析WAV格式文件
将PCM格式存储成WAV格式文件的更多相关文章
- c# Use NAudio Library to Convert MP3 audio into WAV audio(将Mp3格式转换成Wav格式)
Have you been in need of converting mp3 audios to wav audios? If so, the skill in this article prov ...
- iOS: lame框架将PCM录音转成MP3格式
lame框架将PCM录音转成MP3格式 1.lame下载地址:https://github.com/rbrito/lame,它是一个不可执行的文件,需要借助build-lame.sh脚本将其编译成.a ...
- Swift iOS实现把PCM语音转成MP3格式
最近折腾了swift的语音录制识别和转码,这块还是比较坑的,由于语音识别的准确度实测大概也就80%左右,所以还是需要上传录音文件啊.首先是用讯飞语音SDK实现语音录制和识别(语音听写),第一个坑是讯飞 ...
- 分别用Excel和python进行日期格式转换成时间戳格式
最近在处理一份驾驶行为方面的数据,其中要用到时间戳,因此就在此与大家一同分享学习一下. 1.什么是时间戳? 时间戳是指格林威治时间1970年01月01日00时00分00秒(北京时间1970年01月01 ...
- 怎样将M4A音频格式转换成MP3格式
因为MP3音频格式应用的广泛性,所以很多时候我们都需要将不同的音频格式转换成MP3格式的,那么如果我们需要将M4A音频格式转换成MP3格式,我们应该怎样进行实现呢?下面我们就一起来看一下吧. 操作步骤 ...
- 09: xmltodict 模块将xml格式转成json格式
1.1 : xmltodict 模块将xml格式转成json格式 <?xml version="1.0"?> <!--#版本号--> <data> ...
- python脚本实现音频m4a格式转成MP3格式
群里看到有人询问:谁会用python将微信音频文件后缀m4a格式转成mp3格式,毫不犹豫回了句:我会.然后就私下聊起来了 解决方法介绍如下: 工具:windows系统,python2.7,转换库ffm ...
- linux环境下deb格式 转换成rpm格式
linux环境下deb格式 转换成rpm格式 使用alien工具转换deb格式到rpm格式 alien_8.87.tar.gz 下载alien_8.87.tar.gz [root@mysqlnode2 ...
- Excel中将时间格式转化成时间戳格式
时间戳转成正常日期的公式:C1=(A1+8*3600)/86400+70*365+19其中A1表示当时的1249488000时间戳数值其中C1就是所需的日期格式,C1单元格属性改成日期格式就可以了.正 ...
随机推荐
- python_并发编程——事件
1.事件 :通过一个信号来控制多个进程同时执行或者阻塞. 一个信号可以使所有的进程都进入阻塞状态,也可以控制所有的进程接触阻塞,一个事件被创建之后,默认是阻塞状态. from multiprocess ...
- Oracle 中 CONTAINS 函数的用法
Oracle 中 CONTAINS 函数的用法 1. 查询住址在北京的学生 SELECT student_id,student_name FROM students WHERE CONTAINS( a ...
- SSMS开发利器Sql Prompt
一.前言 一个Sql Server 开发智能提示插件,方便查询表结果,避免了开发人员一个个敲查询语句.执行语句等,一起来看看吧. SQL Prompt 9.5 支持SSMS18 下载地址: 链接:ht ...
- iptables常用命令二之如何删除nat规则
删除iptables nat 规则 删除FORWARD 规则: iptables -nL FORWARD --line-number iptables -D FORWARD 1 删除一条nat 规则 ...
- 求序列A中每个数的左边比它小的数的个数(树状数组)
给定一个有N个正整数的序列A(N<=10^5,A[i]<=10^5),对序列中的每一个数,求出序列中它左边比它小的数的个数. 思路:树状数组的经典应用(裸题) #include <i ...
- jupyter安装小结
jupyter安装小结 更新时间:2016年03月13日 15:42:37 投稿:hebedich 我要评论 jupyter (之前的 ipython notebook )于我的最大意义在于 ...
- es 启动问题
max file descriptors [4096] for elasticsearch process is too low, increase to at least [65536] vim / ...
- IList<> IEnumerable<> ReadOnlyCollection<> 使用方向
无论你把它声明为IList<string>,IEnumerable<string>,ReadOnlyCollection<string>或别的东西,是你...... ...
- php.exe文件
一.正常情况PHP文件的访问需要通过浏览器,访问Apache,才能运行一个php文件 php文件在Apache文件夹的站点根目录里 浏览器通过域名文件的形式访问 二.通过浏览器在不需要Apache服务 ...
- noip考点整理(应该不是很完整……)
部分来自百度百科.其他的博客 一.必须会的 1.暴力: DFS.BFS.灌水法搜索.回溯搜索.记忆化搜索.启发式搜索.最优性剪枝.可行性剪枝 2.贪心 3.模拟 4.骗分 二.基础算法 1.图论:SP ...