Vue通信、传值的多种方式,详解
Vue通信、传值的多种方式,详解
转自:https://blog.csdn.net/qq_35430000/article/details/79291287
一、通过路由带参数进行传值
①两个组件 A和B,A组件通过query把orderId传递给B组件(触发事件可以是点击事件、钩子函数等)
this.$router.push({ path: '/conponentsB', query: { orderId: 123 } }) // 跳转到B②在B组件中获取A组件传递过来的参数
this.$route.query.orderId二、通过设置 Session Storage缓存的形式进行传递
①两个组件A和B,在A组件中设置缓存orderData
- const orderData = { 'orderId': 123, 'price': 88 }
- sessionStorage.setItem('缓存名称', JSON.stringify(orderData))
②B组件就可以获取在A中设置的缓存了
const dataB = JSON.parse(sessionStorage.getItem('缓存名称'))此时 dataB 就是数据 orderData
朋友们可以百度下 Session Storage(程序退出销毁) 和 Local Storage(长期保存) 的区别。
三、父子组件之间的传值
(一)父组件往子组件传值props
①定义父组件,父组件传递 number这个数值给子组件,如果传递的参数很多,推荐使用json数组{}的形式
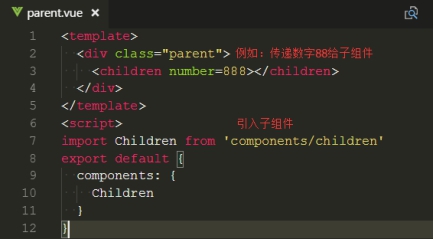
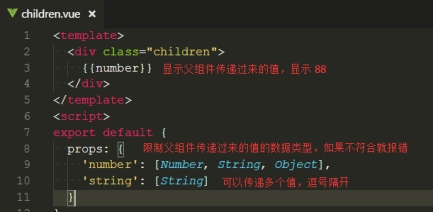
②定义子组件,子组件通过 props方法获取父组件传递过来的值。props中可以定义能接收的数据类型,如果不符合会报错。
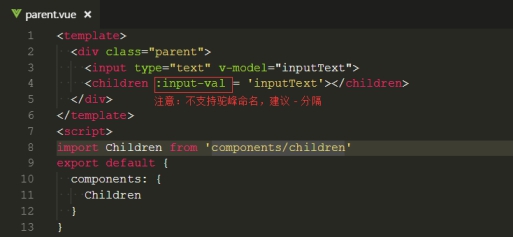
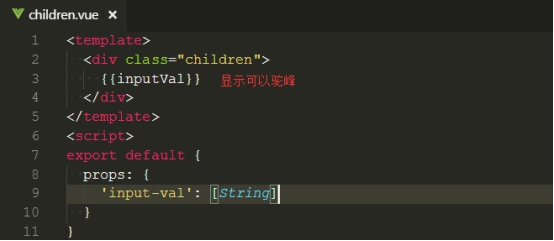
③假如接收的参数 是动态的,比如 input输入的内容 v-model的形式
注意:传递的参数名称不识别驼峰命名,推荐使用横杠-命名
④父子组件传值,数据是异步请求,有可能数据渲染时报错
原因:异步请求时,数据还没有获取到但是此时已经渲染节点了
解决方案:可以在 父组件需要传递数据的节点加上 v-if = false,异步请求获取数据后,v-if = true
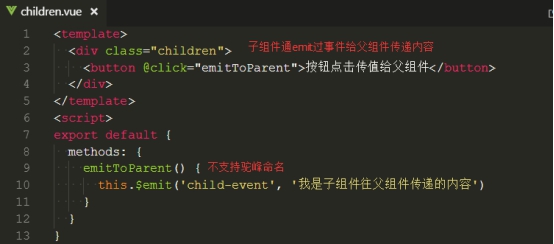
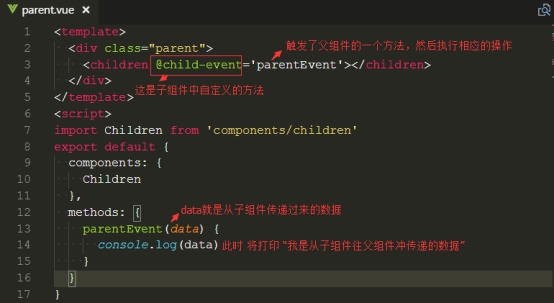
(二)、子组件往父组件传值,通过emit事件
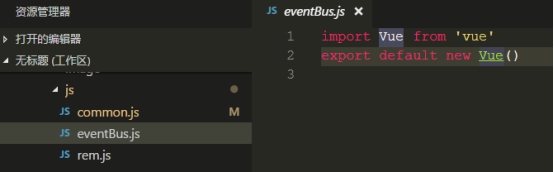
四、不同组件之间传值,通过eventBus(小项目少页面用eventBus,大项目多页面使用 vuex)
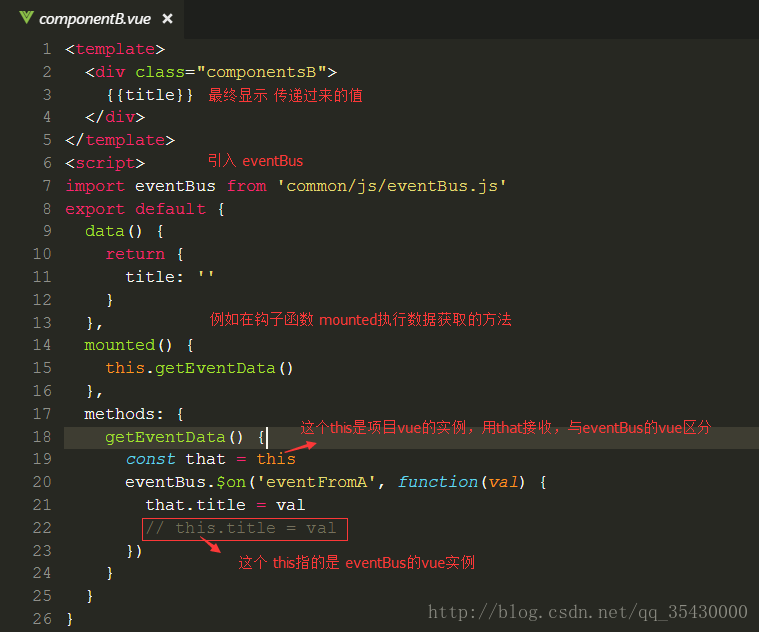
①定义一个新的vue实例专门用于传递数据,并导出
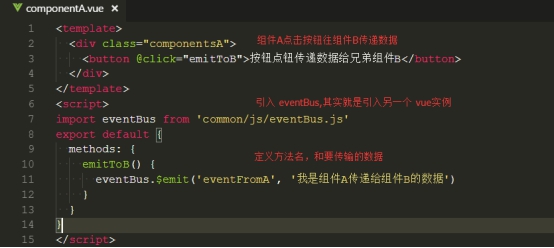
②定义传递的方法名和传输内容,点击事件或钩子函数触发eventBus.emit事件
③接收传递过来的数据
注意:enentBus是一个另一个新的Vue实例,区分两个this所代表得vue实例
五、vuex进行传值
为什么使用vuex?
vuex主要是是做数据交互,父子组件传值可以很容易办到,但是兄弟组件间传值(兄弟组件下又有父子组件),或者大型spa单页面框架项目,页面多并且一层嵌套一层的传值,异常麻烦,用vuex来维护共有的状态或数据会显得得心应手。
需求:两个组件A和B,vuex维护的公共数据是 餐馆的名称 resturantName,默认餐馆名称是 飞歌餐馆,那么现在A和B页面显示的就是飞歌餐馆。如果A修改餐馆名称 为 A餐馆,则B页面显示的将会是 A餐馆,反之B修改同理。这就是vuex维护公共状态或数据的魅力,在一个地方修改了数据,在这个项目的其他页面都会变成这个数据。


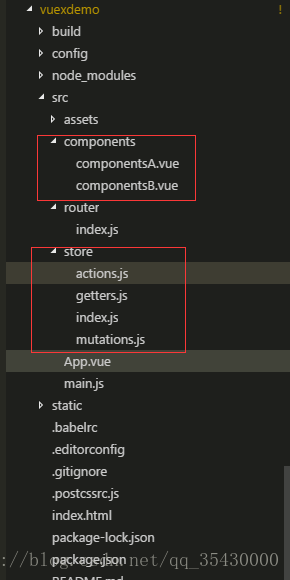
①使用 vue-cli脚手架工具创建一个工程项目,工程目录,创建组件A和组件B路由如下:
路由如下:
- import Vue from 'vue'
- import Router from 'vue-router'
- import componentsA from '@/components/componentsA'
- import componentsB from '@/components/componentsB'
- Vue.use(Router)
- export default new Router({
- mode: 'history',
- routes: [
- {
- path: '/',
- name: 'componentsA',
- component: componentsA
- },
- {
- path: '/componentsA',
- name: 'componentsA',
- component: componentsA
- },
- {
- path: '/componentsB',
- name: 'componentsB',
- component: componentsB
- }
- ]
- })
app.vue
- <template>
- <div id="app">
- <router-view/>
- </div>
- </template>
- <script>
- export default {
- name: 'App'
- }
- </script>
- <style>
- #app {
- font-family: 'Avenir', Helvetica, Arial, sans-serif;
- -webkit-font-smoothing: antialiased;
- -moz-osx-font-smoothing: grayscale;
- text-align: center;
- color: #2c3e50;
- margin-top: 60px;
- }
- </style>
②开始使用vuex,新建一个 sotre文件夹,分开维护 actions mutations getters
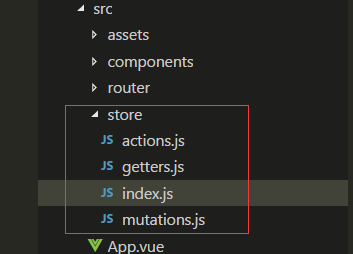
②在store/index.js文件中新建vuex 的store实例
*as的意思是 导入这个文件里面的所有内容,就不用一个个实例来导入了。
- import Vue from 'vue'
- import Vuex from 'vuex'
- import * as getters from './getters' // 导入响应的模块,*相当于引入了这个组件下所有导出的事例
- import * as actions from './actions'
- import * as mutations from './mutations'
- Vue.use(Vuex)
- // 首先声明一个需要全局维护的状态 state,比如 我这里举例的resturantName
- const state = {
- resturantName: '飞歌餐馆' // 默认值
- // id: xxx 如果还有全局状态也可以在这里添加
- // name:xxx
- }
- // 注册上面引入的各大模块
- const store = new Vuex.Store({
- state, // 共同维护的一个状态,state里面可以是很多个全局状态
- getters, // 获取数据并渲染
- actions, // 数据的异步操作
- mutations // 处理数据的唯一途径,state的改变或赋值只能在这里
- })
- export default store // 导出store并在 main.js中引用注册。
③actions
- // 给action注册事件处理函数。当这个函数被触发时候,将状态提交到mutations中处理
- export function modifyAName({commit}, name) { // commit 提交;name即为点击后传递过来的参数,此时是 'A餐馆'
- return commit ('modifyAName', name)
- }
- export function modifyBName({commit}, name) {
- return commit ('modifyBName', name)
- }
- // ES6精简写法
- // export const modifyAName = ({commit},name) => commit('modifyAName', name)
④mutations
- // 提交 mutations是更改Vuex状态的唯一合法方法
- export const modifyAName = (state, name) => { // A组件点击更改餐馆名称为 A餐馆
- state.resturantName = name // 把方法传递过来的参数,赋值给state中的resturantName
- }
- export const modifyBName = (state, name) => { // B组件点击更改餐馆名称为 B餐馆
- state.resturantName = name
- }
⑤getters
- // 获取最终的状态信息
- export const resturantName = state => state.resturantName
⑥在main.js中导入 store实例
- // The Vue build version to load with the `import` command
- // (runtime-only or standalone) has been set in webpack.base.conf with an alias.
- import Vue from 'vue'
- import App from './App'
- import router from './router'
- import store from './store'
- Vue.config.productionTip = false
- /* eslint-disable no-new */
- new Vue({
- el: '#app',
- router,
- store, // 这样就能全局使用vuex了
- components: { App },
- template: '<App/>'
- })
④在组件A中,定义点击事件,点击 修改 餐馆的名称,并把餐馆的名称在事件中用参数进行传递。
...mapactions 和 ...mapgetters都是vuex提供的语法糖,在底层已经封装好了,拿来就能用,简化了很多操作。
其中...mapActions(['clickAFn']) 相当于this.$store.dispatch('clickAFn',{参数}),mapActions中只需要指定方法名即可,参数省略。
...mapGetters(['resturantName'])相当于this.$store.getters.resturantName
- <template>
- <div class="componentsA">
- <P class="title">组件A</P>
- <P class="titleName">餐馆名称:{{resturantName}}</P>
- <div>
- <!-- 点击修改 为 A 餐馆 -->
- <button class="btn" @click="modifyAName('A餐馆')">修改为A餐馆</button>
- </div>
- <div class="marTop">
- <button class="btn" @click="trunToB">跳转到B页面</button>
- </div>
- </div>
- </template>
- <script>
- import {mapActions, mapGetters} from 'vuex'
- export default {
- name: 'A',
- data () {
- return {
- }
- },
- methods:{
- ...mapActions( // 语法糖
- ['modifyAName'] // 相当于this.$store.dispatch('modifyName'),提交这个方法
- ),
- trunToB () {
- this.$router.push({path: '/componentsB'}) // 路由跳转到B
- }
- },
- computed: {
- ...mapGetters(['resturantName']) // 动态计算属性,相当于this.$store.getters.resturantName
- }
- }
- </script>
- <!-- Add "scoped" attribute to limit CSS to this component only -->
- <style scoped>
- .title,.titleName{
- color: blue;
- font-size: 20px;
- }
- .btn{
- width: 160px;
- height: 40px;
- background-color: blue;
- border: none;
- outline: none;
- color: #ffffff;
- border-radius: 4px;
- }
- .marTop{
- margin-top: 20px;
- }
- </style>
B组件同理
- <template>
- <div class="componentsB">
- <P class="title">组件B</P>
- <P class="titleName">餐馆名称:{{resturantName}}</P>
- <div>
- <!-- 点击修改 为 B 餐馆 -->
- <button class="btn" @click="modifyBName('B餐馆')">修改为B餐馆</button>
- </div>
- <div class="marTop">
- <button class="btn" @click="trunToA">跳转到A页面</button>
- </div>
- </div>
- </template>
- <script>
- import {mapActions, mapGetters} from 'vuex'
- export default {
- name: 'B',
- data () {
- return {
- }
- },
- methods:{
- ...mapActions( // 语法糖
- ['modifyBName'] // 相当于this.$store.dispatch('modifyName'),提交这个方法
- ),
- trunToA () {
- this.$router.push({path: '/componentsA'}) // 路由跳转到A
- }
- },
- computed: {
- ...mapGetters(['resturantName']) // 动态计算属性,相当于this.$store.getters.resturantName
- }
- }
- </script>
- <!-- Add "scoped" attribute to limit CSS to this component only -->
- <style scoped>
- .title,.titleName{
- color: red;
- font-size: 20px;
- }
- .btn{
- width: 160px;
- height: 40px;
- background-color: red;
- border: none;
- outline: none;
- color: #ffffff;
- border-radius: 4px;
- }
- .marTop{
- margin-top: 20px;
- }
- </style>
最后:本文完全手打,如需转载请注明出处,谢谢,如果不明白的地方欢迎给我留言哦。
github项目仓库地址:https://github.com/byla678/vuexdemo.git
Vue通信、传值的多种方式,详解的更多相关文章
- Vue通信、传值的多种方式,详解(都是干货)
Vue通信.传值的多种方式,详解(都是干货) 可参考博客: https://blog.csdn.net/qq_35430000/article/details/79291287
- VUE SpringCloud 跨域资源共享 CORS 详解
VUE SpringCloud 跨域资源共享 CORS 详解 作者: 张艳涛 日期: 2020年7月28日 本篇文章主要参考:阮一峰的网络日志 » 首页 » 档案 --跨域资源共享 CORS 详解 ...
- Windows主机里利用VMware安装Linux(CentOS)虚拟机,Host-only连接上网方式详解
关于Host-only指的是主机与虚拟机之间的互联,因此虚拟机是不能连网的,若需要连网则需要使用NAT模式: Host-only模式实现联网得考虑如下配置过程: 附:VMware虚拟机三种网络模式(B ...
- 串口通信-MSComm控件使用详解
串口通信-MSComm控件使用详解 2012年11月13日 09:35:45 他山之石可以攻玉 阅读数:37952更多 个人分类: 控件编程Delphi编程 MSComm 控件通过串行端口传输和接 ...
- vuex的使用及持久化state的方式详解
vuex的使用及持久化state的方式详解 转载 更新时间:2018年01月23日 09:09:37 作者:baby格鲁特 我要评论 这篇文章主要介绍了vuex的使用及持久化state的方 ...
- Linux/centos/redhat下各种压缩解压缩方式详解
1.zip命令 zip -r myfile.zip ./* 将当前目录下的所有文件和文件夹全部压缩成myfile.zip文件,-r表示递归压缩子目录下所有文件. 2.unzip unzip -o -d ...
- Spring事务Transaction配置的五种注入方式详解
Spring事务Transaction配置的五种注入方式详解 前段时间对Spring的事务配置做了比较深入的研究,在此之间对Spring的事务配置虽说也配置过,但是一直没有一个清楚的认识.通过这次的学 ...
- Dubbo配置方式详解
Dubbo 是一个分布式服务框架,致力于提供高性能和透明化的 RPC 远程服务调用方案,是阿里巴巴 SOA 服务化治理方案的核心框架,每天为 2,000+ 个服务提供 3,000,000,000+ 次 ...
- JSON创建键值对(key是中文或者数字)方式详解
JSON创建键值对(key是中文或者数字)方式详解 先准备好一个空的json对象 var obj = {}; 1. 最原始的方法 obj.name = 'zhangsan'; //这种方式很简单的添加 ...
随机推荐
- linux下sprintf_s函数的替代(转载)
转自:http://www.cnblogs.com/yeahgis/archive/2013/01/22/2872179.html windows平台下线程安全的格式化字符串函数sprint_s并非标 ...
- poj1477(水)
犯了一个错误,贡献了一次CE: G++里面没有头文件,用scanf会CE:然而C++就可以. 两大cow解释: 最好不要c 的输入和c++的一起用 (特别是关同步的时候) 然而好像他们也不是很了解.. ...
- HK算法模板+小优化(跑的快一点点)
HUST 2604 #include <iostream> #include <cstdlib> #include <cstdio> #include <cs ...
- python __builtins__ complex类 (13)
13.'complex', 函数用于创建一个值为 real + imag * j 的复数或者转化一个字符串或数为复数.如果第一个参数为字符串,则不需要指定第二个参数. class complex(ob ...
- VS2019+ASP.NETCore+图表
原帖学习踩坑:https://www.cnblogs.com/fzqm-lwz/p/9704973.html,主要根据大佬原帖内容,实现尝试,进行一些修改: 实现方式一:通过标记帮助程序将JS代码传到 ...
- poj3417 闇の連鎖 【树上差分】By cellur925
闇の連鎖(yam.pas/c/cpp)题目描述传说中的暗之连锁被人们称为 Dark.Dark 是人类内心的黑暗的产物,古今中外的勇者们都试图打倒它.经过研究,你发现 Dark 呈现无向图的结构,图中有 ...
- Codeforces Round #395 (Div. 2) A
Description Comrade Dujikov is busy choosing artists for Timofey's birthday and is recieving calls f ...
- ORACLE如何实现函数、包、存储过程的导入和导出
建 议可以用常规的检查,检查一下:数据字典信息/exp 导出结构检查 1.检查 SELECT * FROM ALL_SOURCE t WHERE T.OWNER = '要查询用户' AND t.TYP ...
- 1. Visio Web 形状 - 无法与 Web 服务器建立连接。请稍后重新进行搜索。处理方式
今天在Visio中使用“搜索形状”,发现不管搜什么,结果都是:Visio Web 形状 - 无法与 Web 服务器建立连接.请稍后重新进行搜索 具体解决方案如下:控制面板=>添加或删除程序=&g ...
- C. Arcade dp二维费用背包 + 滚动数组 玄学
http://codeforces.com/gym/101257/problem/C 询问从左上角走到右下角,每次只能向右或者向左,捡起三种物品算作一个logo,求最多能得到多少个logo. 设dp[ ...