PCB Polar SI9000阻抗模型图片文字识别方法
用过Polar SI9000的都知道,阻抗模型图片可以进行用户鼠标交互,那么它的是如何实现的呢,下面就讲一下如何实现此功能的方法
鼠标点击阻抗模型图片某个像素点, 它可以实现找到离它最近的阻抗参数的文字并用红色框选出来, 还可以识别文字是哪一个阻抗参数.
解决方法一:
1.将每一种阻抗模型图片中的所有参数在图片中的位置区域信息与参数值记录到数据库中
2.鼠标点击阻抗模型的坐标位置后,再进与数据库中的参数坐标位置匹配
这样就可以实现与Polar阻抗软件相同的效果,但是Polar SI9000有阻抗计算模型93种,要实现的话工作量可不小,所以这种方法排除了。
解决方法二(采用此方法实现):
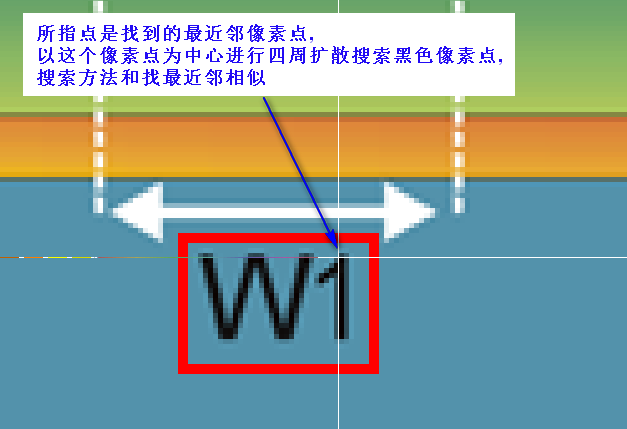
1.找最近邻----点击像素点位置,找出离它最近的一个黑色像素点位置
2.聚类----通过一个像素点查找周边相邻的黑色像素点进行聚类
3.识别---截取指定区域文字图片与图像Ocr识别
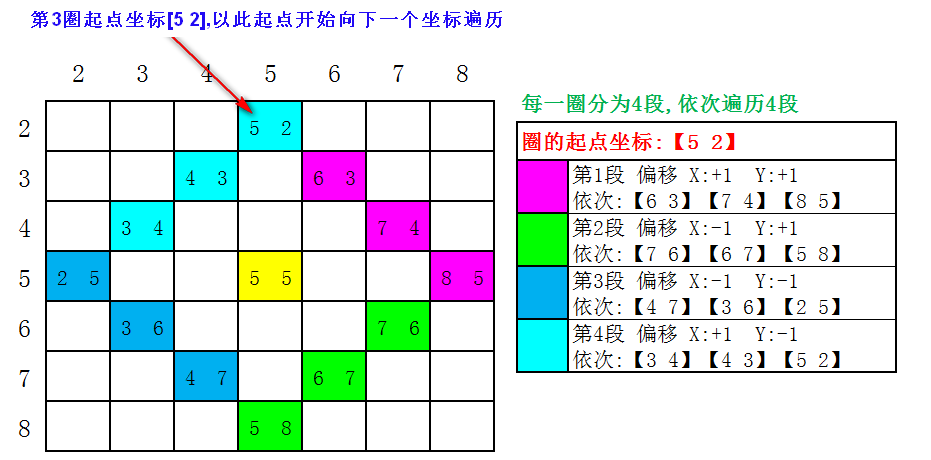
1.【圈】的遍历方式按下图方式进行
以鼠标点击像素的位置,向像素四周搜索黑色像素点,依次遍历第1圈,第2圈,第3圈.....直到找到黑色像素则终止

2.【段】的遍历方式按下图方式进行
3.C#代码实现,鼠标点击像素点位置,找出离它最近的黑色像素点
        /// <summary>

        /// 通过鼠标点击像素点位置,找出离它最近的一个黑色像素点位置

        /// </summary>

        /// <param name="MousePoint"></param>

        /// <param name="ArrayBitmap"></param>

        /// <returns></returns>

        private Point ArrayLoop(Point MousePoint, Bitmap ArrayBitmap)

        {

            Point ClacBlackPoint = new Point();

            Color pixel = ArrayBitmap.GetPixel(MousePoint.X, MousePoint.Y);

            if (pixel.R <=  && pixel.G <=  && pixel.B <= )

            {

                return MousePoint;

            }

            Point ArraySum = new Point(ArrayBitmap.Size);

            int[,] ArrayLoopType = new int[,] { { ,  }, { -,  }, { -, - }, { , - } }; //偏移位移矩阵数组

            int LoopLength = getArrayLoopMax(MousePoint, ArraySum);//遍历的圈数计算

            int ArayLength = ArrayLoopType.GetLength();//计算值为4

            for (int k = ; k <= LoopLength; k++) //按圈遍历

            {

                Point LoopPoint = MousePoint;

                LoopPoint.Offset(, -k);//更新圈的起点像素坐标

                for (int i = ; i < ArayLength; i++)//每圈分为4段遍历

                {

                    for (int j = ; j < k; j++)

                    {

                        LoopPoint.X += ArrayLoopType[i, ];

                        LoopPoint.Y += ArrayLoopType[i, ];

                        if (LoopPoint.X >  && LoopPoint.Y >  && LoopPoint.X <= ArraySum.X && LoopPoint.Y <= ArraySum.Y)//

                        {

                            pixel = ArrayBitmap.GetPixel(LoopPoint.X - , LoopPoint.Y - );

                            if (pixel.R <=  && pixel.G <=  && pixel.B <= )

                            {

                                ClacBlackPoint = LoopPoint;

                                goto L1;

                            }

                        }

                    }

                }

            }

            L1:

            return ClacBlackPoint;

        }

        /// <summary>

        /// 获取遍历圈数最大值

        /// </summary>

        /// <param name="MousePoint"></param>

        /// <param name="ArraySum"></param>

        /// <param name="LoopType"></param>

        /// <returns></returns>

        private int getArrayLoopMax(Point MousePoint, Point ArraySum, int LoopType = )

        {

            int LoopLength = ;

            if (LoopType == )

            {

                int TopLeft = (MousePoint.X -  + MousePoint.Y - );

                int TopRight = (ArraySum.X - MousePoint.X + MousePoint.Y - );

                int TopMax = Math.Max(TopLeft, TopRight);

                int BootomLeft = (MousePoint.X -  + ArraySum.Y - MousePoint.Y);

                int BottomRight = (ArraySum.X - MousePoint.X + ArraySum.Y - MousePoint.Y);

                int BottomMax = Math.Max(BootomLeft, BottomRight);

                LoopLength = Math.Max(TopMax, BottomMax);

            }

            else

            {

                int MaxX = Math.Max(MousePoint.X - , ArraySum.X - MousePoint.X);

                int MaxY = Math.Max(MousePoint.Y - , ArraySum.Y - MousePoint.Y);

                LoopLength = Math.Max(MaxX, MaxY);

            }

            return LoopLength;

        }
1.聚类实现方法按下图进行
2.C#代码实现,通过一个像素点查找周边相邻的黑色像素点进行聚类为一个矩形区域
        /// <summary>

        /// 通过一个像素点查找周边相邻的黑色像素点进行聚类为一个矩形区域

        /// </summary>

        /// <param name="CalcPoint"></param>

        /// <param name="ArrayBitmap"></param>

        /// <returns></returns>

        private RangePoint RangeArea(Point CalcPoint, Bitmap ArrayBitmap)

        {

            int LoopLength = 10; //搜索周边相邻像素个数

            int[,] ArrayLoopType = new int[,] { { ,  }, { -,  }, { -, - }, { , - } };

            Point ArraySum = new Point(ArrayBitmap.Size);

            RangePoint RangePointArea = new RangePoint(CalcPoint, CalcPoint);

            HashSet<Point> PointSet = new HashSet<Point>();

            HashSet<Point> LoopPointSet = new HashSet<Point>();

            Queue<Point> PointQueue = new Queue<Point>();

            PointQueue.Enqueue(CalcPoint);

            while (PointQueue.Count > )

            {

                var TopPoint = PointQueue.Dequeue();  //TopPoint 以这个点周边范围进行搜索像素

                for (int k = ; k <= LoopLength; k++)

                {

                    Point LoopPoint = TopPoint;

                    LoopPoint.Offset(, -k);

                    for (int i = ; i < ; i++)

                    {

                        for (int j = ; j < k; j++)

                        {

                            LoopPoint.X += ArrayLoopType[i, ];

                            LoopPoint.Y += ArrayLoopType[i, ];

                            if (!LoopPointSet.Contains(LoopPoint))

                            {

                                LoopPointSet.Add(LoopPoint);

                                if (LoopPoint.X >  && LoopPoint.Y >  && LoopPoint.X <= ArraySum.X && LoopPoint.Y <= ArraySum.Y)

                                {

                                    Color pixel = ArrayBitmap.GetPixel(LoopPoint.X - , LoopPoint.Y - );

                                    if (pixel.R <=  && pixel.G <=  && pixel.B <= )

                                    {

                                        if (!PointSet.Contains(LoopPoint))

                                        {

                                            //找到相似的黑色像素加入队列

                                            PointQueue.Enqueue(LoopPoint);

                                            //将周边相似相素 进行扩大合并区域

                                            RangePointArea = RangePointArea.Union(LoopPoint);

                                            //加入字典

                                            PointSet.Add(TopPoint);

                                        }

                                    }

                                }

                            }

                        }

                    }

                }

            }

            return RangePointArea;

        }
RangePoint Mod类
    /// <summary>

    /// 范围区域点

    /// </summary>

    public class RangePoint

    {

        public RangePoint(Point MinPoint, Point MaxPoint)

        {

            RangeMinPoint = MinPoint;

            RangeMaxPoint = MaxPoint;

        }

        /// <summary>

        /// 最小点

        /// </summary>

        public Point RangeMinPoint { get; set; }

        /// <summary>

        /// 最大点

        /// </summary>

        public Point RangeMaxPoint { get; set; }

        /// <summary>

        /// 范围宽

        /// </summary>

        public int Width

        {

            get {  return this.RangeMaxPoint.X - this.RangeMinPoint.X + ; }

        }

        /// <summary>

        /// 范围高

        /// </summary>

        public int Height

        {

            get { return this.RangeMaxPoint.Y - this.RangeMinPoint.Y + ; }

        }

        /// <summary>

        /// 合拼区域

        /// </summary>

        /// <param name="point"></param>

        /// <returns></returns>

        public RangePoint Union(Point point)

        {

            Point minP = RangeMinPoint;

            Point MaxP = RangeMaxPoint;

            if (point.X < minP.X)

                minP.X = point.X;

            if (point.Y < minP.Y)

                minP.Y = point.Y;

            if (point.X > MaxP.X)

                MaxP.X = point.X;

            if (point.Y > MaxP.Y)

                MaxP.Y = point.Y;

            RangeMinPoint = minP;

            RangeMaxPoint = MaxP;

            return this;

        }

        /// <summary>

        /// 检测点是否在区域内

        /// </summary>

        /// <param name="point"></param>

        /// <returns></returns>

        public bool IsRangeInner(Point point)

        {

            return (RangeMinPoint.X <= point.X && RangeMinPoint.Y <= point.Y && RangeMaxPoint.X >= point.X && RangeMaxPoint.Y >= point.Y);

        }

        /// <summary>

        /// 获得区域中心点

        /// </summary>

        /// <param name="point"></param>

        /// <returns></returns>

        public Point getRangeCenterPoint()

        {

            return new Point((int)((this.RangeMinPoint.X + this.RangeMaxPoint.X) * 0.5), (int)((this.RangeMinPoint.Y + this.RangeMaxPoint.Y) * 0.5));

        }

        /// <summary>

        /// 区域偏移 扩大缩小

        /// </summary>

        /// <param name="point"></param>

        /// <returns></returns>

        public RangePoint RangeOffset(int OffsetVal)

        {

            this.RangeMinPoint = new Point(this.RangeMinPoint.X - OffsetVal, this.RangeMinPoint.Y - OffsetVal);

            this.RangeMaxPoint = new Point(this.RangeMaxPoint.X + OffsetVal, this.RangeMaxPoint.Y + OffsetVal);

            return this;

        }

    }
1.通过聚类识别出文本区域坐标进行图像截取,并将截取出来的图像进行图像识别转文字.

2.C#代码实现,截取指定区域文字图片与图像识别
此图像识别用Baidu它们家的Ocr API自己注册一下就能用了,另外一个Tesseract也不错的,可以自行对Ocr字体模型训练,最主要是可以实现本地不联网的情况下也可以Ocr识别
        /// <summary>

        /// 获取图片指定部分

        /// </summary>

        /// <param name="pPath">图片路径</param>

        /// <param name="pOrigStartPointX">原始图片开始截取处的坐标X值</param>

        /// <param name="pOrigStartPointY">原始图片开始截取处的坐标Y值</param>

        /// <param name="pPartWidth">目标图片的宽度</param>

        /// <param name="pPartHeight">目标图片的高度</param>

        static System.Drawing.Bitmap GetPart(Image originalImg, int pOrigStartPointX, int pOrigStartPointY, int pPartWidth, int pPartHeight)

        {

            System.Drawing.Bitmap partImg = new System.Drawing.Bitmap(pPartWidth, pPartHeight);

            System.Drawing.Graphics graphics = System.Drawing.Graphics.FromImage(partImg);

            System.Drawing.Rectangle destRect = new System.Drawing.Rectangle(new System.Drawing.Point(, ), new System.Drawing.Size(pPartWidth, pPartHeight));//目标位置

            System.Drawing.Rectangle origRect = new System.Drawing.Rectangle(new System.Drawing.Point(pOrigStartPointX, pOrigStartPointY), new System.Drawing.Size(pPartWidth, pPartHeight));//原图位置(默认从原图中截取的图片大小等于目标图片的大小)

            graphics.DrawImage(originalImg, destRect, origRect, System.Drawing.GraphicsUnit.Pixel);

            return partImg;

        }

       /// <summary>

        /// Baidu Ocr识别

        /// </summary>

        /// <param name="img"></param>

        /// <returns></returns>

        private string OcrGeneralBasic(Image img)

        {

            StringBuilder OcrTxt = new StringBuilder();

            string baiduAPI_ID = "baiduAPI_ID";

            string baiduAPI_key = "baiduAPI_key";

            Baidu.Aip.Ocr.Ocr OcrClient = new Baidu.Aip.Ocr.Ocr(baiduAPI_ID, baiduAPI_key);

            var byteImg = Img2Byte(img);

            var OcrResult = OcrClient.GeneralBasic(byteImg);

            var words_result = OcrResult["words_result"];

            if (words_result == null) return "";

            foreach (var item in words_result)

            {

                OcrTxt.AppendLine(item["words"].ToString());

            }

            return OcrTxt.ToString();

        }

        /// <summary>

        /// 将Image转换成为byte[]

        /// </summary>

        /// <param name="img"></param>

        /// <returns></returns>

        public byte[] Img2Byte(System.Drawing.Image img)

        {

            MemoryStream mstream = new MemoryStream();

            img.Save(mstream, System.Drawing.Imaging.ImageFormat.Bmp);

            byte[] byData = new Byte[mstream.Length];

            mstream.Position = ;

            mstream.Read(byData, , byData.Length); mstream.Close();

            return byData;

        }

1.PictureBox控件显示图片尺寸与实际图片尺寸不一致,会造成PictureBox控件上的鼠标点击像素点位置,并不是实际图片像素点位置,这里给出2种解决方法
方法一.在读入Bitmap图片前提前转换(缩放)图片尺寸和PictureBox控件尺寸一致
        /// <summary>

        /// 图片缩放

        /// </summary>

        /// <param name="bmp"></param>

        /// <param name="newW"></param>

        /// <param name="newH"></param>

        /// <returns></returns>

        public static Bitmap KiResizeImage(Bitmap bmp, int newW, int newH)

        {

            try

            {

                Bitmap newBitmap = new Bitmap(newW, newH);

                Graphics g = Graphics.FromImage(newBitmap);

                g.InterpolationMode = InterpolationMode.HighQualityBicubic;

                g.DrawImage(bmp, new Rectangle(, , newW, newH), new Rectangle(, , bmp.Width, bmp.Height), GraphicsUnit.Pixel);

                g.Dispose();

                return newBitmap;

            }

            catch

            {

                return null;

            }

        }
方法二.计算PictureBox图像大小与真实图像大小的比值关系,通过鼠标点击像素位置与屏幕位置的关系,计算得鼠标真实点击的图像像素位置
        /// <summary>

        /// 鼠标移动  查看鼠标位置与实际图片和显示图片关系

        /// </summary>

        /// <param name="sender"></param>

        /// <param name="e"></param>

        private void picBox_MouseMove(object sender, MouseEventArgs e)

        {

            PictureBox  picBox = (PictureBox)sender;

            int originalWidth = picBox.Image.Width;

            int originalHeight = picBox.Image.Height;

            PropertyInfo rectangleProperty = picBox.GetType().GetProperty("ImageRectangle", BindingFlags.Instance | BindingFlags.NonPublic);

            Rectangle rectangle = (Rectangle)rectangleProperty.GetValue(picBox, null);

            int currentWidth = rectangle.Width;

            int currentHeight = rectangle.Height;

            double rate = (double)currentHeight / (double)originalHeight;

            int black_left_width = (currentWidth == picBox.Width) ?  : (picBox.Width - currentWidth) / ;

            int black_top_height = (currentHeight == picBox.Height) ?  : (picBox.Height - currentHeight) / ;

            int zoom_x = e.X - black_left_width;

            int zoom_y = e.Y - black_top_height;

            double original_x = (double)zoom_x / rate;

            double original_y = (double)zoom_y / rate;

            StringBuilder sb = new StringBuilder();

            sb.AppendFormat("原始尺寸{0}/{1}(宽/高)\r\n", originalWidth, originalHeight);

            sb.AppendFormat("缩放状态图片尺寸{0}/{1}(宽/高)\r\n", currentWidth, currentHeight);

            sb.AppendFormat("缩放比率{0}\r\n", rate);

            sb.AppendFormat("左留白宽度{0}\r\n", black_left_width);

            sb.AppendFormat("上留白高度{0}\r\n", black_top_height);

            sb.AppendFormat("当前鼠标坐标{0}/{1}(X/Y)\r\n", e.X, e.Y);

            sb.AppendFormat("缩放图中鼠标坐标{0}/{1}(X/Y)\r\n", zoom_x, zoom_y);

            sb.AppendFormat("原始图中鼠标坐标{0}/{1}(X/Y)\r\n", original_x, original_y);

            string InfoTxt = sb.ToString();

        }
PCB Polar SI9000阻抗模型图片文字识别方法的更多相关文章
- 【原】Coursera—Andrew Ng机器学习—课程笔记 Lecture 18—Photo OCR 应用实例:图片文字识别
Lecture 18—Photo OCR 应用实例:图片文字识别 18.1 问题描述和流程图 Problem Description and Pipeline 图像文字识别需要如下步骤: 1.文字侦测 ...
- [C13] 应用实例:图片文字识别(Application Example: Photo OCR)
应用实例:图片文字识别(Application Example: Photo OCR) 问题描述和流程图(Problem Description and Pipeline) 图像文字识别应用所作的事是 ...
- 小试Office OneNote 2010的图片文字识别功能(OCR)
原文:小试Office OneNote 2010的图片文字识别功能(OCR) 自Office 2003以来,OneNote就成为了我电脑中必不可少的软件,它集各种创新功能于一身,可方便的记录下各种类型 ...
- 一篇文章搞定百度OCR图片文字识别API
一篇文章搞定百度OCR图片文字识别API https://www.jianshu.com/p/7905d3b12104
- python3 图片文字识别
最近用到了图片文字识别这个功能,从网上搜查了一下,决定利用百度的文字识别接口.通过测试发现文字识别率还可以.下面就测试过程简要说明一下 1.注册用户 链接:https://login.bce.baid ...
- 刚破了潘金莲的身份信息(图片文字识别),win7、win10实测可用(免费下载)
刚破了潘金莲的身份信息(图片文字识别),win7.win10实测可用 效果如下: 证照,车牌.身份证.名片.营业执照 等图片文字均可识别 电脑版 本人出品 大小1.3MB 下载地址:https://p ...
- Python人工智能之图片识别,Python3一行代码实现图片文字识别
1.Python人工智能之图片识别,Python3一行代码实现图片文字识别 2.tesseract-ocr安装包和中文语言包 注意:
- 【图片识别】java 图片文字识别 ocr (转)
http://www.cnblogs.com/inkflower/p/6642264.html 最近在开发的时候需要识别图片中的一些文字,网上找了相关资料之后,发现google有一个离线的工具,以下为 ...
- java 图片文字识别 ocr
最近在开发的时候需要识别图片中的一些文字,网上找了相关资料之后,发现google有一个离线的工具,以下为java使用的demo 在此之前,使用这个工具需要在本地安装OCR工具: 下面一个是一定要安装的 ...
随机推荐
- BZOJ1986: [USACO2004 Dec] Dividing the Path 划区灌溉
L<=1000000的土地上用长度在2*A~2*B的线段覆盖所有点,且给定n<=1000个区间,每个区间上只允许有一条线段,求最少多少线段,无解-1. f[i]表示填前i个土地最少线段,f ...
- Memcached 管理与监控工具 MemAdmin
MemAdmin是一款可视化的Memcached管理与监控工具,基于 PHP5 & JQuery 开发,体积小,操作简单. 主要功能: 服务器参数监控:STATS.SETTINGS.ITEMS ...
- 安装mysql时出现应用程序无法正常启动(0xc000007b)、初始化失败以及密码忘记怎样重置?
https://blog.csdn.net/zztingfeng/article/details/80155624
- HDU 4609 FFT+组合数学
3-idiots Time Limit: 10000/5000 MS (Java/Others) Memory Limit: 32768/32768 K (Java/Others)Total S ...
- POJ 2135 最小费用最大流 入门题
Farm Tour Time Limit: 1000MS Memory Limit: 65536K Total Submissions: 19207 Accepted: 7441 Descri ...
- 转: ORACLE存储过程笔记2----运算符和表达式
运算符和表达式 关系运算 =等于<>,!=不等于<小于>大于<=小于等于>=大于等于 一般运算 +加-减*乘/除:=赋值号=>关系号. ...
- Linux下使用Curl调用Java的WebService接口
其实只要是标准的WSDL的SOA接口WebService都可以用. 调用方式: 注意:上面的方式不包括加密或者登录的,其实SOA有一套完整的加密方式. curl -H'Content-Type: te ...
- IE浏览器不能上传图片
这时将弹出一个“安全设置-Internet选项”对话框,把右侧滚动条慢慢地往下拉. 找到“其他/将文件上载到服务器包含本地目录路径”点击下面的“启用”功能
- .NET作品集:基于svn 的.net 持续集成工具
作品背景 这个.net 持续集成作品还是在2014年的时候从事.net 软件项目开发的时候做的,当时部门还用着vs2008用vb.net做项目(现在也是),项目代码极混乱,版本工具用的vss,而且用的 ...
- 【APUE】进程间通信之管道
管道是UNIX系统IPC最古老形式,并且所有UNIX系统都提供此种通信机制.管道由下面两种局限性: 1)历史上,它们是半双工的(即数据只能在一个方向上流动) 2)它们只能在具有公共祖先的进程之间使用. ...