MongoDB高可用架构:Replica Sets+Sharding
MongoDB的sharding解决了海量存储和动态扩容的问题。但是遇到单点故障就显得无能为力了。MongoDB的副本集可以很好的解决单点故障的问题。所以就有了Sharding+Replica Sets的高可用架构了。
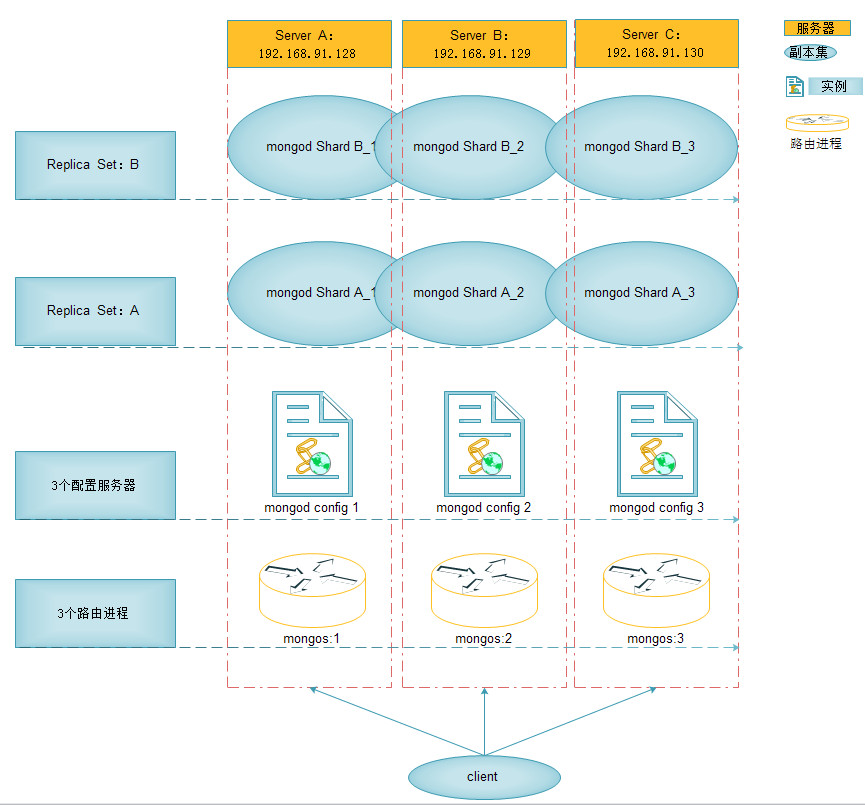
架构图如上所述
环境配置如下:
1:Shard服务器:使用Replica Sets确保每个数据节点的数据都有备份,自动容灾转移,自动恢复的能力。
2:Config服务器:使用3个配置服务器确保元数据完整性。
3:路由进程:使用3个路由进程实现平衡,提高客户端接入的性能。
4:6个分片进程:Shard A_1、Shard A_2、Shard A_3组成一个副本集Shard A。Shard B_1、Shard B_2
、Shard B_3组成另外一个副本集 Shard B。
| Server | IP | 进程以及端口 |
|
Server A |
192.168.91.128 |
Mongod Shard A_1:27017 Mongod Shard B_1:27018 Mongod config:30000 Mongos:40000 |
|
Server B |
192.168.91.129 |
Mongod Shard A_2:27017 Mongod Shard B_2:27018 Mongod config:30000 Mongos:40000 |
|
Server C |
192.168.91.130 |
Mongod Shard A_3:27017 Mongod Shard B_3:27018 Mongod config:30000 Mongos:40000 |
1:在Server A上启动mongod Shard A_1
[root@localhost mongodb]# ./bin/mongod --shardsvr --replSet shard1 --port 27017 --dbpath ./data/servera --logpath ./log/loga/sharda1 --fork

about to fork child process, waiting until server is ready for connections.

forked process: 4838

child process started successfully, parent exiting
在Server B上启动mongod Shard A_2

[root@localhost mongodb]# ./bin/mongod --shardsvr --replSet shard1 --port 27017 --dbpath ./data/servera --logpath ./log/loga/shardb1 --fork

about to fork child process, waiting until server is ready for connections.

forked process: 4540

child process started successfully, parent exiting
在Server C上启动mongod Shard A_3
[root@localhost mongodb]# ./bin/mongod --shardsvr --replSet shard1 --port 27017 --dbpath ./data/servera --logpath ./log/loga/shardc1 --fork

about to fork child process, waiting until server is ready for connections.

forked process: 4505

child process started successfully, parent exiting
在3台服务器的任意一台上执行
[root@localhost mongodb]# ./bin/mongo

MongoDB shell version: 2.6.9

connecting to: test

> config={_id:"shard1",members:[

...  {_id:0,host:"192.168.91.128:27017"},

...  {_id:1,host:"192.168.91.129:27017"},

...  {_id:2,host:"192.168.91.130:27017"}

... ]}

{

	"_id" : "shard1",

	"members" : [

		{

			"_id" : 0,

			"host" : "192.168.91.128:27017"

		},

		{

			"_id" : 1,

			"host" : "192.168.91.129:27017"

		},

		{

			"_id" : 2,

			"host" : "192.168.91.130:27017"

		}

	]

}

> rs.initiate(config)

{

	"info" : "Config now saved locally.  Should come online in about a minute.",

	"ok" : 1

}
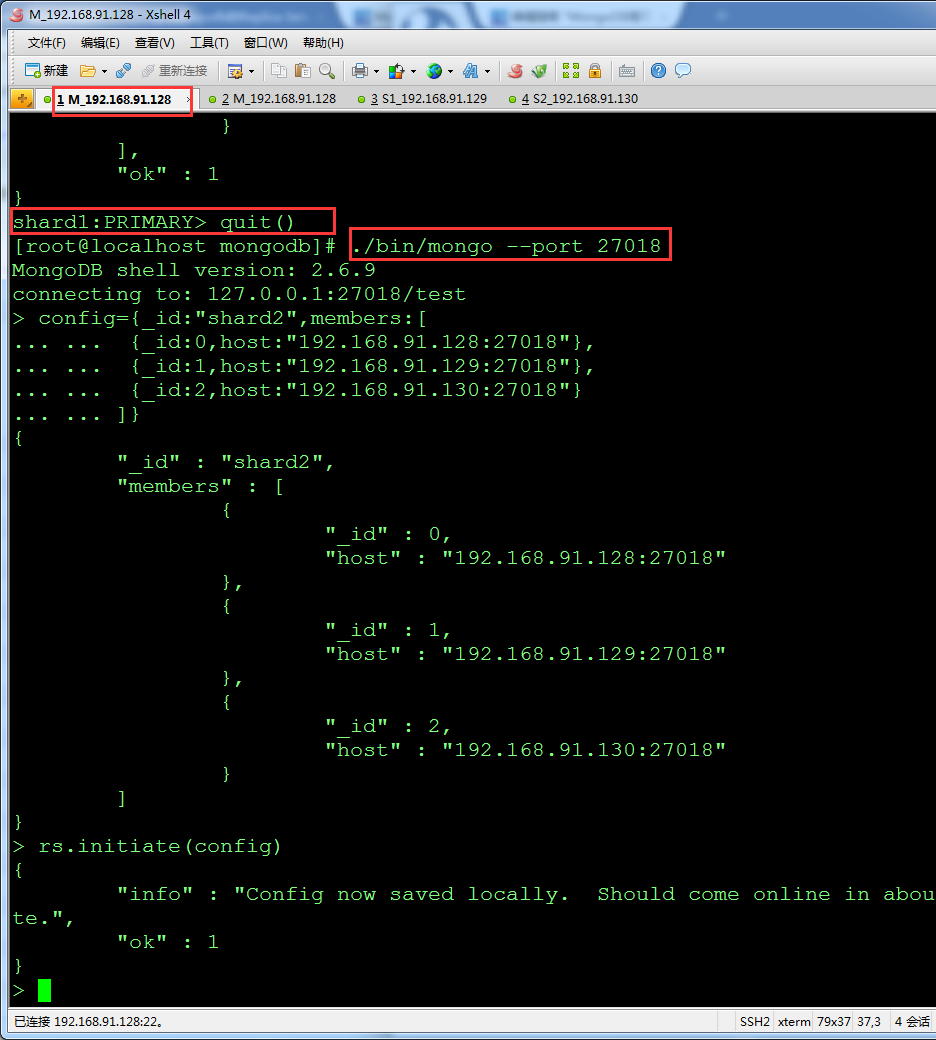
2:在Server A上启动mongod Shard B_1
[root@localhost mongodb]# ./bin/mongod --shardsvr --replSet shard2 --port 27018 --dbpath ./data/serverb --logpath ./log/logb/shardb1 --fork

about to fork child process, waiting until server is ready for connections.

forked process: 5150

child process started successfully, parent exiting
在Server B上启动mongod Shard B_2
[root@localhost mongodb]# ./bin/mongod --shardsvr --replSet shard2 --port 27018 --dbpath ./data/serverb --logpath ./log/logb/shardb2 --fork

about to fork child process, waiting until server is ready for connections.

forked process: 4861

child process started successfully, parent exiting
在Server C上启动mongod Shard B_3
[root@localhost mongodb]# ./bin/mongod --shardsvr --replSet shard2 --port 27018 --dbpath ./data/serverb --logpath ./log/logb/shardb3 --fork

about to fork child process, waiting until server is ready for connections.

forked process: 4800

child process started successfully, parent exiting
[root@localhost mongodb]# ./bin/mongo --port 27018

MongoDB shell version: 2.6.9

connecting to: 127.0.0.1:27018/test

> config={_id:"shard2",members:[

... ...  {_id:0,host:"192.168.91.128:27018"},

... ...  {_id:1,host:"192.168.91.129:27018"},

... ...  {_id:2,host:"192.168.91.130:27018"}

... ... ]}

{

	"_id" : "shard2",

	"members" : [

		{

			"_id" : 0,

			"host" : "192.168.91.128:27018"

		},

		{

			"_id" : 1,

			"host" : "192.168.91.129:27018"

		},

		{

			"_id" : 2,

			"host" : "192.168.91.130:27018"

		}

	]

}

> rs.initiate(config)

{

	"info" : "Config now saved locally.  Should come online in about a minute.",

	"ok" : 1

}
注意:
到这里可以检查A、B、C上的相应的监听服务是否正常?
[root@localhost mongodb]# netstat -nat | grep 2701
副本集至此配置完毕。
3:分别在3台服务器上配置Config Server
在Server A上执行:
[root@localhost mongodb]# ./bin/mongod --port 30000 --dbpath ./data --logpath ./log/configlog --fork

about to fork child process, waiting until server is ready for connections.

forked process: 5430

child process started successfully, parent exiting
在Server B上执行:
[root@localhost mongodb]# ./bin/mongod --port 30000 --dbpath ./data --logpath ./log/configlog --fork

about to fork child process, waiting until server is ready for connections.

forked process: 5120

child process started successfully, parent exiting
在Server C上执行:
[root@localhost mongodb]# ./bin/mongod --port 30000 --dbpath ./data --logpath ./log/configlog --fork

about to fork child process, waiting until server is ready for connections.

forked process: 5056

child process started successfully, parent exiting
4:配置Route Process
在Server A上执行:
[root@localhost mongodb]# ./bin/mongos --configdb 192.168.91.128:30000,192.168.91.129:30000,192.168.91.130:30000 --port 40000 --logpath ./log/route.log --chunkSize 1 --fork

about to fork child process, waiting until server is ready for connections.

forked process: 5596

child process started successfully, parent exiting
chunkSize :指定chunk的大小,默认为200M。为了方便测试指定为1M。意思是当这个分片中插入的数据大于1M时候开始数据转移。
5:配置分片的表和片键
[root@localhost mongodb]# ./bin/mongo --port 40000

MongoDB shell version: 2.6.9

connecting to: 127.0.0.1:40000/test

mongos> use admin

switched to db admin

mongos> db.runCommand({addshard:"shard1/192.168.91.128:27017,192.168.91.129:27017,192.168.91.130:27017})

2015-05-06T00:38:37.360-0700 SyntaxError: Unexpected token ILLEGAL

mongos> db.runCommand({addshard:"shard1/192.168.91.128:27017,192.168.91.129:27017,192.168.91.130:27017"})

{ "shardAdded" : "shard1", "ok" : 1 }

mongos> db.runCommand({addshard:"shard2/192.168.91.128:27018,192.168.91.129:27018,192.168.91.130:27018"})

{ "shardAdded" : "shard2", "ok" : 1 }
mongos> db.person.insert({"uid":1,"uname":"gechong","tel":"158"})

WriteResult({ "nInserted" : 1 })

mongos> db.runCommand({enablesharding:"person"})

{ "ok" : 1 }

mongos> db.runCommand({shardcollection:"person.per",key:{_id:1}})

{ "collectionsharded" : "person.per", "ok" : 1 }
使用person库的per集合来做分片。片键是_id.
至此整个架构已经部署完毕。
MongoDB高可用架构:Replica Sets+Sharding的更多相关文章
- [MongoDB] 高可用架构方案
一.缘由: 众所周知,Mongodb是在高速发展期,一些特性架构难免会发生变化.这里就总结下,我目前所知道的Mongodb 的高可用架构都有哪些.目前Mongodb版本3.2. 二.结构介绍: 1.R ...
- MongoDB高可用架构集群管理(一)
MongoDB数据库核心的两个特点:第一个特点是副本集的自动切换,保证数据的高可靠.服务的高可用:第二个特点是自动分片.服务的横向扩展能力. (一)副本集架构 MongoDB的副本集是一组保持相同数据 ...
- 数据库高可用架构(MySQL、Oracle、MongoDB、Redis)
一.MySQL MySQL小型高可用架构 方案:MySQL双主.主从 + Keepalived主从自动切换 服务器资源:两台PC Server 优点:架构简单,节省资源 缺点:无法线性扩展,主从失 ...
- [转]数据库高可用架构(MySQL、Oracle、MongoDB、Redis)
一.MySQL MySQL小型高可用架构 方案:MySQL双主.主从 + Keepalived主从自动切换 服务器资源:两台PC Server 优点:架构简单,节省资源 缺点:无法线性扩展,主从失 ...
- MongoDB整理笔记のReplica Sets + Sharding
MongoDB Auto-Sharding 解决了海量存储和动态扩容的问题,但离实际生产环境所需的高可靠.高可用还有些距离,所以有了"Replica Sets + Sharding" ...
- MongoDB 高可用集群架构简介
在大数据的时代,传统的关系型数据库要能更高的服务必须要解决高并发读写.海量数据高效存储.高可扩展性和高可用性这些难题.不过就是因为这些问题Nosql诞生了. 转载自严澜的博文——<如何搭建高效的 ...
- MongoDB高可用集群搭建(主从、分片、路由、安全验证)
目录 一.环境准备 1.部署图 2.模块介绍 3.服务器准备 二.环境变量 1.准备三台集群 2.安装解压 3.配置环境变量 三.集群搭建 1.新建配置目录 2.修改配置文件 3.分发其他节点 4.批 ...
- MongoDB 高可用集群副本集+分片搭建
MongoDB 高可用集群搭建 一.架构概况 192.168.150.129192.168.150.130192.168.150.131 参考文档:https://www.cnblogs.com/va ...
- MogoDB(6)--mongoDB高可用和4.0特性
5.1.MongoDB 用户管理 1.用户管理1.1.添加用户为 testdb 添加 tom 用户 use testdb db.createUser({user:"tom",pwd ...
随机推荐
- RTP 有效负载(载荷)类型,RTP Payload Type
转自:http://blog.csdn.net/caoshangpa/article/details/53008018 版权声明:本文为灿哥哥http://blog.csdn.net/caoshang ...
- intellij idea 无法启动或调试 spring-boot
解决方案一: 原因是因为Working directory没有指定, 并且运行前要手动执行mvn clean install命令才可以.所以导致错误了.希望大家不要犯类似错误. 解决方式二: 看看你的 ...
- Redis Nosql数据库
Redis是一个key-value存储系统.和Memcached类似.可是攻克了断电后数据全然丢失的情况.并且她支持很多其它无化的value类型.除了和string外,还支持lis ...
- 详细解读Android中的搜索框(四)—— Searchable配置文件
<?xml version="1.0" encoding="utf-8"?> <searchable xmlns:android=" ...
- LINQ to XML 建立,读取,增,删,改
LINQ to XML的出现使得我们再也不需要使用XMLDocument这样复杂的一个个的没有层次感的添加和删除.LINQ可以使的生成的XML文档在内存中错落有致.下面以一个小的例子说名LINQ ...
- Log stash学习笔记(一)
Logstash是一款开源的数据收集引擎,具备实时管道处理能力.简单来说,logstash作为数据源与数据存储分析工具之间的桥梁,结合 ElasticSearch以及Kibana,能够极大方便数据的处 ...
- SVG.js 基础图形绘制整理(一)
一.矩形 //指定width和height 画矩形 //返回rect对象 var draw = SVG('svg1').size(300, 300); var rect = draw.rect(100 ...
- 【JAVA与C#比较】其它
从语言方面的知识点来说,这应该是最后一篇有关java和C#的比较了.如果要了解两者具体各知识点的异同,请查看前面的相关文章,不过后面有可能存在,不能放到前面文章所列知识点的情况,应该就会补充到这里吧. ...
- CentOS下httpd下php 连接mysql 本机可以,外网报错Could not connect: Can't connect to MySQL server on '127.0.0.1' (13)2003 原因解析
php代码很简单: $server="127.0.0.1"; println("Begin"); $link = mysql_connect($server,& ...
- mysql 5.1简明教程
第一章Mysql简介与安装 第一节 MySql简介 百度百科 第二节 MySql安装与配置 1.MySql5.1下载及安装 2.MySql数据库编码配置 UTF-8 3.MySql图形页面sqlyog ...