
SpringBoot------文件上传
1.pom.xml引入依赖配置
<project xmlns="http://maven.apache.org/POM/4.0.0" xmlns:xsi="http://www.w3.org/2001/XMLSchema-instance" xsi:schemaLocation="http://maven.apache.org/POM/4.0.0 http://maven.apache.org/xsd/maven-4.0.0.xsd">

  <modelVersion>4.0.0</modelVersion>

  <groupId>top.ytheng</groupId>

  <artifactId>springboot-demo</artifactId>

  <version>0.0.1-SNAPSHOT</version>

  <packaging>jar</packaging>

  <parent>

        <groupId>org.springframework.boot</groupId>

        <artifactId>spring-boot-starter-parent</artifactId>

        <version>2.0.5.RELEASE</version>

        <relativePath/> <!-- lookup parent from repository -->

    </parent>

    <properties>

        <project.build.sourceEncoding>UTF-8</project.build.sourceEncoding>

        <project.reporting.outputEncoding>UTF-8</project.reporting.outputEncoding>

        <java.version>1.8</java.version>

    </properties>

    <dependencies>

        <dependency>

            <groupId>org.springframework.boot</groupId>

            <artifactId>spring-boot-starter-web</artifactId>

        </dependency>

        <dependency>

            <groupId>org.springframework.boot</groupId>

            <artifactId>spring-boot-starter-test</artifactId>

            <scope>test</scope>

        </dependency>

        <dependency>

            <groupId>org.springframework.boot</groupId>

            <artifactId>spring-boot-starter-thymeleaf</artifactId>

        </dependency>

        <dependency>

            <groupId>org.springframework.boot</groupId>

            <artifactId>spring-boot-devtools</artifactId>

            <optional>true</optional>

              <scope>true</scope>

        </dependency>

    </dependencies>

    <build>

        <plugins>

            <plugin>

                <groupId>org.springframework.boot</groupId>

                <artifactId>spring-boot-maven-plugin</artifactId>

            </plugin>

        </plugins>

    </build>

</project>
2.添加文件控制器FileController
package top.ytheng.demo.controller;

import java.io.File;

import java.io.IOException;

import java.util.UUID;

import javax.servlet.http.HttpServletRequest;

import org.springframework.beans.factory.annotation.Value;

import org.springframework.context.annotation.PropertySource;

import org.springframework.stereotype.Controller;

import org.springframework.web.bind.annotation.RequestMapping;

import org.springframework.web.bind.annotation.RequestParam;

import org.springframework.web.bind.annotation.ResponseBody;

import org.springframework.web.multipart.MultipartFile;

import top.ytheng.demo.entity.JsonData;

@Controller

@PropertySource({"classpath:application.properties"})

public class FileController {

    @Value("${web.file.path}")

    private String filePath;

    @RequestMapping(value="/api/v1/file")

    public Object index() {

        return "index";

    }

    @RequestMapping("/upload")

    @ResponseBody

    public Object upload(@RequestParam("head_img") MultipartFile file, HttpServletRequest request) {

        //判断文件为空

        //file.isEmpty();

        //判断文件大小

        //file.getSize();

        String name = request.getParameter("name");

        System.out.println("用户名:" + name);

        //获取文件名称

        String fileName = file.getOriginalFilename();

        System.out.println("上传的文件名称:" + fileName);

        //获取文件的后缀名

        String suffixName = fileName.substring(fileName.lastIndexOf("."));

        System.out.println("上传文件后缀名:" + suffixName);

        //文件上传后的路径

        fileName = UUID.randomUUID() + suffixName;

        System.out.println("新的文件名称:" + fileName);

        File dest = new File(filePath + fileName);

        try {

            file.transferTo(dest);

            return new JsonData(0, null, fileName);

        } catch(IllegalStateException e) {

            e.printStackTrace();

        } catch(IOException e) {

            e.printStackTrace();

        }

        return new JsonData(-1, "上传失败");

    }

}
3.添加application.properties配置文件
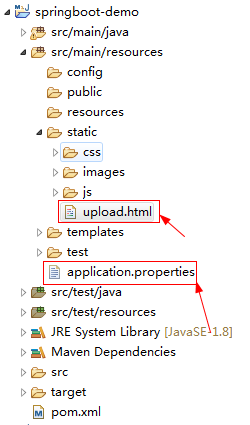
#自定义文件上传路径

web.file.path=C:\\Users\\tianheng\\eclipse-workspace\\springboot-demo\\src\\main\\resources\\static\\images\\

#端口号

server.port=8090
4.添加upload.html界面
<!DOCTYPE html>

<html>

<head>

<meta name="keywords" content="keyword1,keyword2,keyword3">

<meta http-equiv="Content-Type" content="text/html;charset=utf-8"/>

<script type="text/javascript" src="/js/test.js" ></script>

<title>Insert title here</title>

</head>

<body>

    <form enctype="multipart/form-data" method="post" action="/upload">

        文件:<input type="file" name="head_img"/>

        姓名:<input type="text" name="name"/>

        <input type="submit" value="上传"/>

    </form>

</body>

</html>
5.添加启动类
package top.ytheng.demo;

import javax.servlet.MultipartConfigElement;

import org.springframework.boot.SpringApplication;

import org.springframework.boot.autoconfigure.SpringBootApplication;

import org.springframework.boot.web.servlet.MultipartConfigFactory;

@SpringBootApplication //等于下面3个

//@SpringBootConfiguration

//@EnableAutoConfiguration

//@ComponentScan

public class DemoApplication {

    public static void main(String[] args) {

        SpringApplication.run(DemoApplication.class, args);

    }

    //文件大小配置

    public MultipartConfigElement multipartConfigElement() {

        MultipartConfigFactory factory = new MultipartConfigFactory();

        //单个文件最大

        factory.setMaxFileSize("10240KB");

        //设置总上传数据总大小

        factory.setMaxRequestSize("102400KB");

        return factory.createMultipartConfig();

    }

}
6.测试地址
http://localhost:8090/upload.html
SpringBoot------文件上传的更多相关文章
- 补习系列(11)-springboot 文件上传原理
目录 一.文件上传原理 二.springboot 文件机制 临时文件 定制配置 三.示例代码 A. 单文件上传 B. 多文件上传 C. 文件上传异常 D. Bean 配置 四.文件下载 小结 一.文件 ...
- 【SpringBoot】07.SpringBoot文件上传
SpringBoot文件上传 1.编写html文件在classpath下的static中 <!DOCTYPE html> <html> <head> <met ...
- SpringBoot 文件上传临时文件路径问题
年后放假回来,一向运行OK的项目突然图片上传不了了,后台报错日志如下: java.io.IOException: The temporary upload location [/tmp/tomcat. ...
- springboot文件上传下载简单使用
springboot的文件上传比较简单 一.使用默认的Resolver:StandardServletMultipartResolver controller package com.mydemo.w ...
- springboot 文件上传大小配置
转自:https://blog.csdn.net/shi0299/article/details/69525848 springboot上传文件大小的配置有两种,一种是设置在配置文件里只有两行代码,一 ...
- SpringBoot文件上传下载
项目中经常会有上传和下载的需求,这篇文章简述一下springboot项目中实现简单的上传和下载. 新建springboot项目,前台页面使用的thymeleaf模板,其余的没有特别的配置,pom代码如 ...
- Springboot 文件上传(带进度条)
1. 相关依赖 pom.xml <project xmlns="http://maven.apache.org/POM/4.0.0" xmlns:xsi="http ...
- SpringBoot 文件上传、下载、设置大小
本文使用SpringBoot的版本为2.0.3.RELEASE 1.上传单个文件 ①html对应的提交表单 <form action="uploadFile" method= ...
- SpringBoot文件上传异常之提示The temporary upload location xxx is not valid
原文: 一灰灰Blog之Spring系列教程文件上传异常原理分析 SpringBoot搭建的应用,一直工作得好好的,突然发现上传文件失败,提示org.springframework.web.multi ...
- SpringBoot学习6:springboot文件上传
1.编写页面uploadFile.html <!DOCTYPE html> <html lang="en"> <head> <meta c ...
随机推荐
- 接口与virtual,override,new关键字
一,类继承接口 1,首先我们定义一个简单的ITeacher接口,并定义一个Professor类继承它. public interface ITeacher { void Print(); } publ ...
- linux服务器的性能分析与优化(十三)
[教程主题]:1.linux服务器的性能分析与优化 [主要内容] [1]影响Linux服务器性能的因素 操作系统级 Ø CPU 目前大部分CPU在同一时间只能运行一个线程,超线程的处理器可以在同一时间 ...
- Android Studio安装Kotlin插件
1 Kotlin语言介绍 Kotlin 是 JetBrains 在 2010 年推出的基于 JVM 的新编程语言,是一种新的静态类型编程语言.开发者称,设计它的目的是避免 Java 语言编程中的一些难 ...
- ggplot ggplot2 画图
折线图-ggplot2 http://blog.163.com/yugao1986@126/blog/static/6922850820131161531421/http://blog.sina.c ...
- What Great .NET Developers Ought To Know (More .NET Interview Questions)
A while back, I posted a list of ASP.NET Interview Questions. Conventional wisdom was split, with ab ...
- linux中怎么查看ip地址
命令 ifconfig 可以查看当前主机的ip地址: 如果要手动更改ip地址. 可以输入命令cd /etc/sysconfig/network 在这个目录下会有 类似于ifcfg-@@的文件. 可以用 ...
- oauth2.0服务端与客户端搭建
oauth2.0服务端与客户端搭建 - 推酷 今天搭建了oauth2.0服务端与客户端.把搭建的过程记录一下.具体实现的功能是:client.ruanwenwu.cn的用户能够通过 server.ru ...
- 前段时间,接手一个项目使用的是原始的jdbc作为数据库的访问,发布到服务器上在运行了一段时间之后总是会出现无法访问的情况,登录到服务器,查看tomcat日志发现总是报如下的错误。 Caused by: com.mysql.jdbc.exceptions.jdbc4.MySQLNonTransientConnectionException: Data source rejected est
前段时间,接手一个项目使用的是原始的jdbc作为数据库的访问,发布到服务器上在运行了一段时间之后总是会出现无法访问的情况,登录到服务器,查看tomcat日志发现总是报如下的错误. Caused by: ...
- qualcomm permission denied for tty device
在app中访问串口,提示没有读写权限.本文记录解决方法. 调试 查看设备节点权限 shell@msm8909:/ # ll /dev/ttyHSL* crw------- root root 246, ...
- MultipleActiveResultSets=true 数据库连接复用
注:EF连接Mysql时,连接字符串是不能包含MARS的,Mysql不支持这个特性. ADO.NET 1.n 利用SqlDataReader读取数据,针对每个结果集需要一个独立的连接. 这些独立的链接 ...