Installing TensorFlow on Ubuntu
1、安装方法有4种,官方推荐是第一种.
virtualenv(官方推荐)
"native" pip
Docker
Anaconda
2、基于virtualenv的安装方法:
1)、Install pip and virtualenv by issuing one of the following commands:
$ sudo apt-get install python-pip python-dev python-virtualenv # for Python 2.7

$ sudo apt-get install python3-pip python3-dev python-virtualenv # for Python 3.n
2)、把virtualenv安装到目录下: 其中targetDirectory 是你要安装的目录名称,假设我们使用目录名称为tensorfolw
$ virtualenv --system-site-packages targetDirectory # for Python 2.7

$ virtualenv --system-site-packages -p python3 targetDirectory # for Python 3.n
3)、进入virtualenv环境下(假设上一步建立的目录名称为tensorfolw)
$ source ~/tensorflow/bin/activate # bash, sh, ksh, or zsh

 $ source ~/tensorflow/bin/activate.csh  # csh or tcsh
执行命令后,出现这个画面:
(tensorflow)$
4)、安装tensorflow:建议先安装只CPU的版本
 (tensorflow)$ pip install --upgrade tensorflow      # for Python 2.7

 (tensorflow)$ pip3 install --upgrade tensorflow     # for Python 3.n

 (tensorflow)$ pip install --upgrade tensorflow-gpu  # for Python 2.7 and GPU

 (tensorflow)$ pip3 install --upgrade tensorflow-gpu # for Python 3.n and GPU
如果这一步命令出现错误,说明pip version lower than 8.1
则执行下面的命令:
(tensorflow)$ pip install --upgrade https://storage.googleapis.com/tensorflow/linux/cpu/tensorflow-1.2.1-cp27-none-linux_x86_64.whl #python2.7 cpu only
5)、安装完成后,执行以下命令退出
(tensorflow)$ deactivate
6)、测试tensorflow是否安装成功
# Python

import tensorflow as tf

hello = tf.constant('Hello, TensorFlow!')

sess = tf.Session()

print(sess.run(hello))
实际操作环境截图:
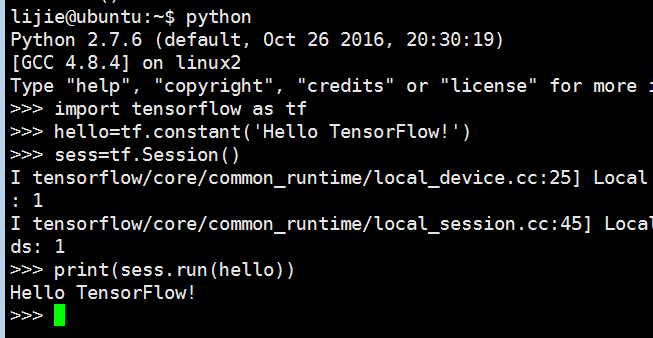
如果成功print了Hello TensorFlow的字符,说明安装成功
Installing TensorFlow on Ubuntu的更多相关文章
- Installing TensorFlow on Ubuntu or Windows
Installing TensorFlow on Ubuntu 显卡驱动:http://developer2.download.nvidia.com/compute/cuda/8.0/secure/P ...
- Installing Moses on Ubuntu 16.04
Installing Moses on Ubuntu 16.04 The process of installation To install requirements sudo apt-get in ...
- TensorFlow安装-ubuntu
windows下某些tensorflow例子跑不成功,比如https://www.tensorflow.org/tutorials/wide 中的例子报下面的错误:' 'NoneType' objec ...
- Installing python-ldap in Ubuntu
These are the steps to be followed to install python-ldap in Ubuntu. At first, sudo apt-get install ...
- 【Tensorflow】Ubuntu 安装 Tensorflow gpu
安装环境:Ubuntu 16.04lts 64位,gcc5.4 1.安装Cuda 1. 下载cuda toolkit. 下载cuda8.0 地址:https://developer.nvidia.co ...
- Compiling Xen-4.4 From Source And Installing It On Ubuntu Server (Amd-64)
First of all, you should install a clean Ubuntu Server (Amd-64) on your server. (Version 14.04 is st ...
- Installing PHP5 on Ubuntu Server
When installing PHP 5 from source I ran into the following problems and solutions: Problem:configure ...
- How to install tensorflow on ubuntu 18.04 64bit
Ans:pip install tensorflow (note: version number of pip and python must be consistent)
- Installing Redis on Ubuntu
wget http://download.redis.io/redis-stable.tar.gz tar xvzf redis-stable.tar.gz cd redis-stable sudo ...
随机推荐
- CDH集群安装配置(七)--CDH组件的安装和配置
1. Clouder Manger页面的配置 访问主节点IP:(cdh1)192.168.80.81:7180 默认用户名和密码:admin,admin 选择一个版本 选择集群的服务器(agent), ...
- Rancher 1.6 版本 只能在 linux 下用
实际操作 启动 , 访问方式 : 在启动过程中会发现没有 image , 然后自动下载 ( 执行 docker pull 命令 ) docker run --rm --privileged -v /v ...
- 使用java配置来构建spring项目
java配置是Spring4.x推荐的配置方式,可以完全代替xml配置,java配置是通过@Configuration和@Bean来实现的.@Configuration声明当前类是一个配置类,相当于S ...
- TortoiseGit学习系列之Git和TortoiseGit的区别
不多说,直接上干货! Git和TortoiseGit的区别: TortoiseGit的安装和使用依赖Git.
- 【ExtJS】 布局Layout
布局用于定义容器如何组织内部子元素和控制子元素的大小. ExtJS中有两种类型的布局:Container容器类布局与Component组件类布局. Containter容器类布局:负责容器内容Extj ...
- AngularJS添加样式
AngularJS添加样式 通过controller.js中的某个$scope变量的值来决定div标签(或者其他html标签)的样式表. 示例 使用ng-style指令在div标签上 <body ...
- Java EE环境
Java EE环境,包括EJB容器和Web容器. (1)Web容器:只运行Web应用的容器,例如Tomcat就是开源的Web容器,它可以运行JSP.Servlet等. (2)EJB容器:运行在EJB组 ...
- 九度oj 1437 To Fill or Not to Fill 2012年浙江大学计算机及软件工程研究生机试真题
题目1437:To Fill or Not to Fill 时间限制:1 秒 内存限制:128 兆 特殊判题:否 提交:1488 解决:345 题目描述: With highways availabl ...
- Codeforces 550C —— Divisibility by Eight——————【枚举 || dp】
Divisibility by Eight time limit per test 2 seconds memory limit per test 256 megabytes input stand ...
- String.Compare 方法 (String, Int32, String, Int32, Int32)
String.Compare 方法 (String, Int32, String, Int32, Int32) 对两个指定的 String 对象的子字符串进行比较,并返回一个指示二者在排序顺序中的相对 ...