Intellij创建简单Springboot项目
Intellij创建简单Springboot项目
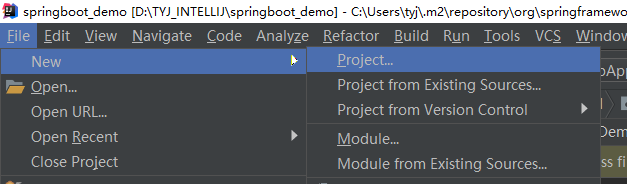
第一步:选择创建新项目——file-new-project
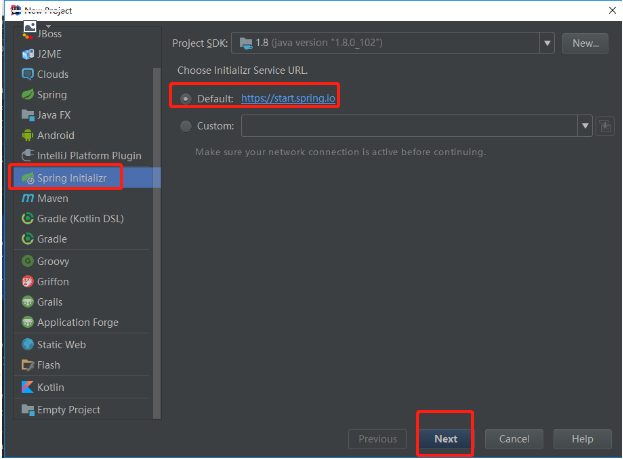
第二步:选择项目类型——Spring Initializr-next
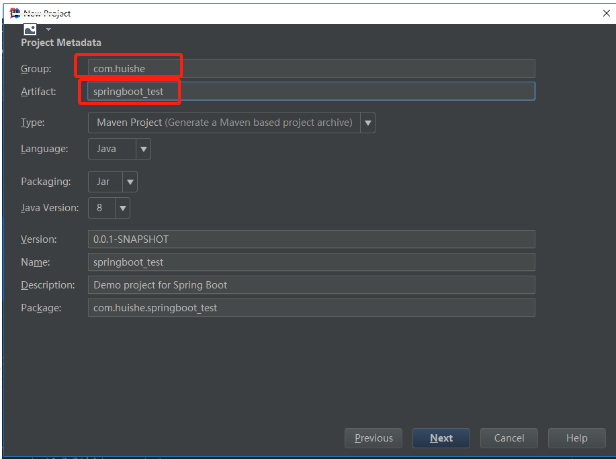
第三步:输入项目信息——Spring Initializr-next
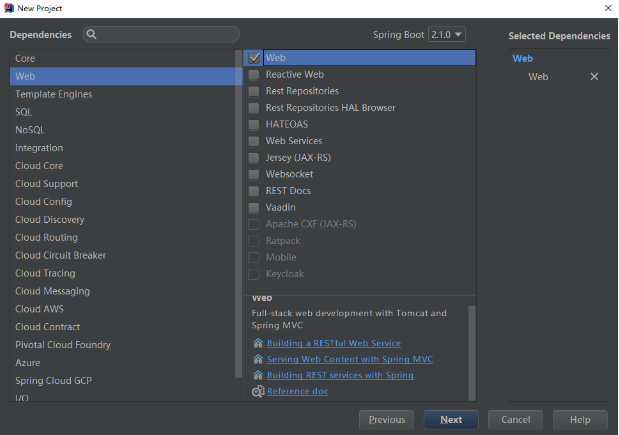
第四步:选择Spring组建——web-web(勾选)
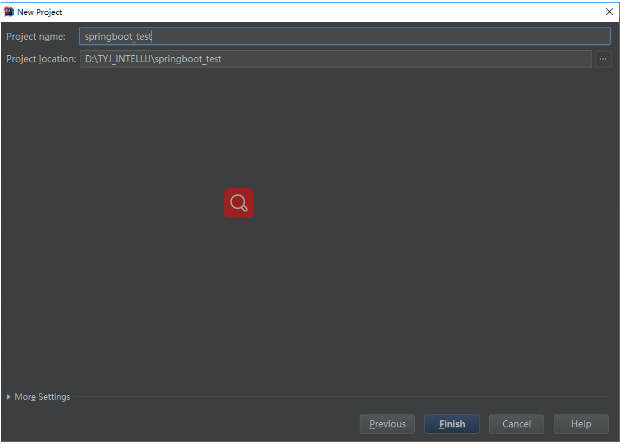
第五步:修改项目名称和项目路径(默认即可)——Finish
第六步:写一个Demo Controller层(controller的代码必须和SpringbootDemoApplication.java位于同级目录或之下)

//Main方法,项目从这里iahsi启动,是项目创建时自动生成的;

package com.example.springboot_demo;

import org.springframework.boot.SpringApplication;

import org.springframework.boot.autoconfigure.SpringBootApplication;

@SpringBootApplication

public class SpringbootDemoApplication {

    public static void main(String[] args) {

        SpringApplication.run(SpringbootDemoApplication.class, args);

    }

}
//自定义Controller方法(注意@RestController的使用)

package com.example.springboot_demo.controller;

import org.springframework.web.bind.annotation.RequestMapping;

import org.springframework.web.bind.annotation.RestController;

@RestController

public class DemoController {

    @RequestMapping("/login")

    public String login(){

        return "login success!";

    }

}
第七步:启动项目,并用浏览器访问项目
//启动日志输出

  .   ____          _            __ _ _

 /\\ / ___'_ __ _ _(_)_ __  __ _ \ \ \ \

( ( )\___ | '_ | '_| | '_ \/ _` | \ \ \ \

 \\/  ___)| |_)| | | | | || (_| |  ) ) ) )

  '  |____| .__|_| |_|_| |_\__, | / / / /

 =========|_|==============|___/=/_/_/_/

 :: Spring Boot ::        (v2.1.0.RELEASE)

2018-11-29 09:47:16.011  INFO 14668 --- [           main] c.e.s.SpringbootDemoApplication          : No active profile set, falling back to default profiles: default

2018-11-29 09:47:17.710  INFO 14668 --- [           main] o.s.b.w.embedded.tomcat.TomcatWebServer  : Tomcat initialized with port(s): 8080 (http)

2018-11-29 09:47:17.734  INFO 14668 --- [           main] o.apache.catalina.core.StandardService   : Starting service [Tomcat]

2018-11-29 09:47:17.735  INFO 14668 --- [           main] org.apache.catalina.core.StandardEngine  : Starting Servlet Engine: Apache Tomcat/9.0.12

2018-11-29 09:47:17.899  INFO 14668 --- [           main] o.a.c.c.C.[Tomcat].[localhost].[/]       : Initializing Spring embedded WebApplicationContext

2018-11-29 09:47:17.899  INFO 14668 --- [           main] o.s.web.context.ContextLoader            : Root WebApplicationContext: initialization completed in 1802 ms

2018-11-29 09:47:17.933  INFO 14668 --- [           main] o.s.b.w.servlet.ServletRegistrationBean  : Servlet dispatcherServlet mapped to [/]

2018-11-29 09:47:17.939  INFO 14668 --- [           main] o.s.b.w.servlet.FilterRegistrationBean   : Mapping filter: 'characterEncodingFilter' to: [/*]

2018-11-29 09:47:17.940  INFO 14668 --- [           main] o.s.b.w.servlet.FilterRegistrationBean   : Mapping filter: 'hiddenHttpMethodFilter' to: [/*]

2018-11-29 09:47:17.940  INFO 14668 --- [           main] o.s.b.w.servlet.FilterRegistrationBean   : Mapping filter: 'formContentFilter' to: [/*]

2018-11-29 09:47:17.940  INFO 14668 --- [           main] o.s.b.w.servlet.FilterRegistrationBean   : Mapping filter: 'requestContextFilter' to: [/*]

2018-11-29 09:47:18.203  INFO 14668 --- [           main] o.s.s.concurrent.ThreadPoolTaskExecutor  : Initializing ExecutorService 'applicationTaskExecutor'

2018-11-29 09:47:18.482  INFO 14668 --- [           main] o.s.b.w.embedded.tomcat.TomcatWebServer  : Tomcat started on port(s): 8080 (http) with context path ''

2018-11-29 09:47:18.487  INFO 14668 --- [           main] c.e.s.SpringbootDemoApplication          : Started SpringbootDemoApplication in 3.183 seconds (JVM running for 4.749)

备注:一开始在DemoController上用@Controller注解,发现不起效果;原来@RestController和@Controller是有区别的。
通过查看@RestController的源码发现:@RestController注解 = @ResponseBody + @Controller
package org.springframework.web.bind.annotation;

import java.lang.annotation.Documented;

import java.lang.annotation.ElementType;

import java.lang.annotation.Retention;

import java.lang.annotation.RetentionPolicy;

import java.lang.annotation.Target;

import org.springframework.core.annotation.AliasFor;

import org.springframework.stereotype.Controller;

@Target({ElementType.TYPE})

@Retention(RetentionPolicy.RUNTIME)

@Documented

@Controller

@ResponseBody

public @interface RestController {

    @AliasFor(

        annotation = Controller.class

    )

    String value() default "";

}
参考资料:
1- https://blog.csdn.net/xyc_csdn/article/details/67672198
2- https://www.cnblogs.com/shuaifing/p/8119664.html
Intellij创建简单Springboot项目的更多相关文章
- IDEA创建简单SpringBoot项目
环境:jdk 1.打开IDEA -->New --> Project -->Spring Initalizer-->next 2.此处,只做创建示例,所以next后Group等 ...
- 使用IDEA创建一个springboot项目
工欲善其事,必先利其器. 不难发现,还是有很多小朋友在使用eclipse开发java项目.当你接触IDEA后,一切都变得美好了. 使用IDEA创建一个springboot项目是一件极其简单的事情.界面 ...
- 创建简单web项目
Intellij Idea直接安装(可根据需要选择自己设置的安装目录),jdk使用1.6/1.7/1.8都可以,主要是配置好系统环境变量,tomcat7上tomcat的官网下载压缩包解压即可. 一.创 ...
- Intellij IDEA实现SpringBoot项目多端口启动的两种方法
有时候使用springboot项目时遇到这样一种情况,用一个项目需要复制很多遍进行测试,除了端口号不同以外,没有任何不同.遇到这种情况怎么办呢?这时候可以使用Intellij IDEA解决 前言 有时 ...
- spting Boot 创建一个springBoot项目
spting Boot 创建一个springBoot项目 1)学习springBoot使用软件:IDEA软件(前面的文章有安装idea的过程). 也可以使用另一种方法在https://start.sp ...
- intellij 创建java web项目(maven管理的SSH)
intellij 创建java web项目(maven管理的SSH) 环境intellij IDEA14.MAVEN.Spring.Struts2.Hibernate.Java Web.工程搭建. 1 ...
- 如何使用IDEA快速创建一个springboot项目
如何使用IDEA快速创建一个springboot项目 https://jingyan.baidu.com/article/0964eca24fdd938284f53640.html
- 使用Intellij Idea创建简单Maven项目(转)
我是学Java Web的,基本靠自学,在网上收集了各种视频资料,逐一的看,代码逐一的敲.学习了这么久之前一直未成想过要把自己的学习路程记录下来,在网上也看到过很多人把自己的学习历程以及遇到的问题写在了 ...
- 使用IntelliJ Idea新建SpringBoot项目
简单给大家介绍一下我来创建SpringBoot项目使用的工具,本人使用IntelliJ Idea来创建项目,利用其中的Spring Initializr工具来快速创建项目. 步骤如下: 菜单栏中选择F ...
随机推荐
- Java工具类DateFormatUtils详解
日期和时间格式化实用程序和常量public static String format(Calendar calendar, String pattern) 说明:将日历格式化为特定的模式:参数:cal ...
- struts2中的constant介绍之struts.objectFactory与spring的整合
struts2提供给我们更为灵活的设计,他的很多东西都是可以手动配置的,下面介绍下他的一些 常用的constant作用和配置 struts.objectFactory这个属性用于说明Struts2的 ...
- 爬虫--Scrapy-参数等级和请求传参
日志等级 日志等级(种类): ERROR:错误 WARNING:警告 INFO:一般信息 DEBUG:调试信息(默认) 指定输入某一中日志信息: settings:LOG_LEVEL = ‘ERROR ...
- javascript:控制一个元素高度始终等于浏览器高度
window.onresize = function(){ this.opHtight()} //给浏览器添加窗口大小改变事件window.onresize = function(){ this.op ...
- Linux命令:sshpass
sshpass介绍 sshpass是一款凡是为凡是使用ssl方式访问的操作提供一个免输入密码的非交互式操作,以便于在脚本中执行ssl操作,如ssh,scp等.sshpass是一家以色列公司Lingnu ...
- Linux后门入侵检测工具
一.rootkit简介 rootkit是Linux平台下最常见的一种木马后门工具,它主要通过替换系统文件来达到入侵和和隐蔽的目的,这种木马比普通木马后门更加危险和隐蔽,普通的检测工具和检查手段很难发现 ...
- Oracle重建表空间操作实例
由于环境维护或者性能测试需要,经常需要对表空间进行重建操作.重建表空间操作主要分3中情况介绍,分别是业务表空间.临时表空间和回滚段表空间的重建. 重建业务表空间 由于业务规划要求,重建后的业务表空间名 ...
- 设置DNS 代理
最近烦心事好多啊,坑爹的中介... 公司之前因为断电,导致DNS基础服务故障,很多系统好半天在能使用,所以这次吸取教训,设置备份的DNS server以及使得DNS能够动态迁移,在这种时候就显得格外的 ...
- swift视图的添加及层次变动和基本动画
// 一般的我们添加一个视图到父视图都是通过 /* let v1 = UIView(frame:CGRectMake(100,200,30,50)) self.view.addSubview(v1) ...
- C# 计算接口调用时长
//获取 接口的数据 Stopwatch sw = new Stopwatch();//计算耗时 sw.Start();fn1();//接口调用方法 sw.Stop();return JsonMsg. ...