jenkins + supervisor + ansible 实现netcore程序的多机一键部署
上一篇我们简单的说到了使用jenkins+supervisor实现了一个单机版的多副本部署,但是在更多的场景下还是需要netcore程序的多机一键部署,那么多
机器间如何分发呢? 肯定不能使用scp这么低级别的命令,所以你的技术栈中要引进ansible,用它来实现这个功能不要太爽。
一:ansible部署
ansible是一个自动化运维工具,实现方法就是在主控机上通过ssh免秘钥的方式自动分发你的程序到多台机器上,所以第一步你要配置主控机到远程机
的ssh免秘钥登陆。我这里有两台机器:
10.25.198.96 【主控机】
10.25.59.59 【远程机】
大概的一个简图就是这样。

1. 免密登陆
[root@localhost ~]# ssh-keygen -t rsa -P ''

Generating public/private rsa key pair.

Enter file in which to save the key (/root/.ssh/id_rsa):

Created directory '/root/.ssh'.

Your identification has been saved in /root/.ssh/id_rsa.

Your public key has been saved in /root/.ssh/id_rsa.pub.

The key fingerprint is:

::cc:f4:c3:e7::c9:9f:ee:f8::ec::be:a1 root@localhost.localdomain

The key's randomart image is:

+--[ RSA ]----+

|    .++    ...   |

|     +oo    o.   |

|      . + . .. . |

|       . + .  o  |

|        S .  .   |

|           .  .  |

|        .   oo   |

|       ....o...  |

|      E.oo .o..  |

+-----------------+

[root@localhost ~]# ls /root/.ssh/id_rsa

/root/.ssh/id_rsa

[root@localhost ~]# ls /root/.ssh

id_rsa  id_rsa.pub

[root@localhost ~]# scp /root/.ssh/id_rsa.pub root@10.25.59.59:/root/.ssh/authorized_keys

root@10.25.59.59's password:

id_rsa.pub                                                                %       .4KB/s   :

[root@localhost ~]# cat /root/.ssh/id_rsa.pub >> /root/.ssh/authorized_keys
2. 安装ansible
因为ansible是python写的,通常有两种安装方式:yum 和 pip install 。 我这里就采用yum安装,安装完成之后,直接键入ansible命令如下:
[root@localhost ~]# ansible

ERROR! Unexpected Exception, this is probably a bug: (cryptography 0.8. (/usr/lib64/python2./site-packages), Requirement.parse('cryptography>=1.1'))

the full traceback was:
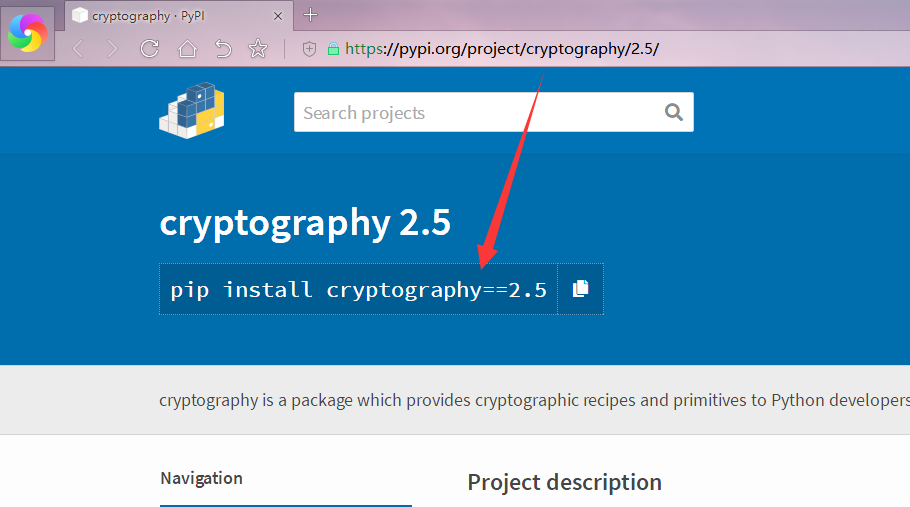
可以看到上面报错了,如果你不了解python,还是有点头疼的,上面说的是你的cryptography包版本太低,需要安装>=1.1的,你可以到pipy上down一个
新包下来。 https://pypi.org/project/cryptography/2.5/
对了,如果你的pip也没装的话,那你还是先通过yum install pip吧。
[root@localhost ~]# pip install cryptography==2.5

DEPRECATION: Python 2.7 will reach the end of its life on January 1st, . Please upgrade your Python as Python 2.7 won't be maintained after that date. A future version of pip will drop support for Python 2.7.

Collecting cryptography==2.5

  Downloading https://files.pythonhosted.org/packages/17/fd/4c2c8953a9dfe38fbe0c3adafb6355540bd98cef70cc82734acb0a4c0e2f/cryptography-2.5-cp27-cp27mu-manylinux1_x86_64.whl (2.4MB)

    % |████████████████████████████████| .4MB 14kB/s

Collecting cffi!=1.11.,>=1.8 (from cryptography==2.5)

  Downloading https://files.pythonhosted.org/packages/14/dd/3e7a1e1280e7d767bd3fa15791759c91ec19058ebe31217fe66f3e9a8c49/cffi-1.11.5-cp27-cp27mu-manylinux1_x86_64.whl (407kB)

    % |████████████████████████████████| 409kB 15kB/s

Requirement already satisfied: six>=1.4. in /usr/lib/python2./site-packages (from cryptography==2.5) (1.9.)

Collecting ipaddress; python_version < "" (from cryptography==2.5)

  Downloading https://files.pythonhosted.org/packages/fc/d0/7fc3a811e011d4b388be48a0e381db8d990042df54aa4ef4599a31d39853/ipaddress-1.0.22-py2.py3-none-any.whl

Collecting asn1crypto>=0.21. (from cryptography==2.5)

  Downloading https://files.pythonhosted.org/packages/ea/cd/35485615f45f30a510576f1a56d1e0a7ad7bd8ab5ed7cdc600ef7cd06222/asn1crypto-0.24.0-py2.py3-none-any.whl (101kB)

    % |████████████████████████████████| 102kB 34kB/s

Requirement already satisfied: enum34; python_version < "" in /usr/lib/python2./site-packages (from cryptography==2.5) (1.0.)

Requirement already satisfied: pycparser in /usr/lib/python2./site-packages (from cffi!=1.11.,>=1.8->cryptography==2.5) (2.14)

Installing collected packages: cffi, ipaddress, asn1crypto, cryptography

  Found existing installation: cffi 0.8.

    Uninstalling cffi-0.8.:

      Successfully uninstalled cffi-0.8.

  Found existing installation: cryptography 0.8.

    Uninstalling cryptography-0.8.:

      Successfully uninstalled cryptography-0.8.

Successfully installed asn1crypto-0.24. cffi-1.11. cryptography-2.5 ipaddress-1.0.
再输入ansbile如果没有报错那就恭喜你搞定了,否则的话还是迭代循环吧。
[root@localhost ~]# ansible

Usage: ansible <host-pattern> [options]

Define and run a single task 'playbook' against a set of hosts
3. ansible简单介绍
安装好了ansible之后,在/etc/ansible目录下会有三个文件,如下:
[root@localhost ~]# cd /etc/ansible

[root@localhost ansible]# ls

ansible.cfg  hosts  roles
《1》 ansible.cfg
这个是ansible自身的config文件,默认就这样,我们暂不管。
《2》 hosts
这里面配置的就是ansible要操控的远程机器,比如我在末尾加上的10.25.59.59 和 10.25.198.96 两台我要分发的机器。
# This is the default ansible 'hosts' file.

#

# It should live in /etc/ansible/hosts

#

#   - Comments begin with the '#' character

#   - Blank lines are ignored

#   - Groups of hosts are delimited by [header] elements

#   - You can enter hostnames or ip addresses

#   - A hostname/ip can be a member of multiple groups

# Ex : Ungrouped hosts, specify before any group headers.

## green.example.com

## blue.example.com

## 192.168.100.1

## 192.168.100.10

# Ex : A collection of hosts belonging to the 'webservers' group

## [webservers]

## alpha.example.org

## beta.example.org

## 192.168.1.100

## 192.168.1.110

# If you have multiple hosts following a pattern you can specify

# them like this:

## www[:].example.com

# Ex : A collection of database servers in the 'dbservers' group

## [dbservers]

##

## db01.intranet.mydomain.net

## db02.intranet.mydomain.net

## 10.25.1.56

## 10.25.1.57

# Here's another example of host ranges, this time there are no

# leading 0s:

## db-[:]-node.example.com

[memsql-test]

10.25.59.59

10.25.198.96
《3》 roles
一般来说ansible推荐都是以role模板格式作为playbook来实现非常强大的功能,比如这个地方:https://galaxy.ansible.com/ 都是一些供你学习的role模板。
4. 编写playbook
《1》 deploy.yaml
---

- hosts: all

  remote_user: root

  vars:

    inifile: "memsql-test"

    program: "MemSql.Test"

    workspace: "/var/lib/jenkins/workspace/{{ program }}/MemSql.NetCore/{{ program }}/bin/Release/netcoreapp2.1/publish/"

  tasks:

    - name: . directory publish files

      copy:

        src: "{{ workspace }}"

        dest: "/data/output/{{ program }}"

    - name: . copy *.ini file for supervisor

      copy:

        src: "{{ workspace }}/doc/{{ inifile }}.ini"

        dest: /data/supervisor/conf/

    - name: . supervisord file

      supervisorctl:

        name: memsql-test

        state: restarted

        supervisorctl_path: /usr/bin/supervisorctl

        config: /data/supervisor/supervisord.conf
这个配置文件大概是什么意思呢?
《1》 hosts: memsql-test 表示要操作memsql-test组下的所有主机,还记得你在hosts中配置的ip地址吗?
《2》 remote_user: root 告诉你远程操控的角色是什么。
《3》 vars 定义一些变量,方便后面少些一些重复的代码。
《4》 tasks: 定义一些按顺序执行的Action
《5》 name: 某一个action动作的描述
copy: copy命令,这个算是ansible的模块了,具体参见:https://docs.ansible.com/ansible/latest/modules/copy_module.html
supervisorctl: 这个ansible集成了supervisor,挺好的,具体参见:https://docs.ansible.com/ansible/latest/modules/supervisorctl_module.html
三:ansible 和 jenkins 集成
在我的doc文件夹下有三个文件,方便jenkins在脚本执行的时候获取相关文件。

《1》 deploy.yaml 这个就是上面介绍的
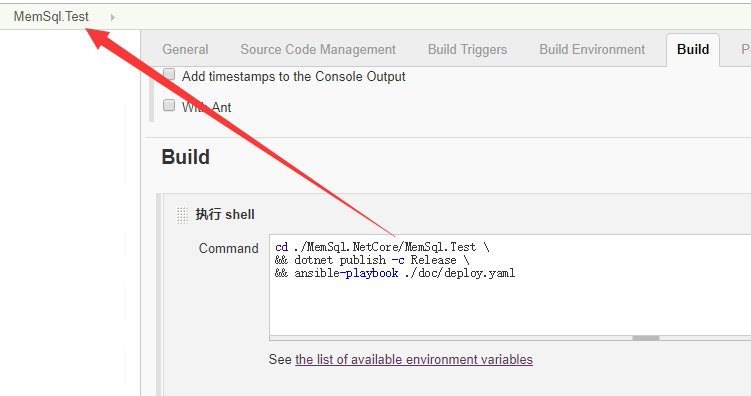
《2》 entrypoint.sh 这个脚本是准备copy到jenkins的command命令框中
cd ./MemSql.NetCore/MemSql.Test \

&& dotnet publish -c Release \

&& ansible-playbook ./doc/deploy.yaml
《3》 memsql-test.ini 如果看过上一篇,那这个就不介绍了
[program:memsql-test]

command=/usr/bin/dotnet /data/output/MemSql.Test/MemSql.Test.dll

autostart=false

autorestart=true

stdout_logfile=/data/output/MemSql.Test/.log
《4》 最后就是一个简单的program.cs
 class Program

    {

        static void Main(string[] args)

        {

            var cts = new CancellationTokenSource();

            var bgtask = Task.Run(() =>

            {

                for (int i = ; i < int.MaxValue; i++)

                {

                    Log.Info($"当前index={i}, 时间为:{DateTime.Now}");

                    Thread.Sleep(new Random().Next(, ));

                }

            });

            Log.Info($"{DateTime.Now} Test 后端服务程序正常启动!");

            Console.WriteLine($"{DateTime.Now} Test 后端服务程序正常启动!");

            bgtask.Wait();

        }

    }
《5》 在jenkins中执行一下, 当然你也可以使用jenkins的ansible插件,简单的话用脚本也可以。
点击jenkins构建之后,就可以看到console界面中 playbook的脚本在跑了。
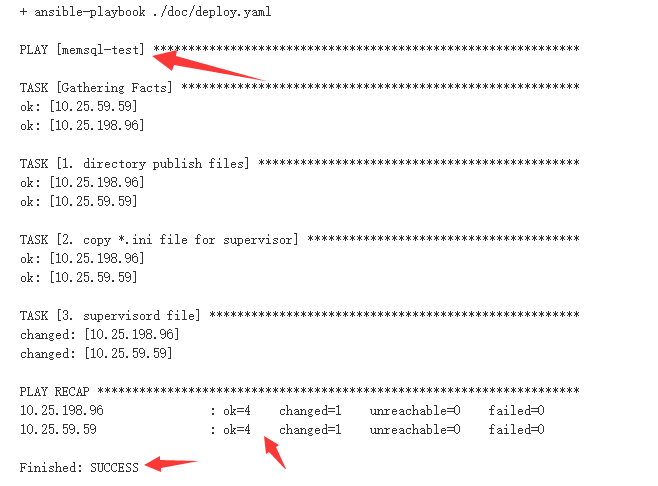
然后你到两台机器都验证一起,process可是起来了。
[root@--- ~]# ps -ef | grep dotnet

root          : ?        :: /usr/bin/dotnet /data/output/MemSql.Test/MemSql.Test.dll

root         : pts/    :: grep --color=auto dotnet

[root@--- ~]# ps -ef | grep dotnet

root          : ?        :: /usr/bin/dotnet /data/output/MemSql.Test/MemSql.Test.dll
好了,本篇就说到这里,希望对你有帮助。
jenkins + supervisor + ansible 实现netcore程序的多机一键部署的更多相关文章
- Jenkins+Gitlab+Ansible自动化部署(五)
Freestyle Job实现静态网站部署交付(接Jenkins+Gitlab+Ansible自动化部署(四)https://www.cnblogs.com/zd520pyx1314/p/102445 ...
- [ jenkins ] git+jenkins+maven + ansible 部署java程序
1. 工具介绍 git:版本控制,一般都是托管到代码仓库的.如 github.coding.gitlab (本文以 coding 为例) jenkins:持续集成工具之一,也是最常用的工具,主要工作就 ...
- jenkins结合ansible用shell实现自动化部署和回滚
最近用jenkins+gitlab+ansible做持续化集成,自动化部署和版本回滚.然而deploy plugin没能做到增量升级和回滚操作,折腾了很久决定自己写个脚本来简单实现. 环境: cent ...
- Jenkins + Maven + Ansible + Tomcat 实现JAVA代码自动部署
自动部署过程: jenkins从svn拉取代码,调用maven去打war包,用ansible去解压war包,最后重启tomcat. 前情回顾:在前面的文章我的环境已经有Jenkins+ansible ...
- Gitlab_ansible_jenkins三剑客⑥Jenkins和ansible集成
ip 角色 备注 10.11.0.215 jenkins服务器 通过deploy运行jenkins服务,deploy用户做了免秘钥登录ansible服务器 10.11.0.210 ansible服务器 ...
- Asp.NetCore程序发布到CentOs(含安装部署netcore)--最佳实践(二)
Asp.NetCore程序发布到CentOs(含安装部署netcore)--最佳实践(一) 接上一篇 3. Nginx配置反向代理 3.1 cnetos 安装nginx 首先,我们需要在服务器上安装N ...
- Dockerfile+Jenkinsfile+GitLab轻松实现.NetCore程序的CI&CD
一.相关介绍 Dockerfile:关于Dockerfile的使用说明,我在文章<让.NetCore程序跑在任何有docker的地方>中有说到,这里不在赘述,需要的可以先看下,本文主要介绍 ...
- jenkins集成ansible注意事项Failed to connect to the host via ssh.
在集成jenkins和ansible实现自动化部署时,root用户下执行ansible命令时可以正常运行.由于是通过jenkins用户去执行ansible命令,而jenkins用户却报如下异常: XX ...
- 用DotTrace 来分析.NET-Core程序
1. 前言 看园子里面讲dotTrace 的文章不多,最近也有这方面的需要,于是去搜索了一下,.NET 性能分析方面的工具.目的呢,主要是想发现我的代码中,哪些代码占用了最多时间,来进行优化.主要 ...
随机推荐
- Maven打包详细流程
方法一:cmd 控制台打包(比较不推荐) 首先安装maven插件百度下载一个,配置环境变量什么的~在cmd控制台能mvn version能有数据出现. 打包只需要到项目的根目录下~在cmd敲入mvn ...
- Java学习导航
由于最近在系统的重新学习Java,为了便于日后复习,给个人博客中Java内容做一个目录. Java基础:Java虚拟机(JVM) Java基础:内存模型 Java基础:JVM垃圾回收算法 Java基础 ...
- Python 函数和相关用法笔记
python中%r和%s的区别 总结:%r打印时能够重现它所代表的对象 __str__和__repr__的用法
- ajax基本介绍
AJAX即"Asynchronous Javascript And XML"(异步JavaScript和XML[Extensible Markup Language] ),是指一种 ...
- Python_自定义有向图
directedGraph.py class DirectedGraph(object): def __init__(self,d): if isinstance(d,dict): self.__gr ...
- Centos6.5DRBD加载失败,系统更换yum源(国内163)
我安装的系统是centos6.5的,要在系统上安装DRBD镜像软件,安装完后,无法加载modprobe drbd. 需要更新kernel. 1,首先,先把yum源更换成国内的,不然无法更新kernel ...
- Myeclipse10破解版安装包
下载地址;http://pan.baidu.com/s/1pLka0un
- linux常用的时间获取函数(time,gettimeofday,clock_gettime,_ftime,localtime,strftime )
time()提供了秒级的精确度 1.头文件 <time.h> 2.函数原型 time_t time(time_t * timer) 函数返回从TC1970-1-1 0:0:0开始到现在的秒 ...
- Linux kernel的中断子系统之(二):IRQ Domain介绍
返回目录:<ARM-Linux中断系统>. 总结:一.二概述了软硬件不同角度的IRQ Number和HW Interrupt ID,这就需要他们之间架个桥梁. 三介绍了架设这种桥梁的几种方 ...
- Java EE