
android消息处理源码分析
一、简介
消息处理机制主要涉及到这几个类:
1.Looper
2.MessageQueue
3.Message
4.Handler
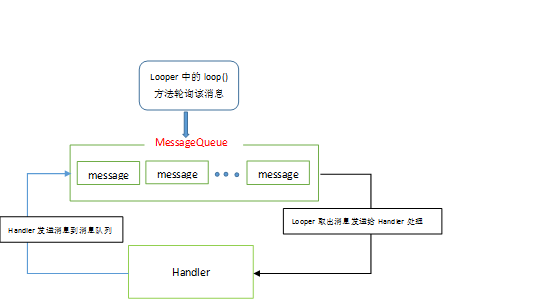
二、源码分析
Looper.class的关键源码:
//保存Looper对象,在android中每创建一个消息队列,就有一个并且是唯一一个与之对应的Looper对象

static final ThreadLocal<Looper> sThreadLocal = new ThreadLocal<Looper>();

//主线程的Looper

private static Looper sMainLooper;

//消息队列

final MessageQueue mQueue;

final Thread mThread;

//子线程中通过调用该方法来创建消息队列

public static void prepare() {

    prepare(true);

}

private static void prepare(boolean quitAllowed) {

    if (sThreadLocal.get() != null) {

        throw new RuntimeException("Only one Looper may be created per thread");

    }

    sThreadLocal.set(new Looper(quitAllowed));

}

//主线程调用该方法来创建消息队列

public static void prepareMainLooper() {

    prepare(false);

    synchronized (Looper.class) {

        if (sMainLooper != null) {

            throw new IllegalStateException("The main Looper has already been prepared.");

        }

        sMainLooper = myLooper();

    }

}

//实例化Looper,创建消息队列,获取当前线程

private Looper(boolean quitAllowed) {

    mQueue = new MessageQueue(quitAllowed);

    mThread = Thread.currentThread();

}

//调用loop方法开启消息循环

public static void loop() {

    //获取当前的Looper对象,若为null,抛出异常

    final Looper me = myLooper();

    if (me == null) {

        throw new RuntimeException("No Looper; Looper.prepare()

            wasn't called on this thread.");

     }

    //获取当前的消息队列,进入循环

    final MessageQueue queue = me.mQueue;

    for (;;) {

        //调用next()方法从消息队列中获取消息,如果为null,结束循环;否则,继续执行(有可能会阻塞)

        Message msg = queue.next();

        if (msg == null) {

            return;

        }

        ......

        try {

            //调用handler的dispatchMessage(msg)分发消息

            msg.target.dispatchMessage(msg);

        } finally {

        ......

        }

        //回收消息资源

        msg.recycleUnchecked();

    }

}

//消息循环退出

public void quit() {

    mQueue.quit(false);

}

public void quitSafely() {

    mQueue.quit(true);

}
消息循环退出过程
从上面可以看到loop()方法是一个死循环,只有当MessageQueue的next()方法返回null时才会结束循环。那么MessageQueue的next()方法何时为null呢?
在Looper类中我们看到了两个结束的方法quit()和quitSalely()。
两者的区别就是quit()方法直接结束循环,处理掉MessageQueue中所有的消息。
quitSafely()在处理完消息队列中的剩余的非延时消息(延时消息(延迟发送的消息)直接回收)时才退出。这两个方法都调用了MessageQueue的quit()方法
MessageQueue.class 的关键源码:
MessageQueue中最重要的就是两个方法:
1.enqueueMessage()向队列中插入消息
2.next() 从队列中取出消息
/*

*MessageQueue中enqueueMessage方法的目的有两个:

*1.插入消息到消息队列

*2.唤醒Looper中等待的线程(如果是即时消息并且线程是阻塞状态)

*/

boolean enqueueMessage(Message msg, long when) {

    //发送该消息的handler为null,抛出异常

    if (msg.target == null) {

        throw new IllegalArgumentException("Message must have a target.");

    }

    //此消息正在被使用

    if (msg.isInUse()) {

        throw new IllegalStateException(msg + " This message is already in use.");

    }

    synchronized (this) {

        //此消息队列已经被放弃了

        if (mQuitting) {

            IllegalStateException e = new IllegalStateException(

                    msg.target + " sending message to a Handler on a dead thread");

            msg.recycle();

            return false;

        }

        msg.markInUse();

        msg.when = when;

        //消息队列的第一个元素,MessageQueue中的成员变量mMessages指向的就是该链表的头部元素。

        Message p = mMessages;

        boolean needWake;

        if (p == null || when == 0 || when < p.when) {

            //如果此队列中头部元素是null(空的队列,一般是第一次),或者此消息不是延时的消息,则此消息需要被立即处理,

            //将该消息作为新的头部,并将此消息的next指向旧的头部。如果是阻塞状态则需要唤醒。

            msg.next = p;

            mMessages = msg;

            needWake = mBlocked;

        } else {

            //如果此消息是延时的消息,则将其添加到队列中,

            //原理就是链表的添加新元素,按照时间顺序来插入的,这样就得到一条有序的延时消息链表

            needWake = mBlocked && p.target == null && msg.isAsynchronous();

            Message prev;

            for (;;) {

                prev = p;

                p = p.next;

                if (p == null || when < p.when) {

                    break;

                }

                if (needWake && p.isAsynchronous()) {

                    needWake = false;

                }

            }

            msg.next = p;

            prev.next = msg;

        }

        if (needWake) {

            nativeWake(mPtr);

        }

    }

    return true;

}

Message next() {

    //与native方法相关,当mPtr为0时返回null,退出消息循环

    final long ptr = mPtr;

    if (ptr == 0) {

        return null;

    }

    int pendingIdleHandlerCount = -1;

    //0不进入睡眠,-1进入睡眠

    int nextPollTimeoutMillis = 0;

    for (;;) {

        if (nextPollTimeoutMillis != 0) {

            //处理当前线程中待处理的Binder进程间通信请求

            Binder.flushPendingCommands();

        }

        //native方法,nextPollTimeoutMillis为-1时进入睡眠状态

        //阻塞方法,主要是通过native层的epoll监听文件描述符的写入事件来实现的。

        //如果nextPollTimeoutMillis=-1,一直阻塞不会超时。

        //如果nextPollTimeoutMillis=0,不会阻塞,立即返回。

        //如果nextPollTimeoutMillis>0,最长阻塞nextPollTimeoutMillis毫秒(超时),如果期间有程序唤醒会立即返回

        nativePollOnce(ptr, nextPollTimeoutMillis);

        synchronized (this) {

            final long now = SystemClock.uptimeMillis();

            Message prevMsg = null;

            Message msg = mMessages;

            if (msg != null && msg.target == null) {

                do {

                    prevMsg = msg;

                    msg = msg.next;

                } while (msg != null && !msg.isAsynchronous());

            }

            if (msg != null) {

                if (now < msg.when) {

                    // Next message is not ready.  Set a timeout to wake up when it is ready.

                    nextPollTimeoutMillis = (int) Math.min(msg.when - now, Integer.MAX_VALUE);

                } else {

                    //正常取出消息,设置mBlocked = false代表目前没有阻塞

                    mBlocked = false;

                    if (prevMsg != null) {

                        prevMsg.next = msg.next;

                    } else {

                        mMessages = msg.next;

                    }

                    msg.next = null;

                    msg.markInUse();

                    return msg;

                }

            } else {

                // No more messages.更新到睡眠状态

                nextPollTimeoutMillis = -1;

            }

                // Process the quit message now that all pending messages have been handled.

                if (mQuitting) {

                    dispose();

                    return null;

                }

                // If first time idle, then get the number of idlers to run.

                // Idle handles only run if the queue is empty or if the first message

                // in the queue (possibly a barrier) is due to be handled in the future.

                if (pendingIdleHandlerCount < 0

                        && (mMessages == null || now < mMessages.when)) {

                    pendingIdleHandlerCount = mIdleHandlers.size();

                }

                if (pendingIdleHandlerCount <= 0) {

                    // No idle handlers to run.  Loop and wait some more.

                    mBlocked = true;

                    continue;

                }

                if (mPendingIdleHandlers == null) {

                    mPendingIdleHandlers = new IdleHandler[Math.max(pendingIdleHandlerCount, 4)];

                }

                mPendingIdleHandlers = mIdleHandlers.toArray(mPendingIdleHandlers);

            }

        }

        //非睡眠状态下处理IdleHandler接口

        for (int i = 0; i < pendingIdleHandlerCount; i++) {

            final IdleHandler idler = mPendingIdleHandlers[i];

            // release the reference to the handler

            mPendingIdleHandlers[i] = null;

            boolean keep = false;

            try {

               keep = idler.queueIdle();

            } catch (Throwable t) {

                Log.wtf(TAG, "IdleHandler threw exception", t);

            }

            if (!keep) {

                synchronized (this) {

                    mIdleHandlers.remove(idler);

                }

            }

        }

        pendingIdleHandlerCount = 0;

        nextPollTimeoutMillis = 0;

    }

}
Handler.class源码分析:
/*

*通过handler类向线程的消息队列发送消息,

*每个Handler对象中都有一个Looper对象和MessageQueue对象

*/

public Handler(Callback callback, boolean async) {

    if (FIND_POTENTIAL_LEAKS) {

        final Class<? extends Handler> klass = getClass();

        if ((klass.isAnonymousClass() || klass.isMemberClass() || klass.isLocalClass()) &&

                (klass.getModifiers() & Modifier.STATIC) == 0) {

            Log.w(TAG, "The following Handler class should be static or leaks might occur: " +

                klass.getCanonicalName());

        }

    }

    //获取Looper对象

    mLooper = Looper.myLooper();

    if (mLooper == null) {...}

    //获取消息队列

    mQueue = mLooper.mQueue;

    mCallback = callback;

    mAsynchronous = async;

}

/*

*多种sendMessage方法,最终都调用了同一个方法sendMessageAtTime()

*/

public boolean sendMessageAtTime(Message msg, long uptimeMillis) {

    MessageQueue queue = mQueue;

    if (queue == null) {

        RuntimeException e = new RuntimeException(

                this + " sendMessageAtTime() called with no mQueue");

        Log.w("Looper", e.getMessage(), e);

        return false;

    }

    //向消息队列中添加消息

    return enqueueMessage(queue, msg, uptimeMillis);

}

/*

*1.当Message中的callback不为null时,执行Message中的callback中的方法。这个callback时一个Runnable接口。

*2.当Handler中的Callback接口不为null时,执行Callback接口中的方法。

*3.直接执行Handler中的handleMessage()方法。

*/

public void dispatchMessage(Message msg) {

    // 消息Callback接口不为null,执行Callback接口

    if (msg.callback != null) {

        handleCallback(msg);

    } else {

        if (mCallback != null) {

            //Handler Callback接口不为null,执行接口方法

            if (mCallback.handleMessage(msg)) {

                return;

            }

        }

        //处理消息

        handleMessage(msg);

    }

}
android消息处理源码分析的更多相关文章
- Android HandlerThread 源码分析
HandlerThread 简介: 我们知道Thread线程是一次性消费品,当Thread线程执行完一个耗时的任务之后,线程就会被自动销毁了.如果此时我又有一 个耗时任务需要执行,我们不得不重新创建线 ...
- Android Choreographer 源码分析
Choreographer 的作用主要是配合 Vsync ,给上层 App 的渲染提供一个稳定的 Message 处理的时机,也就是 Vsync 到来的时候 ,系统通过对 Vsync 信号周期的调整, ...
- Appium Android Bootstrap源码分析之启动运行
通过前面的两篇文章<Appium Android Bootstrap源码分析之控件AndroidElement>和<Appium Android Bootstrap源码分析之命令解析 ...
- Appium Android Bootstrap源码分析之命令解析执行
通过上一篇文章<Appium Android Bootstrap源码分析之控件AndroidElement>我们知道了Appium从pc端发送过来的命令如果是控件相关的话,最终目标控件在b ...
- Appium Android Bootstrap源码分析之控件AndroidElement
通过上一篇文章<Appium Android Bootstrap源码分析之简介>我们对bootstrap的定义以及其在appium和uiautomator处于一个什么样的位置有了一个初步的 ...
- Appium Android Bootstrap源码分析之简介
在上一个系列中我们分析了UiAutomator的核心源码,对UiAutomator是怎么运行的原理有了根本的了解.今天我们会开始另外一个在安卓平台上基于UiAutomator的新起之秀--Appium ...
- Android base-adapter-helper 源码分析与扩展
转载请标明出处:http://blog.csdn.net/lmj623565791/article/details/44014941,本文出自:[张鸿洋的博客] 本篇博客是我加入Android 开源项 ...
- Android -- ViewGroup源码分析+自定义
1,我们前三篇博客了解了一下自定义View的基本方法和流程 从源码的角度一步步打造自己的TextView 深入了解自定义属性 onMeasure()源码分析 之前,我们只是学习过自定义View,其实自 ...
- [旧][Android] Retrofit 源码分析之 ServiceMethod 对象
备注 原发表于2016.05.03,资料已过时,仅作备份,谨慎参考 前言 大家好,我又来学习 Retrofit 了,可能这是最后一篇关于 Retrofit 框架的文章了.我发现源码分析这回事,当时看明 ...
随机推荐
- github routine
1. 从官方库fork 自己的分支库后,git clone到local. 2. local的remotes/origin默认是自己的分支库.可以添加remotes/upstream指向官方库. 3. ...
- day12 EL 表达式和国际化开发
day12 EL 表达式和国际化开发 1. EL(Expression Language) 表达式简介 1.1 执行运算 1.2 获取web开发常用对象(el 中定义了11个隐式对象) 1.3 使用 ...
- MYSQL数据库设计规范与原则
MYSQL数据库设计规范 1.数据库命名规范 采用26个英文字母(区分大小写)和0-9的自然数(经常不需要)加上下划线'_'组成; 命名简洁明确(长度不能超过30个字符); 例如:user, stat ...
- Javassist字节码增强示例
概述 Javassist是一款字节码编辑工具,可以直接编辑和生成Java生成的字节码,以达到对.class文件进行动态修改的效果.熟练使用这套工具,可以让Java编程更接近与动态语言编程. 下面一个方 ...
- [Mysql]——通过例子理解事务的4种隔离级别(转)
SQL标准定义了4种隔离级别,包括了一些具体规则,用来限定事务内外的哪些改变是可见的,哪些是不可见的. 低级别的隔离级一般支持更高的并发处理,并拥有更低的系统开销. 一.事务隔离级别分类 第1级别:R ...
- Vlan ---虚拟局域网
VLAN是一种将局域网(LAN)设备从逻辑上划分(注意,不是从物理上划分)成一个个网段(或者说是更小的局域网LAN),从而实现虚拟工作组(单元)的数据交换技术.VLAN(Virtual Local A ...
- springboot中配置文件application.properties的理解
前言 Spring Boot使用"习惯优于配置"(项目中存在大量的配置,此外还内置了一个习惯性的配置,让你无需手动进行配置)的理念让你的项目快速运行起来.所以,我们要想把Sprin ...
- 区分命令行模式和Python交互模式
命令行模式 在Windows开始菜单选择"命令提示符",就进入到命令行模式,它的提示符类似C:\> Python交互模式 在命令行模式下敲命令python,就看到类似如下的一 ...
- @Scheduled不执行的原因
1. 今天用@Schedule做了一个定时任务,希望凌晨1点执行,代码如下 @Service public class ParseJsonService { @Scheduled(cron = &qu ...
- javascript 事件编程之事件(流,处理,对象,类型)
1. 事件处理 1.1. 绑定事件方式 1)行内绑定 语法: //最常用的使用方式 <元素 事件="事件处理程序"> 2)动态绑定 //结构+样式+行为分离的页面(ht ...