Qt入门-layout布局
开发一个图形界面应用程序,界面的布局影响到界面的美观。在设计一个界面之前,应该考虑到开发的界面可能给不用的用户使用,而用户的屏幕大小、纵横比例、分辨率可能不同,界面还可能是可缩放的,程序应该可以适应这些变化。
前面的程序中都是使用setGeometry()方法定位控件的位置,这个方法比较笨拙。试想如果控件很多,布局这些控件需要编写大量的代码。幸运的是,QT提供了更好的方法布局控件。
常用的三种布局方法:
(1)使用水平布局类QHBoxLayout;
(2)使用垂直布局类QVBoxLayout;
(3)使用网格布局类QGridLayout。
这三种方法可以嵌套使用。
控件在布局时可以先不指定父窗口,最后交由Layout统一指定。
示例:
- #include <QApplication>
- #include <QDialog>
- #include <QPushButton>
- #include <QLineEdit>
- #include <QLayout>
- #include <QLabel>
- int main(int argc, char *argv[])
- {
- QApplication a(argc, argv);
- QDialog *mainWindow = new QDialog;
- QHBoxLayout *topLayout = new QHBoxLayout;
- QLabel *lbl = new QLabel(QWidget::tr("&Input:"), mainWindow);
- QLineEdit *lineEdt = new QLineEdit(mainWindow);
- lbl->setBuddy(lineEdt);
- topLayout->addWidget(lbl);
- topLayout->addWidget(lineEdt);
- QHBoxLayout *bomLayout = new QHBoxLayout;
- QPushButton *btn_ok = new QPushButton(QWidget::tr("OK"), mainWindow);\
- btn_ok->setDefault(true);
- QPushButton *btn_cancel = new QPushButton(QWidget::tr("Cancel"), mainWindow);
- bomLayout->addStretch();
- bomLayout->addWidget(btn_ok);
- bomLayout->addStretch();
- bomLayout->addWidget(btn_cancel);
- bomLayout->addStretch();
- QVBoxLayout *mainLayout = new QVBoxLayout;
- mainLayout->addLayout(topLayout);
- mainLayout->addLayout(bomLayout);
- mainWindow->setLayout(mainLayout);
- mainWindow->resize(300, 100);
- mainWindow->setWindowTitle(QWidget::tr("Qt Test"));
- mainWindow->show();
- return a.exec();
- }
编译运行,界面如下:
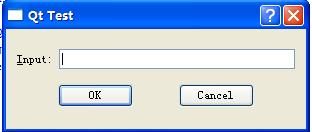
在界面中,最外部是mainLayout,它的类型是垂直布局类QVBoxLayout。它包含了两个水平布局类QHBoxLayout,分别是topLayout和bomLayout。
比起QHBoxLayout和HVBoxLayout, QGridLayout运用更加灵活。
QGridLayout的常用方法
(1)addWidget:
- //放置一个控件到一个单元格
- void addWidget ( QWidget * widget, int row, int column, Qt::Alignment alignment = 0 )
- //如果放置的控件超出一个单元格,则使用该方法
- void addWidget ( QWidget * widget, int fromRow, int fromColumn, int rowSpan, int columnSpan, Qt::Alignment alignment = 0 )
1)row:指放置控件的网格行号(行号从0开始);
2)colum:指放置控件的网格列号(从0开始);
3)alignment:对齐方式。
4)fromRow:指放置控件的起始网格行号;
5)fromColumn:指放置控件的起始网格列号;
6)rowSpan:指放置控件占多少行;
7)columnSpan:指放置控件占多少列。
(2)addLayout
- void addLayout ( QLayout * layout, int row, int column, Qt::Alignment alignment = 0 )
- void addLayout ( QLayout * layout, int row, int column, int rowSpan, int columnSpan, Qt::Alignment alignment = 0 )
参数与addWidget类似。
(3)setSpacing
- void QGridLayout::setSpacing ( int spacing )
设置控件水平和垂直之间的间隔。
示例:
- #include <QApplication>
- #include <QDialog>
- #include <QPushButton>
- #include <QLineEdit>
- #include <QLayout>
- #include <QLabel>
- #include <QTextEdit>
- int main(int argc, char *argv[])
- {
- QApplication a(argc, argv);
- QDialog *mainWindow = new QDialog;
- QGridLayout *gridLayout = new QGridLayout;
- gridLayout->setColumnStretch(0, 1);
- gridLayout->setColumnStretch(1, 4);
- gridLayout->setColumnStretch(2, 1);
- gridLayout->setColumnStretch(3, 1);
- gridLayout->setColumnStretch(4, 4);
- gridLayout->setMargin(15);
- gridLayout->setColumnMinimumWidth(2, 15);
- QLabel *lbl1 = new QLabel(QWidget::tr("First Name:"));
- QLineEdit *edit1 = new QLineEdit;
- QLabel *lbl2 = new QLabel(QWidget::tr("Last Name:"));
- QLineEdit *edit2 = new QLineEdit;
- QLabel *lbl3 = new QLabel(QWidget::tr("Sex:"));
- QLineEdit *edit3 = new QLineEdit;
- QLabel *lbl4 = new QLabel(QWidget::tr("Birthday:"));
- QLineEdit *edit4 = new QLineEdit;
- QLabel *lbl5 = new QLabel(QWidget::tr("Address:"));
- QTextEdit *textEdt = new QTextEdit;
- gridLayout->addWidget(lbl1, 0, 0);
- gridLayout->addWidget(edit1, 0, 1);
- gridLayout->addWidget(lbl2, 0, 3);
- gridLayout->addWidget(edit2, 0, 4);
- gridLayout->addWidget(lbl3, 1, 0);
- gridLayout->addWidget(edit3, 1, 1);
- gridLayout->addWidget(lbl4, 1, 3);
- gridLayout->addWidget(edit4, 1, 4);
- gridLayout->addWidget(lbl5, 2, 0);
- gridLayout->addWidget(textEdt, 3, 0, 2, 5);
- mainWindow->setLayout(gridLayout);
- mainWindow->resize(400, 150);
- mainWindow->setWindowTitle(QWidget::tr("Qt Test"));
- mainWindow->show();
- return a.exec();
- }
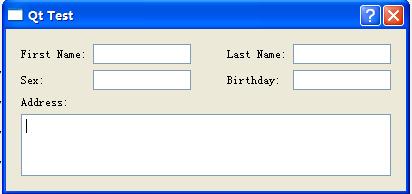
编译运行,界面如图:
转http://blog.csdn.net/xgbing/article/details/7764326
Qt入门-layout布局的更多相关文章
- qt坐标系统与布局的简单入门
qt坐标系统 qt坐标系统比較简单 ); 上面的代码把button显示为父窗体的20,20处宽度为100,高度为100 接下去是布局 qt里面布局须要增加<QLayout.h>这个头 ...
- elementUI 学习入门之 layout 布局
layout 布局 通过基础的 24 分栏,可进行快速布局 基础布局 使用单一分栏创建基础的栅格布局, 通过 span 属性指定每栏的大小 <el-col :span="8" ...
- 新建android工程的时候eclipse没有生成MainActivity和layout布局
一.新建android工程的时候eclipse没有生成MainActivity和layout布局 最近由于工作上的原因,开始学习Android开发,在入门的时候就遇到了不少的坑,遇到的第一个坑就是&q ...
- Android实现入门界面布局
Android实现入门界面布局 开发工具:Andorid Studio 1.3 运行环境:Android 4.4 KitKat 代码实现 首先是常量的定义,安卓中固定字符串应该定义在常量中. stri ...
- Thinkphp入门 四 —布局、缓存、系统变量 (48)
原文:Thinkphp入门 四 -布局.缓存.系统变量 (48) [控制器操作方法参数设置] http://网址/index.php/控制器/操作方法 [页面跳转] [变量调节器] Smarty变量调 ...
- Android开发中遇到的问题(二)——新建android工程的时候eclipse没有生成MainActivity和layout布局
一.新建android工程的时候eclipse没有生成MainActivity和layout布局 最近由于工作上的原因,开始学习Android开发,在入门的时候就遇到了不少的坑,遇到的第一个坑就是&q ...
- qt——常用的布局方法
布局相关对象及简介 窗体上的所有的控件必须有一个合适的尺寸和位置.Qt提供了一些类负责排列窗体上的控件,主要有:QHBoxLayout,QVBoxLayout,QGridLayout,QStackLa ...
- easyui实现树形菜单Tab功能、layout布局
一:常见三种前端ui框架 在初学者入门的状态下,我们常见的前端框架有三种且都有自己的官方网站: 1.easyui:官方网站(http://www.jeasyui.net/) 基于jquery的用户页面 ...
- layout布局实例化
实例化xml中的Layout布局在开发中经常会用到,有几种方法可以使用 1.在Activity中使用getLayoutInflater()方法 View layout = getLayoutInfla ...
- ASP.NET MVC3 系列教程 – 新的Layout布局系统
原文地址:http://www.cnblogs.com/highend/archive/2011/04/18/asp_net_mvc3_layout.html I:回忆MVC2当中MasterPage ...
随机推荐
- python中的sort、sorted、reverse、reversed详解
python语言中的列表排序方法有三个:reverse反转/倒序排序.sort正序排序.sorted可以获取排序后的列表.在更高级列表排序中,后两中方法还可以加入条件参数进行排序. reverse() ...
- sqlserver 创建对某个存储过程执行情况的跟踪
有时候需要抓取执行存储过程时某个参数的值,有时候程序调用存储过程执行后结果不太对,不确定是程序的问题还是存储过程的问题,需要单独执行存储过程看结果 即可用下面的方法 --=============== ...
- spring boot更换日志为log4j2
<dependency> <groupId>org.springframework.boot</groupId> <artifactId>spring- ...
- Linux服务器修改时区时间
时间的一致性很关键,对于日志的分析和程序的对接都至关重要! 01.tzselect 修改时区 可以使用命令 tzselect,修改时区.操作示例: $ tzselect Please identify ...
- Java IO 要点总结
Java 流在处理上分为字符流和字节流.字符流处理的单元为 2 个字节的 Unicode 字符,分别操作字符.字符数组或字符串,而字节流处理单元为 1 个字节,操作字节和字节数组. Java 内用 U ...
- this.class.getClassLoader().getResourceAsStream与this.class.getResourceAsStream
本文部分转自:http://xixinfei.iteye.com/blog/1256291 this.getClass().getClassLoader().getResource("tem ...
- ACM遇到的问题与解决方案
C++防止栈溢出措施: 只要在你的代码里加上下面这句话, OK,栈溢出直接搞定!!! #pragma comment(linker, "/STACK:102400000,102400000& ...
- leetcode185 Department Top Three Salaries
Employee表存储员工姓名.员工所在公寓.员工工资 Department表存储公寓id 评选出各个公寓的工资前三名的员工. 遇到的问题如下: limit,in等语句不能用在嵌套select语句中, ...
- XP和Win 7双系统安装说明和注意事项
安装前说明: 1.先装XP,再装Windows 7,最好不要反过来,不然XP不会把Windows 7的启动管理器给覆盖掉,会麻烦些.总之遵循“旧版本到新版本”安装原则. 2.如果分区不够大,请用以下软 ...
- RabbitMQ消息队列(二):"Hello, World"[转]
2. Sending 第一个program send.cs:发送Hello world 到queue.正如我们在上篇文章提到的,你程序的第9行就是建立连接,第12行就是创建channel,第14行创建 ...