Ubuntu+IntelliJ IDEA+Android 配置NDK环境+openCV
最近需要将Python人证对比模型移植安卓端.安卓端需要使用openCV简单的人像提取处理.在配置openCV前首先需要配置NDK环境.
NDK的介绍(http://www.cnblogs.com/leaven/archive/2010/05/27/1744855.html)
JNI与NDK详细介绍: http://blog.csdn.net/carson_ho/article/details/73250163
一 NDK在Ubuntu的配置
参考: http://blog.csdn.net/jq_ak47/article/details/52349189
二 NDK在IntelliJ IDEA中的配置
参考: http://blog.csdn.net/yipatshi/article/details/54585049
三 NDK开发实例
参考: http://www.cnblogs.com/xiaoxiaoqingyi/p/6524165.html
在main/java下创建创建一个NDKUtils.Java类:
public class NDKUtils {

    public native String invokeCmethod();

    static {

        System.loadLibrary("NDKUtils");

    }

}
右键选择 External Tools ---> javah
会在app目录下生成jni目录和目录内一个com_**_demo_utils_NDKUtils.h文件
复制.h 文件修改后缀名为 .c (该文件就是C 语言的实现文件)
修改com_**_demo_utils_NDKUtils.c内容:
JNIEXPORT jstring JNICALL Java_com_**_demo_utils_NDKUtils_jniInit

  (JNIEnv *env, jobject obj){

                       return (*env)->NewStringUTF(env,"NDK 获取Native 字符串");

                       }
将jni目录拷贝至main/java目录下.
在jni目录下新建Android.mk和Application.mk:
Android.mk:
LOCAL_PATH:=$(call my-dir)

include $(CLEAR_VARS)

LOCAL_MODULE := NDKUtils

LOCAL_SRC_FILES := com_**_demo_utils_NDKUtils.c

include $(BUILD_SHARED_LIBRARY)
Application.mk:
APP_PLATFORM := android-23

APP_ABI := armeabi
在IntelliJ IDEA的命令窗口(Terminal)执行:
cd app/src/main/
继续输入:
ndk-build
该命令是编译C文件,然后生成 .so 文件,生成在 app\src\main\libs 目录下。
完成后会在main目录下生成libs和obj两个目录.
配置build.gradle 文件,在android {}中添加:
    sourceSets{

        main{

            jni.srcDirs = [] // disable automatic ndk-build call, which ignore our Android.mk

            jniLibs.srcDir 'src/main/libs'

        }

    }
在MainActivity中使用:
package com.***.opencvdemo;

import android.support.v7.app.AppCompatActivity;

import android.os.Bundle;

import android.widget.TextView;

public class MainOpencvActivity extends AppCompatActivity {

    @Override

    protected void onCreate(Bundle savedInstanceState) {

        super.onCreate(savedInstanceState);

        setContentView(R.layout.activity_main_opencv);

        NDKUtils ndk = new NDKUtils();

        TextView text = (TextView) findViewById(R.id.tv);

        text.setText(ndk.invokeCmethod());

    }

}
运行程序会输出字符串: NDK 获取Native 字符串
以上测试成功.
四 Android+openCV
首先下载openCV包,地址:http://opencv.org/
最新的3.3,我下载了3.2
opencv配置参考: http://www.cnblogs.com/xiaoxiaoqingyi/p/6676096.html
NDKUtils.Java代码:
package com.***.opencvdemo;

public class NDKUtils {

    //public native String invokeCmethod();

    public static native int[] gray(int[] buf, int w, int h);

    static {

        //System.loadLibrary("NDKUtils");

        System.loadLibrary("OpenCV");//导入生成的链接库文件

    }

}
右键选择 External Tools ---> javah 同上,把生成目录jni拷贝到 src/main.
复制.h文件 修改后缀名为 .cpp (.c文件编译会报错) 参考: https://stackoverflow.com/questions/30219754/ubuntu-no-such-file-or-directory-include-string
编辑 com_***_opencvdemo_NDKUtils.cpp:
#include <jni.h>

#include <string>

#include <iostream>

#include <stdio.h>

#include <stdlib.h>

#include <opencv2/opencv.hpp>

using namespace cv;

extern "C"

  JNIEXPORT jintArray JNICALL Java_com_***_opencvdemo_NDKUtils_gray(

          JNIEnv *env, jclass obj, jintArray buf, int w, int h) {

      jint *cbuf;

      cbuf = env->GetIntArrayElements(buf, JNI_FALSE );

      if (cbuf == NULL) {

          return 0;

      }

      Mat imgData(h, w, CV_8UC4, (unsigned char *) cbuf);

      uchar* ptr = imgData.ptr(0);

      for(int i = 0; i < w*h; i ++){

          //计算公式:Y(亮度) = 0.299*R + 0.587*G + 0.114*B

          //对于一个int四字节,其彩色值存储方式为:BGRA

          int grayScale = (int)(ptr[4*i+2]*0.299 + ptr[4*i+1]*0.587 + ptr[4*i+0]*0.114);

          ptr[4*i+1] = grayScale;

          ptr[4*i+2] = grayScale;

          ptr[4*i+0] = grayScale;

      }

      int size = w * h;

      jintArray result = env->NewIntArray(size);

      env->SetIntArrayRegion(result, 0, size, cbuf);

      env->ReleaseIntArrayElements(buf, cbuf, 0);

      return result;

  }
把 sdk/native 目录 拷贝到 项目的 jni 目录下.
修改:
Android.mk:
LOCAL_PATH:=$(call my-dir)

include $(CLEAR_VARS)

OpenCV_INSTALL_MODULES := on

OpenCV_CAMERA_MODULES := off

OPENCV_LIB_TYPE :=STATIC

ifeq ("$(wildcard $(OPENCV_MK_PATH))","")

include $(LOCAL_PATH)/native/jni/OpenCV.mk

else

include $(OPENCV_MK_PATH)

endif

LOCAL_MODULE := OpenCV

LOCAL_SRC_FILES := com_***_opencvdemo_NDKUtils.cpp

LOCAL_LDLIBS +=  -lm -llog

include $(BUILD_SHARED_LIBRARY)
Application.mk:
APP_STL := gnustl_static

APP_CPPFLAGS := -frtti -fexceptions

APP_PLATFORM := android-9
ndk-build:生成.so文件
MainOpencvActivity:
package com.***.opencvdemo;

import android.graphics.Bitmap;

import android.graphics.drawable.BitmapDrawable;

import android.support.v7.app.AppCompatActivity;

import android.os.Bundle;

import android.widget.ImageView;

public class MainOpencvActivity extends AppCompatActivity {

    @Override

    protected void onCreate(Bundle savedInstanceState) {

        super.onCreate(savedInstanceState);

        setContentView(R.layout.activity_main_opencv);

        Bitmap bitmap = ((BitmapDrawable) getResources().getDrawable(

                R.mipmap.aaa)).getBitmap();

        int w = bitmap.getWidth(), h = bitmap.getHeight();

        int[] pix = new int[w * h];

        bitmap.getPixels(pix, 0, w, 0, 0, w, h);

        int [] resultPixes= NDKUtils.gray(pix,w,h);

        Bitmap result = Bitmap.createBitmap(w,h, Bitmap.Config.RGB_565);

        result.setPixels(resultPixes, 0, w, 0, 0,w, h);

        ImageView img = (ImageView)findViewById(R.id.image2);

        img.setImageBitmap(result);

    }

}
附加 activity_main_opencv.xml:
<?xml version="1.0" encoding="utf-8"?>

<android.support.constraint.ConstraintLayout

        xmlns:android="http://schemas.android.com/apk/res/android"

        xmlns:tools="http://schemas.android.com/tools"

        xmlns:app="http://schemas.android.com/apk/res-auto"

        android:layout_width="match_parent"

        android:layout_height="match_parent"

        tools:context="com.***.opencvdemo.MainOpencvActivity">

    <TextView

            android:layout_width="wrap_content"

            android:layout_height="wrap_content"

            android:text="调用openCV灰度化"

            app:layout_constraintBottom_toBottomOf="parent"

            app:layout_constraintLeft_toLeftOf="parent"

            app:layout_constraintRight_toRightOf="parent"

            app:layout_constraintTop_toTopOf="parent"/>

    <TextView

            android:layout_width="wrap_content"

            android:layout_height="wrap_content"

            android:id="@+id/tv"

            android:text="原图"

            app:layout_constraintBottom_toBottomOf="parent"

            app:layout_constraintLeft_toLeftOf="parent"

            app:layout_constraintRight_toRightOf="parent"

            app:layout_constraintTop_toTopOf="parent"

            app:layout_constraintVertical_bias="0.1"/>

    <ImageView

            android:scaleType="centerInside"

            android:layout_width="0dp"

            android:layout_height="180dp"

            android:id="@+id/image1"

            android:src="@mipmap/aaa"

            android:layout_margin="10dp"

            app:layout_constraintBottom_toBottomOf="parent"

            app:layout_constraintLeft_toLeftOf="parent"

            app:layout_constraintRight_toRightOf="parent"

            app:layout_constraintTop_toTopOf="parent"

            app:layout_constraintVertical_bias="0.2" />

    <ImageView

            android:scaleType="centerInside"

            android:layout_width="0dp"

            android:layout_height="180dp"

            android:id="@+id/image2"

            android:src="@mipmap/aaa"

            android:layout_margin="10dp"

            app:layout_constraintBottom_toBottomOf="parent"

            app:layout_constraintLeft_toLeftOf="parent"

            app:layout_constraintRight_toRightOf="parent"

            app:layout_constraintTop_toTopOf="parent"

            app:layout_constraintVertical_bias="0.8" />

</android.support.constraint.ConstraintLayout>
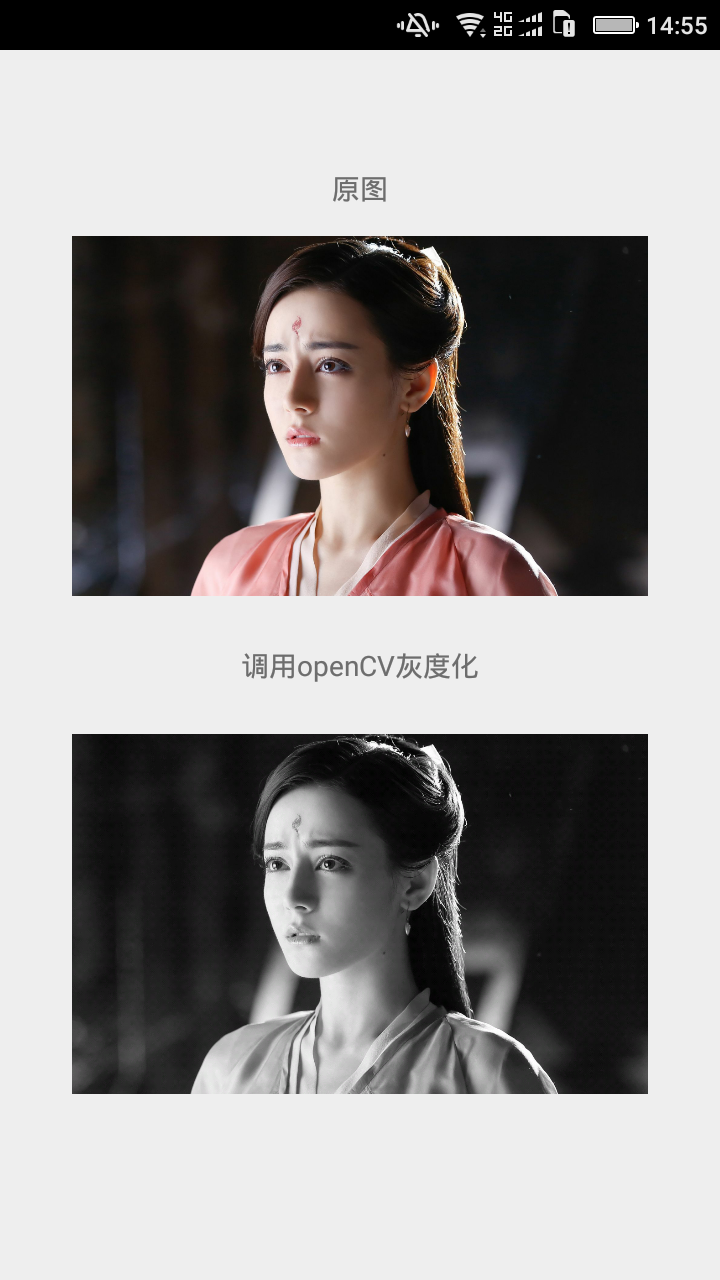
运行效果:
Ubuntu+IntelliJ IDEA+Android 配置NDK环境+openCV的更多相关文章
- Android之NDK环境配置+JNI开发+so文件编译
前言 这边Android作为日常记录,虽然破坏了文章队形~ 最近人工智能挺火的,也稍微了解了一些库,比如关于视觉库openCV.要在安卓下调用这些C/C++库,需要用到JNI开发,在此把过程分享一 ...
- Android Studio NDK环境配置
本文参考:Android Studio NDK环境配置及JNI使用方法:http://blog.csdn.net/tongseng/article/details/53005123 并添加自己的实践: ...
- Android NDK开发 Android Studio使用新的Gradle构建工具配置NDK环境(一)
本文主要讲述了如何如何在Android Studio使用新的Gradle构建工具配置NDK环境,现在把相关的步骤整理出来分享给Android程序员兄弟们,希望给他们在配置NDK环境时带来帮助. 从An ...
- [eShopOnContainers 学习系列] - 03 - 在远程 Ubuntu 16.04 上配置开发环境
直接把 md 粘出来了,博客园的富文本编辑器换成 markdown,没啥效果呀 ,先凑合吧.实在不行换地方 # 在远程 Ubuntu 16.04 上配置开发环境 ## 零.因 为什么要用这么麻烦的 ...
- Android 新版NDK环境搭建(免Cygwin)
使用最新ndk,直接抛弃cygwin,以前做Android的项目要用到NDK就必须要下载NDK,下载安装Cygwin(模拟Linux环境用的),下载CDT(Eclipse C/C++开发插件),还要配 ...
- Mac下配置NDK环境
下载NDK 这里写图片描述配置NDK开发环境 第一步:打开Mac终端 Snip20170208_1.png 第二步:在终端中输入:open -e .bash_profile,打开.bash_profi ...
- windows 下配置ndk环境,无需cygwin
时隔好久要用ndk编译jni库,本以为配制安装cygwin环境,便按部就班的下载安装,但是公司的网速真的不给力,三天安装了三四次都没有安装成功(我选择的是在线安装),于是我便开始查ndk的官网看看,发 ...
- 如何在 Ubuntu 14.04 里面配置 chroot 环境
你可能会有很多理由想要把一个应用.一个用户或者一个环境与你的 Linux 系统隔离开来.不同的操作系统有不同的实现方式,而在 Linux 中,一个典型的方式就是 chroot 环境. 在这份教程中,我 ...
- ☆☆配置NDK环境
1 前提是 已经配置好 安卓SDK开发环境. 2 下载 android-ndk64-r10-windows-x86_64,可以从官方网站下载,这里有一个现成的. http://pan.baidu.co ...
随机推荐
- codeforces645B
Mischievous Mess Makers CodeForces - 645B It is a balmy spring afternoon, and Farmer John's n cows a ...
- redis - Sentinel 和 cluster
redis哨兵集群 引入 上回说到redis主从同步时,master(主库)如果宕机了怎么解决... 我给出了一个手动解决的办法! 但实际上,如果你配置了Sentinel,它能自动发现master宕机 ...
- SQLSERVER 实现三元运算符
三元运算符在很多种编程语言中都存在,那么在SQL Server中有没有呢? 很遗憾,SQL server中并没有这个功能,三元运算符是什么呢? 这是一段表达式:[条件 ? 满足返回值 : 不满足返回值 ...
- class09
class09 四川菜很辣. Sichuan cuisine is very spicy. 那个汤是凉的. That soup is cold. 这茶很烫. This tea is very hot. ...
- 用IntelliJ IDEA 开发Spring+SpringMVC+Mybatis框架 分步搭建三:配置spring并测试
这一部分的主要目的是 配置spring-service.xml 也就是配置spring 并测试service层 是否配置成功 用IntelliJ IDEA 开发Spring+SpringMVC+M ...
- Springboot 2.返回cookies信息的get接口开发 和 带cookis去请求
首先要有一个启动类,默认的启动类的名字就是Application.java.启动的时候直接右键点击run就可以 Application.java: import org.springframework ...
- 美化博客CSS
title: 美化博客CSS date: 2019/01/19 14:28:59 --- 美化博客CSS 可以去这里看下好看的样式 修改下文档的css,博客园是在页面定制CSS代码,我这里修改了下标题 ...
- 利用git提交代码
一.首先需要下载git 查看电脑是否安装git,打开终端,输入git,回车如果输出如下,则代表已安装了git 如果未安装,则会输出: 按照提示输入:sudo apt-get install git即可 ...
- SpringBoot系列: JdbcTemplate 事务控制
============================Spring JdbcTemplate 事务控制============================之前使用 JDBC API 操作, 经常 ...
- [数分提高]2014-2015-2第6教学周第1次课讲义 3.3 Taylor 公式
1. (Taylor 公式). 设 $f^{(n)}$ 在 $[a,b]$ 上连续, $f^{(n+1)}$ 在 $(a,b)$ 内存在, 试证: $ \forall\ x,x_0\in [a,b], ...