
centos7项目部署
1. 安装nginx
添加CentOS 7 Nginx yum资源库
   sudo rpm -Uvh http://nginx.org/packages/centos/7/noarch/RPMS/nginx-release-centos-7-0.el7.ngx.noarch.rpm

   # 安装nignx
  sudo yum install -y nginx
Nginx将完成安装在你的CentOS 7 服务器中。
附:nginx 官方给不同系统准备了很多包,可到这个地址依次查找 http://nginx.org/packages/
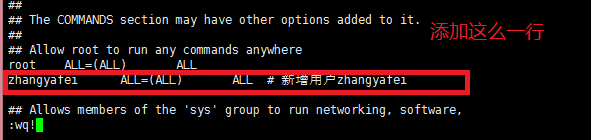
2. 添加用户并授予管理员权限
# 新增用户
[root@VM_0_3_centos ~]# useradd zhangyafei

# 设置密码
[root@VM_0_3_centos ~]# passwd zhangyafei

Changing password for user zhangyafei.

New password:

BAD PASSWORD: The password contains the user name in some form

Retype new password:

Sorry, passwords do not match.

New password:

BAD PASSWORD: The password contains the user name in some form

Retype new password:

passwd: all authentication tokens updated successfully.

# 切换用户
[root@VM_0_3_centos ~]# su zhangyafei

# 查找指定文件路径
[zhangyafei@VM_0_3_centos root]$ whereis sudoers

sudoers: /etc/sudoers /etc/sudoers.d /usr/libexec/sudoers.so /usr/share/man/man5/sudoers.5.gz

# 查看指定文件修改权限
[zhangyafei@VM_0_3_centos root]$ ls -l /etc/sudoers

-r--r----- 1 root root 3907 Jun 23  2017 /etc/sudoers

# 增加指定文件写的权限
[zhangyafei@VM_0_3_centos root]$ chmod -v u+w /etc/sudoers

chmod: changing permissions of ‘/etc/sudoers’: Operation not permitted

failed to change mode of ‘/etc/sudoers’ from 0440 (r--r-----) to 0640 (rw-r-----)

[zhangyafei@VM_0_3_centos root]$ su root

Password:

[root@VM_0_3_centos ~]# chmod -v u+w /etc/sudoers

mode of ‘/etc/sudoers’ changed from 0440 (r--r-----) to 0640 (rw-r-----)

[root@VM_0_3_centos ~]# vi /etc/sudoers
3.修改主机名
hostnamectl set-hostname centos77.magedu.com
hostname
[root@VM_0_3_centos ~]# vim /etc/hosts

[root@centos ~]# cat /etc/hosts

127.0.0.1 VM_0_3_centos VM_0_3_centos centos

127.0.0.1 localhost.localdomain localhost

127.0.0.1 localhost4.localdomain4 localhost4

::1 VM_0_3_centos VM_0_3_centos centos

::1 localhost.localdomain localhost

::1 localhost6.localdomain6 localhost6
4. 安装mysql
CentOS7默认安装mariadb数据库:yum remove mariadb-libs.x86_64
下载Mysql源:
wget https://repo.mysql.com/mysql57-community-release-el7-8.noarch.rpm
安装源
yum localinstall mysql57-community-release-el7-8.noarch.rpm
安装MySQL
yum install mysql-community-server
启动
sudo service mysqld start
报错
首次在centos下安装mysql,客户端连接mysql时报错:

[root@localhost opt]# mysql -u root

ERROR 1045 (28000): Access denied for user 'root'@'localhost' (using password: NO)
解决
[root@centos bin]# cat /var/log/mysqld.log  | grep password

2019-02-23T13:20:38.188663Z 1 [Note] A temporary password is generated for root@localhost: 6kq9r3fS=pLB

2019-02-23T13:22:36.565007Z 2 [Note] Access denied for user 'root'@'localhost' (using password: NO)

2019-02-23T13:23:06.290669Z 3 [Note] Access denied for user 'localhost'@'localhost' (using password: NO)

2019-02-23T13:23:55.824104Z 4 [Note] Access denied for user 'root'@'localhost' (using password: NO)

2019-02-23T13:24:17.247383Z 0 [Note] Shutting down plugin 'validate_password'

2019-02-23T13:24:19.142034Z 0 [Note] Shutting down plugin 'sha256_password'

2019-02-23T13:24:19.142037Z 0 [Note] Shutting down plugin 'mysql_native_password'

2019-02-23T13:24:26.907100Z 2 [Note] Access denied for user 'root'@'localhost' (using password: NO)

2019-02-23T13:25:25.294091Z 3 [Note] Access denied for user 'root'@'localhost' (using password: NO)

2019-02-23T13:25:39.918727Z 4 [Note] Access denied for user 'root-p'@'localhost' (using password: NO)

2019-02-23T13:29:07.486422Z 0 [Note] Shutting down plugin 'validate_password'

2019-02-23T13:29:09.214411Z 0 [Note] Shutting down plugin 'sha256_password'

2019-02-23T13:29:09.214414Z 0 [Note] Shutting down plugin 'mysql_native_password'

2019-02-23T13:29:18.308960Z 2 [Note] Access denied for user 'root'@'localhost' (using password: NO)

2019-02-23T13:30:51.366573Z 0 [Note] Shutting down plugin 'validate_password'

2019-02-23T13:30:52.507640Z 0 [Note] Shutting down plugin 'sha256_password'

2019-02-23T13:30:52.507643Z 0 [Note] Shutting down plugin 'mysql_native_password'

[root@centos bin]# service mysqld start

Redirecting to /bin/systemctl start  mysqld.service

[root@centos bin]# mysql -u root-p

ERROR 1045 (28000): Access denied for user 'root-p'@'localhost' (using password: NO)

[root@centos bin]# mysql -u root -p

Enter password:

Welcome to the MySQL monitor.  Commands end with ; or \g.

Your MySQL connection id is 3

Server version: 5.7.25

Copyright (c) 2000, 2019, Oracle and/or its affiliates. All rights reserved.

Oracle is a registered trademark of Oracle Corporation and/or its

affiliates. Other names may be trademarks of their respective

owners.

Type 'help;' or '\h' for help. Type '\c' to clear the current input statement.

mysql>
设置密码
SET PASSWORD FOR 'root'@'localhost' = PASSWORD('Mysqlpassw0rd.');

alter user 'root'@'localhost' identified by 'Mysqlpassw0rd.';
注意:mysql的密码有规则限制,所以不能太简单
5. 安装git
sudo yum install git
6.安装python3
备份python2.7
cd /usr/bin

mv python python.bak
下载安装python3
1.	yum install openssl-devel bzip2-devel expat-devel gdbm-devel readline-devel sqlite-devel  mysql-devel gcc gcc-devel python-devel

2.	mkdir /usr/local/python3

        cd /usr/local/python3

3.      wget "https://www.python.org/ftp/python/3.6.5/Python-3.6.5.tgz"

4.	tar -zxvf Python-3.6.5.tgz

5.	Python-3.6.5/configure --prefix=/usr/local/python3

6.	cd Python-3.6.5

7.	make

8.     make install

9.	ln -s /usr/local/python3/bin/python3 /usr/bin/python3

10.   ln -s /usr/local/python3/bin/pip3 /usr/bin/pip3
软链接创建完毕之后。再说个事情,就是centos的yum命令是需要python支持的,我们贸然把当期的版本更换了,万一yum出错怎么办,还是让yum依然用原来的2.7版本吧。好吧我们帮它改一下吧:
注意:下面这个操作用vi操作,不熟悉vi的同学一定要按照我的指示来,不然你一脸懵逼连修改后的文件怎么保存退出都不知道。
首先输入命令,然后回车:
[root@localhost bin]# vi /usr/bin/yum
接下来出现一个全新的界面。此时任何按键都不要动。听我指示。
首先,切换到英文输入法,再输入字符 i 是aeiou的i
然后就可以开始编辑这个文件了。
把文件开头第一行的
#!/usr/bin/python改成#!/usr/bin/python2.7 这样就可以了。
设置python和pip为python3
alias python='python3'

alias pip='pip3'
7.安装virtualenv
ln -s /usr/local/python3/bin/pip3 /usr/bin/pip3

pip install virtualenv

ln -s /usr/local/python3/bin/virtualenv /usr/bin/virtualenv

virutalenv -p /usr/bin/python3
8.pip3使用豆瓣源
vi ~/.pip/pip.conf

内容

[global]

timeout = 60

index-url = https://pypi.douban.com/simple

如果使用http链接,则需要trusted-host参数

[global]

timeout = 60

index-url = http://pypi.douban.com/simple

trusted-host = pypi.douban.com
centos7项目部署的更多相关文章
- .NET Core跨平台:.NET Core项目部署到linux(Centos7)
1.开篇说明 a 上篇博客简单的说明了一下 使用.NET Core开发的一个总结,地址是:(http://www.cnblogs.com/hanyinglong/p/6442148.html),那么这 ...
- 基于腾讯云CentOS7.4+MySQL5.7+Python3+uwsgi+nginx的Django项目部署
准备知识 1.django一个基于python的开源web框架,请确保自己熟悉它的框架目录结构. 2.uWSGI一个基于自有的uwsgi协议.wsgi协议和http服务协议的web网关 3.nginx ...
- centos7+tomcat部署JavaWeb项目超详细步骤
我们平时访问的网站大多都是发布在云服务器上的,比如阿里云.腾讯云等.对于新手,尤其是没有接触过linux系统的人而言是比较有困难的,而且至今使用云服务器也是有成本的,很多时候我们可以通过虚拟机自己搭建 ...
- 【转载】centos7+tomcat部署JavaWeb项目超详细步骤
我们平时访问的网站大多都是发布在云服务器上的,比如阿里云.腾讯云等.对于新手,尤其是没有接触过linux系统的人而言是比较有困难的,而且至今使用云服务器也是有成本的,很多时候我们可以通过虚拟机自己搭建 ...
- SpringMVC项目部署到CentOS7虚拟机问题及解决办法记录
1.前言 计划将之前在Windows系统上练手做的项目部署到云服务器上,想先在本地虚拟机上测试一下是否可行,过程中发现很多问题,特此记录.还有问题未能解决,希望后面能有思路. 突然想到是否和数据库有关 ...
- CentOS7安装部署zabbix3.4操作记录
CentOS7安装部署zabbix3.4操作记录 1.安装前准备 1.1 查看centos的系统版本 [root@zabbix ~]# cat /etc/redhat-release CentOS L ...
- CentOS7中部署Showdoc
目录 CentOS7中部署Showdoc 前置环境 部署 配置文件 解压安装包 添加启动服务 设置权限 运行安装 界面 CentOS7中部署Showdoc 文:铁乐与猫 前置环境 因为showdoc其 ...
- CentOS7上部署ASP.Net Core 2.2应用
前言 在CentOS7上部署ASP.Net Core应用是我的技术路线验证的一部分,下一个产品计划采用ASP.Net Boilerplate Framework开发.因此需要求提前进行一下技术验证,在 ...
- (转)Centos7上部署openstack ocata配置详解
原文:http://www.cnblogs.com/yaohong/p/7601470.html 随笔-124 文章-2 评论-82 Centos7上部署openstack ocata配置详解 ...
随机推荐
- SQL 创建分区表
(以项目中实际使用的GNSS库为例) 背景:数据量巨大,定时创建月表存放数据,月表中数据存放在不同的文件组中来提高查询效率 一.创建数据库,添加文件组 除了逻辑文件和物理文件的分离之外,SQL S ...
- Expression
表达式目录树 1.什么是表达式目录树Expression? 表达式目录树是一个数据结构,语法树. 首先我们去看看 Expressions类 ,定义了一个泛型委托类型 TDelegate: // 摘要: ...
- Windows的GDI映射方式,逻辑坐标,设备坐标的理解
最近在学Win32的编程,看的是<Windows程序设计第5版>一书,这本书是台湾人翻译的,有些译法和大陆不一样,书中还有一些错误的地方,很多时候需要中英文对照阅读,下载请点击 https ...
- Get https://registry-1.docker.io/v2/: net/http: request canceled while waiting for connection (Clien
https://blog.csdn.net/asahinokawa/article/details/84746422
- PHP奇淫技巧
https://www.jb51.net/list/list_67_1.htm PHP技巧:https://www.jb51.net/list/list_67_13.htm mysql三范式 1NF: ...
- HTML5新增特性
1. 语义化标签 2. 增强型表单 (1)新的表单输入类型 (2)新表单元素 (3)新表单属性 3. 视频和音频 4. Canvas绘图(图形.路径.文本.渐变.图像) 5. SVG绘图 (与Canv ...
- Python的GIL机制与多线程编程
GIL 全称global interpreter lock 全局解释锁 gil使得python同一个时刻只有一个线程在一个cpu上执行字节码,并且无法将多个线程映射到多个cpu上,即不能发挥多个cpu ...
- ondaHTTPError: HTTP 000 CONNECTION FAILED for url
可能是网络问题,换网络. 可能是获取库的IP无法链接到,换库的IP,如添加清华镜像IP等.
- C Programming Style 总结
对材料C Programming Style for Engineering Computation的总结. 原文如下: C Programming Style for Engineering Com ...
- Photoshop调出外景婚片蓝色小清新艺术效果
春季婚纱旺季来了,好多童鞋给我抱怨说客片太难转色了,春天的小清新感都转不了,其实并不难,运用好互补色来进行加减色,能很快调整好照片的偏色,互补色也可称为对比色,后期调色的加也可称为减,如加蓝=减黄.加 ...