
scrapy爬虫事件以及数据保存为txt,json,mysql
今天要爬取的网页是虎嗅网
我们将完成如下几个步骤:
- 创建一个新的Scrapy工程
- 定义你所需要要抽取的Item对象
- 编写一个spider来爬取某个网站并提取出所有的Item对象
- 编写一个Item Pipline来存储提取出来的Item对象
创建Scrapy工程
在任何目录下执行如下命令
scrapy startproject coolscrapy
cd coolscrapy

scrapy genspider huxiu huxiu.com
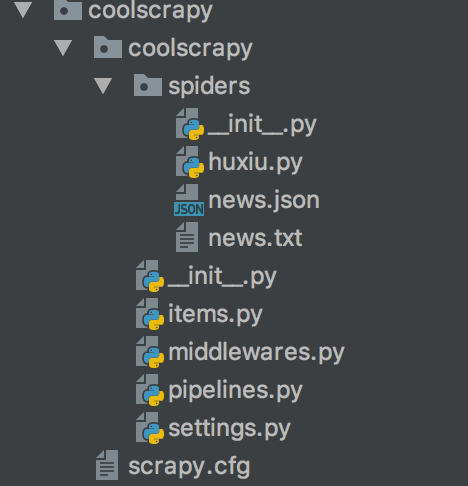
我们看看创建的工程目录结构:(news.json,news.txt是最后结果保存的)
定义Item
我们通过创建一个scrapy.Item类,并定义它的类型为scrapy.Field的属性, 我们准备将虎嗅网新闻列表的名称、链接地址和摘要爬取下来。
 import scrapy

 class CoolscrapyItem(scrapy.Item):

     # define the fields for your item here like:

     # name = scrapy.Field()

     title = scrapy.Field() #标题

     link = scrapy.Field() #链接

     desc = scrapy.Field() #简述

     posttime = scrapy.Field() #发布时间
编写Spider
蜘蛛就是你定义的一些类,Scrapy使用它们来从一个domain(或domain组)爬取信息。 在蜘蛛类中定义了一个初始化的URL下载列表,以及怎样跟踪链接,如何解析页面内容来提取Item。
定义一个Spider,只需继承scrapy.Spider类并定于一些属性:
- name: Spider名称,必须是唯一的
- start_urls: 初始化下载链接URL
- parse(): 用来解析下载后的Response对象,该对象也是这个方法的唯一参数。 它负责解析返回页面数据并提取出相应的Item(返回Item对象),还有其他合法的链接URL(返回Request对象)。
我们打开在coolscrapy/spiders文件夹下面的huxiu.py,内容如下:
 # -*- coding: utf-8 -*-

 import scrapy

 from coolscrapy.items import CoolscrapyItem

 class HuxiuSpider(scrapy.Spider):

     name = "huxiu"

     allowed_domains = ["huxiu.com"]

     start_urls = ['http://huxiu.com/index.php']

     def parse(self, response):

         items = []

         data = response.xpath('//div[@class="mod-info-flow"]/div/div[@class="mob-ctt"]')

         for sel in data:

             item = CoolscrapyItem()

             if len(sel.xpath('./h2/a/text()').extract()) <= 0:

                 item['title'] = 'No title'

             else:

                 item['title'] = sel.xpath('./h2/a/text()').extract()[0]

             if len(sel.xpath('./h2/a/@href').extract()) <= 0:

                 item['link'] = 'link在哪里!!!!!!!!'

             else:

                 item['link'] = sel.xpath('./h2/a/@href').extract()[0]

             url = response.urljoin(item['link'])

             if len(sel.xpath('div[@class="mob-sub"]/text()').extract()) <= 0:

                 item['desc'] = '啥也没有哦...'

             else:

                 item['desc'] = sel.xpath('div[@class="mob-sub"]/text()').extract()[0]

             #item['posttime'] = sel.xpath('./div[@class="mob-author"]/span/@text()').extract()[0]

             print(item['title'], item['link'], item['desc'])

             items.append(item)

         return items
现在可以在终端运行了,是可以打印每个新闻信息的。
scrapy crawl huxiu
如果一切正常,应该可以打印出每一个新闻
处理链接
如果想继续跟踪每个新闻链接进去,看看它的详细内容的话,那么可以在parse()方法中返回一个Request对象, 然后注册一个回调函数来解析新闻详情。
下面继续编写huxiu.py
# -*- coding: utf-8 -*-

import scrapy

from coolscrapy.items import CoolscrapyItem

class HuxiuSpider(scrapy.Spider):

    name = "huxiu"

    allowed_domains = ["huxiu.com"]

    start_urls = ['http://huxiu.com/index.php']

    def parse(self, response):

        #items = []

        data = response.xpath('//div[@class="mod-info-flow"]/div/div[@class="mob-ctt"]')

        for sel in data:

            item = CoolscrapyItem()

            if len(sel.xpath('./h2/a/text()').extract()) <= 0:

                item['title'] = 'No title'

            else:

                item['title'] = sel.xpath('./h2/a/text()').extract()[0]

            if len(sel.xpath('./h2/a/@href').extract()) <= 0:

                item['link'] = 'link在哪里!!!!!!!!'

            else:

                item['link'] = sel.xpath('./h2/a/@href').extract()[0]

            url = response.urljoin(item['link'])

            if len(sel.xpath('div[@class="mob-sub"]/text()').extract()) <= 0:

                item['desc'] = '啥也没有哦...'

            else:

                item['desc'] = sel.xpath('div[@class="mob-sub"]/text()').extract()[0]

            #item['posttime'] = sel.xpath('./div[@class="mob-author"]/span/@text()').extract()[0]

            print(item['title'], item['link'], item['desc'])

            #items.append(item)

        #return items

            yield scrapy.Request(url,callback=self.parse_article)

    def parse_article(self,response):

        detail = response.xpath('//div[@class="article-wrap"]')

        item = CoolscrapyItem()

        item['title'] = detail.xpath('./h1/text()')[0].extract().strip()

        item['link'] = response.url

        item['posttime'] = detail.xpath('./div/div[@class="column-link-box"]/span[1]/text()')[0].extract()

        print(item['title'],item['link'],item['posttime'])

        yield item
现在parse只提取感兴趣的链接,然后将链接内容解析交给另外的方法去处理了。 你可以基于这个构建更加复杂的爬虫程序了。
导出抓取数据
最简单的保存抓取数据的方式是使用json格式的文件保存在本地,像下面这样运行:
scrapey crawl huxiu -o items.json
一般构建爬虫系统,建议自己编写Item Pipeline
数据保存为TXT/JSON/MySql
1.数据保存为TXT
打开Pipeline.py
 import codecs

 import os

 import json

 import pymysql

 class CoolscrapyPipeline(object):#需要在setting.py里设置'coolscrapy.piplines.CoolscrapyPipeline':300

     def process_item(self, item, spider):

         # 获取当前工作目录

         base_dir = os.getcwd()

         fiename = base_dir + '/news.txt'

         # 从内存以追加的方式打开文件,并写入对应的数据

         with open(fiename, 'a') as f:

             f.write(item['title'] + '\n')

             f.write(item['link'] + '\n')

             f.write(item['posttime'] + '\n\n')

         return item
2.保存为json格式
在Pipeline.py里面新建一个类
 #以下两种写法保存json格式,需要在settings里面设置'coolscrapy.pipelines.JsonPipeline': 200

 class JsonPipeline(object):

     def __init__(self):

         self.file = codecs.open('logs.json', 'w', encoding='utf-8')

     def process_item(self, item, spider):

         line = json.dumps(dict(item), ensure_ascii=False) + "\n"

         self.file.write(line)

         return item

     def spider_closed(self, spider):

         self.file.close()

 class JsonPipeline(object):

     def process_item(self, item, spider):

         base_dir = os.getcwd()

         filename = base_dir + '/news.json'

         # 打开json文件,向里面以dumps的方式吸入数据

         # 注意需要有一个参数ensure_ascii=False ,不然数据会直接为utf编码的方式存入比如

         # :“/xe15”

         with codecs.open(filename, 'a') as f:

             line = json.dumps(dict(item), ensure_ascii=False) + '\n'

             f.write(line)

         return item
上面是两种写法,都是一样的
3.保存到mysql
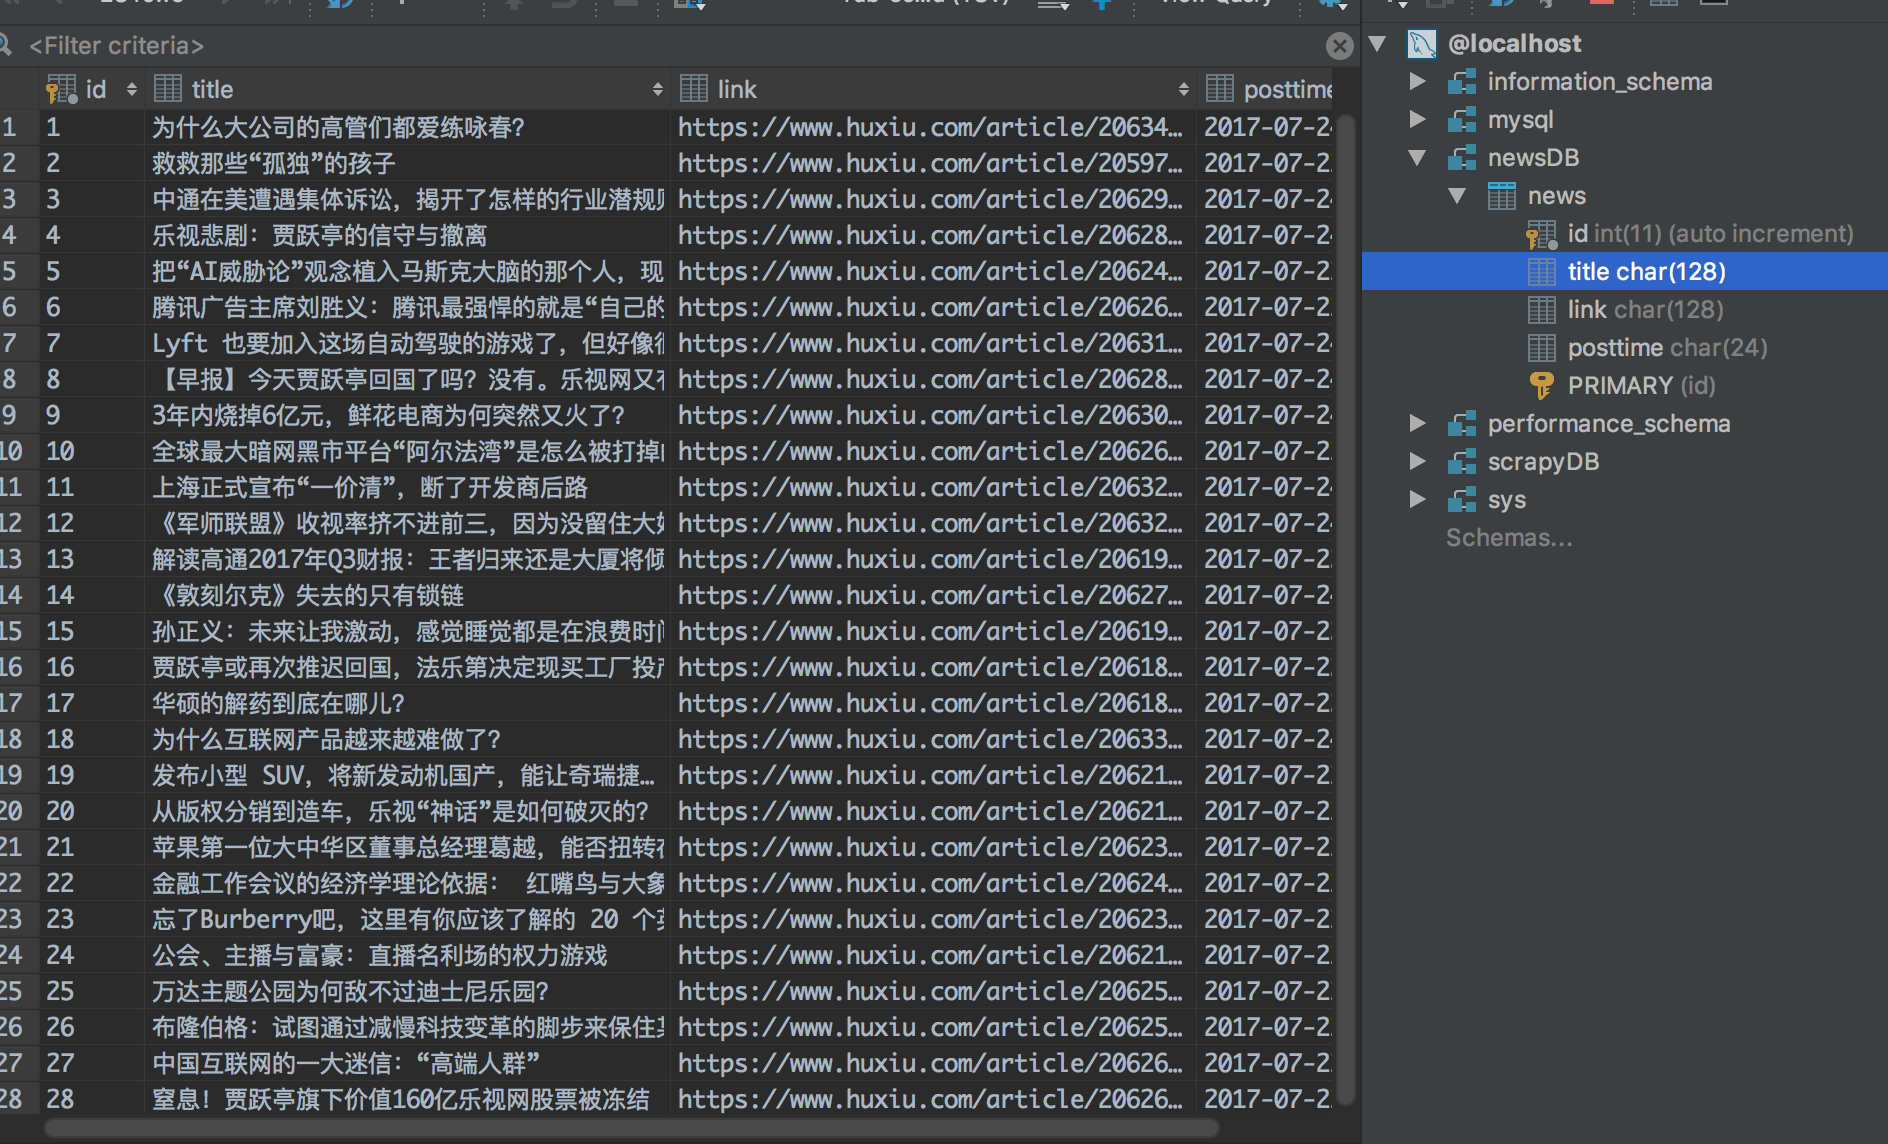
保存到数据库需要建立表格newsDB,详情请参考http://www.cnblogs.com/freeman818/p/7223161.html
在Pipeline.py里面新建一个类
 class mysqlPipeline(object):

     def process_item(self,item,spider):

         '''

         将爬取的信息保存到mysql

         '''

         # 将item里的数据拿出来

         title = item['title']

         link = item['link']

         posttime = item['posttime']

         # 和本地的newsDB数据库建立连接

         db = pymysql.connect(

             host='localhost',  # 连接的是本地数据库

             user='root',  # 自己的mysql用户名

             passwd='',  # 自己的密码

             db='newsDB',  # 数据库的名字

             charset='utf8mb4',  # 默认的编码方式:

             cursorclass=pymysql.cursors.DictCursor)

         try:

             # 使用cursor()方法获取操作游标

             cursor = db.cursor()

             # SQL 插入语句

             sql = "INSERT INTO NEWS(title,link,posttime) \

                   VALUES ('%s', '%s', '%s')" % (title,link,posttime)

             # 执行SQL语句

             cursor.execute(sql)

             # 提交修改

             db.commit()

         finally:

             # 关闭连接

             db.close()

         return item
编写Settings.py
我们需要在Settings.py将我们写好的PIPELINE添加进去,
scrapy才能够跑起来
这里只需要增加一个dict格式的ITEM_PIPELINES,
数字value可以自定义,数字越小的优先处理
 ITEM_PIPELINES={'coolscrapy.pipelines.CoolscrapyPipeline':300,

                 'coolscrapy.pipelines.JsonPipeline': 200,

                 'coolscrapy.pipelines.mysqlPipeline': 100,

 }
下面让程序跑起来
scrape crawl huxiu
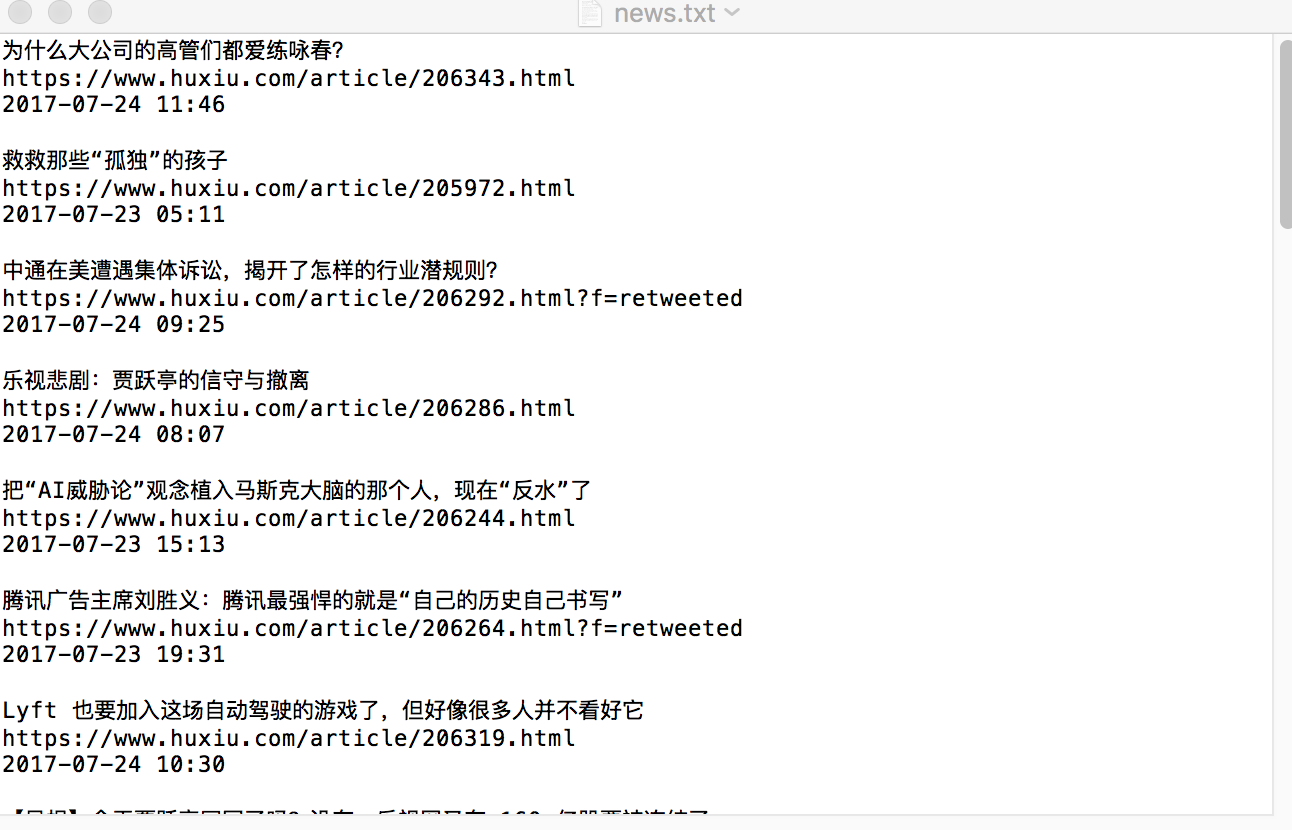
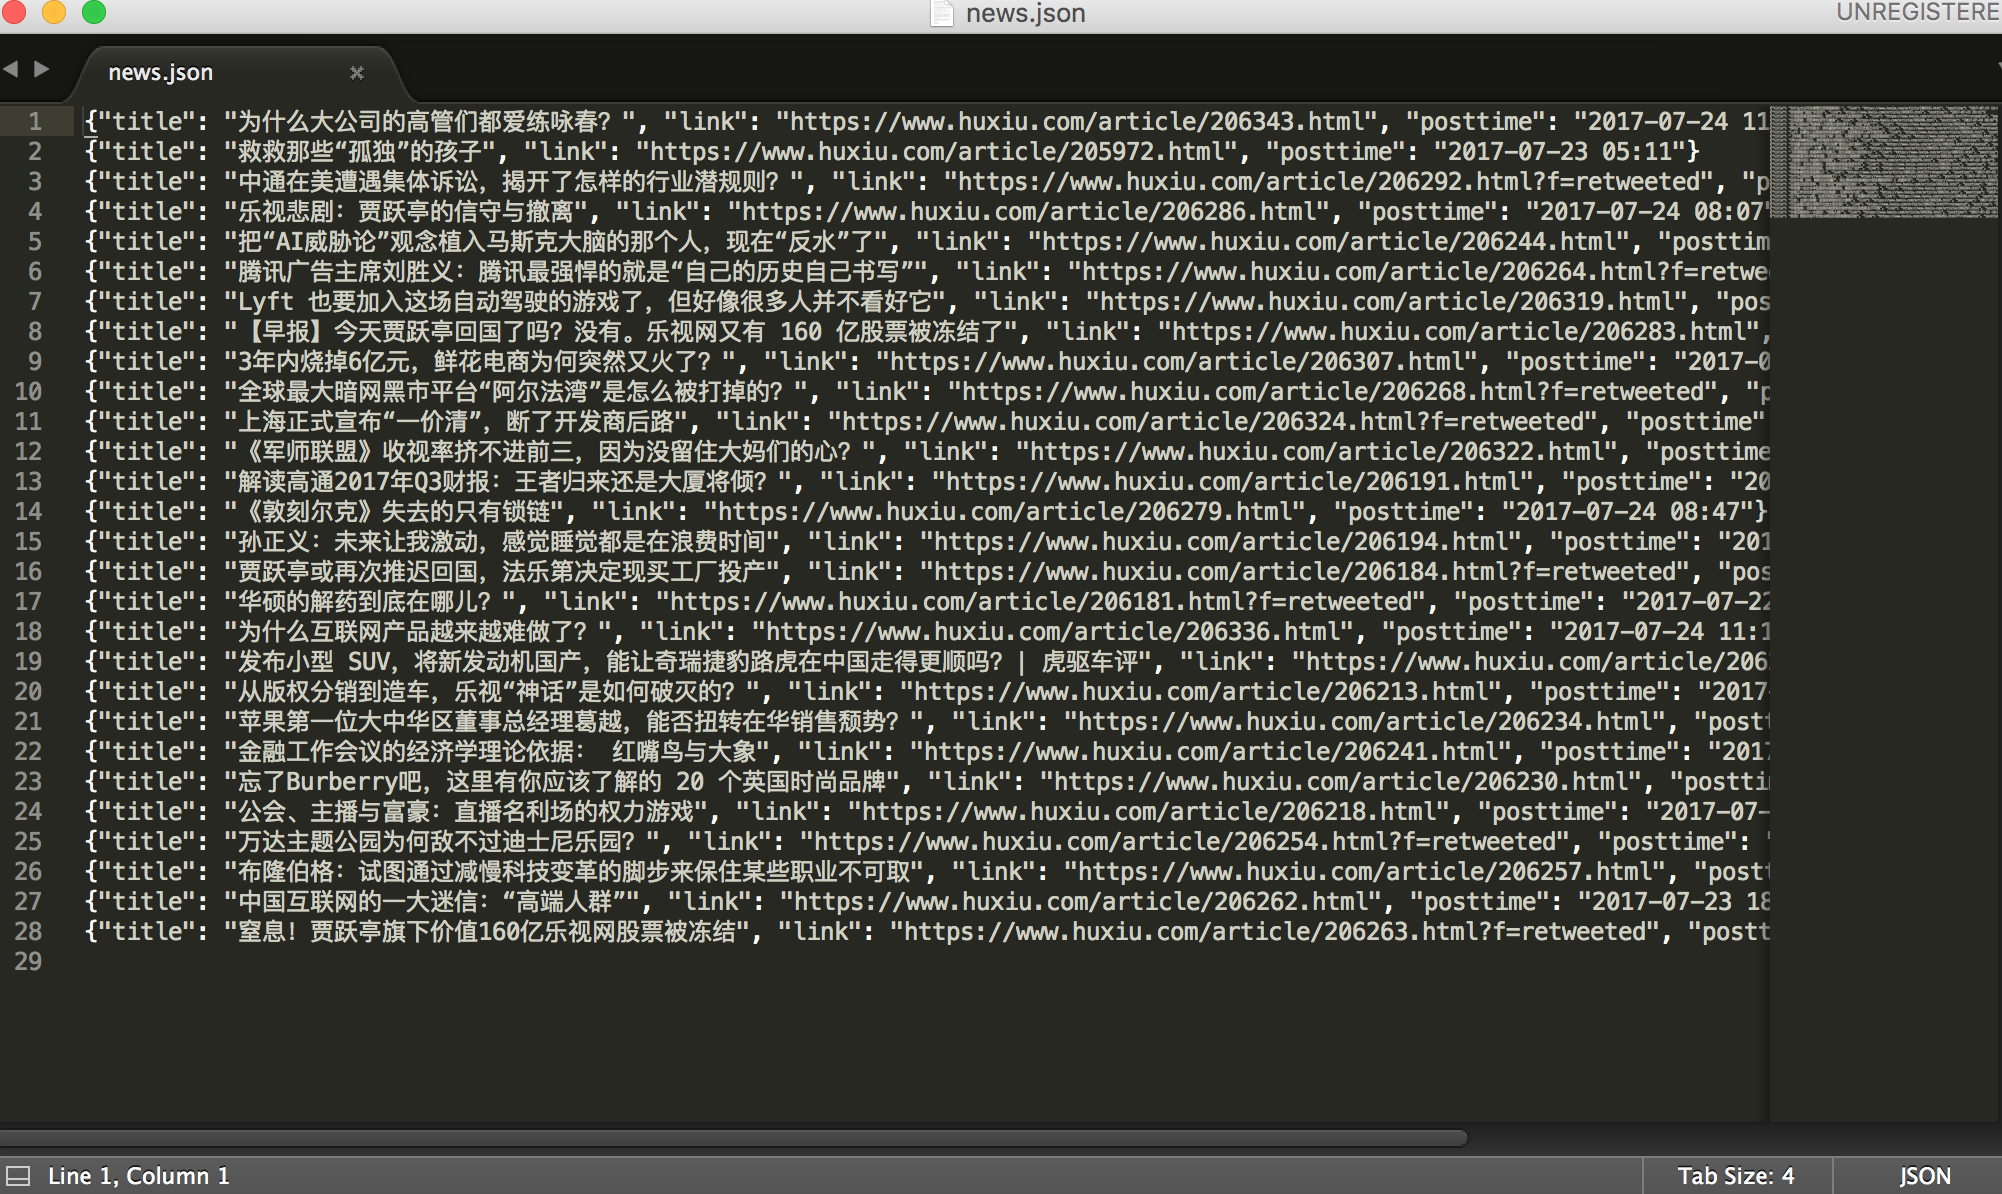
看看结果:
好了,这次就到这里。代码要自己敲才会慢慢熟练。
scrapy爬虫事件以及数据保存为txt,json,mysql的更多相关文章
- python3+Scrapy爬虫使用pipeline数据保存到文本和数据库,数据少或者数据重复问题
爬取的数据结果是没有错的,但是在保存数据的时候出错了,出现重复数据或者数据少问题.那为什么会造成这种结果呢? 其原因是由于Spider的速率比较快,而scapy操作数据库操作比较慢,导致pipelin ...
- python爬虫:将数据保存到本地
一.python语句存储 1.with open()语句 with open(name,mode,encoding) as file: file.write() name:包含文件名称的字符串; mo ...
- Python将数据保存为txt文件的方法
f = open('name.txt',mode='w') #打开文件,若文件不存在系统自动创建. #参数name 文件名,mode 模式. #w 只能操作写入 r 只能读取 a 向文件追加 #w+ ...
- spark sql中将数据保存成parquet,json格式
val df = sqlContext.load("/opt/modules/spark1.3.1/examples/src/main/resources/people.json" ...
- scrapy爬虫保存数据
1.数据保存为TXT 打开Pipeline.py import codecs import os import json import pymysql class CoolscrapyPipeline ...
- 图像特征的提取(gaussian,gabor,frangi,hessian,Morphology...)及将图片保存为txt文件
# -*- coding: utf-8 -*- #2018-2-19 14:30:30#Author:Fourmi_gsj import cv2 import numpy as np import p ...
- 第三百四十二节,Python分布式爬虫打造搜索引擎Scrapy精讲—爬虫数据保存
第三百四十二节,Python分布式爬虫打造搜索引擎Scrapy精讲—爬虫数据保存 注意:数据保存的操作都是在pipelines.py文件里操作的 将数据保存为json文件 spider是一个信号检测 ...
- 二十一 Python分布式爬虫打造搜索引擎Scrapy精讲—爬虫数据保存
注意:数据保存的操作都是在pipelines.py文件里操作的 将数据保存为json文件 spider是一个信号检测 # -*- coding: utf-8 -*- # Define your ite ...
- scrapy爬虫案例:用MongoDB保存数据
用Pymongo保存数据 爬取豆瓣电影top250movie.douban.com/top250的电影数据,并保存在MongoDB中. items.py class DoubanspiderItem( ...
随机推荐
- appium历史版本下载地址
https://github.com/appium/appium-desktop/releases
- Java Array 方法和使用
1.Arrays.toString():数组转字符串 格式:Arrays.toString(数组名) 将数组转化成字符串,此时输出的结果是字符串类型. import java.util.Arrays; ...
- HBase之八--(2):HBase二级索引之Phoenix
1. 介绍 Phoenix 是 Salesforce.com 开源的一个 Java 中间件,可以让开发者在Apache HBase 上执行 SQL 查询.Phoenix完全使用Java编写,代码位于 ...
- 同步机制之--java之CountDownLatch闭锁
CountDownLatch闭锁 1.类介绍 一个同步辅助类,在完成一组正在其他线程中执行的操作之前,它允许一个或多个线程一直等待.用给定的计数初始化 CountDownLatch.CountDown ...
- 查询mysql数据库启动时间抛异常
mysql 5.7.10使用dbforget Studio 连接异常 提示:The'INFORMATION_SCHEMA.SESSION_VARIABLES' feature is dis 查看mys ...
- 关闭easyui Tabs,有意思的JS异步处理
因业务需要,需要将关闭windows窗口内的所有Tabs关闭掉,因此写了个方法,执行结果把我惊了一下. function closeAllTabs() { var tabsCount = $(&quo ...
- 侯捷stl学习笔记链接
http://www.cnblogs.com/ranjiewen/category/799058.html http://www.cnblogs.com/ranjiewen/p/8260275.htm ...
- 走了很多弯路的CCScrollView
最近在学习Cocos2d-x,学习CCScrollView的时候走了很多弯路,决定记录下来. 学习cocos2d-x的最大的困惑就是资料不是很齐全,网上有很多资料,但是版本差异大,其次深度低,讲解不够 ...
- springboot-shiro chapter01——创建springboot webmvc环境
简介:本章提供了springboot简单例子,主要包含以下内容 1.pom.xml依赖资源 2.springboot配置 3.web应用spring mvc 环境: IDEA15+ JDK1.8+ M ...
- Python入门——import
最近身边的人或多或少都知道一点python,自己也想动手试试吧.按照网上的教程,安装了python,Eclipse插件pydev.接下来就是在Eclipse下新建工程,创建py文件这就不多说了. 第一 ...