Ionic 4 and the Lifecycle Hooks
原文: https://medium.com/@paulstelzer/ionic-4-and-the-lifecycle-hooks-4fe9eabb2864
--------------------------------------------------------------------------------------------
There are a lot of questions related to Ionic 4 and the Lifecycle Hooks. There are new issues at the Ionic Github Repository where people complain that the Lifecycle Hooks are not working. So I will tell you in this article when the Lifecycle Hooks are running in Ionic 4.
For example:
When I navigate from the home to another route, the lifecycle ngOnDestroy of the home component is not executed
But why? Let’s start how Lifecycle Hooks working in Ionic 4!
TL;DR
Please skip to the end of the page, I added a short summary ;)
Ionic 4 uses the Angular Lifecycle Hooks
The first good news: Ionic 4 uses the Angular Lifecycle Hooks! So you can use ngOnInit, ngOnDestroy and all other Lifecycle hooks and do not have to remember the special ones from Ionic. Read more about Angular Lifecycle Hooks at the official documentation!
Short recap: How it was in Ionic 3
If you already used Ionic 3, then you will used ionViewDidLoad, ionViewWillEnterand ionViewDidEnteron pushing a new view and if the current view pops away you use ionViewWillLeave, ionViewDidLeaveand ionViewWillUnload. Also two nav guards ( ionViewCanEnter and ionViewCanLeave) . At the Ionic Blog you find a very good post about it and the following image which shows the lifecycles very good:
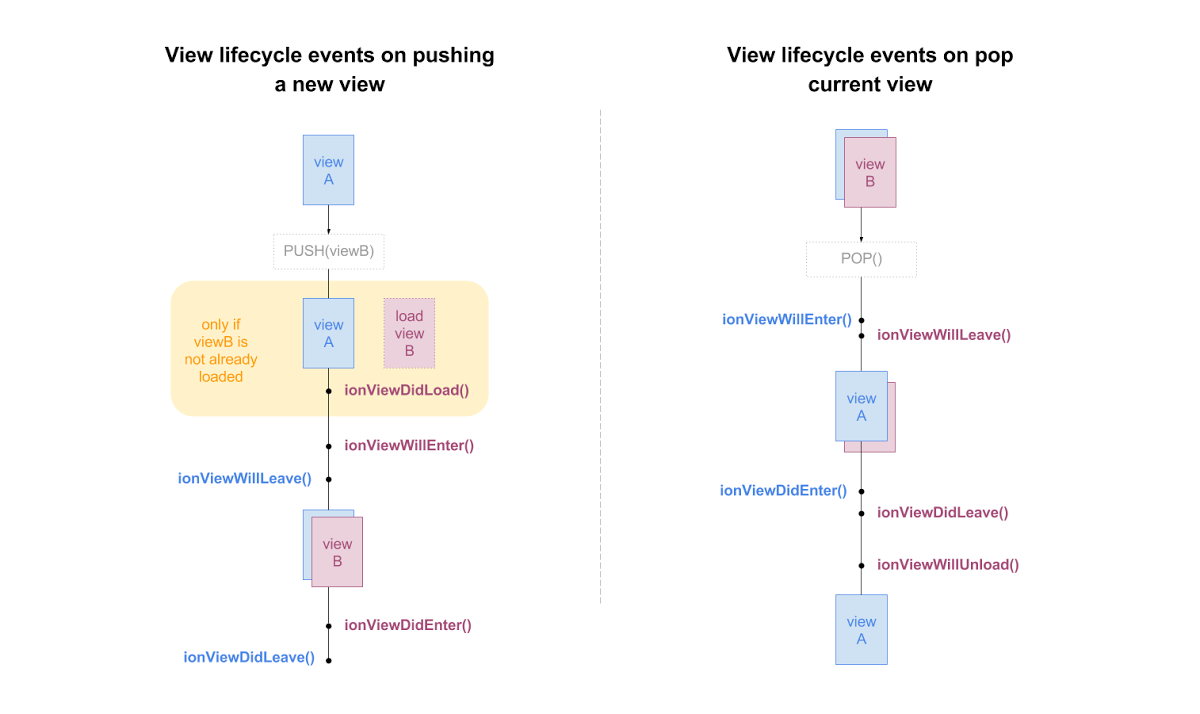
Ionic 3 lifecycle — Source: blog.ionicframework.com
Are these lifecycles still working?
Yes, Ionic has still this lifecycles (see in Github). Only ionViewDidLoad has been replaced with Angular Lifecycle (use ngOnInit now).
Also the two nav guards ( ionViewCanEnter and ionViewCanLeave) were removed because Angular Router provides route guards, so you can determine if a user can access a route and can leave a route ( canActivate and canDeactivate ). ionViewWillUnloadis not required if you use Angular, here you have to use ngOnDestroy . But Ionic 4 is framework independent, so in other cases this can be useful. ionViewWillEnter, ionViewDidEnterionViewWillLeaveand ionViewDidLeave are still very nice, but more about it later!
Ionic 4 and ion-router-outlet
If you already created a sample app like the blank starter, tabs starter, or sidemenu starter, you will notice the <ion-router-outlet></ion-router-outlet> instead of <router-outlet></router-outlet> in your app.component.html and a
{ provide: RouteReuseStrategy, useClass: IonicRouteStrategy }
in your app.module.ts.
You can still use <router-outlet></router-outlet> with the Ionic 4 components, but the Ionic team added a special feature to it:
A “stack” functionality like in Ionic 3
Okay! And what does this mean?
Normally if you switch from one route to another in Angular, the components will be destroyed immediately. The Ionic router keeps the components (Ionic calls it pages — I like this terminology) in a stack. They are not destroyed by default.
Show me in practice
Enough theory, let’s see how it works in practice. I created a new project based on the starter package of Ionic and created two new pages: ListPage and ListItemPage. ListPage contains a list of items and if I tap on a item, I will redirect to the ListItemPage.
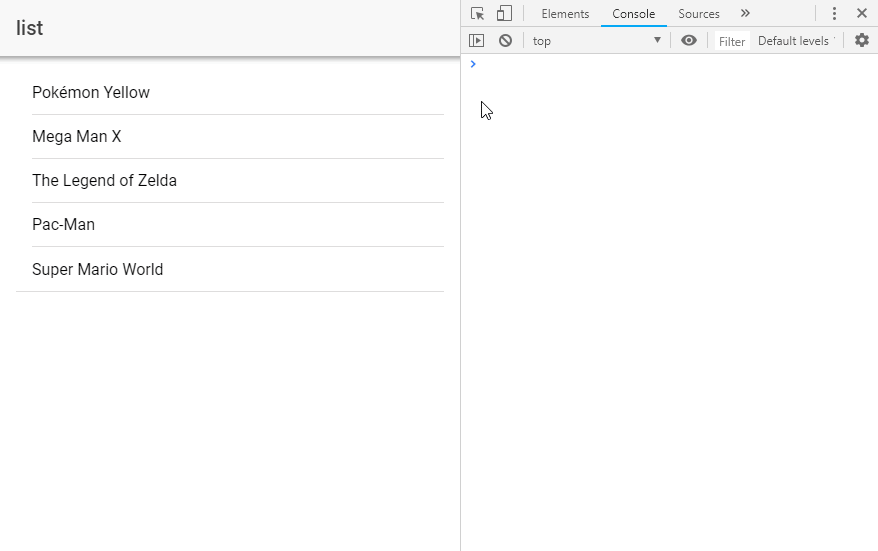
Lifecycle in Ionic 4
The GIF above shows a lot of details, so I will guide you through it:
- We start on ListPage and I tap on a item, so I will navigate to the ListItemPage (I navigate forward). Take a look at the console: No ngOnDestroy! But this is not a bug!
Here is the source code. I am using NavController from Ionic (navigateForward() is the same like router.navigate() )
gotoItem() {
  // navController is instanceof NavController from '@ionic/angular'
  // the following is the same like this.router.navigate()
  this.navController.navigateForward(['/list-item']);
}
2. I am on ListItemPage now! I am using the <ion-back-button>, but you can also use navController.navigateBack(url). If I tap on the back button, you see ‘ngOnDestroy ListItem’ in the console.
3. If I take a look at the inspector and see the elements, you see the stack functionality. The ListPage is still in our DOM, it’s not visible because it’s behind the ListItemPage. If I navigate backward, the ListItemPage will be destroyed (removed from the stack — also removed from DOM).
In short: Whenever you wonder, why ngOnDestroy is not firing, just take a look at the DOM inspector and you will see that the component is still there. It’s not destroyed yet, so ngOnDestroy is not firing!
Earlier I talked about the special Ionic Lifecycles. We can use them here now! If you leave ListPage and want to cancel the observables, just do it inside ionViewWillLeave or ionViewDidLeave. If the component becomes active again, just subscribe to that observable inside ionViewWillEnteror ionViewDidEnter. Everything in ngOnInit will not be triggered because the component was already initialized.
And when I want to destroy ListPage ?
If you do not want to push ListPage into the stack, just use navigateRoot() of the NavController!
gotoItem() {
  this.navController.navigateRoot(['/list-item']);
}
If you execute this now, ngOnDestroy will be triggered, the component will be removed from DOM. It’s not added to the stack.
And what about ion-tabs?
At the moment (beta.15) ion-tabs are only lazy loading at the beginning. Open a tab initialize the component. If you now switch to another tab, this will be initialize at the first time. If you move back to the last tab, you will not see any Lifecycle hooks (neither ngOnInit nor ionViewWillEnter ).
If you remove the TabsPage from the Stack (for example by navigateRoot() to another route), all components will be destroyed at once. Then you will see the ngOnDestroy lifecycle hook.
Maybe the lifecycle of tabs change in future, but for now this is the behaviour. You can take a look at this issue at GitHub to follow that process.
Summary: Lifecycles in Ionic 4
Okay Paul, nice background information, but what should I memorize?
- Ionic 4 extends the Router Navigation of Angular
- Ionic 4 introduces a stack functionality (like in Ionic 3)
- Ionic 4 adds new Lifecycle Hooks to Angular:
ionViewWillEnter— Fired when entering a page (also if it’s come back from stack)ionViewDidEnter— Fired after entering (also if it’s come back from stack)ionViewWillLeave— Fired if the page will leaved (also if it’s keep in stack)ionViewDidLeave— Fired after the page was leaved (also if it’s keep in stack)ionViewWillUnload— In Angular not firing because here you have to usengOnDestroy - Except
ionViewDidLoad(because it’s the same likengOnInit) and the two nav guards all Lifecycle hooks from Ionic 3 are still available ngOnInitwill not be triggered, if you come back to a page after putting it into a stack- By default, if you navigate forward, the current page keeps in stack, so NO
ngOnDestroywill be triggered. Only if you set the new page as root (navController.navigateRoot())) or you navigate backwards, it will be removed from stack - If you want to cancel Observables, just do it
ionViewWillLeaveorionViewDidLeaveand subscribe to it again inionViewWillEnterorionViewDidEnter - Take a look at the DOM inspector, there you can see that your page is still in the stack
- If you use the Angular Router, pages will add to the stack. I recommend to use the Ionic Angular NavController because here you can use the new stack functionality
- At the moment (beta.15) If you use ion-tabs, a tab will be initialized if you open it the first time and then stay active all time (it will not be removed nor any lifecycle hooks will be triggered if you switch back — see this issue at Github)
Do you have more questions or I write something not correctly, just let me know and post a comment!
Ionic 4 and the Lifecycle Hooks的更多相关文章
- [Recompose] Add Lifecycle Hooks to a Functional Stateless Component using Recompose
Learn how to use the 'lifecycle' higher-order component to conveniently use hooks without using a cl ...
- Kubernetes Container lifecycle hooks
简介 在kubernetes中,容器hooks旨在解决服务进程启动与停止时的一些优雅操作需求.比如说进程停止时要给进程一个清理数据的时间,保证服务的请求正常结束,而不是强行中断服务的运行,这样在生产环 ...
- [MST] Use Volatile State and Lifecycle Methods to Manage Private State
MST has a pretty unique feature: It allows you to capture private state on models, and manage this s ...
- kubernetes concepts -- Pod Lifecycle
Pod Lifecycle This page describes the lifecycle of a Pod. Pod phase A Pod’s status field is a PodSta ...
- Vue.js学习笔记(1)
数据的双向绑定(ES6写法) 效果: 没有改变 input 框里面的值时
- Vue.js:轻量高效的前端组件化方案
转发一篇尤老师对vue.js的介绍,了解vue.js的来龙去脉.不过现在已经是2.0了,也有添加一些新的东西,当然有些东西也改了. Vue.js:轻量高效的前端组件化方案 Vue.js 是我在2014 ...
- 各种报错各种坑 webpack让我在学习的过程中一度想要放弃
由于拓展部分不是必须的,只是可以增强用户体验,但是有些时候页面给分页预留的位置不够,这个时候我们就可以通过设置来除去这一部分 子分区由两种创建方法,一种是不定义每个子分区子分区的名字和路径由分区决定, ...
- vue.js慢速入门(2)
4.组件使用基础 什么是组件?组件可以理解为可重用的自定义HTML. 可以使用一堆组件来构造大型应用,任意类型的应用界面都可以抽象为一个组件树: 可以把组件代码按照template.style.scr ...
- Vue.js:轻量高效的前端组件化方案(转载)
摘要:Vue.js通过简洁的API提供高效的数据绑定和灵活的组件系统.在前端纷繁复杂的生态中,Vue.js有幸受到一定程度的关注,目前在GitHub上已经有5000+的star.本文将从各方面对Vue ...
随机推荐
- python opencv3 运动检测
git:https://github.com/linyi0604/Computer-Vision 思路: 开启摄像头后 设置一个当前帧为背景, 在之后检测到的帧都与背景对比不同,对不同的地方进行检测 ...
- CF1027F Session in BSU
link 花絮: 这场看起来打得还不错的样子……(别问我是用哪个号打的). 然后听说这题的思想被出了好多次,女生赛也出过,quailty算法,然而当时没反应过来,而且时间不多啦. 题意: 有n个人,每 ...
- hdu 2266 dfs
题意:在数字之间添加运算符号,使得结果等于题目中要求的Sample Input123456789 321 1Sample Output181 这题虽然看起来比较简单,但是之前和差的状态不太好表示,因此 ...
- Java并发(二十):线程本地变量ThreadLocal
ThreadLocal是一个本地线程副本变量工具类. 主要用于将私有线程和该线程存放的副本对象做一个映射,各个线程之间的变量互不干扰,在高并发场景下,可以实现无状态的调用,特别适用于各个线程依赖不同的 ...
- [LearnOpenGL]照相机的变换、坐标系、摄像机
前言 跟着LearnOpenGL上学着做项目,的确对于知识掌握得更清晰一些了. 第一个项目 第一个项目,是关于简单的熟悉矩阵变换的,创建了10个立方体,代码如下. // 视图矩阵,看作是一个照相机 g ...
- BZOJ 2750 HAOI 2012 Road 高速公路 最短路
题意: 给出一个有向图,求每条边有多少次作为最短路上的边(任意的起始点). 范围:n <= 1500, m <= 5005 分析: 一个比较容易想到的思路:以每个点作为起点,做一次SPFA ...
- UVALive 6257 Chemist's vows
#include<iostream> #include<string.h> #include<stdio.h> #include<ctype.h> #i ...
- bestcoder#23 1001 Sequence
Sequence Time Limit: 2000/1000 MS (Java/Others) Memory Limit: 32768/32768 K (Java/Others)Total Su ...
- PHP个人博客系统开发历程
声明: Author:GenialX GenialX's QQ:2252065614 GenialX's URL:胡旭博客 - www.ihuxu.com 一年多曾经的某一天,我在上交实验报告时,偶然 ...
- C#把文字转换成声音
在System.Speech命名空间下,SpeechSynthesizer类可以把文字读出来,一起来玩下~~ 首先在Windows窗体项目中引入System.Speech.界面部分: 后台代码也很简单 ...