
springboot-14-自定义properties文件值注入javaBean中
被这个问题困扰了好几天....
在spring中, 从资源文件向bean中注入值非常简单, 只需要properties文件被spring加载, 然后在被spring管理的类写响应的属性, 然后 @Value("${SERVER_URL") 的方式就可以取到值了
在springboot中, 同样的方式也可以取到值, 但未免感觉有点low, 所以苦苦寻觅好几天,
在这儿以创建一个ESClient的方式进行说明:
0, 在pom.xml中导入依赖
为什么叫0呢, 因为你不导入, 加上(1) 的注解, 会有警告黄线提示你导入
<dependency>

            <groupId>org.springframework.boot</groupId>

            <artifactId>spring-boot-configuration-processor</artifactId>

            <optional>true</optional>

        </dependency>
1, 在App.java中加入注解
@EnableConfigurationProperties
我的类上有注解, @EnableAutoConfiguration, 所以没有加
2, 将 elasticsearch.properties 文件放置在 source/ES/下

3, 然后在需要注入的类上加入注解:
@Component

@ConfigurationProperties(prefix = "escluster.transport")

@PropertySource("classpath:ES/elasticsearch.properties")
因为 5.1.0 以后, 取消了ConfigurationProperties中location属性, 所以使用 PropertySource 进行了替代, 也正是这个注解需要步骤一种的注解
查了挺多博客才找到原因: http://www.jianshu.com/p/b71845c142d0, 为此还找了个vpn, 挺好用, 想要可以联系 wenbronk@163.com
4, 完整的ESClient类代码
package com.iwhere.easy.travel.tool;

import java.net.InetSocketAddress;

import org.elasticsearch.client.Client;

import org.elasticsearch.common.settings.Settings;

import org.elasticsearch.common.transport.InetSocketTransportAddress;

import org.elasticsearch.transport.client.PreBuiltTransportClient;

import org.slf4j.Logger;

import org.slf4j.LoggerFactory;

import org.springframework.boot.context.properties.ConfigurationProperties;

import org.springframework.context.annotation.Bean;

import org.springframework.context.annotation.PropertySource;

import org.springframework.stereotype.Component;

/**

 * 获取esclient工具类

 *

 * @author wenbronk

 * @time 2017年4月5日 上午11:29:52 2017

 */

@Component

@ConfigurationProperties(prefix = "escluster.transport")

@PropertySource("classpath:ES/elasticsearch.properties")

public class ESClient {

    private Logger LOGGER = LoggerFactory.getLogger(ESClient.class);

    private String name;

    private String ip;

    private int port;

    private boolean sniff;

    private boolean ignore_cluster_name;

    private int ping_timeout;

    private int nodes_sampler_interval;

    /**

     * @return

     */

    @Bean(name = "client")

    public Client getEsClient() {

        Client client = null;

        Settings settings = Settings.builder().put("cluster.name", name)

                .put("client.transport.sniff", sniff)

                // .put("client.transport.ignore_cluster_name",

                // ESCLUSTER_IGNORE_NAME)

                // .put("client.transport.ping_timeout", ESCLUSTER_TIMEOUT)

                // .put("client.transport.nodes_sampler_interval",

                // ESCLUSTER_INTERVAL)

                .build();

        client = new PreBuiltTransportClient(settings).addTransportAddress(

                new InetSocketTransportAddress(new InetSocketAddress(ip, port)));

        LOGGER.info("transport client has created ");

        return client;

    }

    public Logger getLOGGER() {

        return LOGGER;

    }

    public void setLOGGER(Logger lOGGER) {

        LOGGER = lOGGER;

    }

    public String getName() {

        return name;

    }

    public void setName(String name) {

        this.name = name;

    }

    public String getIp() {

        return ip;

    }

    public void setIp(String ip) {

        this.ip = ip;

    }

    public int getPort() {

        return port;

    }

    public void setPort(int port) {

        this.port = port;

    }

    public boolean isSniff() {

        return sniff;

    }

    public void setSniff(boolean sniff) {

        this.sniff = sniff;

    }

    public boolean isIgnore_cluster_name() {

        return ignore_cluster_name;

    }

    public void setIgnore_cluster_name(boolean ignore_cluster_name) {

        this.ignore_cluster_name = ignore_cluster_name;

    }

    public int getPing_timeout() {

        return ping_timeout;

    }

    public void setPing_timeout(int ping_timeout) {

        this.ping_timeout = ping_timeout;

    }

    public int getNodes_sampler_interval() {

        return nodes_sampler_interval;

    }

    public void setNodes_sampler_interval(int nodes_sampler_interval) {

        this.nodes_sampler_interval = nodes_sampler_interval;

    }

}
现在就完成了springboot从properties文件向bean中注值问题的解决
写在最后, 不要在构造方法中使用 @Autowired的值, 猜测应该是对象创建完成后才会对值进行导入, 再次坑了很久
对于yml格式的文件, 注入值的方式为:
@Component

@ConfigurationProperties(prefix = "interface.server.url")

// @PropertySource("classpath:server_url.yml")

public class BaseInterfaceUtil {

    private static Logger LOGGER = LoggerFactory.getLogger(BaseInterfaceUtil.class);

    private String geosot;

        @setGet

}
yml文件的书写格式:

如果是单独的properties文件, 也可以使用
ResourceBundle.getBundle("fileName")
他会默认加载 classpath: 下的 fileName.properties文件, 并存入一个map集合中
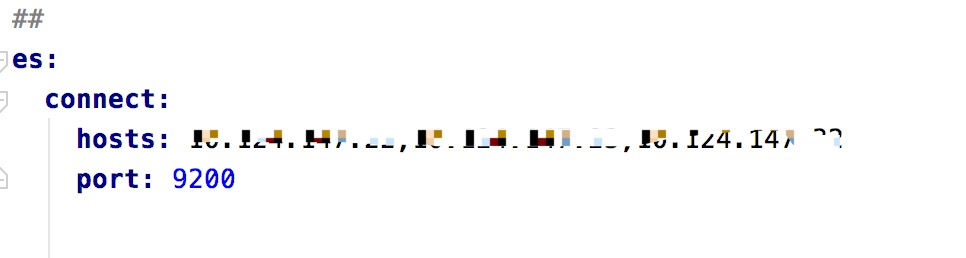
5, 如果直接在application.yml中写配置, 可以
package rdp.hive.phone.job.conf;

import com.google.common.collect.Lists;

import org.apache.http.HttpHost;

import org.elasticsearch.client.RestClient;

import org.elasticsearch.client.RestHighLevelClient;

import org.springframework.boot.autoconfigure.condition.ConditionalOnMissingBean;

import org.springframework.boot.context.properties.ConfigurationProperties;

import org.springframework.context.annotation.Bean;

import org.springframework.stereotype.Component;

import java.util.ArrayList;

import java.util.Arrays;

/**

 *

 */

@Component

@ConfigurationProperties(prefix = "es.connect")

public class EsClientConfig {

    private String hosts;

    private Integer port;

    @Bean

    @ConditionalOnMissingBean(RestHighLevelClient.class)

    public RestHighLevelClient getRestHighLevelClient() {

        ArrayList<HttpHost> hostsArray = Lists.newArrayList();

        Arrays.stream(hosts.split(", *")).forEach(host -> {

            hostsArray.add(new HttpHost(host, port, "http"));

        });

        return new RestHighLevelClient(RestClient.builder(hostsArray.toArray(new HttpHost[])));

    }

    public String getHosts() {

        return hosts;

    }

    public void setHosts(String hosts) {

        this.hosts = hosts;

    }

    public Integer getPort() {

        return port;

    }

    public void setPort(Integer port) {

        this.port = port;

    }

}
然后在yml中配置:
系列原创, 转载请注明出处, 谢谢 @wenbronk
springboot-14-自定义properties文件值注入javaBean中的更多相关文章
- 尚硅谷springboot学习9-配置文件值注入
首先让我想到的是spring的依赖注入,这里我们可以将yaml或者properties配置文件中的值注入到java bean中 配置文件 person: lastName: hello age: 18 ...
- SpringBoot读取application.properties文件
http://blog.csdn.net/cloume/article/details/52538626 Spring Boot中使用自定义的properties Spring Boot的applic ...
- SpringBoot @Value读取properties文件的属性
SpringBoot在application.properties文件中,可以自定义属性. 在properties文件中如下示: #自定义属性 mail.fromMail.addr=lgr@163.c ...
- JAVA中自定义properties文件介绍
Gradle中的使用 1. 使用gradle.properties buid.gradle 和 gradle.properties可以项目使用,在同一个项目中,build.gradle可以直接获取其同 ...
- JAVAEE——SpringBoot配置篇:配置文件、YAML语法、文件值注入、加载位置与顺序、自动配置原理
转载 https://www.cnblogs.com/xieyupeng/p/9664104.html @Value获取值和@ConfigurationProperties获取值比较 @Confi ...
- 3springboot:springboot配置文件(配置文件、YAML、属性文件值注入<@Value、@ConfigurationProperties、@PropertySource,@ImportResource、@Bean>)
1.配置文件: springboot默认使用一个全局配置文件 配置文件名是固定的 配置文件有两种(开头均是application,主要是文件的后缀): ->application.prope ...
- SpringBoot的读取properties文件的方式
转载:https://www.imooc.com/article/18252一.@ConfigurationProperties方式 自定义配置类:PropertiesConfig.java pack ...
- 170720、springboot编程之properties文件讲解
但是在实际开发过程中有更复杂的需求,我们在对properties进一步的升华.在本篇博客中您将会学到如下知识(这节中有对之前的知识的温故,对之前的升华): (1) 在application.prope ...
- 161216、使用spring的DefaultResourceLoader自定义properties文件加载工具类
import java.io.IOException; import java.io.InputStream; import java.util.NoSuchElementException; imp ...
随机推荐
- Win & Mac 系统之间U盘传递的U盘文件格式选取问题
Win & Mac 系统之间U盘传递的U盘文件格式选取问题 1. Win系统与Mac系统之间可以通过 exFat U盘文件系统传递 exFAT(Extended File Allocation ...
- Python中通过open()操作文件时的文件中文名乱码问题
最近在用Python进行文件操作的时候,遇到创建中文文件名的乱码问题. Python默认是不支持中文的,一般我们在程序的开头加上#-*-coding:utf-8-*-来解决这个问题,但是在我用open ...
- inline函数的作用
(一)inline函数(摘自C++ Primer的第三版) 在函数声明或定义中函数返回类型前加上关键字inline即把min()指定为内联. inline int min(int first, int ...
- matlab 生成mat文件
生成MAT文件 假如你的矩阵A.B都已赋值,现在需要将A,B矩阵保存成mat格式文件,执行如下命令:save mydata A B 就会把A B矩阵数据保存在yourdata.dat文件中了 保存指定 ...
- flume 整合kafka
背景:系统的数据量越来越大,日志不能再简单的文件的保存,如此日志将会越来越大,也不方便查找与分析,综合考虑下使用了flume来收集日志,收集日志后向kafka传递消息,下面给出具体的配置 # The ...
- jvm lock低性能分析
日志平台client面临着输出日志的问题.为了避免干扰业务系统,我们采用异步输出的方式.这实际上相当于一个多生产者-单消费者的多线程模型.传统的方式是使用同步加锁的方式,但是这种方式不够高效.之前 钟 ...
- C# 一些代码小结--使用文件记录日志
C# 一些代码小结--使用文件记录日志 public class FaceLog { public static void AppendInfoLog(string errMsg) { try { s ...
- laravel5的Bcrypt加密方式对系统保存密码的小结
laravel5文档介绍 //对 A 密码使用Bcrypt 加密 $password = Hash::make('secret'); //你也可直接使用 bcrypt 的 function $pass ...
- 1047 行 MySQL 详细学习笔记
https://blog.csdn.net/baidu_25310663/article/details/86517610 Windows服务 -- 启动MySQL net start mys ...
- MySQL数据库命令大全
--数据库操作前的准备-- 创建数据库-- create database python_test_1 charset=utf8; -- 使用数据库-- use python_test_1; -- s ...