
分布式ehcache缓存
今天在这里了记录一下学习ehcache分布式集群的过程。
ehcache的三种最为常用集群方式,分别是 RMI、JGroups 以及 EhCache Server 。
这里主要讲一下rmi方式。
1、添加依赖
<dependency>

  <groupId>net.sf.ehcache</groupId>

  <artifactId>ehcache</artifactId>

  <version>2.10.3</version>

</dependency>
2、配置文件
spring.xml:
<?xml version="1.0" encoding="UTF-8"?>

<beans xmlns="http://www.springframework.org/schema/beans"

       xmlns:xsi="http://www.w3.org/2001/XMLSchema-instance"

       xmlns:context="http://www.springframework.org/schema/context"

       xmlns:cache="http://www.springframework.org/schema/cache"

       xsi:schemaLocation="http://www.springframework.org/schema/beans http://www.springframework.org/schema/beans/spring-beans.xsd http://www.springframework.org/schema/context http://www.springframework.org/schema/context/spring-context.xsd http://www.springframework.org/schema/cache http://www.springframework.org/schema/cache/spring-cache.xsd">

    <!-- 自动扫描注解的bean -->

    <context:component-scan base-package="com.yitop.feng" />

    <!-- 启用缓存注解功能(请将其配置在Spring主配置文件中) -->

    <cache:annotation-driven cache-manager="cacheManager" />

    <bean id="cacheManager" class="org.springframework.cache.ehcache.EhCacheCacheManager">

        <property name="cacheManager" ref="ehcache"></property>

    </bean>

    <bean id="ehcache" class="org.springframework.cache.ehcache.EhCacheManagerFactoryBean">

        <property name="configLocation" value="classpath:ehcache.xml"></property>

    </bean>

</beans>
server1的ehcache.xml:
<?xml version="1.0" encoding="UTF-8"?>

<ehcache xmlns:xsi="http://www.w3.org/2001/XMLSchema-instance"

         xsi:noNamespaceSchemaLocation="ehcache.xsd">

    <!--

    配置提供者

        1、peerDiscovery,提供者方式,有两种方式:自动发现(automatic)、手动配置(manual)

        2、rmiUrls,手动方式时提供者的地址,多个的话用|隔开

    -->

    <cacheManagerPeerProviderFactory

            class="net.sf.ehcache.distribution.RMICacheManagerPeerProviderFactory"

            properties="peerDiscovery=manual,rmiUrls=//192.168.30.51:40002/cachetest"

    />

    <!--

    配置监听器

        1、hostName 主机地址

        2、port 端口

        3、socketTimeoutMillis socket子模块的超时时间,默认是2000ms

    -->

    <cacheManagerPeerListenerFactory

            class="net.sf.ehcache.distribution.RMICacheManagerPeerListenerFactory"

            properties="hostName=192.168.30.51, port=40001, socketTimeoutMillis=2000"

    />

    <!-- 默认缓存 -->

    <defaultCache

            maxEntriesLocalHeap="10000"

            eternal="false"

            timeToIdleSeconds="120"

            timeToLiveSeconds="120"

            maxEntriesLocalDisk="10000000"

            diskExpiryThreadIntervalSeconds="120"

            memoryStoreEvictionPolicy="LRU"/>

    <!-- cachetest缓存 缓存时间为5秒 -->

    <cache name="cachetest"

           maxElementsInMemory="1000"

           eternal="false"

           timeToIdleSeconds="300"

           timeToLiveSeconds="300"

           overflowToDisk="false"

           memoryStoreEvictionPolicy="LRU">

        <!--

        配置缓存事件监听器

            replicateAsynchronously  操作是否异步,默认值为true.

            replicatePuts 添加操作是否同步到集群内的其他缓存,默认为true.

            replicateUpdates 更新操作是否同步到集群内的其他缓存,默认为true.

            replicateUpdatesViaCopy 更新之后的对象是否复制到集群中的其他缓存(true);

            replicateRemovals 删除操作是否同步到集群内的其他缓存,默认为true.

        -->

        <cacheEventListenerFactory

                class="net.sf.ehcache.distribution.RMICacheReplicatorFactory"

                properties="

                replicateAsynchronously=true,

                replicatePuts=true,

                replicateUpdates=true,

                replicateUpdatesViaCopy=true,

                replicateRemovals=true "/>

        <!-- 初始化缓存,以及自动设置-->

        <bootstrapCacheLoaderFactory class="net.sf.ehcache.distribution.RMIBootstrapCacheLoaderFactory"/>

    </cache>

</ehcache>
server2的ehcache.xml只要把提供者和监听者的端口调换就可以了
3、测试
这里是随便写个查询和写入缓存的方法
@CachePut(value = "cachetest", key = "#key")

public String put(String key, String value) {

    System.out.println("保存数据, " + key + " : " + value);

    return value;

}

@Cacheable(value = "cachetest", key = "#name")

public String getName(String name) {

    return String.valueOf(System.currentTimeMillis());

}
下面是两个测试类,模拟两台服务器
test1
package com.yitop.feng;

  import com.yitop.feng.service.EhcacheTestService;

  import org.junit.Test;

  import org.junit.runner.RunWith;

  import org.springframework.beans.factory.annotation.Autowired;

  import org.springframework.test.context.ContextConfiguration;

  import org.springframework.test.context.junit4.SpringJUnit4ClassRunner;

  import java.util.Scanner;

  /**

   * @author fengzp

   * @date 17/3/1下午2:19

   * @email fengzp@gzyitop.com

   * @company 广州易站通计算机科技有限公司

   */

  @RunWith(SpringJUnit4ClassRunner.class)

  @ContextConfiguration(locations = {"classpath:spring.xml"})

  public class EhcacheTest {

      @Autowired

      private EhcacheTestService ehcacheTestService;

      @Test

      public void test() throws InterruptedException {

          String name = "feng";

          int i = 1;

          while (true){

              String o = ehcacheTestService.getName(name + i);

              System.out.println(i + " : " + o);

              i++;

              Thread.sleep(1000);

              if(i > 5) i = 1;

          }

      }

  }
test2:
	package com.yitop.feng;

  import com.yitop.feng.service.EhcacheTestService;

  import org.junit.Test;

  import org.junit.runner.RunWith;

  import org.springframework.beans.factory.annotation.Autowired;

  import org.springframework.cache.Cache;

  import org.springframework.test.context.ContextConfiguration;

  import org.springframework.test.context.junit4.SpringJUnit4ClassRunner;

  import java.util.Scanner;

  /**

   * @author fengzp

   * @date 17/3/1下午2:19

   * @email fengzp@gzyitop.com

   * @company 广州易站通计算机科技有限公司

   */

  @RunWith(SpringJUnit4ClassRunner.class)

  @ContextConfiguration(locations = {"classpath:test2/spring2.xml"})

  public class EhcacheTest2 {

      @Autowired

      private EhcacheTestService ehcacheTestService;

      @Test

      public void test() throws InterruptedException {

          String name = "feng";

          int i = 1;

          while (true){

              String o = ehcacheTestService.getName(name + i);

              System.out.println(i + " : " + o);

              i++;

              if(i > 5){

                  i = 1;

                  break;

              }

          }

          Thread.sleep(5000);

          while (true) {

              ehcacheTestService.put(name + i, i++ + "");

              if(i > 5) break;

          }

          while (true){

          }

      }

  }
4、结果
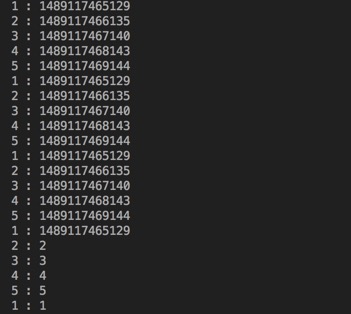
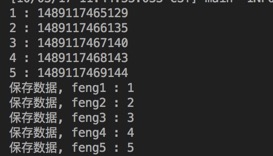
这里先启动test1,等它把数据都写到缓存后,启动test2。可以看到test2启动后能够读取到test1的缓存, 并且之后test2更新缓存后,test1也能同时更新,说明缓存已经成功集群到两边。
分布式ehcache缓存的更多相关文章
- 深入探讨在集群环境中使用 EhCache 缓存系统
EhCache 缓存系统简介 EhCache 是一个纯 Java 的进程内缓存框架,具有快速.精干等特点,是 Hibernate 中默认的 CacheProvider. 下图是 EhCache 在应用 ...
- EhCache缓存
EhCache缓存 EhCache 是一个纯Java的进程内缓存框架,具有快速.精干等特点,是Hibernate中默认的CacheProvider. Ehcache是一种广泛使用的开源Java分布式缓 ...
- 我们究竟什么时候可以使用Ehcache缓存
一.Ehcache是什么 EhCache是Hibernate的二级缓存技术之一,可以把查询出来的数据存储在内存或者磁盘,节省下次同样查询语句再次查询数据库,大幅减轻数据库压力. 二.Ehcache的使 ...
- mybatis0210 mybatis和ehcache缓存框架整合
.1mybatis和ehcache缓存框架整合 一般不用mybatis来管理缓存而是用其他缓存框架在管理缓存,因为其他缓存框架管理缓存会更加高效,因为别人专业做缓存的而mybatis专业做sql语句的 ...
- (转)深入探讨在集群环境中使用 EhCache 缓存系统
简介: EhCache 是一个纯 Java 的进程内缓存框架,具有快速.精干等特点,是 Hibernate 中默认的 CacheProvider.本文充分的介绍了 EhCache 缓存系统对集群环境的 ...
- 我们究竟什么时候可以使用Ehcache缓存(转)
一.Ehcache是什么 EhCache是Hibernate的二级缓存技术之一,可以把查询出来的数据存储在内存或者磁盘,节省下次同样查询语句再次查询数据库,大幅减轻数据库压力. 二.Ehcache的使 ...
- Hibernate性能优化之EHCache缓存
像Hibernate这种ORM框架,相较于JDBC操作,需要有更复杂的机制来实现映射.对象状态管理等,因此在性能和效率上有一定的损耗. 在保证避免映射产生低效的SQL操作外,缓存是提升Hibernat ...
- SpringMVC+mybatis+maven+Ehcache缓存实现
所谓缓存,就是将程序或系统经常要调用的对象存在内存中,以便其使用时可以快速调用,不必再去创建新的重复的实例.这样做可以减少系统开销,提高系统效率. 缓存主要可分为二大类: 一.通过文件缓存,顾名思义文 ...
- ehcache缓存技术的特性
Ehcache是现在最流行的纯Java开源缓存框架,配置简单.结构清晰.功能强大,最初知道它,是从hibernate的缓存开始的.网上中文的EhCache材料以简单介绍和配置方法居多,如果你有这方面的 ...
随机推荐
- js 数组去重的三种方法(unique)
方法一: Array.prototype.unique=function(){ var arr=[];//新建一个临时数组 for(var i=0;i<this.length;i++){//遍历 ...
- JavaScript修改注册表
JavaScript修改注册表 2009-04-14 11:22:13| 分类: JS相关 | 标签: |字号大中小 订阅 注册表有关安全设置项的说明: 注册表路径: HKEY_CURRE ...
- python之BeautifulSoup模块
# 名称修改(bs4) from bs4 import BeautifulSoup 帮助文档 Beautiful Soup parses a (possibly invalid) XML or HTM ...
- CSS 关键的基础知识
今晚看了 百度传课 一门关于CSS的课程, 感觉不错, 随手记了点儿笔记, 供以后查阅. =================================================== pos ...
- KBMMW 4.70.00 发布
We are happy to announce the release of kbmMW v. 4.70.00 Professional and Enterprise Edition. kbmMW ...
- 《Delphi XE6 android 编程入门教程》推荐
近5.6年已经没有看见关于delphi的新技术的书出来了(看来在国内delphi的使用量确实很低了), 高勇同学最近出了一本<Delphi XE6 android 编程入门教程>,上周刚拿 ...
- 2018.10.23 NOIP模拟 “新”的家园(缩图+dijksta/spfa)
传送门 考试70分骗分写挂了=30分=全场最低. 哎今天230垫底了. 这题出的挺好. 对于非关键点直接缩点. 每次把要查的insertinsertinsert进缩好的图里面跑spfa/dijkstr ...
- spring boot入门与进阶
视频课程包含: SpringBoot入门.SpringBoot进阶.Spring Cloud微服务.Spring Ecosystem 微服务相关.Spring Boot 入门 IDEA 版本.Spri ...
- 使用idea,springboot,springsession,redis实现分布式微服务的session 共享
本次开发环境:idea2016.3.4 +jdk1.8+maven3.3.9+redis+springboot+jedis 本文中的项目使用Maven来管理项目依赖,使用Spring Session和 ...
- python Cannot uninstall 'numpy'. It is a distutils installed project and thus we cannot accurately determine which files belong to it which would lead to only a partial uninstall.
在Python中移除(升级)numpy的时候出现: Cannot uninstall 'numpy'. It is a distutils installed project and thus we ...