Scala + Thrift+ Zookeeper+Flume+Kafka配置笔记
1. 开发环境
1.1. 软件包下载
1.1.1. JDK下载地址
http://www.oracle.com/technetwork/java/javase/downloads/jdk8-downloads-2133151.html
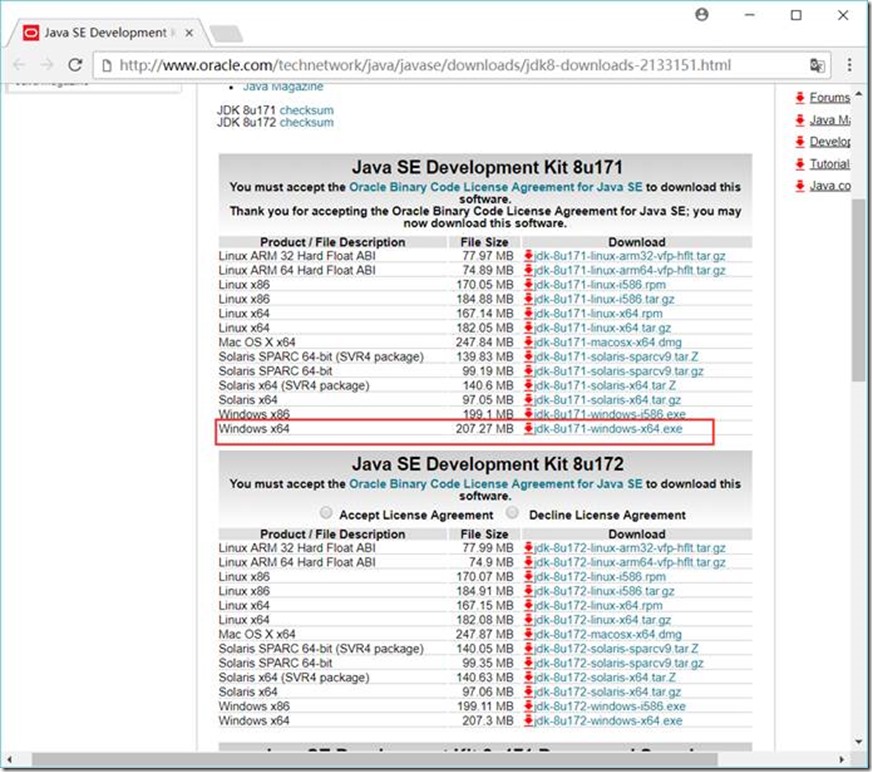
安装到 D:\GreenSoftware\Java\Java8X64\jdk1.8.0_91 目录
1.1.2. Maven下载地址
https://maven.apache.org/download.cgi
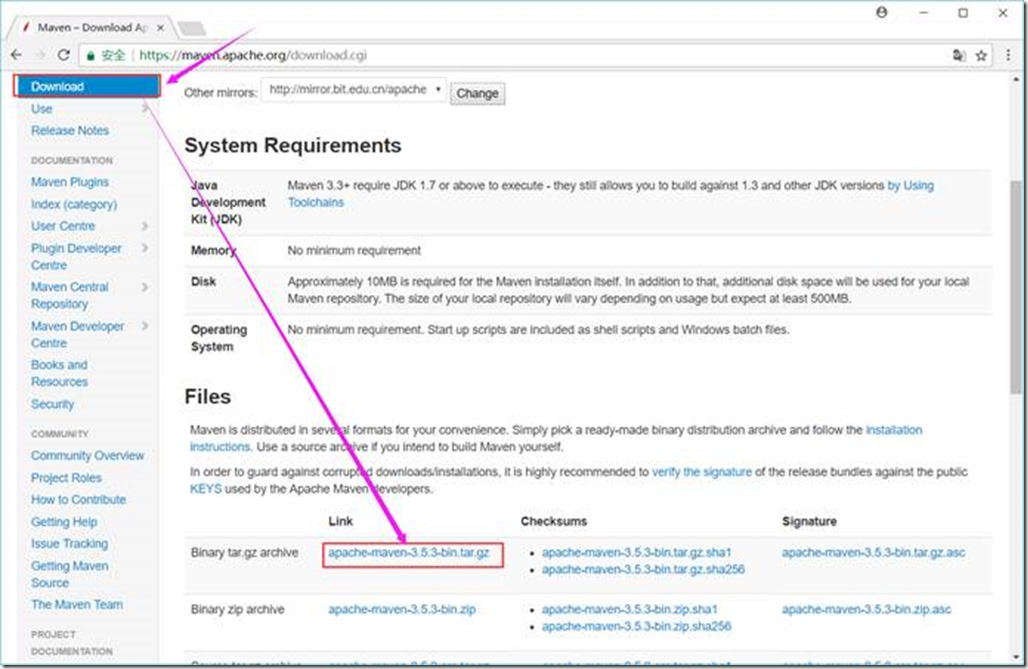
解压到 D:\GreenSoftware\apache-maven-3.3.9 目录
1.1.3. Scala下载地址
https://www.scala-lang.org/download/
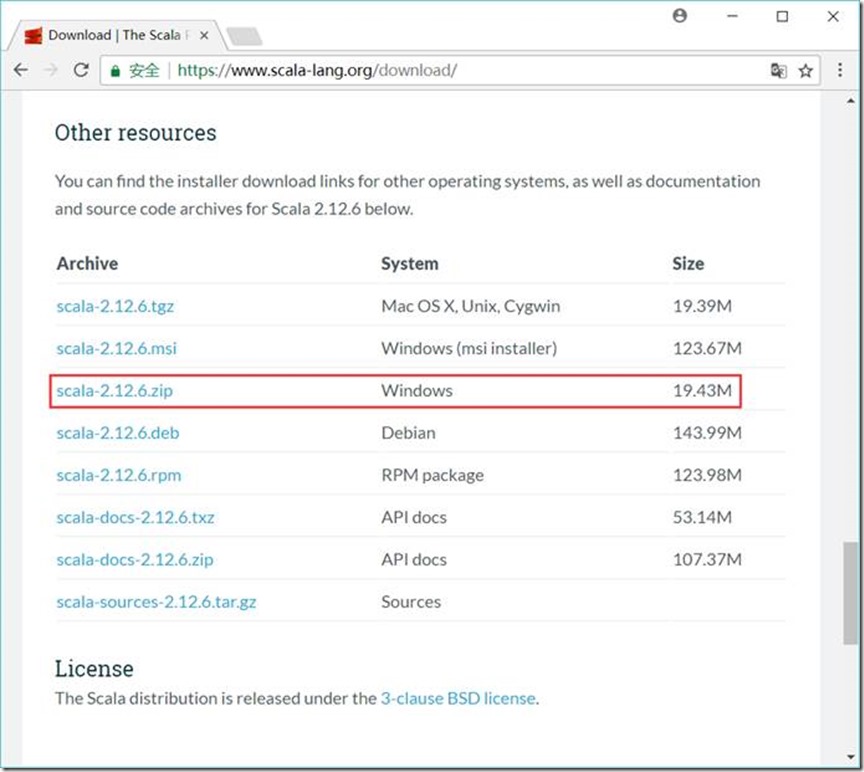
解压到 D:\GreenSoftware\Java\scala-2.12.6 目录
1.1.4. Thrift下载地址
http://thrift.apache.org/download
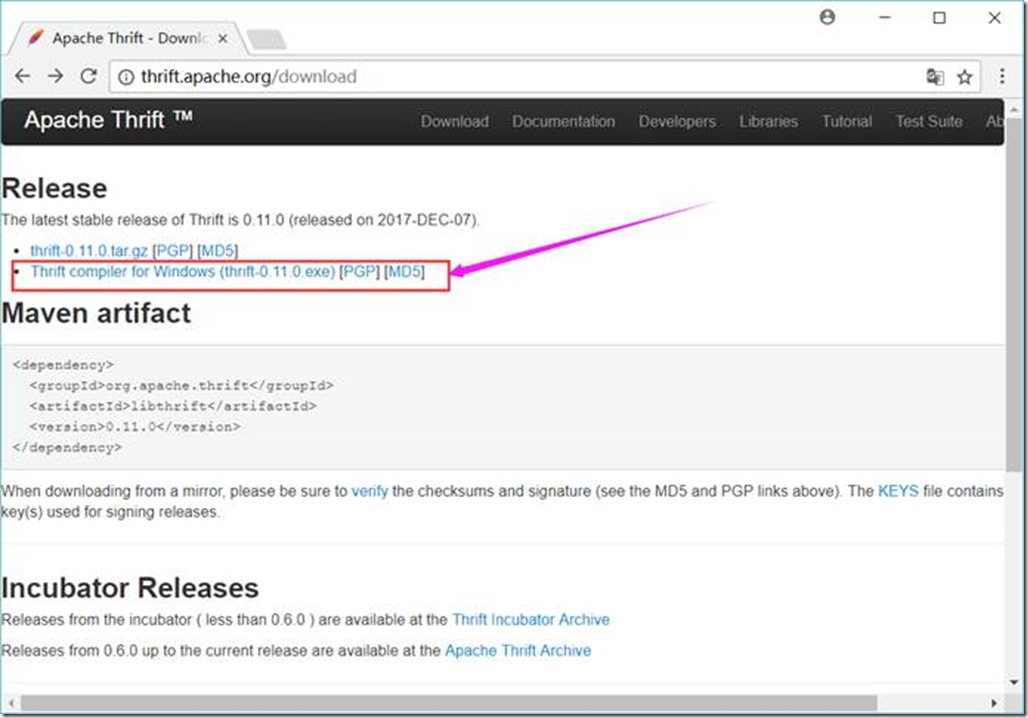
将下载的thrift-0.11.0.exe文件放到 D:\Project\ServiceMiddleWare\thrift目录下,并重命名为thrift.exe
1.1.5. Zookeeper
https://mirrors.tuna.tsinghua.edu.cn/apache/zookeeper/current/
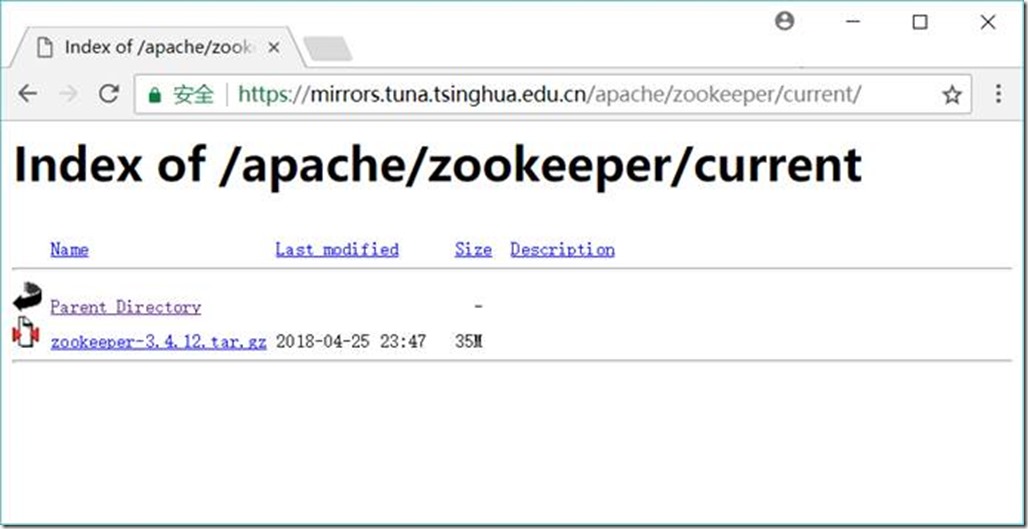
解压到 D:\Project\ServiceMiddleWare\zookeeper-3.4.10目录
1.1.6. Flume下载地址
http://flume.apache.org/download.html
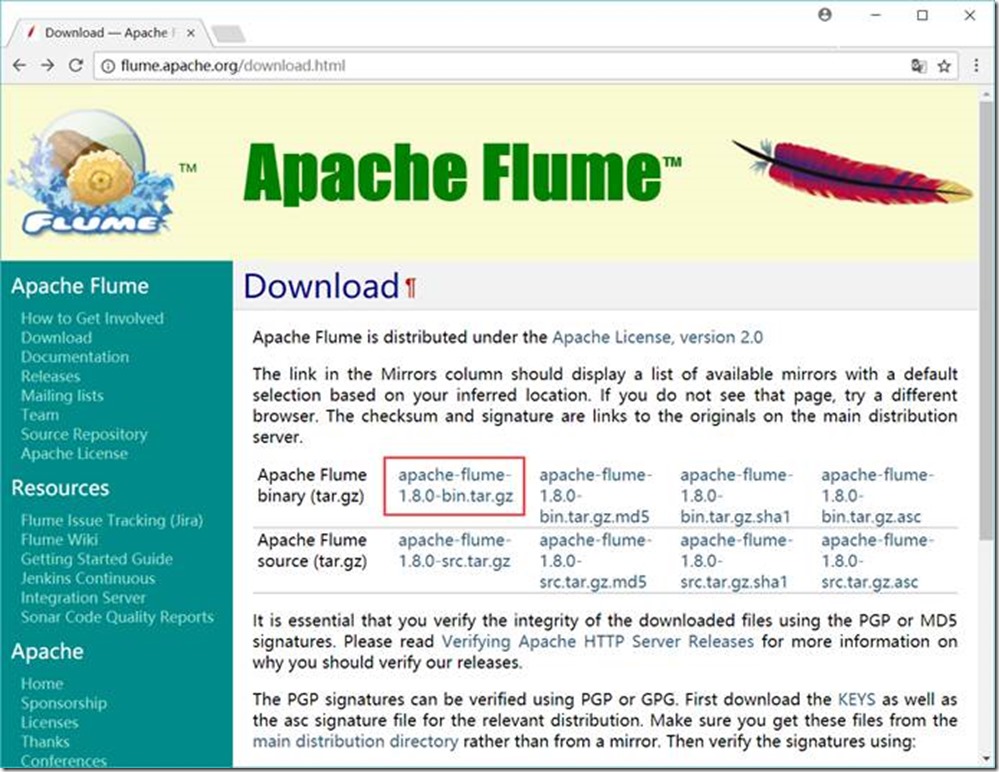
解压到 D:\Project\ServiceMiddleWare\flume-1.8.0目录
1.1.7. Kafka下载地址
http://kafka.apache.org/downloads
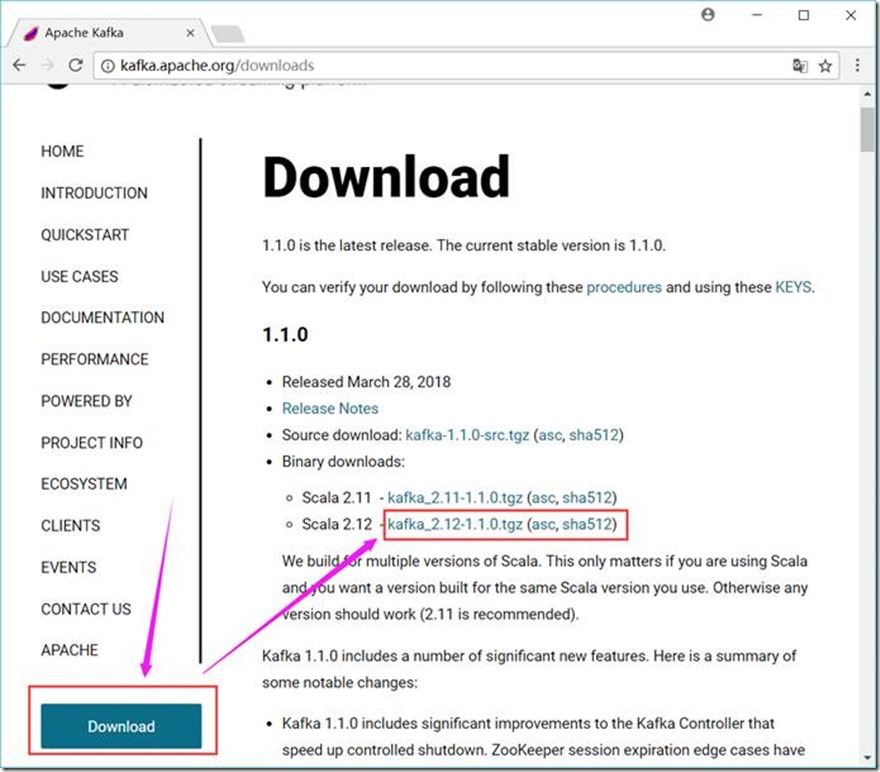
解压到 D:\Project\ServiceMiddleWare\kafka_2.12-1.1.0 目录
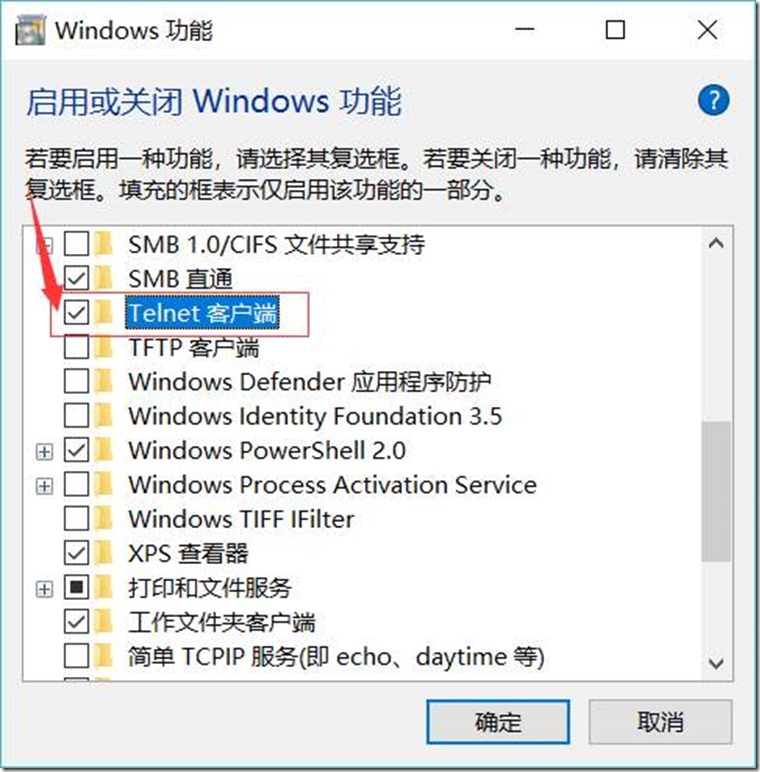
1.2. JDK+Maven+Scala+Thrift
1.2.1. 环境变量
JAVA_HOME D:\GreenSoftware\Java\Java8X64\jdk1.8.0_91
CLASSPATH .;%JAVA_HOME%\lib\dt.jar;%JAVA_HOME%\lib\tools.jar
MAVEN_HOME D:\GreenSoftware\apache-maven-3.3.9
SCALA_HOME D:\GreenSoftware\Java\scala-2.12.6
PATH 中加入
%JAVA_HOME%\bin;
%MAVEN_HOME%\bin;
%SCALA_HOME%\bin;
D:\Project\ServiceMiddleWare\thrift;
1.3. 安装、配置及验证
1.3.1. JDK
C:\Users\zyx>java -version
java version "1.8.0_91"
Java(TM) SE Runtime Environment (build 1.8.0_91-b14)
Java HotSpot(TM) 64-Bit Server VM (build 25.91-b14, mixed mode)
C:\Users\zyx>
1.3.2. Maven
C:\Users\zyx>mvn -version
Apache Maven 3.3.9 (bb52d8502b132ec0a5a3f4c09453c07478323dc5; 2015-11-11T00:41:47+08:00)
Maven home: D:\GreenSoftware\apache-maven-3.3.9\bin\..
Java version: 1.8.0_91, vendor: Oracle Corporation
Java home: D:\GreenSoftware\Java\Java8X64\jdk1.8.0_91\jre
Default locale: zh_CN, platform encoding: GBK
OS name: "windows 10", version: "10.0", arch: "amd64", family: "dos"
1.3.3. Scala
C:\Users\zyx>scala -version
Scala code runner version 2.12.6 -- Copyright 2002-2018, LAMP/EPFL and Lightbend, Inc.
C:\Users\zyx>scala
Welcome to Scala 2.12.6 (Java HotSpot(TM) 64-Bit Server VM, Java 1.8.0_91).
Type in expressions for evaluation. Or try :help.
scala> :quit
C:\Users\zyx>
1.3.4. Thrift
C:\Users\zyx>thrift -version
Thrift version 0.11.0
1.3.5. Zookeeper
1.3.5.1. 配置
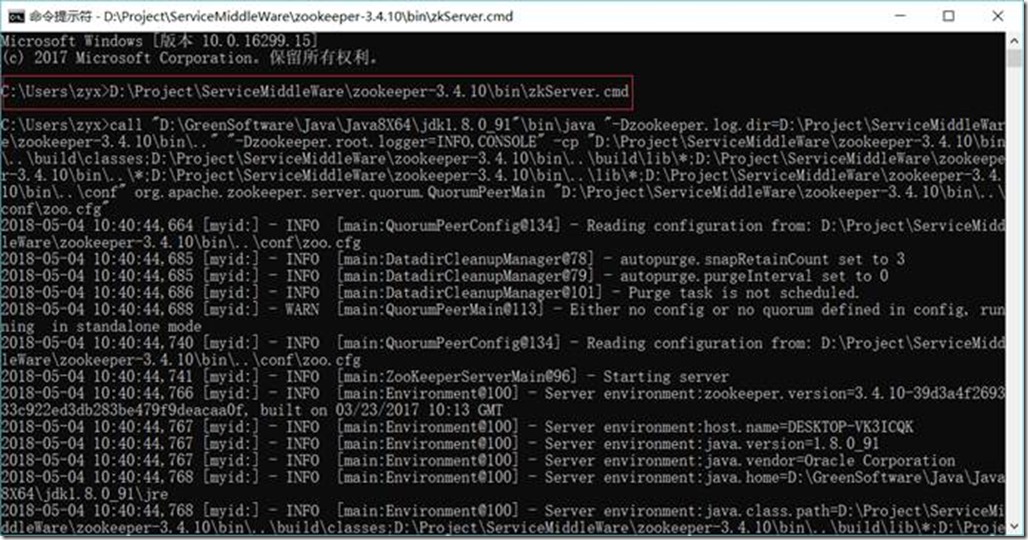
在D:\Project\ServiceMiddleWare\zookeeper-3.4.10\conf目录下创建一个zoo.cfg文件,内容如下
tickTime=2000
dataDir=D:/Project/ServiceMiddleWare/zookeeper-3.4.10/data/db
dataLogDir=D:/Project/ServiceMiddleWare/zookeeper-3.4.10/data/log
clientPort=2181
# Zookeeper Cluster
# server.1=127.0.0.1:12888:1388
# server.2=127.0.0.1:12889:1389
# server.3=127.0.0.1:12887:1387
1.3.5.2. 启动Zookeeper
D:\Project\ServiceMiddleWare\zookeeper-3.4.10\bin\zkServer.cmd
1.3.5.3. 启动客户端
D:\Project\ServiceMiddleWare\zookeeper-3.4.10\bin\zkCli.cmd -server 127.0.0.1:2181
1.3.5.4. 基本命令
查看目录
ls /
1.3.5.5. 创建节点
create /config 0
1.3.5.6. 删除节点
delete /config
1.3.5.7. 退出客户端
quit
1.3.6. Kafka
1.3.6.1. 配置
1.3.6.1.1. Kafka的配置文件
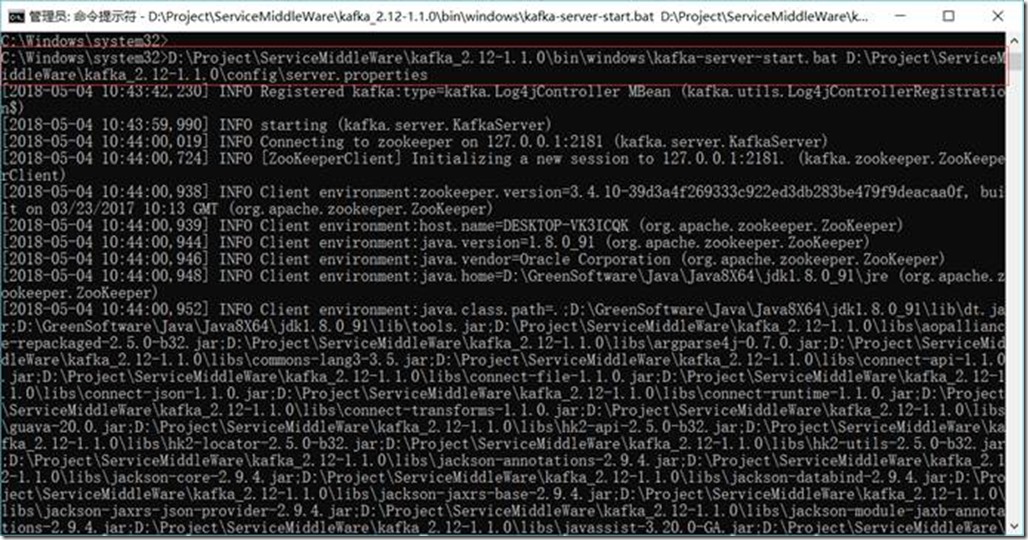
修改D:\Project\ServiceMiddleWare\kafka_2.12-1.1.0\config目录下的server.properties文件,内容如下
broker.id=0
port=9092
host.name=127.0.0.1
# listeners=PLAINTEXT://127.0.0.1:9092
# register zookeeper’s node data
# advertised.listeners=PLAINTEXT://127.0.0.1:9092
# log.dirs=/tmp/kafka-logs
log.dirs=D:/Project/ServiceMiddleWare/kafka_2.12-1.1.0/data/log
log.dir = D:/Project/ServiceMiddleWare/kafka_2.12-1.1.0/data/log
# zookeeper.connect=localhost:2181
zookeeper.connect=127.0.0.1:2181
# Zookeeper Cluster
# zookeeper.connect=127.0.0.1:2181,127.0.0.1:2182,127.0.0.1:2183
1.3.6.1.2. 日志的配置
修改D:\Project\ServiceMiddleWare\kafka_2.12-1.1.0\config目录下的log4j.properties文件,内容如下
kafka.logs.dir=D:/Project/ServiceMiddleWare/kafka_2.12-1.1.0/data/log
log.dir = /tmp/kafka-logs
1.3.6.1.3. 端口配置(如果同一台服务器配置多个Kafka,则需要)
修改D:\Project\ServiceMiddleWare\kafka_2.12-1.1.0\bin\windows目录下的kafka-run-class.bat文件,在文件开头增加内容如下
set JMX_PORT=19093
set JAVA_DEBUG_PORT =5005
1.3.6.2. 启动Kafka
D:\Project\ServiceMiddleWare\kafka_2.12-1.1.0\bin\windows\kafka-server-start.bat D:\Project\ServiceMiddleWare\kafka_2.12-1.1.0\config\server.properties
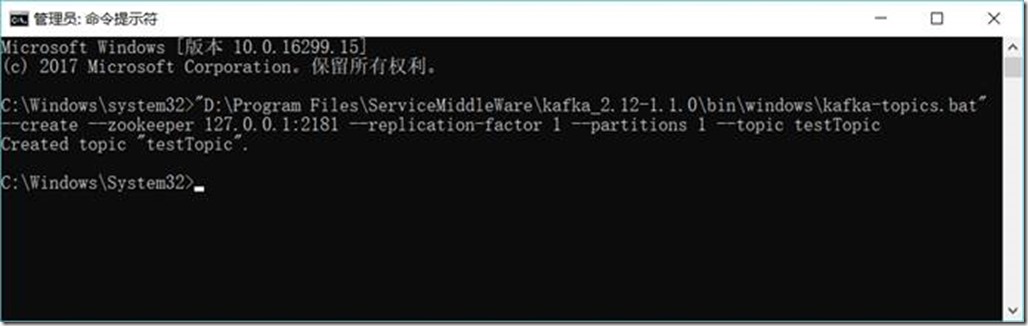
1.3.6.3. 创建主题(Topic)
D:\Project\ServiceMiddleWare\kafka_2.12-1.1.0\bin\windows\kafka-topics.bat --create --zookeeper 127.0.0.1:2181 --replication-factor 1 --partitions 1 --topic testTopic
1.3.6.4. 创建生产者(Producer)
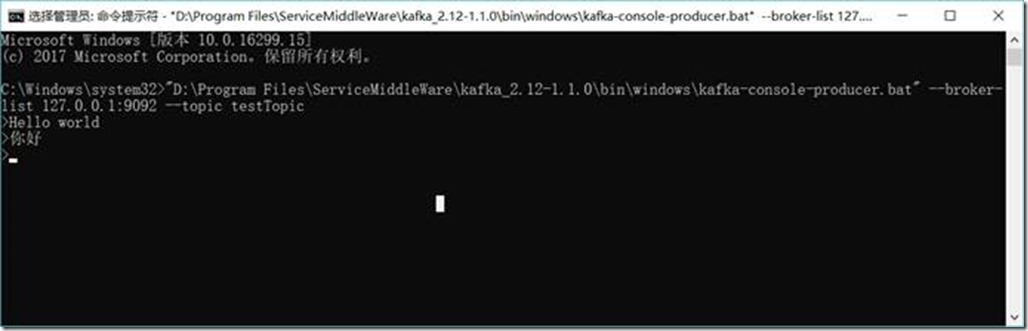
D:\Project\ServiceMiddleWare\kafka_2.12-1.1.0\bin\windows\kafka-console-producer.bat --broker-list 127.0.0.1:9092 --topic testTopic
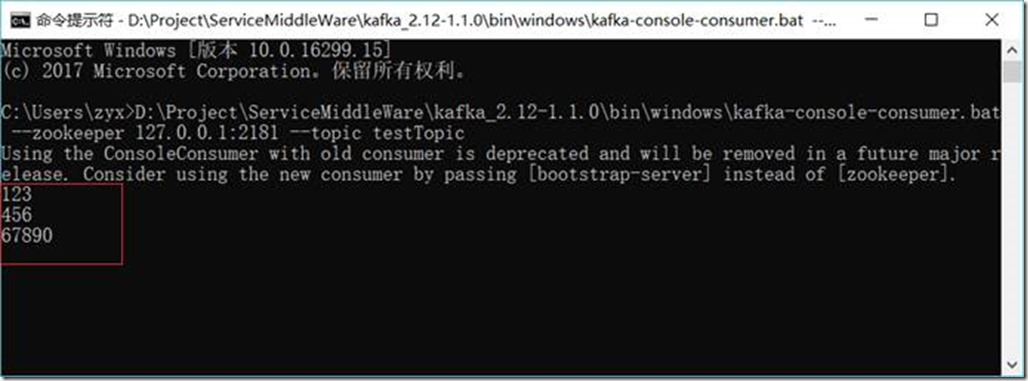
1.3.6.5. 创建消费者(Consumer)
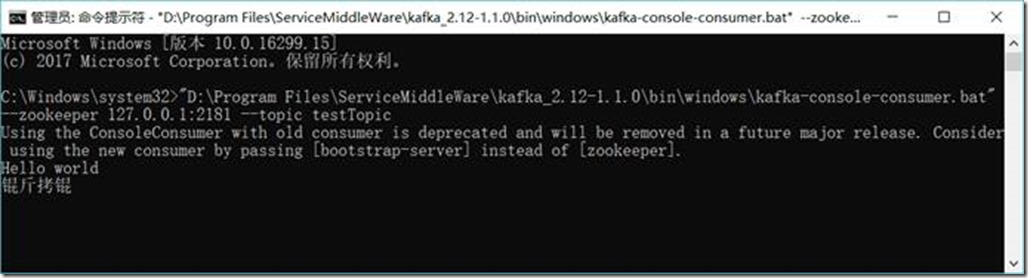
D:\Project\ServiceMiddleWare\kafka_2.12-1.1.0\bin\windows\kafka-console-consumer.bat --zookeeper 127.0.0.1:2181 --topic testTopic
1.3.6.6. 生成者发送消息
Hello world
你好
1.3.6.7. 消费者收到消息
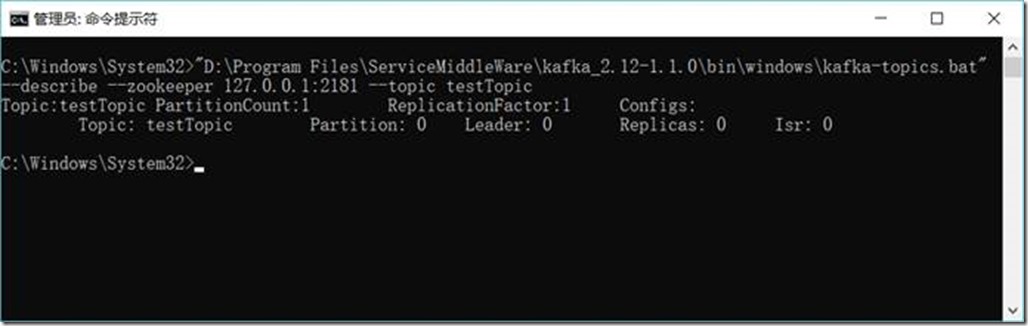
1.3.6.8. 查看主题(Topic)状态
D:\Project\ServiceMiddleWare\kafka_2.12-1.1.0\bin\windows\kafka-topics.bat --describe --zookeeper 127.0.0.1:2181 --topic testTopic
1.3.6.9. 彻底删除topic
https://blog.csdn.net/odailidong/article/details/61615554
1.3.7. Flume
1.3.7.1. 配置
1.3.7.1.1. Flume的配置文件
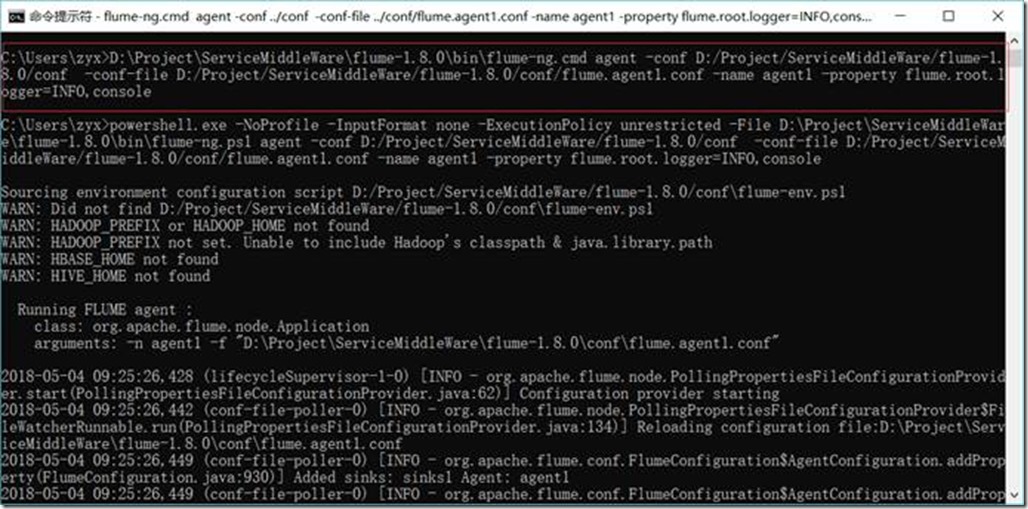
在D:\Project\ServiceMiddleWare\flume-1.8.0\conf目录下创建一个flume.agent1.conf文件,内容如下:
# flume.agent1.conf: A single-node Flume listen netcat configuration
# Name the components on this agent
agent1.sources = sources1
agent1.sinks = sinks1
agent1.channels = channels1
# Describe/configure the source
# agent1.sources.sources1.type = Avro, Exec, HTTP, JMS, Netcat, Sequence generator, Spooling directory, Syslog, Thrift, Twitter
agent1.sources.sources1.type = netcat
agent1.sources.sources1.bind = 127.0.0.1
agent1.sources.sources1.port = 44444
agent1.sources.source1.interceptors = interceptor1
# agent1.sources.source1.interceptors.interceptor1.type = Host, Morphline, Regex extractor, Regex filtering, Static, Timestamp, UUID
agent1.sources.source1.interceptors.interceptor1.type = timestamp
# Describe the sink
# agent1.sinks.sinks1.type = Avro, Elasticsearch, File roll, HBase, HDFS, IRC, Logger, Morphline(Solor), Null, Thrift
agent1.sinks.sinks1.type = logger
# Use a channel which buffers events in memory
# agent1.channels.channels1.type = File, JDBC, Memory
agent1.channels.channels1.type = memory
agent1.channels.channels1.capacity = 1000
agent1.channels.channels1.transactionCapacity = 100
# Bind the source and sink to the channel
agent1.sources.sources1.channels = channels1
agent1.sinks.sinks1.channel = channels1
1.3.7.1.2. 日志的配置
修改D:\Project\ServiceMiddleWare\flume-1.8.0\conf目录下的log4j.properties文件,内容如下
# flume.log.dir=./logs
flume.log.dir=D:/Project/ServiceMiddleWare/flume-1.8.0/data/log
1.3.7.2. 启动Flume
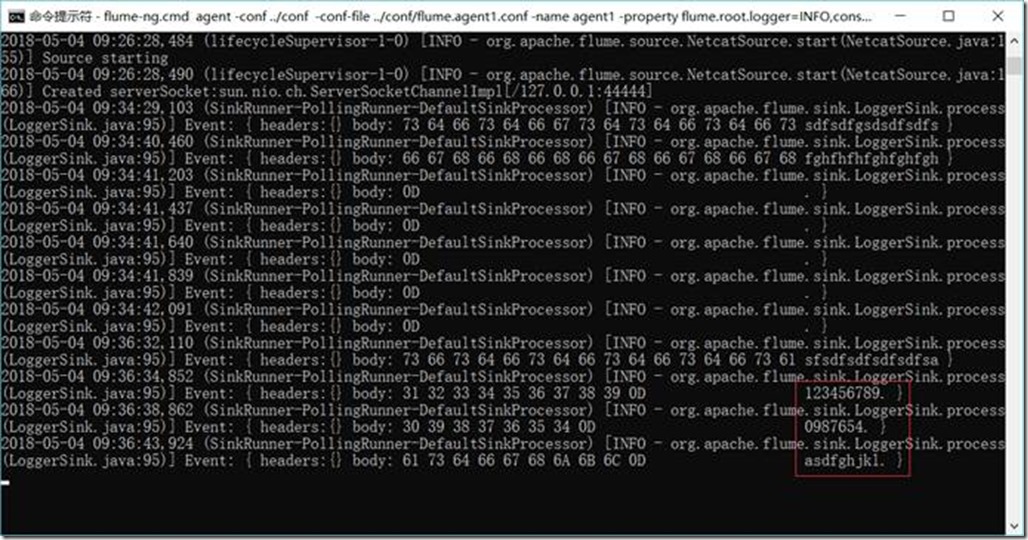
D:\Project\ServiceMiddleWare\flume-1.8.0\bin\flume-ng.cmd agent -conf D:/Project/ServiceMiddleWare/flume-1.8.0/conf -conf-file D:/Project/ServiceMiddleWare/flume-1.8.0/conf/flume.agent1.conf -name agent1 -property flume.root.logger=INFO,console
或
cd D:\Project\ServiceMiddleWare\flume-1.8.0\bin
flume-ng.cmd agent -conf ../conf -conf-file ../conf/flume.agent1.conf -name agent1 -property flume.root.logger=INFO,console
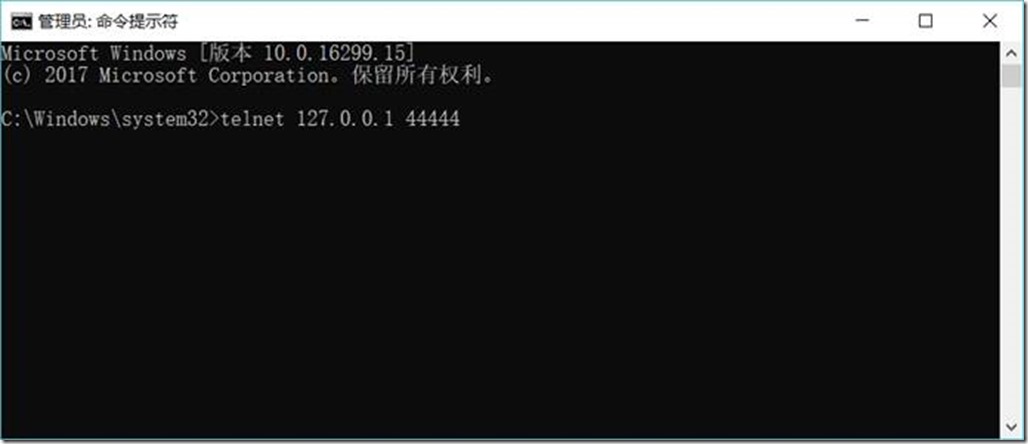
1.3.7.3. 访问44444端口,模拟数据输入
telnet 127.0.0.1 44444
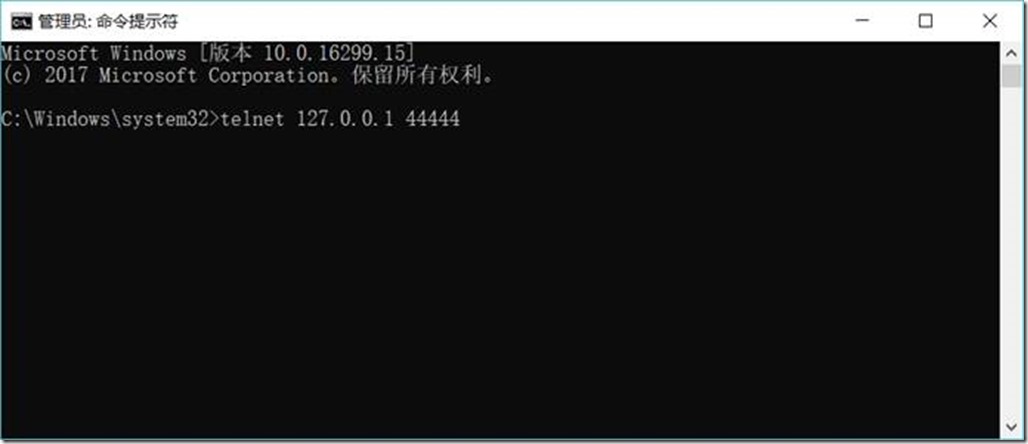
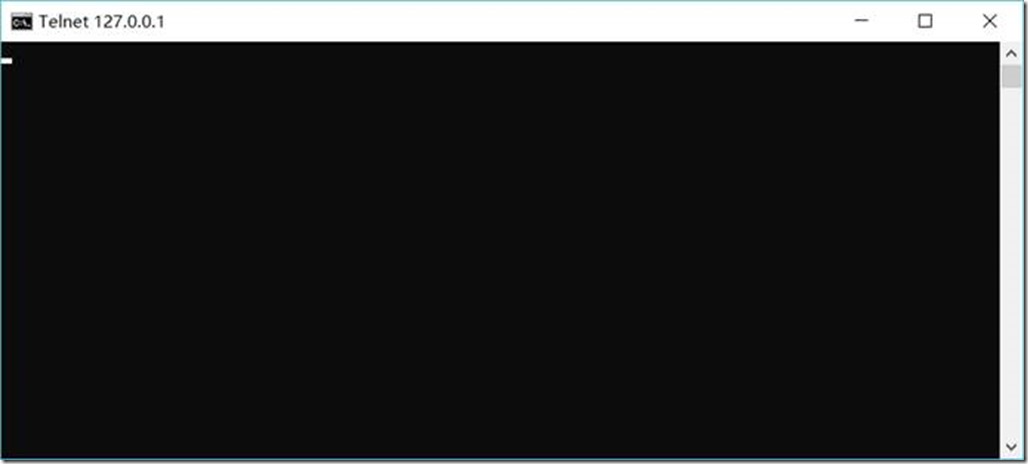
然后输入任意内容

查看Flume接收结果:
1.3.8. Flume与Kafka连接
1.3.8.1. Flume的配置
在D:\Project\ServiceMiddleWare\flume-1.8.0\conf目录下修改flume.agent1.conf文件,内容如下:
# flume.agent1.conf: A single-node Flume listen netcat configuration
# Name the components on this agent
agent1.sources = sources1
agent1.sinks = sinks1
agent1.channels = channels1
# Describe/configure the source
# agent1.sources.sources1.type = Avro, Exec, HTTP, JMS, Netcat, Sequence generator, Spooling directory, Syslog, Thrift, Twitter
agent1.sources.sources1.type = netcat
agent1.sources.sources1.bind = 127.0.0.1
agent1.sources.sources1.port = 44444
agent1.sources.source1.interceptors = interceptor1
# agent1.sources.source1.interceptors.interceptor1.type = Host, Morphline, Regex extractor, Regex filtering, Static, Timestamp, UUID
agent1.sources.source1.interceptors.interceptor1.type = timestamp
# Describe the sink
# agent1.sinks.sinks1.type = Avro, Elasticsearch, File roll, HBase, HDFS, IRC, Logger, Morphline(Solor), Null, Thrift
# agent1.sinks.sinks1.type = logger
agent1.sinks.sinks1.type = org.apache.flume.sink.kafka.KafkaSink
agent1.sinks.sinks1.kafka.topic = testTopic
agent1.sinks.sinks1.kafka.bootstrap.servers = 127.0.0.1:9092
agent1.sinks.sinks1.kafka.flumeBatchSize = 20
agent1.sinks.sinks1.kafka.producer.acks = 1
agent1.sinks.sinks1.kafka.producer.linger.ms = 1
agent1.sinks.sinks1.kafka.producer.compression.type = snappy
# Use a channel which buffers events in memory
# agent1.channels.channels1.type = File, JDBC, Memory
agent1.channels.channels1.type = memory
agent1.channels.channels1.capacity = 1000
agent1.channels.channels1.transactionCapacity = 100
# Bind the source and sink to the channel
agent1.sources.sources1.channels = channels1
agent1.sinks.sinks1.channel = channels1
1.3.8.2. 启动Zookeeper
D:\Project\ServiceMiddleWare\zookeeper-3.4.10\bin\zkServer.cmd
1.3.8.3. 启动Kafka
D:\Project\ServiceMiddleWare\kafka_2.12-1.1.0\bin\windows\kafka-server-start.bat D:\Project\ServiceMiddleWare\kafka_2.12-1.1.0\config\server.properties
1.3.8.4. 创建消费者(Consumer)
D:\Project\ServiceMiddleWare\kafka_2.12-1.1.0\bin\windows\kafka-console-consumer.bat --zookeeper 127.0.0.1:2181 --topic testTopic

1.3.8.5. 启动Flume
D:\Project\ServiceMiddleWare\flume-1.8.0\bin\flume-ng.cmd agent -conf D:/Project/ServiceMiddleWare/flume-1.8.0/conf -conf-file D:/Project/ServiceMiddleWare/flume-1.8.0/conf/flume.agent1.conf -name agent1 -property flume.root.logger=INFO,console
1.3.8.6. 启动Flume的数据生产者(访问44444端口,模拟数据输入)
telnet 127.0.0.1 44444
然后输入任意内容
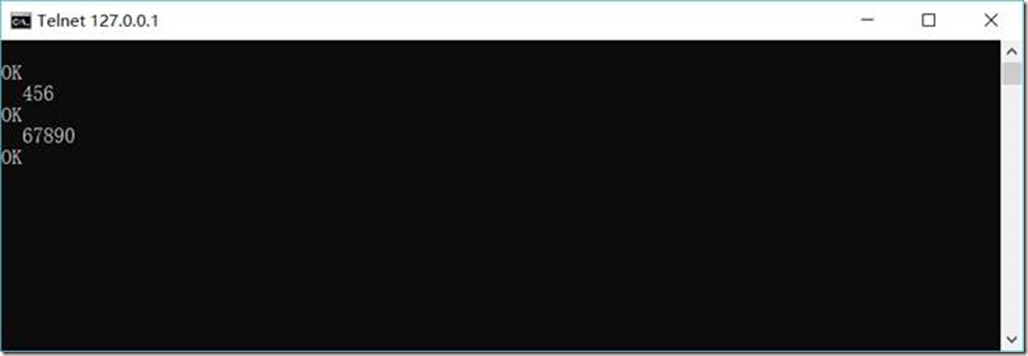
1.3.8.7. 查看kafka中消费者收到消息结果
Scala + Thrift+ Zookeeper+Flume+Kafka配置笔记的更多相关文章
- 最新 Zookeeper + Flume + Kafka 简易整合教程
在大数据领域有很多耳熟能详的框架,今天要介绍的就是 zookeeper.flume.kafka.因为平时是做数据接入的,所以对这些实时的数据处理系统不是很熟悉.通过官网的简要介绍,搭建了一套简要的平台 ...
- flume kafka 配置指南
1.官方网站也有配置: https://flume.apache.org/FlumeUserGuide.html#kafka-source 2.clodera 官方配置 https://www.clo ...
- Flume - Kafka日志平台整合
1. Flume介绍 Flume是Cloudera提供的一个高可用的,高可靠的,分布式的海量日志采集.聚合和传输的系统,Flume支持在日志系统中定制各类数据发送方,用于收集数据:同时,Flume提供 ...
- 【转】flume+kafka+zookeeper 日志收集平台的搭建
from:https://my.oschina.net/jastme/blog/600573 flume+kafka+zookeeper 日志收集平台的搭建 收藏 jastme 发表于 10个月前 阅 ...
- windows安装zookeeper和kafka,flume
一.安装JDK 过程比较简单,这里不做说明. 最后打开cmd输入如下内容,表示安装成功 二.安装zooeleeper 下载安装包:http://zookeeper.apache.org/release ...
- Apache ZooKeeper在Kafka中的角色 - 监控和配置
1.目标 今天,我们将看到Zookeeper在Kafka中的角色.本文包含Kafka中需要ZooKeeper的原因.我们可以说,ZooKeeper是Apache Kafka不可分割的一部分.在了解Zo ...
- HyperLedger Fabric基于zookeeper和kafka集群配置解析
简述 在搭建HyperLedger Fabric环境的过程中,我们会用到一个configtx.yaml文件(可参考Hyperledger Fabric 1.0 从零开始(八)--Fabric多节点集群 ...
- kafka集群与zookeeper集群 配置过程
Kafka的集群配置一般有三种方法,即 (1)Single node – single broker集群: (2)Single node – multiple broker集群: (3)Mult ...
- Ubuntu16.04配置单机版Zookeeper和Kafka
1. 配置zookeeper单机模式 选择的是zookeeper-3.4.10版本,官网下载链接:http://mirrors.hust.edu.cn/apache/zookeeper/stable/ ...
随机推荐
- 【xsy1232】Magic 最小割
题目大意:给你一个$n$个点,$m$条有向边的图,每个点有一个点权$a_i$,同时你可以用$b_i$的代价将$a_i$变为$0$ 另外你要付出$\sum\limits_{i=1}^n\max\limi ...
- 【GDOI2015】 水题 tarjan缩点
这一题,我当年只会$60$分做法..... 我们考虑对原图跑一波边双,然后缩成一个森林. 对于森林中的每一棵树,我们钦定一个根. 令$siz[x]$表示以$x$为根的子树中,在原图中点的个数. 令当前 ...
- 【2018北京集训十二】 coin 矩阵快速幂
矩阵快速幂原来还可以这么用?? 你们城里人还真会玩. 我们令$f[i][j][k]$表示总的钱数为i,当前使用的最大面值硬币的面值为$v_j$,最小为$v_k$的方案数量. 不难发现$f[i][j][ ...
- webstorm 添加css前缀(兼容)自动添加
Webstorm自动添加css前缀( 兼容) 百度了很多在webstorm中添加css前缀(兼容)自动添加,autoprefixer插件是首选,对于基本的css,还有less都支持,所以就选择了aut ...
- yolov3源码分析keras(一)数据的处理
一.前言 本次分析的源码为大佬复现的keras版本,上一波地址:https://github.com/qqwweee/keras-yolo3 初步打算重点分析两部分,第一部分为数据,即分析图像如何做等 ...
- Vue.js系列之四计算属性和观察者
一.计算属性 1.模版内的表达式非常便利,但是设计它们的初衷是用于简单计算的.在模版中放入太多的逻辑运算会让模版过重且难以维护,例如如下代码: <div id="example&quo ...
- 手机访问电脑中部署的tomcat应用
手机访问电脑中部署的tomcat应用. 操作步骤: 第一种:有无线路由的情况. 1.建议局域通信. 操作如下:电脑,手机都自动连接到无线路由器中(无线路由不必非要联网). 2.启动电脑用的tomcat ...
- python 获取excel表内容 生成php数组
需求: 生成:同时处理数字类型,比如3 不能显示为3.0 [ ['type'=>3,'da_name'=>福建省平潭拓至美装饰工程有限公司,'da_aka'=>福建省平潭拓至美装饰工 ...
- javascript数组原型方法
1.javascript数组原型方法. <!DOCTYPE html> <html lang="en"> <head> <meta cha ...
- mysql笔记--group by,limit用法
table: id tag status a b c d 一.group by用法 .与count 联合计数 select status,count(*) from table group by st ...