iOS-自定义起始时间选择器视图
概述
详细
随着界面的整体效果的各种展现, 起始时间选择器的展现也需求突出!
最近项目中发现时间选择器使用处还挺多, 数了数原型图发现有6处. 便决定自定义时间选择器视图写个 Demo, 封装好在所需控制器里直接调用!
一、实现功能及主要思路
实现功能:
自定义起始时间选择器视图, 调起时间选择器, 传值(起始时间/截止时间), 两者时间均要合理, 不能超过未来时间, 并且起始时间不能大于截止时间. 点击取消或空白处收起时间选择器.
其中两者时间(起始时间/截止时间)是可以做限制,例如:当月月初1日 到 当天时间.
主要思路:
1. 创建时间选择器Picker 且确认取消按钮实现功能逻辑
2. 创建展示时间菜单的按钮视图 (按钮: 图片在右,标题在左的按钮)
3. 创建时间选择器视图 且 起始时间/截止时间逻辑判断
4. 使用代理传值起始时间/截止时间(时间串转换)
二、程序实现
第一步. 创建时间选择器Picker 且确认取消按钮实现功能逻辑
自定义ZLDatePickerView 文件:
@property (nonatomic, assign) id<ZLDatePickerViewDelegate> deleagte;

// 最初/小时间(一般为左边值)

@property (nonatomic, strong) NSDate *minimumDate;

// 截止时间(一般为右边值)

@property (nonatomic, strong) NSDate *maximumDate;

// 当前选择时间

@property (nonatomic, strong) NSDate *date;

+ (instancetype)datePickerView;

- (void)showFrom:(UIView *)view;
使用代理传值:
@protocol ZLDatePickerViewDelegate <NSObject>

- (void)datePickerView:(ZLDatePickerView *)pickerView backTimeString:(NSString *)string To:(UIView *)view;

@end
使用 xib 展现datePicker:
+ (instancetype)datePickerView {

    ZLDatePickerView *picker = [[NSBundle mainBundle] loadNibNamed:@"ZLDatePickerView" owner:nil options:nil].lastObject;

    picker.frame = CGRectMake(0, UI_View_Height - 250, UI_View_Width, 250);

    picker.maximumDate = [NSDate date];

    return picker;

}

- (void)showFrom:(UIView *)view {

    UIView *bgView = [[UIView alloc] initWithFrame:[[UIScreen mainScreen] bounds]];

    bgView.backgroundColor = [UIColor lightGrayColor];

    bgView.alpha = 0.5;

    UITapGestureRecognizer *tap = [[UITapGestureRecognizer alloc] initWithTarget:self action:@selector(tap:)];

    [bgView addGestureRecognizer:tap];

    self.fromView = view;

    self.bgView = bgView;

    [[UIApplication sharedApplication].keyWindow addSubview:self.bgView];

    [[UIApplication sharedApplication].keyWindow addSubview:self];

}
起始时间/截止时间设值:
- (void)setMinimumDate:(NSDate *)minimumDate {

    self.datePicker.minimumDate = minimumDate;

}

- (void)setMaximumDate:(NSDate *)maximumDate {

    self.datePicker.maximumDate = maximumDate;

}

- (void)setDate:(NSDate *)date {

    self.datePicker.date = date;

}
确认/取消按钮实现功能逻辑:
- (IBAction)cancel:(id)sender {

    [self dismiss];

}

- (IBAction)makeSure:(id)sender {

    [self dismiss];

    NSDate *date = self.datePicker.date;

    if ([self.deleagte respondsToSelector:@selector(datePickerView:backTimeString:To:)]) {

        [self.deleagte datePickerView:self backTimeString:[self fomatterDate:date] To:self.fromView];

    }

}
第二步. 创建展示时间菜单的按钮视图 (按钮: 图片在右,标题在左的按钮)
这个可以根据需求来,有些不需要这个按钮图片在右边的,则没必要添加.
自定义ZLOppositeButton文件:
- (void)layoutSubviews {

    [super layoutSubviews];

    CGFloat margin = 10;

    // 替换 title 和 image 的位置

    // 图片在右,标题在左

    // 由于 button 内部的尺寸是自适应的.调整尺寸即可

    CGFloat maxWidth = self.width - self.imageView.width - margin;

    if (self.titleLabel.width >= maxWidth) {

        self.titleLabel.width = maxWidth;

    }

    CGFloat totalWidth = self.titleLabel.width + self.imageView.width;

    self.titleLabel.x =  (self.width - totalWidth - margin) * 0.5;

    self.imageView.x = CGRectGetMaxX(self.titleLabel.frame) + margin;

}
接着利用上面的按钮创建一个展示时间菜单的按钮视图ZLTimeBtn文件:
- (void)setup {

    self.backgroundColor = [UIColor clearColor];

    [self setImage:[UIImage imageNamed:@"xiangxiadianji"] forState:UIControlStateNormal];

    [self setTitle:[self timeStringDefault] forState:UIControlStateNormal];

    [self setTitleColor:ZLColor(102, 102, 102) forState:UIControlStateNormal];

    self.titleLabel.font = [UIFont systemFontOfSize:14];

}

// 时间默认展示当天

- (NSString *)timeStringDefault {

    NSDate *date = [NSDate date];

    return [date timeFormat:@"yyyy-MM-dd"];

}
其中我们上传时间一般都是字符串而不是时间戳, 则需要进行转换:
#import "NSDate+ZLDateTimeStr.h"
- (NSString *)timeFormat:(NSString *)dateFormat {

    NSDateFormatter *formatter = [[NSDateFormatter alloc] init];

    [formatter setDateStyle:NSDateFormatterMediumStyle];

    [formatter setTimeStyle:NSDateFormatterShortStyle];

    [formatter setTimeZone:[NSTimeZone timeZoneWithAbbreviation:@"UTC"]];

    [formatter setDateFormat:dateFormat];

    return [formatter stringFromDate:self];

}
第三步. 创建时间选择器视图 且 起始时间/截止时间逻辑判断
利用第二步自定义的按钮来自定义ZLTimeView文件:
- (void)layoutSubviews {

    [super layoutSubviews];

    self.beginTimeBtn.frame = CGRectMake(0, 0, self.width / 5.0 * 2, self.height);

    self.label.frame = CGRectMake(CGRectGetMaxX(self.beginTimeBtn.frame), 0, self.width / 5, self.height);

    self.endTimeBtn.frame = CGRectMake(CGRectGetMaxX(self.label.frame),0 , self.width / 5.0 * 2, self.height);

    self.line.frame = CGRectMake(0, self.height - 1, self.width, 1);

}
- (void)setupSubview {

    // 起始时间按钮

    YYPTimeBtn *beginTimeBtn = [[YYPTimeBtn alloc] init];

    beginTimeBtn.backgroundColor = [UIColor clearColor];

    [beginTimeBtn addTarget:self action:@selector(beginTimeBtnClick:) forControlEvents:UIControlEventTouchUpInside];

    // 起始时间默认展示当月一号

 //   [beginTimeBtn setTitle:[self timeStringDefaultWith:@"yyyy-MM-01"] forState:UIControlStateNormal];

    [self addSubview:beginTimeBtn];

    self.beginTimeBtn = beginTimeBtn;

    // 至label

    UILabel *label = [[UILabel alloc] init];

    label.backgroundColor = [UIColor clearColor];

    label.text = @"——";

    label.textColor = YYPWhiteTitleColor;

    label.font = [UIFont systemFontOfSize:14];

    label.textAlignment = NSTextAlignmentCenter;

    self.label = label;

    [self addSubview:label];

    // 终止时间按钮

    YYPTimeBtn *endTimeBtn = [[YYPTimeBtn alloc] init];

    [endTimeBtn addTarget:self action:@selector(endTimeBtnClick:) forControlEvents:UIControlEventTouchUpInside];

    // 终止时间默认展示当天

 //   [endTimeBtn setTitle:[self timeStringDefaultWith:@"yyyy-MM-dd"] forState:UIControlStateNormal];

    self.endTimeBtn = endTimeBtn;

    [self addSubview:endTimeBtn];

    UIView *line = [[UIView alloc] init];

    line.backgroundColor = YYPColor(204, 204, 204);

    self.line = line;

    [self addSubview:line];

}
这里强调一点: 如果默认展示的起始时间均为当天时间时,则在可在自定义按钮里设置就好,不需添加下面方法.
// 自定义默认展示的当月起始时间

- (NSString *)timeStringDefaultWith:(NSString *)timeFormat {

    NSDate *date = [NSDate date];

    return [date timeFormat:timeFormat];

}
使用代理:
@protocol ZLTimeViewDelegate <NSObject>

/**

 *  时间选择器视图

 *

 *  @param beginTime           起始时间/开始时间

 *  @param endTime             终止时间按/结束时间

 *

 */

- (void)timeView:(ZLTimeView *)timeView seletedDateBegin:(NSString *)beginTime end:(NSString *)endTime;

@end
使用第一步创建的时间选择器Picker, 来进行起始时间/截止时间逻辑判断:
#pragma mark - ZLDatePickerViewDelegate

- (void)beginTimeBtnClick:(UIButton *)btn {

    ZLDatePickerView *beginTimePV = [ZLDatePickerView datePickerView];

    beginTimePV.date = [NSDate stringChangeTimeFormat:@"yyyy-MM-dd" string:btn.titleLabel.text];

    if (self.maxDate) {

        beginTimePV.maximumDate = self.maxDate;

    }

    beginTimePV.deleagte = self;

    [beginTimePV showFrom:btn];

}

- (void)endTimeBtnClick:(UIButton *)btn {

    ZLDatePickerView *endTimePV = [ZLDatePickerView datePickerView];

    endTimePV.date = [NSDate stringChangeTimeFormat:@"yyyy-MM-dd" string:btn.titleLabel.text];

    if (self.minDate) {

        endTimePV.minimumDate = self.minDate;

    }

    endTimePV.deleagte = self;

    [endTimePV showFrom:btn];

}

- (void)datePickerView:(ZLDatePickerView *)pickerView backTimeString:(NSString *)string To:(UIView *)view {

    UIButton *btn = (UIButton *)view;

    if (btn == self.beginTimeBtn) {

        self.minDate = [NSDate stringChangeTimeFormat:@"yyyy-MM-dd" string:string];

    }

    if (btn == self.endTimeBtn) {

        self.maxDate = [NSDate stringChangeTimeFormat:@"yyyy-MM-dd" string:string];

    }

    [btn setTitle:string forState:UIControlStateNormal];

    if ([self.delegate respondsToSelector:@selector(timeView:seletedDateBegin:end:)]) {

        [self.delegate timeView:self seletedDateBegin:self.beginTimeBtn.titleLabel.text end:self.endTimeBtn.titleLabel.text];

    }

}
第四步. 使用代理传值起始时间/截止时间
在所需控制器里创建起始时间选择器控件:
#import "ZLTimeView.h"
懒加载:
- (ZLTimeView *)timeView {

    if (!_timeView) {

        ZLTimeView *timeView = [[ZLTimeView alloc] initWithFrame:CGRectMake(0, 100, UI_View_Width, 50)];

        timeView.backgroundColor = [UIColor greenColor];

        timeView.delegate = self;

        _timeView = timeView;

    }

    return _timeView;

}
创建添加起始时间选择器控件:
[self.view addSubview:self.timeView];
使用代理<ZLTimeViewDelegate>:
#pragma mark - ZLTimeViewDelegate

- (void)timeView:(ZLTimeView *)timeView seletedDateBegin:(NSString *)beginTime end:(NSString *)endTime {

    // TODO: 进行上传时间段

}
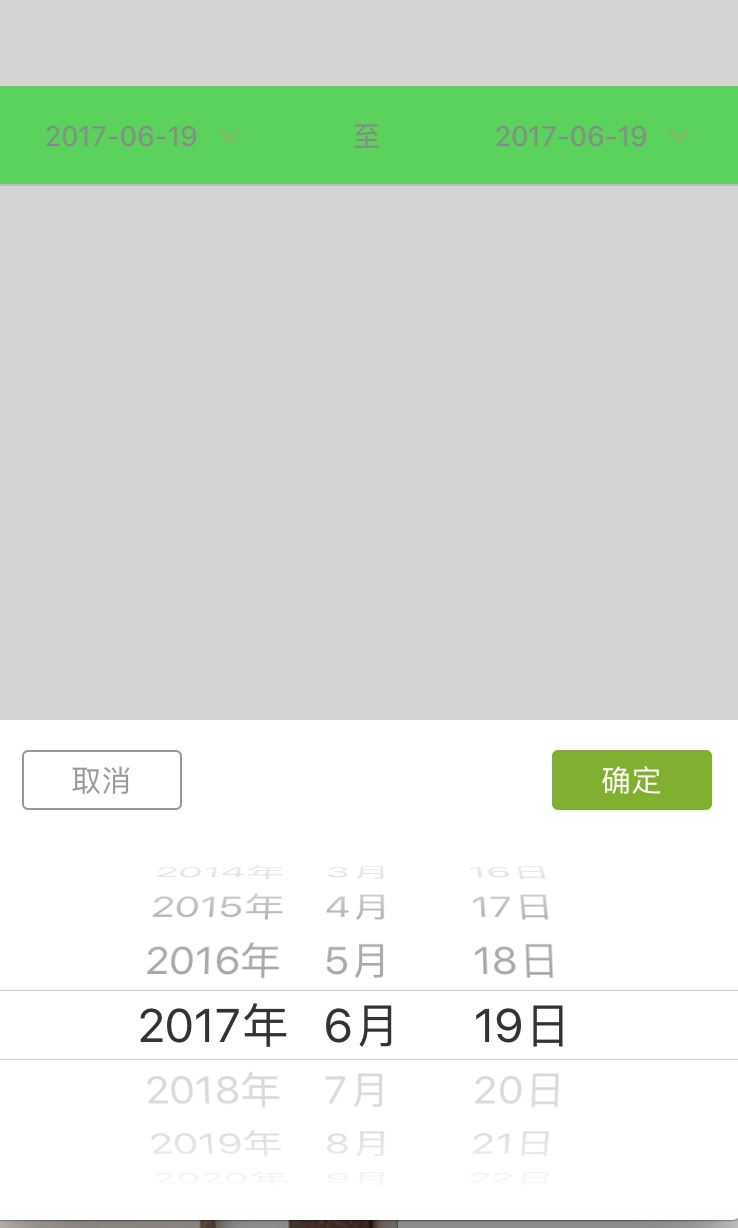
三、压缩文件截图及运行效果
压缩文件截图:
2. 项目截图
3.运行效果:
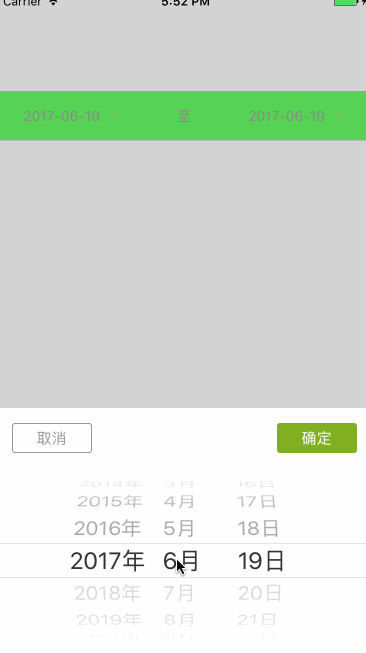
4.效果截图:
四、其他补充
界面性问题可以根据自己项目需求调整即可, 具体可参考代码, 项目能够直接运行!
注:本文著作权归作者,由demo大师发表,拒绝转载,转载需要作者授权
iOS-自定义起始时间选择器视图的更多相关文章
- iView -- TimePicker 自定义修改时间选择器选择时间面板样式
iView官方组件展示效果: 期望的最终效果: 为什么要修改期望效果? 项目需要只选择小时,分钟跟秒的不需要,而官方并没有直接相关的小时组件或者是设置显示成小时或分钟或秒的时间选择器,因为自己直接修改 ...
- Android日期时间选择器实现以及自定义大小
本文主要讲两个内容:1.如何将DatePicker和TimePicker放在一个dialog里面:2.改变他们的宽度: 问题1:其实现思路就是自定义一个Dialog,然后往里面同时放入DatePick ...
- 分享一下我封装iOS自定义控件的体会,附上三个好用的控件Demo <时间选择器&多行输入框&日期选择器>
前段时间有小伙伴问到我:"这样的控件该怎么做呢?",我感觉是个比较简单的控件,可能对于入行不久的同志思路没有很清晰吧.趁着最近工作不忙,就来这里分享一下我封装自定义控件的几点体会吧 ...
- iOS自定义组与组之间的距离以及视图
iOS自定义组与组之间的距离以及视图 //头视图高度 - (CGFloat)tableView:(UITableView *)tableView heightForHeaderInSection:(N ...
- picker-view、微信小程序自定义时间选择器(非官方)
picker-view自定义时间选择器 官网的自定义时间选择器比较简陋.日期不准 下面是我自己写的一个demo <view class="baseList"> < ...
- Android——图片视图(ImageView)、状态开关按钮(ToggleButton)、时钟、图片透明度、滚动和时间选择器
activity_ui1.xml dth="wrap_content" android:layout_height="wrap_content" android ...
- 微信小程序----日期时间选择器(自定义精确到分秒或时段)
声明 bug:由于此篇博客是在bindcolumnchange事件中做的值的改变处理,因此会出现当你选择时,没有点击确定,直接取消返回后,会发现选择框的值依然改变.造成原因:这一点就是由于在bindc ...
- iOS 自定义转场动画浅谈
代码地址如下:http://www.demodashi.com/demo/11612.html 路漫漫其修远兮,吾将上下而求索 前记 想研究自定义转场动画很久了,时间就像海绵,挤一挤还是有的,花了差不 ...
- 【bootstrap】时间选择器datetimepicker和daterangepicker
在bootstrap中的时间选择器有两种:dateTimePicker和dateRangePicker 1.dateTimePicker好像是官方嫡插件: 需要的文件: <link rel= ...
随机推荐
- C#编程(九)----------控制台I/O
原文链接:http://blog.csdn.net/shanyongxu/article/details/46454985 控制台I/O 可以使用Console.ReadLine()方法从控制台中读取 ...
- 【docker】关于docker中挂载的解释
现在有这么一个命令: docker run -p 33061:3306 --name mysql --restart=always -e MYSQL_ROOT_PASSWORD=pisen -v /e ...
- Selenium2+python自动化34-获取百度输入联想词
前言 最近有小伙伴问百度输入后,输入框下方的联想词如何定位到,这个其实难度不大,用前面所讲的元素定位完全可以定位到的. 本篇以百度输入框输入关键字匹配后,打印出联想词汇. 一.定位输入框联想词 1.首 ...
- T4 生成实体和简单的CRUD操作
<#@ template debug="false" hostspecific="false" language="C#" #> ...
- https跳转到http的过程在IE6中存在BUG(Bea-090475)
前段时间做OA系统的https的安全登录功能(以前登录是采用的一般的http方式,后因为安全性考虑需要改成https的方式)在本机测试完全通过. 可是近期同事发现在测试环境下用IE6访问会出现不能访问 ...
- Android之zip包换肤(极力推荐)
转自:http://www.eoeandroid.com/thread-102536-1-1.html 直接上图,以图为证,哈哈 第一图为原始的皮肤:<ignore_js_op> 第二种为 ...
- [Android Pro] Swift 3.0多线程
本文只介绍Grand Central Dispath(GCD) 中央调度 个人认为一个GCD就够用了,可能是改版或是其他的在找之前写的多线程方法时发现不能用了,看文档之后发现改了,现在看上去更加简单易 ...
- Git 学习(八)其他
Git 学习(八)其他 通过以上七章Git的学习,基本操作已差不多了,本章介绍一点落网之鱼: 包括如何忽略文件.配置别名.以及使用GitHub等. 当然,Git的强大远不是七章内容可概括的,之后可结 ...
- python文章学习列表
1.https://home.cnblogs.com/u/darkpig/feed/blog/ 这篇博主的系列文章 2.
- std::vector利用swap()函数进行内存的释放【转】
首先,vector与deque不同,其内存占用空间只会增长,不会减小.比如你首先分配了10,000个字节,然后erase掉后面9,999个,则虽然有效元素只有一个,但是内存占用仍为10,000个.所有 ...