PReact10.5.13源码理解
React源码看过几次,每次都没有坚持下来,索性学习一下PReact部分,网上讲解源码的不少,但是基本已经过时,所以自己来梳理下
render.js部分
import { EMPTY_OBJ, EMPTY_ARR } from './constants';

import { commitRoot, diff } from './diff/index';

import { createElement, Fragment } from './create-element';

import options from './options';

/**

 * Render a Preact virtual node into a DOM element

 * @param {import('./internal').ComponentChild} vnode The virtual node to render

 * @param {import('./internal').PreactElement} parentDom The DOM element to

 * render into

 * @param {import('./internal').PreactElement | object} [replaceNode] Optional: Attempt to re-use an

 * existing DOM tree rooted at `replaceNode`

 */

export function render(vnode, parentDom, replaceNode) {

    if (options._root) options._root(vnode, parentDom);

    // We abuse the `replaceNode` parameter in `hydrate()` to signal if we are in

    // hydration mode or not by passing the `hydrate` function instead of a DOM

    // element..

    let isHydrating = typeof replaceNode === 'function';

    // To be able to support calling `render()` multiple times on the same

    // DOM node, we need to obtain a reference to the previous tree. We do

    // this by assigning a new `_children` property to DOM nodes which points

    // to the last rendered tree. By default this property is not present, which

    // means that we are mounting a new tree for the first time.

     // 为了支持多次在一个dom节点上调用render函数,需要在dom节点上添加一个饮用,用来获取指向上一次渲染的虚拟dom树。

     // 这个属性默认是指向空的,也意味着我们第一次正在装备一颗新的树

     // 所以开始时这里的oldVNode是空(不论isHydrating的值),但是如果重复在这个节点上调用render那oldVNode是有值的

    let oldVNode = isHydrating

        ? null

        : (replaceNode && replaceNode._children) || parentDom._children;

    // 用Fragment包裹一下vnode,同时给replaceNode和parentDom的_children赋值

     vnode = (

        (!isHydrating && replaceNode) ||

        parentDom

    )._children = createElement(Fragment, null, [vnode]);

    // List of effects that need to be called after diffing.

     // 用来放置diff之后需要进行各种生命周期处理的Component,比如cdm、cdu;componentWillUnmount在diffChildren的unmount函数中执行不在commitRoot时执行

    let commitQueue = [];

    diff(

        parentDom, // 这个使用parentDom的_children属性已经指向[vnode]了

        // Determine the new vnode tree and store it on the DOM element on

        // our custom `_children` property.

        vnode,

        oldVNode || EMPTY_OBJ, // 旧的树

        EMPTY_OBJ,

        parentDom.ownerSVGElement !== undefined,

              // excessDomChildren,这个参数用来做dom复用的作用

        !isHydrating && replaceNode

            ? [replaceNode]

            : oldVNode

            ? null

            : parentDom.firstChild // 如果parentDom有子节点就会把整个子节点作为待复用的节点使用

            ? EMPTY_ARR.slice.call(parentDom.childNodes)

            : null,

        commitQueue,

              // oldDom,在后续方法中用来做标记插入位置使用

        !isHydrating && replaceNode

            ? replaceNode

            : oldVNode

            ? oldVNode._dom

            : parentDom.firstChild,

        isHydrating

    );

    // Flush all queued effects

     // 调用所有commitQueue中的节点_renderCallbacks中的方法

    commitRoot(commitQueue, vnode);

}

/**

 * Update an existing DOM element with data from a Preact virtual node

 * @param {import('./internal').ComponentChild} vnode The virtual node to render

 * @param {import('./internal').PreactElement} parentDom The DOM element to

 * update

 */

export function hydrate(vnode, parentDom) {

    render(vnode, parentDom, hydrate);

}
create-context.js部分
import { createContext, h, render } from 'preact';

const FontContext = createContext(20);

function Child() {

  return <FontContext.Consumer>

    {fontSize=><div style={{fontSize:fontSize}}>child</div>}

  </FontContext.Consumer>

}

function App(){

  return <Child/>

}

render(

  <FontContext.Provider value={26}>

    <App/>

  </FontContext.Provider>,

  document.getElementById('app')

);
看一下源码:
import { enqueueRender } from './component';

export let i = 0;

export function createContext(defaultValue, contextId) {

    contextId = '__cC' + i++; // 生成一个唯一ID

    const context = {

        _id: contextId,

        _defaultValue: defaultValue,

        /** @type {import('./internal').FunctionComponent} */

        Consumer(props, contextValue) {

            // return props.children(

            //     context[contextId] ? context[contextId].props.value : defaultValue

            // );

            return props.children(contextValue);

        },

        /** @type {import('./internal').FunctionComponent} */

        Provider(props) {

            if (!this.getChildContext) { // 第一次调用时进行一些初始化操作

                let subs = [];

                let ctx = {};

                ctx[contextId] = this;

                            // 在diff操作用,如果判断一个组件在Comsumer中,会调用sub进行订阅;

                            // 同时这个节点后续所有diff的地方都会带上这个context,调用sub方法进行调用

                            // context具有层级优先级,组件会先加入最近的context中

                this.getChildContext = () => ctx;

                this.shouldComponentUpdate = function(_props) {

                    if (this.props.value !== _props.value) {

                        // I think the forced value propagation here was only needed when `options.debounceRendering` was being bypassed:

                        // https://github.com/preactjs/preact/commit/4d339fb803bea09e9f198abf38ca1bf8ea4b7771#diff-54682ce380935a717e41b8bfc54737f6R358

                        // In those cases though, even with the value corrected, we're double-rendering all nodes.

                        // It might be better to just tell folks not to use force-sync mode.

                        // Currently, using `useContext()` in a class component will overwrite its `this.context` value.

                        // subs.some(c => {

                        //     c.context = _props.value;

                        //     enqueueRender(c);

                        // });

                        // subs.some(c => {

                        //     c.context[contextId] = _props.value;

                        //     enqueueRender(c);

                        // });

                                              // enqueueRender最终会进入renderComponent函数,进行diff、commitRoot、updateParentDomPointers等操作

                        subs.some(enqueueRender);

                    }

                };

                this.sub = c => {

                    subs.push(c);// 进入订阅数组,

                    let old = c.componentWillUnmount;

                    c.componentWillUnmount = () => { // 重写componentWillUnmount

                        subs.splice(subs.indexOf(c), 1);

                        if (old) old.call(c);

                    };

                };

            }

            return props.children;

        }

    };

    // Devtools needs access to the context object when it

    // encounters a Provider. This is necessary to support

    // setting `displayName` on the context object instead

    // of on the component itself. See:

    // https://reactjs.org/docs/context.html#contextdisplayname

    // createContext最终返回的是一个context对象,带着Provider和Consumer两个函数

    // 同时Consumber函数的contextType和Provider函数的_contextRef属性都指向context

    return (context.Provider._contextRef = context.Consumer.contextType = context);

}
                    if (c.getChildContext != null) {

                globalContext = assign(assign({}, globalContext), c.getChildContext());

            }

            if (!isNew && c.getSnapshotBeforeUpdate != null) {

                snapshot = c.getSnapshotBeforeUpdate(oldProps, oldState);

            }

            let isTopLevelFragment =

                tmp != null && tmp.type === Fragment && tmp.key == null;

            let renderResult = isTopLevelFragment ? tmp.props.children : tmp;

            diffChildren(

                parentDom,

                Array.isArray(renderResult) ? renderResult : [renderResult],

                newVNode,

                oldVNode,

                globalContext,

                isSvg,

                excessDomChildren,

                commitQueue,

                oldDom,

                isHydrating

            );
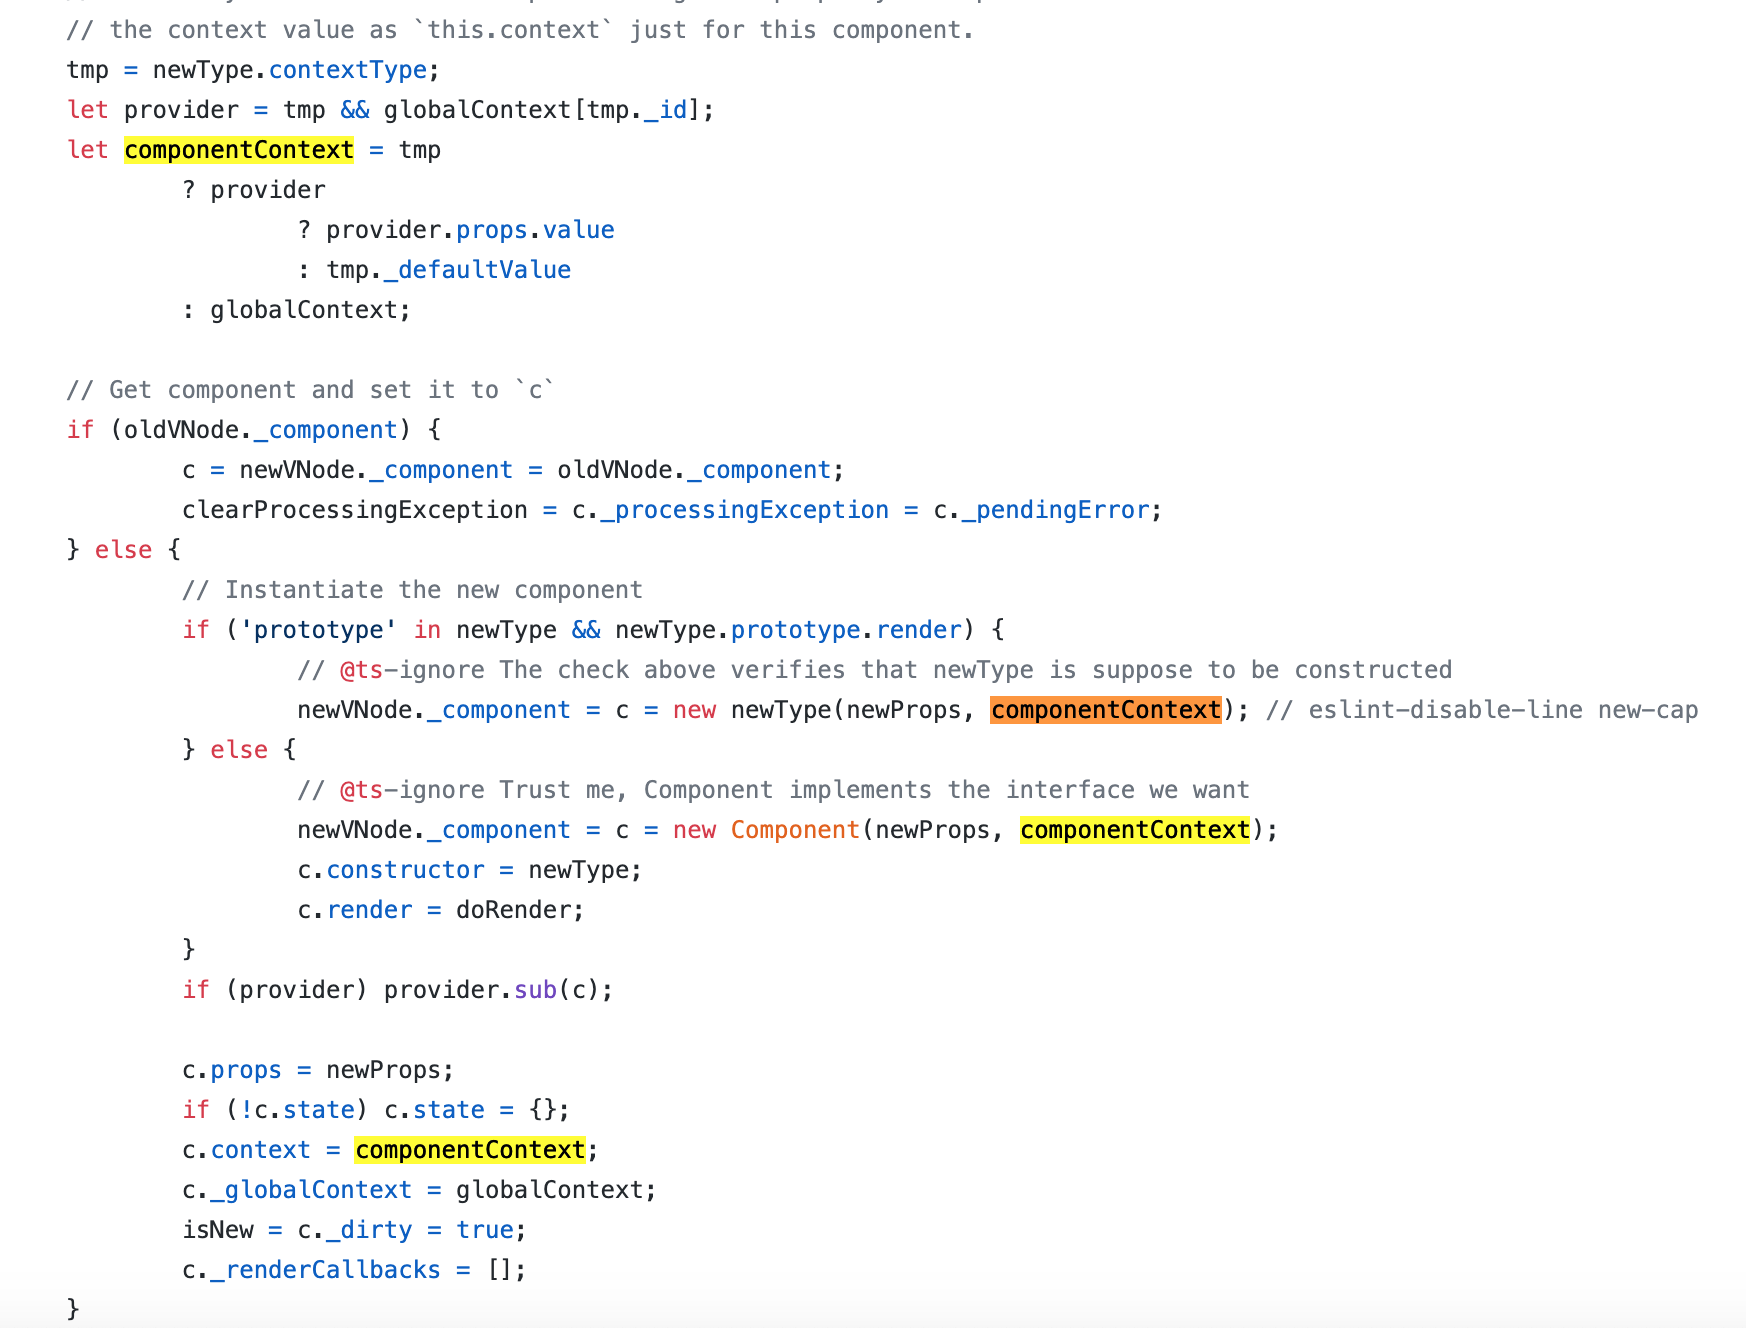
所以源码中,globalContext对象的每一个key指向一个Context.Provider;componentContext代表组件所在的Consumer传递的上下文信息即配对的Provider的props的value;
同时Provider的shouldComponentUpdate方法中用到了 ·this.props.value !== _props.value· 那么这里的this.props是哪来的?Provider中并没有相关属性。
主要是下面这个地方,当判断没有render方法时,会先用Compoent来实例化一个对象,并将render方法设置为doRender,并将constructor指向newType(当前函数),在doRender中调用this.constructor方法
// Instantiate the new component

                if ('prototype' in newType && newType.prototype.render) {

                    // @ts-ignore The check above verifies that newType is suppose to be constructed

                    newVNode._component = c = new newType(newProps, componentContext); // eslint-disable-line new-cap

                } else {

                    // @ts-ignore Trust me, Component implements the interface we want

                    newVNode._component = c = new Component(newProps, componentContext);

                    c.constructor = newType;

                    c.render = doRender;

                }
/** The `.render()` method for a PFC backing instance. */

function doRender(props, state, context) {

    return this.constructor(props, context);

}
diff部分
diff部分比较复杂,整体整理了一张大图

真是不得不吐槽,博客园的编辑器bug太多了,尤其是mac上使用,比如第二次上传代码提交不了;赋值粘贴用不了。。。
只有情怀让我继续在这里更新
PReact10.5.13源码理解的更多相关文章
- PReact10.5.13源码理解之hook
hook源码其实不多,但是实现的比较精巧:在diff/index.js中会有一些optison.diff这种钩子函数,hook中就用到了这些钩子函数. 在比如options._diff中将curr ...
- .NET Core 3.0之深入源码理解Startup的注册及运行
原文:.NET Core 3.0之深入源码理解Startup的注册及运行 写在前面 开发.NET Core应用,直接映入眼帘的就是Startup类和Program类,它们是.NET Core应用程 ...
- HashMap源码理解一下?
HashMap 是一个散列桶(本质是数组+链表),散列桶就是数据结构里面的散列表,每个数组元素是一个Node节点,该节点又链接着多个节点形成一个链表,故一个数组元素 = 一个链表,利用了数组线性查找和 ...
- Caffe源码理解2:SyncedMemory CPU和GPU间的数据同步
目录 写在前面 成员变量的含义及作用 构造与析构 内存同步管理 参考 博客:blog.shinelee.me | 博客园 | CSDN 写在前面 在Caffe源码理解1中介绍了Blob类,其中的数据成 ...
- 基于SpringBoot的Environment源码理解实现分散配置
前提 org.springframework.core.env.Environment是当前应用运行环境的公开接口,主要包括应用程序运行环境的两个关键方面:配置文件(profiles)和属性.Envi ...
- jedis的源码理解-基础篇
[jedis的源码理解-基础篇][http://my.oschina.net/u/944165/blog/127998] (关注实现关键功能的类) 基于jedis 2.2.0-SNAPSHOT ...
- VUEJS2.0源码理解--优
VUEJS2.0源码理解 http://jiongks.name/blog/vue-code-review/#pingback-112428
- AdvanceEast源码理解
目录 文章思路 源码理解 一. 标签点形式 按顺序排列四个点,逆时针旋转,且第一个点为左上角点(刚开始选择最左边的点, 二. 标签切边 三. loss计算 四. NMS 最后说明 文章思路 大神的gi ...
- Pytorch学习之源码理解:pytorch/examples/mnists
Pytorch学习之源码理解:pytorch/examples/mnists from __future__ import print_function import argparse import ...
随机推荐
- DOH & TRR & HTTPS & DNS
DOH & TRR & HTTPS & DNS DNS over HTTPS Trusted Recursive Resolver DNS 解析过程图解 DNS 解析过程 递归 ...
- mobile chart & f2
mobile chart & f2 https://www.yuque.com/antv/f2/getting-started https://antv.alipay.com/zh-cn/f2 ...
- layui 时间插件laydate中动态设置改变min和max值
<div class="layui-inline"> <label class="layui-form-label">申请时间</ ...
- 「NGK每日快讯」2021.2.4日NGK公链第93期官方快讯!
- HTTP状态响应码解析
# HTTP响应状态码 ## 1xx:临时响应 #### 表示临时响应并需要请求者继续执行操作的状态代码. 100 **继续**请求者应当继续提出请求.服务器返回此代码表示已收到请求的第一部分,正在等 ...
- Python学习笔记_购物车案例
goods_dic = { "iphone":6000, "ipad":3000, "T-shirt":100, "coffee& ...
- Java对象内存布局
本文转载自Java对象内存布局 导语 首先直接抛出问题 Unsafe.getInt(obj, fieldOffset)中的fieldOffset是什么, 类似还有compareAndSwapX(obj ...
- 从微信小程序到鸿蒙js开发【11】——页面路由
目录: 1.router.push()&wx.navigateTo() 2.router.replace()&wx.redirectTo() 3.router.back()&w ...
- jenkins+docker+nginx+tomcat实现vue项目部署
一.项目准备 1.新建一个vue的项目,确保能在浏览器正常访问.然后在项目的根目录下新建一个Dockerfile的文件,内容如下 FROM nginx COPY dist /usr/share/ngi ...
- dpi dp px 换算关系
getResources().getDisplayMetrics().densityDpi 就是屏幕密度.getResources().getDisplayMetrics().density 也可以理 ...