SpringMVC初始化阶段流程源码分析
1、都知道SpringMVC项目启动的时候都会初始化一个类:DispatcherServlet,看这个类的源码我们可以发现他其实就是一个servlet,
为什么这么说呢?请看:
DispatcherServlet extends FrameworkServlet
FrameworkServlet extends HttpServletBean
HttpServletBean extends HttpServlet
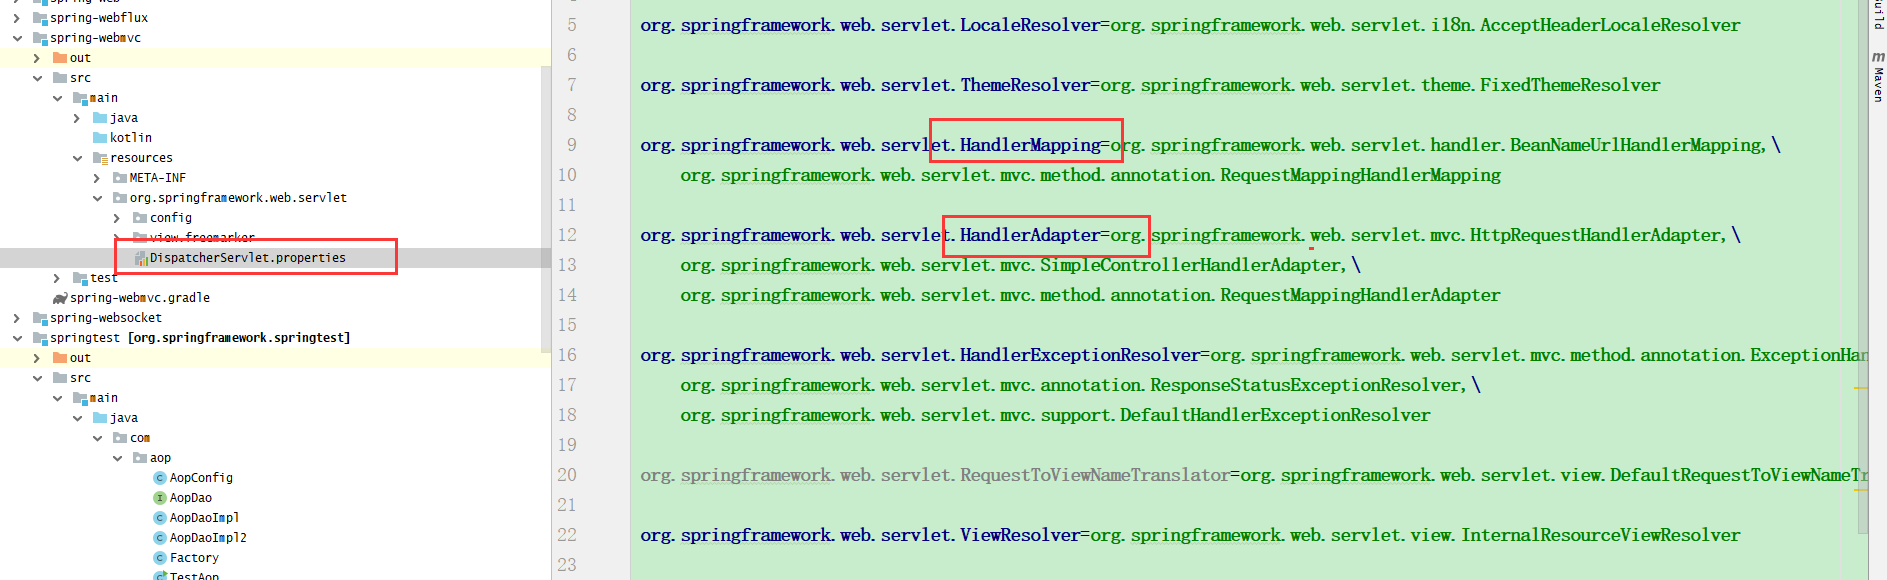
初始化这个DispatcherServlet的时候我们可以看到这个类里面有一个静态代码块:根据代码可以看出代码块里面会去读取DispatcherServlet.properties配置文件里面的配置,load到Properties集合里面
private static final String DEFAULT_STRATEGIES_PATH = "DispatcherServlet.properties";
private static final Properties defaultStrategies;
static {

        try {

            ClassPathResource resource = new ClassPathResource(DEFAULT_STRATEGIES_PATH, DispatcherServlet.class);

            defaultStrategies = PropertiesLoaderUtils.loadProperties(resource);

        }

        catch (IOException ex) {

            throw new IllegalStateException("Could not load '" + DEFAULT_STRATEGIES_PATH + "': " + ex.getMessage());

        }

    }
2、我们都知道一个servlet初始化阶段 ,会调用init()方法,那么这边会先调用HttpServlet的子类HttpServletBean里面的init方法:org.springframework.web.servlet.HttpServletBean#init,这个方法里面调用了initServletBean这个方法:org.springframework.web.servlet.FrameworkServlet#initServletBean
@Override

    public final void init() throws ServletException {

        if (logger.isDebugEnabled()) {

            logger.debug("Initializing servlet '" + getServletName() + "'");

        }

        // Set bean properties from init parameters.

        PropertyValues pvs = new ServletConfigPropertyValues(getServletConfig(), this.requiredProperties);

        if (!pvs.isEmpty()) {

            try {

                BeanWrapper bw = PropertyAccessorFactory.forBeanPropertyAccess(this);

                ResourceLoader resourceLoader = new ServletContextResourceLoader(getServletContext());

                bw.registerCustomEditor(Resource.class, new ResourceEditor(resourceLoader, getEnvironment()));

                initBeanWrapper(bw);

                bw.setPropertyValues(pvs, true);

            }

            catch (BeansException ex) {

                if (logger.isErrorEnabled()) {

                    logger.error("Failed to set bean properties on servlet '" + getServletName() + "'", ex);

                }

                throw ex;

            }

        }

        // Let subclasses do whatever initialization they like.

        initServletBean();

        if (logger.isDebugEnabled()) {

            logger.debug("Servlet '" + getServletName() + "' configured successfully");

        }

    }
org.springframework.web.servlet.FrameworkServlet#initServletBean里面调用了org.springframework.web.servlet.FrameworkServlet#initWebApplicationContext
@Override

    protected final void initServletBean() throws ServletException {

        getServletContext().log("Initializing Spring FrameworkServlet '" + getServletName() + "'");

        if (this.logger.isInfoEnabled()) {

            this.logger.info("FrameworkServlet '" + getServletName() + "': initialization started");

        }

        long startTime = System.currentTimeMillis();

        try {

            this.webApplicationContext = initWebApplicationContext();

            initFrameworkServlet();

        }

        catch (ServletException | RuntimeException ex) {

            this.logger.error("Context initialization failed", ex);

            throw ex;

        }

        if (this.logger.isInfoEnabled()) {

            long elapsedTime = System.currentTimeMillis() - startTime;

            this.logger.info("FrameworkServlet '" + getServletName() + "': initialization completed in " +

                    elapsedTime + " ms");

        }

    }
org.springframework.web.servlet.FrameworkServlet#initWebApplicationContext
    protected WebApplicationContext initWebApplicationContext() {

        WebApplicationContext rootContext =

                WebApplicationContextUtils.getWebApplicationContext(getServletContext());

        WebApplicationContext wac = null;

        if (this.webApplicationContext != null) {

            // A context instance was injected at construction time -> use it

            wac = this.webApplicationContext;

            if (wac instanceof ConfigurableWebApplicationContext) {

                ConfigurableWebApplicationContext cwac = (ConfigurableWebApplicationContext) wac;

                if (!cwac.isActive()) {

                    // The context has not yet been refreshed -> provide services such as

                    // setting the parent context, setting the application context id, etc

                    if (cwac.getParent() == null) {

                        // The context instance was injected without an explicit parent -> set

                        // the root application context (if any; may be null) as the parent

                        cwac.setParent(rootContext);

                    }

                    configureAndRefreshWebApplicationContext(cwac);

                }

            }

        }

        if (wac == null) {

            // No context instance was injected at construction time -> see if one

            // has been registered in the servlet context. If one exists, it is assumed

            // that the parent context (if any) has already been set and that the

            // user has performed any initialization such as setting the context id

            wac = findWebApplicationContext();

        }

        if (wac == null) {

            // No context instance is defined for this servlet -> create a local one

            wac = createWebApplicationContext(rootContext);

        }

        if (!this.refreshEventReceived) {

            // Either the context is not a ConfigurableApplicationContext with refresh

            // support or the context injected at construction time had already been

            // refreshed -> trigger initial onRefresh manually here.

            onRefresh(wac);

        }

        if (this.publishContext) {

            // Publish the context as a servlet context attribute.

            String attrName = getServletContextAttributeName();

            getServletContext().setAttribute(attrName, wac);

            if (this.logger.isDebugEnabled()) {

                this.logger.debug("Published WebApplicationContext of servlet '" + getServletName() +

                        "' as ServletContext attribute with name [" + attrName + "]");

            }

        }

        return wac;

    }
里面有一个onRefresh方法:里面做了一些列的初始化操作,具体哪个方法对应什么功能呢?请大家自行看里面的源码,我这边主要说的是
initHandlerMappings(context);

initHandlerAdapters(context);
这两个方法就是初始化我们的映射器和我们的适配器的,到此我们的初始化就结束了;
@Override

    protected void onRefresh(ApplicationContext context) {

        initStrategies(context);

    }

    protected void initStrategies(ApplicationContext context) {

        //此方法主要做文件上传处理的

        initMultipartResolver(context);

        initLocaleResolver(context);

        initThemeResolver(context);

        //此方法主要是获取配置文件DispatcherServlet.properties里面的handlerMapping类型对象

        initHandlerMappings(context);

        initHandlerAdapters(context);

        initHandlerExceptionResolvers(context);

        initRequestToViewNameTranslator(context);

        initViewResolvers(context);

        initFlashMapManager(context);

    }
SpringMVC初始化阶段流程源码分析的更多相关文章
- Spring加载流程源码分析03【refresh】
前面两篇文章分析了super(this)和setConfigLocations(configLocations)的源代码,本文来分析下refresh的源码, Spring加载流程源码分析01[su ...
- Spark(四十九):Spark On YARN启动流程源码分析(一)
引导: 该篇章主要讲解执行spark-submit.sh提交到将任务提交给Yarn阶段代码分析. spark-submit的入口函数 一般提交一个spark作业的方式采用spark-submit来提交 ...
- [Android]从Launcher开始启动App流程源码分析
以下内容为原创,欢迎转载,转载请注明 来自天天博客:http://www.cnblogs.com/tiantianbyconan/p/5017056.html 从Launcher开始启动App流程源码 ...
- [Android]Android系统启动流程源码分析
以下内容为原创,欢迎转载,转载请注明 来自天天博客:http://www.cnblogs.com/tiantianbyconan/p/5013863.html Android系统启动流程源码分析 首先 ...
- Android笔记--View绘制流程源码分析(二)
Android笔记--View绘制流程源码分析二 通过上一篇View绘制流程源码分析一可以知晓整个绘制流程之前,在activity启动过程中: Window的建立(activit.attach生成), ...
- Android笔记--View绘制流程源码分析(一)
Android笔记--View绘制流程源码分析 View绘制之前框架流程分析 View绘制的分析始终是离不开Activity及其内部的Window的.在Activity的源码启动流程中,一并包含 着A ...
- Spark(五十一):Spark On YARN(Yarn-Cluster模式)启动流程源码分析(二)
上篇<Spark(四十九):Spark On YARN启动流程源码分析(一)>我们讲到启动SparkContext初始化,ApplicationMaster启动资源中,讲解的内容明显不完整 ...
- spring boot 加载web容器tomcat流程源码分析
spring boot 加载web容器tomcat流程源码分析 我本地的springboot版本是2.5.1,后面的分析都是基于这个版本 <parent> <groupId>o ...
- springboot 事务创建流程源码分析
springboot 事务创建流程源码分析 目录 springboot 事务创建流程源码分析 1. 自动加载配置 2. InfrastructureAdvisorAutoProxyCreator类 3 ...
随机推荐
- dpkg:处理 xxx (--configure)时出错解决办法
1.$ sudo mv /var/lib/dpkg/info /var/lib/dpkg/info_old //现将info文件夹更名2.$ sudo mkdir /var/lib/dpkg/info ...
- 计算机网络-应用层(4)DNS协议
域名系统(Domain Name System, DNS):一个分层的由DNS服务器实现的分布式数据库+一个使得主机能够查询分布式数据库的应用层协议 DNS服务器通常是运行BIND (Berkeley ...
- 如何使用python移除/删除非空文件夹?
移除/删除非空文件夹/目录的最有效方法是什么? 1.标准库参考:shutil.rmtree. 根据设计,rmtree在包含只读文件的文件夹树上失败.如果要删除文件夹,不管它是否包含只读文件,请使用 i ...
- 使用log4j将数据流入flume
最近做了一个log抽取的项目,采用log4j+flume实现,在此分享记录一下. 准备 什么是flume? flume是一个提供高可用的,高可靠的,分布式的海量日志采集.聚合和传输的系统. flume ...
- python分支结构
if分支 一.单分支结构 # if 表达式:# 语句块# 后续语句 # 执行流程:如果表达式结果为真,则执行语句块.否则,直接执行后续语句 二.双分支结构 # 双分支语句# if 表达式:# ...
- 基于 GitBook 搭建个人博客
目录 基于 GitBook 搭建个人博客 1.为什么要写博客? 2.为什么选择使用 GitBook 来搭建? 3.搭建方式 3.1 GitBook 线上直接搭建 3.2 由基于Node.js的命令工具 ...
- SPFA算法详解
前置知识:Bellman-Ford算法 前排提示:SPFA算法非常容易被卡出翔.所以如果不是图中有负权边,尽量使用Dijkstra!(Dijkstra算法不能能处理负权边,但SPFA能) 前排提示*2 ...
- 【socket编程基础模板】
网络编程的基础是基于socket编程.socket(TCP)编程基于固定编程模板 server端: socket(声明socket类型) bind(命令socket,绑定地址和端口) listen(创 ...
- Nodejs模块:querystring
/** * @description querystring模块 */ const querystring = require('querystring'); const url = 'https:/ ...
- viewPager2的Bug
在使用数据绑定时,viewpager2的 android:layout_width 必需 match_parent,不然要么显示不正常,要么直接崩溃.