
spring-cloud-netflix-config
Spring Cloud Config
在我们了解spring cloud config之前,我可以想想一个配置中心提供的核心功能应该有什么
- 提供服务端和客户端支持
- 集中管理各环境的配置文件
- 配置文件修改之后,可以快速的生效
- 可以进行版本管理
- 支持大的并发查询
- 支持各种语言
Spring Cloud Config可以完美的支持以上所有的需求。
Spring Cloud Config项目是一个解决分布式系统的配置管理方案。它包含了Client和Server两个部分,server提供配置文件的存储、以接口的形式将配置文件的内容提供出去,client通过接口获取数据、并依据此数据初始化自己的应用。Spring cloud使用git或svn存放配置文件,默认情况下使用git,我们先以git为例做一套示例。
一、创建配置中心服务
1.首先在码云上创建一个 仓库spring-cofig-sever,在仓库里新建三个文件
lf-config-dev.properties 配置env=dev
lf-config-test.properties 配置env=test
lf-config.properties 配置 lf.config=hello lf
2.创建项目,集成spring-cloud-config, pom.xml
<?xml version="1.0" encoding="UTF-8"?>

<project xmlns="http://maven.apache.org/POM/4.0.0" xmlns:xsi="http://www.w3.org/2001/XMLSchema-instance"

         xsi:schemaLocation="http://maven.apache.org/POM/4.0.0 https://maven.apache.org/xsd/maven-4.0.0.xsd">

    <modelVersion>4.0.0</modelVersion>

    <parent>

        <groupId>lf.liyouyou</groupId>

        <artifactId>spring-cloud-netflix-demo</artifactId>

        <version>1.0-SNAPSHOT</version>

    </parent>

    <groupId>lf.liyouyou</groupId>

    <artifactId>spring-cloud-config</artifactId>

    <version>0.0.1-SNAPSHOT</version>

    <name>spring-cloud-config</name>

    <description>Demo project for Spring Boot</description>

    <properties>

        <java.version>1.8</java.version>

        <spring-cloud.version>Hoxton.SR8</spring-cloud.version>

    </properties>

    <dependencies>

        <dependency>

            <groupId>org.springframework.cloud</groupId>

            <artifactId>spring-cloud-config-server</artifactId>

        </dependency>

        <dependency>

            <groupId>org.springframework.cloud</groupId>

            <artifactId>spring-cloud-starter-netflix-eureka-client</artifactId>

        </dependency>

        <dependency>

            <groupId>org.springframework.boot</groupId>

            <artifactId>spring-boot-starter-test</artifactId>

            <scope>test</scope>

            <exclusions>

                <exclusion>

                    <groupId>org.junit.vintage</groupId>

                    <artifactId>junit-vintage-engine</artifactId>

                </exclusion>

            </exclusions>

        </dependency>

    </dependencies>

    <dependencyManagement>

        <dependencies>

            <dependency>

                <groupId>org.springframework.cloud</groupId>

                <artifactId>spring-cloud-dependencies</artifactId>

                <version>${spring-cloud.version}</version>

                <type>pom</type>

                <scope>import</scope>

            </dependency>

        </dependencies>

    </dependencyManagement>

    <build>

        <plugins>

            <plugin>

                <groupId>org.springframework.boot</groupId>

                <artifactId>spring-boot-maven-plugin</artifactId>

            </plugin>

        </plugins>

    </build>

</project>
3、启动类开启spring-cloud-config支持
@SpringBootApplication

@EnableConfigServer

public class SpringCloudConfigApplication {

    public static void main(String[] args) {

        SpringApplication.run(SpringCloudConfigApplication.class, args);

    }

}
4、配置properties
spring.application.name=spring-cloud-config

server.port=9002

eureka.client.service-url.defaultZone=http://localhost:8000/eureka/

#spring.cloud.config.server.git.uri=https://github.com/**/spring-cloud-netflix-config

spring.cloud.config.server.git.uri=https://gitee.com/**/spring-cofig-sever

spring.cloud.config.server.git.force-pull=true

spring.cloud.config.server.git.username= 用户名

spring.cloud.config.server.git.password= 密码
启动配置中心,启动项目,发现spring-cloud-config服务已经注册到配置中心。
访问http://localhost:9002/spring-cloud-config-client.properties 返回配置
二、创建配置中心消费端
1.创建工程spring-cloud-config-client , 添加spring-cloud-config客户端依赖
2.git上新增对应服务配置文件spring-cloud-config-client.properties 配置:
env=test

hello=lf

lf.config=spring-cloud-config-client
3.新增controller,获取配置
package lf.liyouyou.controller;

import org.springframework.beans.factory.annotation.Value;

import org.springframework.cloud.context.config.annotation.RefreshScope;

import org.springframework.web.bind.annotation.RequestMapping;

import org.springframework.web.bind.annotation.RestController;

@RestController

@RefreshScope

public class ConfigController {

    @Value("${env}")

    private String tex;

    @Value("${hello}")

    private String hello;

    @Value("${lf.config}")

    private String env;

    @RequestMapping("/hello")

    public String from() {

        return env+"-"+tex+"-"+this.hello;

    }

}
启动类添加扫描controller
package lf.liyouyou;

import org.springframework.boot.SpringApplication;

import org.springframework.boot.autoconfigure.SpringBootApplication;

import org.springframework.context.annotation.ComponentScan;

@SpringBootApplication

@ComponentScan(basePackages = "lf.liyouyou.controller")

public class SpringCloudConfigCilentApplication {

    public static void main(String[] args) {

        SpringApplication.run(SpringCloudConfigCilentApplication.class, args);

    }

}
4.配置bootstrap.properties、application.properties
bootstrap.properties
spring.cloud.config.discovery.enabled=true

spring.cloud.config.discovery.service-id=spring-cloud-config

eureka.client.service-url.defaultZone=http://localhost:8000/eureka/
application.properties
spring.application.name=spring-cloud-config-client

server.port=9003

management.endpoints.web.exposure.include=refresh
启动项目,访问http://localhost:9003/hello ,返回配置。
修改git上对应配置,发现访问http://localhost:9002/spring-cloud-config-client.properties 返回已经修改的配置,而http://localhost:9003/hello则未刷新。
@RefreshScope则可以触发刷新,用postman 或者curl -X POST http://localhost:9003/actuator/refresh进行节点刷新。
再访问而http://localhost:9003/hello,获取最新提交的配置。

三、参照二步骤创建(复制)一个config客户端spring-cloud-config-client-demo工程,端口改为9004,git上新增一个spring-cloud-config-client-demo.properties文件,配置:
lf.liyouyou=liyouyou
启动,访问http://localhost:9004/hello,返回配置。
同时修改git上对应spring-cloud-config-client.properties、spring-cloud-config-client-demo.properties 两个配置,发现访问http://localhost:9002/spring-cloud-config-client-demo.properties、http://localhost:9002/spring-cloud-config-client.properties
返回已经修改的配置,而http://localhost:9004/hello、http://localhost:9003/hello则未刷新。
同样@RefreshScope则可以触发刷新,用postman 或者curl -X POST http://localhost:9003/actuator/refresh进行节点刷新。
再访问而http://localhost:9003/hello,获取最新提交的配置。http://localhost:9004/hello还是未刷新。
再http://localhost:9004/actuator/refresh进行节点刷新,http://localhost:9004/hello才能获取到最新刷新的配置
综上,基于actuator的refresh只能进行单节点刷新
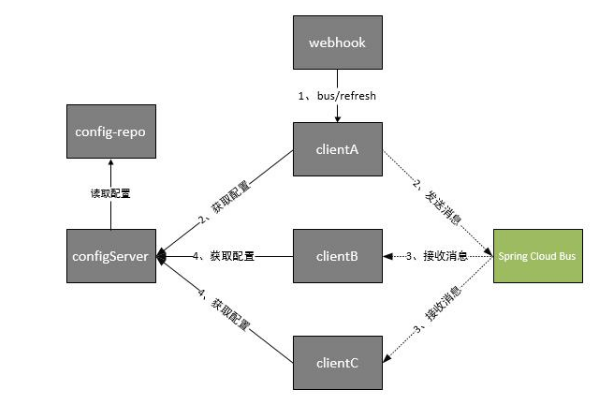
四、基于消息总线bus+监控monitor+webhook进行自动多节点刷新的最终解决方案
基于消息总线配置+webhook的组合(http://localhost:9002/actuator/bus-refresh 所有节点都刷新),由于git推送信息会推送很多无关信息,会导致json解析异常,为此spring推出了monitor去解决此问题
效果图如下:
1.改造spring-cloud-config引入对应bus 、monitor依赖
<?xml version="1.0" encoding="UTF-8"?>

<project xmlns="http://maven.apache.org/POM/4.0.0" xmlns:xsi="http://www.w3.org/2001/XMLSchema-instance"

         xsi:schemaLocation="http://maven.apache.org/POM/4.0.0 https://maven.apache.org/xsd/maven-4.0.0.xsd">

    <modelVersion>4.0.0</modelVersion>

    <parent>

        <groupId>lf.liyouyou</groupId>

        <artifactId>spring-cloud-netflix-demo</artifactId>

        <version>1.0-SNAPSHOT</version>

    </parent>

    <groupId>lf.liyouyou</groupId>

    <artifactId>spring-cloud-config</artifactId>

    <version>0.0.1-SNAPSHOT</version>

    <name>spring-cloud-config</name>

    <description>Demo project for Spring Boot</description>

    <properties>

        <java.version>1.8</java.version>

        <spring-cloud.version>Hoxton.SR8</spring-cloud.version>

    </properties>

    <dependencies>

        <dependency>

            <groupId>org.springframework.cloud</groupId>

            <artifactId>spring-cloud-config-server</artifactId>

        </dependency>

        <dependency>

            <groupId>org.springframework.cloud</groupId>

            <artifactId>spring-cloud-starter-netflix-eureka-client</artifactId>

        </dependency>

        <!--<dependency>

            <groupId>org.springframework.cloud</groupId>

            <artifactId>spring-cloud-starter-bus-kafka</artifactId>

        </dependency>-->

        <dependency>

            <groupId>org.springframework.cloud</groupId>

            <artifactId>spring-cloud-starter-bus-amqp</artifactId>

        </dependency>

        <dependency>

            <groupId>org.springframework.cloud</groupId>

            <artifactId>spring-cloud-config-monitor</artifactId>

        </dependency>

        <dependency>

            <groupId>org.springframework.boot</groupId>

            <artifactId>spring-boot-starter-actuator</artifactId>

        </dependency>

        <dependency>

            <groupId>org.springframework.boot</groupId>

            <artifactId>spring-boot-starter-test</artifactId>

            <scope>test</scope>

            <exclusions>

                <exclusion>

                    <groupId>org.junit.vintage</groupId>

                    <artifactId>junit-vintage-engine</artifactId>

                </exclusion>

            </exclusions>

        </dependency>

    </dependencies>

    <dependencyManagement>

        <dependencies>

            <dependency>

                <groupId>org.springframework.cloud</groupId>

                <artifactId>spring-cloud-dependencies</artifactId>

                <version>${spring-cloud.version}</version>

                <type>pom</type>

                <scope>import</scope>

            </dependency>

        </dependencies>

    </dependencyManagement>

    <build>

        <plugins>

            <plugin>

                <groupId>org.springframework.boot</groupId>

                <artifactId>spring-boot-maven-plugin</artifactId>

            </plugin>

        </plugins>

    </build>

</project>
spring-cloud-bus可以使用rabbitMQ或者kafka进行实现,这边选择使用rabbitMQ进行实现
2.配置文件修改,添加mq 、bus支持
spring.application.name=spring-cloud-config

server.port=9002

eureka.client.service-url.defaultZone=http://localhost:8000/eureka/

#spring.cloud.config.server.git.uri=https://github.com/**/spring-cloud-netflix-config

spring.cloud.config.server.git.uri=https://gitee.com/**/spring-cofig-sever

spring.cloud.config.server.git.force-pull=true

spring.cloud.config.server.git.username=**

spring.cloud.config.server.git.password=**

#Config Server会默认从应用的src/main/resource目录下检索配置文件。

#spring.profiles.active=native

#也可以通过如下方式 属性来指定配置文件的位置

#spring.cloud.config.server.native.searchLocations=file:D:/properties/

spring.rabbitmq.host=192.168.**.151

spring.rabbitmq.port=5672

spring.rabbitmq.username=**

spring.rabbitmq.password=**

## 刷新时,关闭安全验证

management.security.enabled=false

spring.cloud.bus.enabled=true

spring.cloud.bus.trace.enabled=true

spring.cloud.bus.refresh.enabled=true

management.endpoints.web.exposure.include=*
重新启动项目。
3.改造两个config client,pom.xml,配置文件分别添加对bus的支持
pom.xml
<dependency>

            <groupId>org.springframework.boot</groupId>

            <artifactId>spring-boot-starter-actuator</artifactId>

        </dependency>

        <dependency>

            <groupId>org.springframework.cloud</groupId>

            <artifactId>spring-cloud-starter-bus-amqp</artifactId>

        </dependency>
application.properties
spring.application.name=spring-cloud-config-client

server.port=9003

spring.rabbitmq.host=192.168.**.151

spring.rabbitmq.port=5672

spring.rabbitmq.username=**

spring.rabbitmq.password=**

spring.cloud.bus.enabled=true

#management.endpoints.web.exposure.include=refresh

management.endpoints.web.exposure.include=*
分别启动即可。
4.检测monitor+bus全局刷新
分别访问,http://localhost:9003/hello http://localhost:9004/hello 获取到对应配置,这时修改git上
同时修改git上对应spring-cloud-config-client.properties、spring-cloud-config-client-demo.properties 两个配置,发现访问http://localhost:9002/spring-cloud-config-client-demo.properties、http://localhost:9002/spring-cloud-config-client.properties
返回已经修改的配置,而http://localhost:9004/hello、http://localhost:9003/hello则未刷新。进行monitor刷新一次spring-cloud-config配置中心服务端
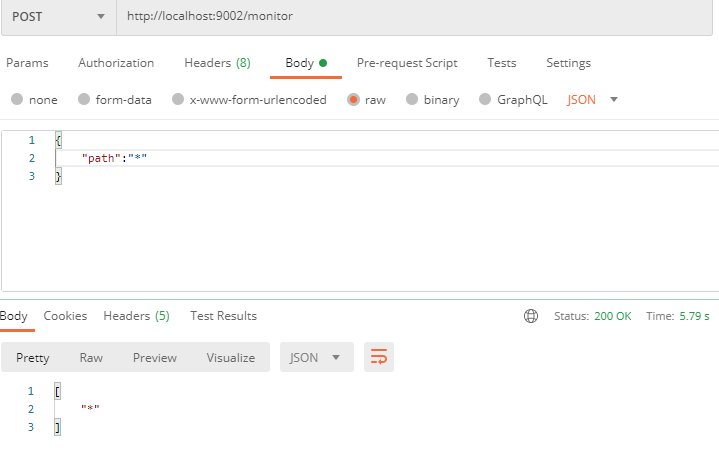
再http://localhost:9004/hello、http://localhost:9003/hello ,发现都获取到了最新提交的配置。
5、再配置webhook自动进行刷新,不需要手动进行http://localhost:9003/monitor进行刷新
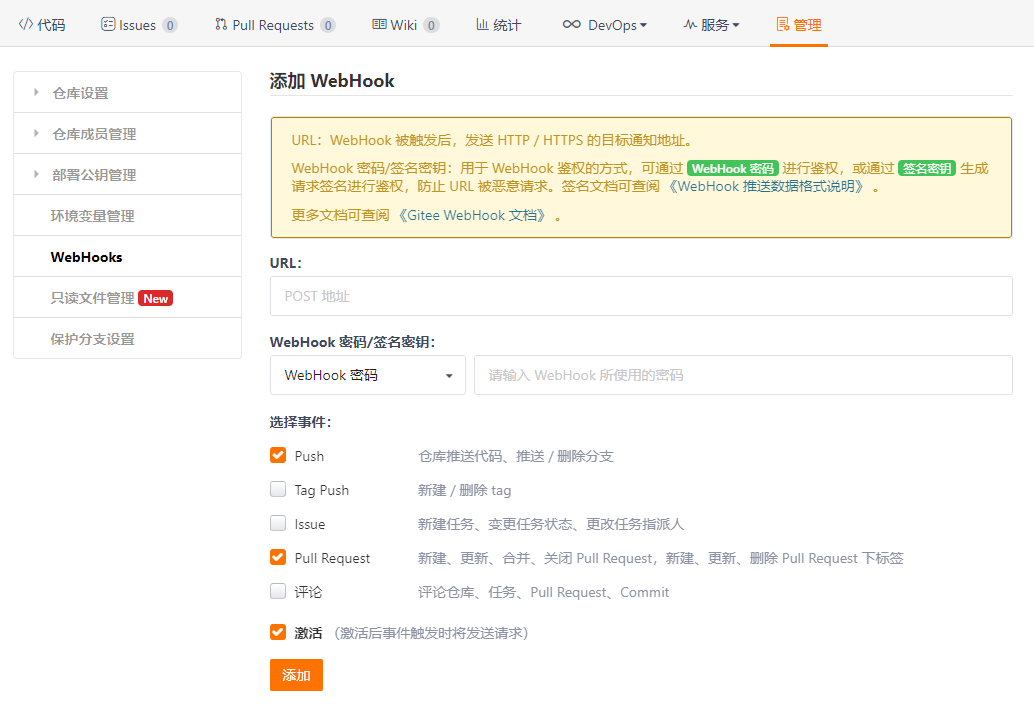
新增一个webhook,并配置刷新地址http://localhost:9002外网映射ip/monitor?path=*
但是要注意添加到webhook的内网地址需要用ngrok工具进行外网地址映射,不然无妨访问本地
6、添加完成进行测试
会发现哪怕同时更改git上多个服务的配置,访问http://localhost:9004/hello、http://localhost:9003/hello都能获取到最新配置,
证明webhook已经帮助我们自动进行自动刷新。
spring-cloud-netflix-config的更多相关文章
- Spring Cloud Netflix多语言/非java语言支持之Spring Cloud Sidecar
Spring Cloud Netflix多语言/非java语言支持之Spring Cloud Sidecar 前言 公司有一个调研要做,调研如何将Python语言提供的服务纳入到Spring Clou ...
- Spring Cloud 入门教程(十):和RabbitMQ的整合 -- 消息总线Spring Cloud Netflix Bus
在本教程第三讲Spring Cloud 入门教程(三): 配置自动刷新中,通过POST方式向客户端发送/refresh请求, 可以让客户端获取到配置的最新变化.但试想一下, 在分布式系统中,如果存在很 ...
- Spring Cloud Netflix项目进入维护模式
任何项目都有其生命周期,Spring Could Netflix也不例外,官宣已进入维护模式,如果在新项目开始考虑技术选型时要考虑到这点风险,并考虑绕道的可能性. 原创: itmuch IT牧场 这 ...
- spring cloud连载第三篇之Spring Cloud Netflix
1. Service Discovery: Eureka Server(服务发现:eureka服务器) 1.1 依赖 <dependency> <groupId>org.spr ...
- 基于Spring Cloud Netflix的TCC柔性事务和EDA事件驱动示例
Solar Spring Cloud为开发者提供了快速构建分布式系统中的一些常见工具,如分布式配置中心,服务发现与注册中心,智能路由,服务熔断及降级,消息总线,分布式追踪的解决方案等. 本次实战以模拟 ...
- Spring Cloud Netflix之Euraka Server注册中心
Spring Cloud简介 Spring Cloud是基于Spring Boot的一套实现微服务架构的生态组件.生态组件中包含Spring Cloud NetFlix,Spring Cloud Fe ...
- Spring Cloud Netflix vs Spring Cloud Alibaba
Spring Cloud Netflixhttps://spring.io/projects/spring-cloud-netflix spring-cloud-alibaba/README-zh.m ...
- Spring Cloud Netflix Zuul 重试会自动跳过经常超时的服务实例的简单说明和分析
在使用E版本的Spring Cloud Netflix Zuul内置的Ribbon重试功能时,发现Ribbon有一个非常有用的特性: 如果某个服务的某个实例经常需要重试,Ribbon则会在自己维护的一 ...
- Spring Cloud Netflix Eureka源码导读与原理分析
Spring Cloud Netflix技术栈中,Eureka作为服务注册中心对整个微服务架构起着最核心的整合作用,因此对Eureka还是有很大的必要进行深入研究. 本文主要分为四部分,一是对项目构建 ...
- Spring Cloud Netflix概览和架构设计
Spring Cloud简介 Spring Cloud是基于Spring Boot的一整套实现微服务的框架.他提供了微服务开发所需的配置管理.服务发现.断路器.智能路由.微代理.控制总线.全局锁.决策 ...
随机推荐
- SVM 支持向量机算法-实战篇
公号:码农充电站pro 主页:https://codeshellme.github.io 上一篇介绍了 SVM 的原理和一些基本概念,本篇来介绍如何用 SVM 处理实际问题. 1,SVM 的实现 SV ...
- NOIP2020 T2 字符串匹配题解
首先考虑O(n^3)的暴力怎么写. 显然,可以枚举字符串\(A\)+\(B\)的右端点,左端点显然是1,暴力判断是否能与后面的字符构成循环节,对于满足 \(k*(A+B)+C=\) 整个字符串\((k ...
- 时序数据库 Apache-IoTDB 源码解析之元数据索引块(六)
上一章聊到 TsFile 索引块的详细介绍,以及一个查询所经过的步骤.详情请见: 时序数据库 Apache-IoTDB 源码解析之文件索引块(五) 打一波广告,欢迎大家访问 IoTDB 仓库,求一波 ...
- MySQL主从复制配置部署
配置前准备:安装MySQL MySQL在centOS上的安装传送门: 1.集群规划 hadoop105 hadoop106 hadoop107 MySQL(master) MySQL(slave) ...
- 思考gRPC :为什么是HTTP/2
Introducing gRPC Support with NGINX 1.13.10 - NGINX https://www.nginx.com/blog/nginx-1-13-10-grpc/ 思 ...
- XV6学习(9)Lab cow: Copy-on-write fork
代码在github上.总体来说如果理解了COW机制的话,这个实验的完成也没有很复杂. 这一个实验是要完成COW(copy on write)fork.在原始的XV6中,fork函数是通过直接对进程的地 ...
- 第八届“图灵杯”NEUQ-ACM程序设计竞赛个人赛(同步赛)
传送门 B-小宝的幸运数组 题目描述 对于小宝来说,如果一个数组的总和能够整除他的幸运数字k,就是他的幸运数组,而其他数组小宝都很讨厌.现在有一个长度为n的数组,小宝想知道这个数组的子数组中,最长的幸 ...
- Gitlab + DRBD HA
部署简介: 为了gitlab有容灾的能力,所以部署一个HA的小集群,用到的软件有 gitlab 和brbd,目前现有环境为 master节点 系统版本:CentOS release 6.5 (Fina ...
- LCA算法——倍增
概况 LCA(Lowest Common Ancestors),即最近公共祖先,是指在有根树中,找出某两个结点u和v最近的公共祖先. 实现过程 预处理:通过dfs遍历,记录每个节点到根节点的距离dis ...
- Could not transfer artifact org.apache.maven.plugins:maven-clean-plugin:pom:2.5 from 这类问题的解决方法
最近换了台电脑,所以重新在IEDA上搭建Spring Boot环境,遇到一个问题,网上查了很久,又实践了一通,终于解决,这里把步骤详细记录下来. 问题描述:创建IDEA的Maven项目后,出现 Mav ...