
Android高手进阶教程(五)之----Android 中LayoutInflater的使用!
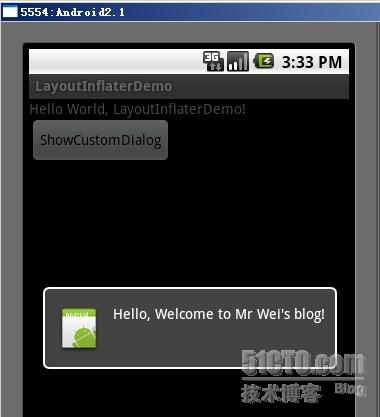
- view plaincopy to clipboardprint?
- <?xml version="1.0"
- encoding="utf-8"?>
- <LinearLayout
- xmlns:android="http://schemas.android.com/apk/res/android"
- android:orientation="vertical"
- android:layout_width="fill_parent"
- android:layout_height="fill_parent"
- >
- <TextView
- android:layout_width="fill_parent"
- android:layout_height="wrap_content"
- android:text="@string/hello"
- />
- <Button
- android:id="@+id/button"
- android:layout_width="wrap_content"
- android:layout_height="wrap_content"
- android:text="ShowCustomDialog"
- />
- </LinearLayout>
- <?xml version="1.0"
- encoding="utf-8"?>
- <LinearLayout
- xmlns:android="http://schemas.android.com/apk/res/android"
- android:orientation="vertical"
- android:layout_width="fill_parent"
- android:layout_height="fill_parent"
- >
- <TextView
- android:layout_width="fill_parent"
- android:layout_height="wrap_content"
- android:text="@string/hello"
- />
- <Button
- android:id="@+id/button"
- android:layout_width="wrap_content"
- android:layout_height="wrap_content"
- android:text="ShowCustomDialog"
- />
- </LinearLayout>
- view plaincopy to clipboardprint?
- <?xml version="1.0"
- encoding="utf-8"?>
- <LinearLayout
- xmlns:android="http://schemas.android.com/apk/res/android"
- android:orientation="horizontal"
- android:layout_width="fill_parent"
- android:layout_height="fill_parent"
- android:padding="10dp"
- >
- <ImageView android:id="@+id/image"
- android:layout_width="wrap_content"
- android:layout_height="fill_parent"
- android:layout_marginRight="10dp"
- />
- <TextView android:id="@+id/text"
- android:layout_width="wrap_content"
- android:layout_height="fill_parent"
- android:textColor="#FFF"
- />
- </LinearLayout>
- <?xml version="1.0"
- encoding="utf-8"?>
- <LinearLayout
- xmlns:android="http://schemas.android.com/apk/res/android"
- android:orientation="horizontal"
- android:layout_width="fill_parent"
- android:layout_height="fill_parent"
- android:padding="10dp"
- >
- <ImageView android:id="@+id/image"
- android:layout_width="wrap_content"
- android:layout_height="fill_parent"
- android:layout_marginRight="10dp"
- />
- <TextView android:id="@+id/text"
- android:layout_width="wrap_content"
- android:layout_height="fill_parent"
- android:textColor="#FFF"
- />
- </LinearLayout>
- view plaincopy to clipboardprint?
- package com.android.tutor;
- import android.app.Activity;
- import android.app.AlertDialog;
- import android.content.Context;
- import android.os.Bundle;
- import android.view.LayoutInflater;
- import android.view.View;
- import android.view.View.OnClickListener;
- import android.widget.Button;
- import android.widget.ImageView;
- import android.widget.TextView;
- public class LayoutInflaterDemo extends Activity implements
- OnClickListener {
- private Button button;
- public void onCreate(Bundle savedInstanceState) {
- super.onCreate(savedInstanceState);
- setContentView(R.layout.main);
- button = (Button)findViewById(R.id.button);
- button.setOnClickListener(this);
- }
- @Override
- public void onClick(View v) {
- showCustomDialog();
- }
- public void showCustomDialog()
- {
- AlertDialog.Builder builder;
- AlertDialog alertDialog;
- Context mContext = LayoutInflaterDemo.this;
- //下面俩种方法都可以
- ////LayoutInflater inflater = getLayoutInflater();
- LayoutInflater inflater = (LayoutInflater)
- mContext.getSystemService(LAYOUT_INFLATER_SERVICE);
- View layout = inflater.inflate(R.layout.custom_dialog,null);
- TextView text = (TextView) layout.findViewById(R.id.text);
- text.setText("Hello, Welcome to Mr Wei's blog!");
- ImageView image = (ImageView) layout.findViewById(R.id.image);
- image.setImageResource(R.drawable.icon);
- builder = new AlertDialog.Builder(mContext);
- builder.setView(layout);
- alertDialog = builder.create();
- alertDialog.show();
- }
- }
- package com.android.tutor;
- import android.app.Activity;
- import android.app.AlertDialog;
- import android.content.Context;
- import android.os.Bundle;
- import android.view.LayoutInflater;
- import android.view.View;
- import android.view.View.OnClickListener;
- import android.widget.Button;
- import android.widget.ImageView;
- import android.widget.TextView;
- public class LayoutInflaterDemo extends Activity implements
- OnClickListener {
- private Button button;
- public void onCreate(Bundle savedInstanceState) {
- super.onCreate(savedInstanceState);
- setContentView(R.layout.main);
- button = (Button)findViewById(R.id.button);
- button.setOnClickListener(this);
- }
- @Override
- public void onClick(View v) {
- showCustomDialog();
- }
- public void showCustomDialog()
- {
- AlertDialog.Builder builder;
- AlertDialog alertDialog;
- Context mContext = LayoutInflaterDemo.this;
- //下面俩种方法都可以
- ////LayoutInflater inflater = getLayoutInflater();
- LayoutInflater inflater = (LayoutInflater)
- mContext.getSystemService(LAYOUT_INFLATER_SERVICE);
- View layout = inflater.inflate(R.layout.custom_dialog,null);
- TextView text = (TextView) layout.findViewById(R.id.text);
- text.setText("Hello, Welcome to Mr Wei's blog!");
- ImageView image = (ImageView) layout.findViewById(R.id.image);
- image.setImageResource(R.drawable.icon);
- builder = new AlertDialog.Builder(mContext);
- builder.setView(layout);
- alertDialog = builder.create();
- alertDialog.show();
- }
- }
Android高手进阶教程(五)之----Android 中LayoutInflater的使用!的更多相关文章
- Android高手进阶教程(十七)之---Android中Intent传递对象的两种方法(Serializable,Parcelable)!
[转][原文] 大家好,好久不见,今天要给大家讲一下Android中Intent中如何传递对象,就我目前所知道的有两种方法,一种是Bundle.putSerializable(Key,Object); ...
- Android高手进阶教程(七)之----Android 中Preferences的使用!
http://blog.csdn.net/Android_Tutor/article/details/5531849 大家好,我们这一节讲的是Android Preferences 的学习,Prefe ...
- Android高手进阶教程(二十八)之---Android ViewPager控件的使用(基于ViewPager的横向相册)!!!
分类: Android高手进阶 Android基础教程 2012-09-14 18:10 29759人阅读 评论(35) 收藏 举报 android相册layoutobjectclassloade ...
- Android Studio系列教程五--Gradle命令详解与导入第三方包
Android Studio系列教程五--Gradle命令详解与导入第三方包 2015 年 01 月 05 日 DevTools 本文为个人原创,欢迎转载,但请务必在明显位置注明出处!http://s ...
- Android 高手进阶之自定义View,自定义属性(带进度的圆形进度条)
Android 高手进阶(21) 版权声明:本文为博主原创文章,未经博主允许不得转载. 转载请注明地址:http://blog.csdn.net/xiaanming/article/detail ...
- Android高手进阶:Adapter深入理解与优化
一般是针对包含多个元素的View,如ListView,GridView,ExpandableListview,的时候我们是给其设置一个Adapter.Adapter是与View之间提供数据的桥梁,也是 ...
- Android高手进阶——Adapter深入理解与优化
Android高手进阶--Adapter深入理解与优化 通常是针对包括多个元素的View,如ListView,GridView.ExpandableListview,的时候我们是给其设置一个Adapt ...
- SpringBoot进阶教程(五十九)整合Codis
上一篇博文<详解Codis安装与部署>中,详细介绍了codis的安装与部署,这篇文章主要介绍介绍springboot整合codis.如果之前看过<SpringBoot进阶教程(五十二 ...
- Android高手进阶篇4-实现侧滑菜单框架,一分钟集成到项目中
先来看下面的这张效果图: 上面这张效果图是百度影音的,现在在Android上很流行,最初是由facebook自己实现的,而后各大应用有跟风之势,那么这种侧滑效果是如何实现的呢? 网上现在这种侧滑菜单的 ...
随机推荐
- Appium入门示例(python)
安装Python依赖 pip3.4 install nose pip3.4 install selenium pip3.4 install Appium-Python-Client 运行测试用例and ...
- JDK环境变量解析
设置环境变量 在java 中需要设置三个环境变量(1.5之后不用再设置classpath了,但个人强烈建议继续设置以保证向下兼用问题)JDK安装完成之后我们来设置环境变量:右击“我的电脑”,选择“属性 ...
- lintcode:两个数组的交
题目 返回两个数组的交 样例 nums1 = [1, 2, 2, 1], nums2 = [2, 2], 返回 [2]. 解题 排序后,两指针找相等元素,注意要去除相同的元素 public class ...
- Project Euler 109 :Darts 飞镖
Darts In the game of darts a player throws three darts at a target board which is split into twenty ...
- Linux问题定位工具大放送
我们在程序定位问题时,经常不知所错,但是在linux有很多强大的工具,只要我们合理利用,一定见奇效. 主要会遇到以下问题: 1 mem高 2 cpu高 3 io高 4 网络延迟高 vargrind:h ...
- Help Jimmy--poj1661(dp)
题目链接:http://poj.org/problem?id=1661 下图是左边的,右边的同理: #include<stdio.h> #include<string.h> # ...
- SSIS ->> Logging
SSIS提供了Event Handler之外的另一种方法捕捉Event和获取需要的信息,这种方法是Logging.SSIS的Logging针对不同的组件可以提供比Event Handler更多的Eve ...
- 可视化MNIST之降维探索Visualizing MNIST: An Exploration of Dimensionality Reduction
At some fundamental level, no one understands machine learning. It isn’t a matter of things being to ...
- HDU 4647 Another Graph Game 思路+贪心
官方题解: 若没有边权,则对点权从大到小排序即可.. 考虑边,将边权拆成两半加到它所关联的两个点的点权中即可. ..因为当两个人分别选择不同的点时,这一权值将互相抵消. #include <cs ...
- Myeclipse的web项目移植到Eclipse中需要添加的包
3.jstl.jar 4.standard-1.1.2.jar 把Myeclipse的web项目一直到Eclipse当中需要添加的包主要有一下4个: 1.servlet-api.jar 2.jsp-a ...