
Fragment+RadioButton实现点击切换页面效果
首先我们需要在主布局文件中 放一个 容器,方便让fragment加入进去,我们创建了四个Fragment,并用RedioButton实现了导航栏
MainActivity.java
 package com.example.administrator.fragmentdemo;

 import android.app.Activity;

 import android.app.FragmentManager;

 import android.app.FragmentTransaction;

 import android.os.Bundle;

 import android.view.View;

 import android.widget.RadioButton;

 public class MainActivity extends Activity implements View.OnClickListener {

     private RadioButton image1;

     private RadioButton image2;

     private RadioButton image3;

     private RadioButton image4;

     private FirstFragment firstFragment;

     private SecondFragment secondFragment;

     private ThirdFragment thirdFragment;

     private FourFragment fourFragment;

     @Override

     protected void onCreate(Bundle savedInstanceState) {

         super.onCreate(savedInstanceState);

         setContentView(R.layout.activity_main);

         initViews();

         initEvents();

         //首先 我们先选定一个

         select(0);

     }

     //初始化  各种个 View

     private void initViews(){

         image1 = (RadioButton) findViewById(R.id.tab_image1);

         image2 = (RadioButton) findViewById(R.id.tab_image2);

         image3 = (RadioButton) findViewById(R.id.tab_image3);

         image4 = (RadioButton) findViewById(R.id.tab_image4);

     }

     //初始化 监听事件

     private void initEvents(){

         image1.setOnClickListener(this);

         image2.setOnClickListener(this);

         image3.setOnClickListener(this);

         image4.setOnClickListener(this);

     }

     // 初始化 各种图片

     private void initImageBack(){

         image1.setBackgroundResource(R.drawable.chatting_biaoqing_btn_normal);

         image2.setBackgroundResource(R.drawable.lbs_icon_disable);

         image3.setBackgroundResource(R.drawable.scan_book);

         image4.setBackgroundResource(R.drawable.scan_word);

     }

     //

     private void select(int i){

         FragmentManager fm = getFragmentManager();  //获得Fragment管理器

         FragmentTransaction ft = fm.beginTransaction(); //开启一个事务

         hidtFragment(ft);   //先隐藏 Fragment

         switch (i){

             case 0:

                 image1.setBackgroundResource(R.drawable.chatting_biaoqing_btn_enable);

                 if (firstFragment == null){

                     firstFragment = new FirstFragment();

                     ft.add(R.id.fragment_container,firstFragment);

                 }else{

                     ft.show(firstFragment);

                 }

                 break;

             case 1:

                 image2.setBackgroundResource(R.drawable.lbs_icon_enable);

                 if (secondFragment == null){

                     secondFragment = new SecondFragment();

                     ft.add(R.id.fragment_container,secondFragment);

                 }else {

                     ft.show(secondFragment);

                 }

                 break;

             case 2:

                 image3.setBackgroundResource(R.drawable.scan_book_hl);

                 if (thirdFragment == null){

                     thirdFragment = new ThirdFragment();

                     ft.add(R.id.fragment_container,thirdFragment);

                 }else {

                     ft.show(thirdFragment);

                 }

                 break;

             case 3:

                 image4.setBackgroundResource(R.drawable.scan_word_hl);

                 if(fourFragment == null){

                     fourFragment = new FourFragment();

                     ft.add(R.id.fragment_container,fourFragment);

                 }else {

                     ft.show(fourFragment);

                 }

                 break;

         }

         ft.commit();   //提交事务

     }

     //隐藏所有Fragment

     private void hidtFragment(FragmentTransaction fragmentTransaction){

         if (firstFragment != null){

             fragmentTransaction.hide(firstFragment);

         }

         if (secondFragment != null){

             fragmentTransaction.hide(secondFragment);

         }

         if (thirdFragment != null){

             fragmentTransaction.hide(thirdFragment);

         }

         if (fourFragment != null){

             fragmentTransaction.hide(fourFragment);

         }

     }

     //重写监听

     @Override

     public void onClick(View v) {

         initImageBack(); //初始化 图片背景

         switch (v.getId()){

             case R.id.tab_image1:

                 select(0);

                 break;

             case R.id.tab_image2:

                 select(1);

                 break;

             case R.id.tab_image3:

                 select(2);

                 break;

             case R.id.tab_image4:

                 select(3);

                 break;

         }

     }

 }
主布局文件,在这里我分开写的,底部的导航栏有新建了一个xml文件,并在主布局文件中用include将他包含进来。
activity_main.xml
<LinearLayout

    xmlns:android="http://schemas.android.com/apk/res/android"

    xmlns:tools="http://schemas.android.com/tools"

    android:layout_width="match_parent"

    android:layout_height="match_parent"

    android:orientation="vertical"

    tools:context=".MainActivity">

    <ImageView

        android:layout_width="match_parent"

        android:layout_height="40dp"

        android:background="@drawable/friendactivity_comment_frame_pressed"/>

    <FrameLayout

        android:id="@+id/fragment_container"

        android:layout_width="match_parent"

        android:layout_height="0dp"

        android:layout_weight="1">

    </FrameLayout>

    <include layout="@layout/activity_main_tab_view"/>

</LinearLayout>
底部导航栏的布局文件
<?xml version="1.0" encoding="utf-8"?>

<LinearLayout

    xmlns:android="http://schemas.android.com/apk/res/android"

    android:orientation="horizontal"

    android:layout_width="match_parent"

    android:layout_height="50dp"

    android:layout_gravity="bottom"

    android:background="@drawable/friendactivity_comment_frame_pressed">

    <RadioGroup

        android:layout_width="match_parent"

        android:layout_height="match_parent"

        android:orientation="horizontal">

        <RadioButton

            android:id="@+id/tab_image1"

            android:layout_width="0dp"

            android:layout_height="match_parent"

            android:layout_weight="1"

            android:button="@null"

            android:background="@drawable/chatting_biaoqing_btn_normal"/>

        <RadioButton

            android:id="@+id/tab_image2"

            android:layout_width="0dp"

            android:layout_height="match_parent"

            android:layout_weight="1"

            android:button="@null"

            android:background="@drawable/lbs_icon_disable"/>

        <RadioButton

            android:id="@+id/tab_image3"

            android:layout_width="0dp"

            android:layout_height="match_parent"

            android:layout_weight="1"

            android:button="@null"

            android:background="@drawable/scan_book"/>

        <RadioButton

            android:id="@+id/tab_image4"

            android:layout_width="0dp"

            android:layout_height="match_parent"

            android:layout_weight="1"

            android:button="@null"

            android:background="@drawable/scan_word"/>

    </RadioGroup>

</LinearLayout>
四个fragment都一样,我就放一个代码,布局也很简单,就放了一个TextView
Fragment.java
package com.example.administrator.fragmentdemo;

import android.app.Fragment;

import android.os.Bundle;

import android.view.LayoutInflater;

import android.view.View;

import android.view.ViewGroup;

/**

 * Created by Administrator on 2015/9/3.

 */

public class FirstFragment extends Fragment {

    @Override

    public View onCreateView(LayoutInflater inflater, ViewGroup container, Bundle savedInstanceState) {

        return inflater.inflate(R.layout.first_fragment_view,container,false);

    }

}
该fragment的布局文件为:
<?xml version="1.0" encoding="utf-8"?>

<LinearLayout

    xmlns:android="http://schemas.android.com/apk/res/android"

    android:layout_width="match_parent"

    android:layout_height="match_parent"

    android:orientation="vertical">

    <TextView

        android:layout_width="wrap_content"

        android:layout_height="wrap_content"

        android:text="This is frist fragment"/>

</LinearLayout>
效果图:
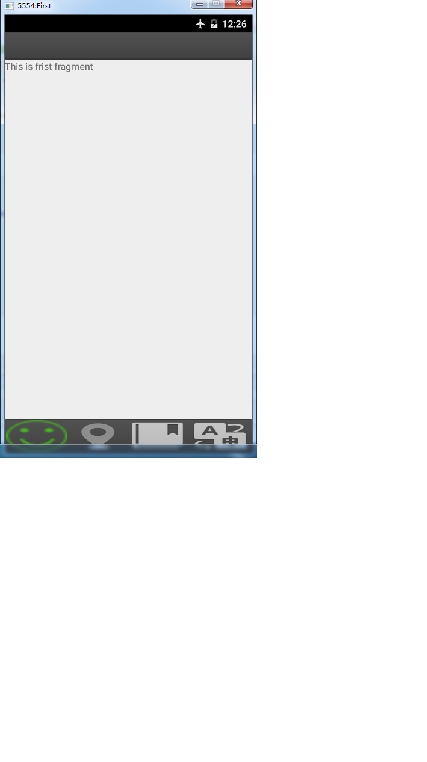
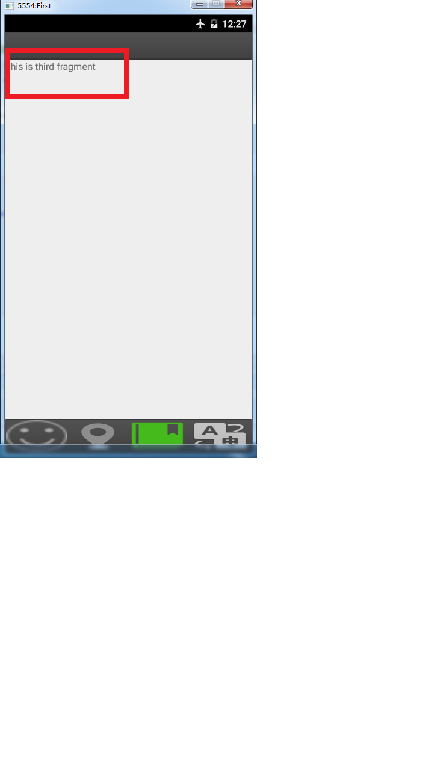
Fragment+RadioButton实现点击切换页面效果的更多相关文章
- VUE 实现tab切换页面效果
一 163邮箱登录tab切换 <!DOCTYPE html> <html lang="en"> <head> <meta charset= ...
- Android切换页面效果的实现二:WebView+ViewPager
前言: 由于第一种切换页面的效果不能满足项目的要求,于是又找到另外一种更简单好用的方法来实现,顿时感觉,做项目开发,找到一种合适的方法能够减少很多时间,(刚开始自己弄的时候还想着自己写手势识别的方法呢 ...
- Android切换页面效果的实现一:WebView+ViewFlipper
前言: 这两周在帮学校做一个新生入学用的“新里程”的项目,要做到页面切换阅读的效果,自己百度了下,找到普遍是使用WebView+ViewFlipper的实现方法,但这种方法不能满足我的要求,因为它很难 ...
- 关于Vue中,checkBox等组件在赋值后,点击切换页面未及时更新问题
我们经常碰到这样的问题,在v-for循环中,给某些组件(此处以checkBox为例)赋值后,组件并不能正常切换, 这是因为数据层太多,render函数没有自动更新,需手动强制刷新. 解决方法:在切换c ...
- html+js(swiper.js)+css左右滑动切换页面效果,适配移动端
demo: 截图: 结构:1.swiper-progress.html2.css文件夹 -swiper.css -swiper.min.css 3.js文件夹 -swiper.min.js -swip ...
- Android——Fragment实例精讲——底部导航栏+ViewPager滑动切换页面
说明: 实现效果: 1- 用ViewPager实现Fragmen之间的切换 2- 底部用RadioGroup实现,更方便的实现图片和字体颜色的改变,更方便的通过RadioButton的点击事件来控制页 ...
- react实现页面切换动画效果
一.前情概要 注:(我使用的路由是react-router4) 如下图所示,我们需要在页面切换时有一个过渡效果,这样就不会使页面切换显得生硬,用户体验大大提升: but the 问题是 ...
- 【转】 Pro Android学习笔记(四二):Fragment(7):切换效果
目录(?)[-] 利用setTransition 利用setCustomAnimations 通过ObjectAnimator自定义动态效果 程序代码的编写 利用fragment transactio ...
- 基于vue2.0打造移动商城页面实践 vue实现商城购物车功能 基于Vue、Vuex、Vue-router实现的购物商城(原生切换动画)效果
基于vue2.0打造移动商城页面实践 地址:https://www.jianshu.com/p/2129bc4d40e9 vue实现商城购物车功能 地址:http://www.jb51.net/art ...
随机推荐
- [设计模式 3] 用设计模式的眼光看MVC框架
导读:之前一直在区分MVC和设计模式的区别,但是,既然有些人认为MVC是一种设计模式,那么它们之间肯定是有共通之处的.所以,本篇博客,就用设计模式的眼光来看MVC框架.仅是本人对于MVC的粗鄙看法,还 ...
- .Net 乱序方法
前两天开发一个奇葩的功能,突然间想到了用打乱顺序的方式解决.记录代码如下: /// <summary> /// 把收集回来的列表打乱顺序之后返回 /// </summary> ...
- Jsp servlet 值传递。。
先新建一个动态WEB项目. 展开WebRoot/index.jsp 1 <%@ page language="java" import="java.util.*&q ...
- WP8_当滚动到滚动条的70%时,自动加载数据效果实现
Touch.FrameReported += Touch_FrameReported; void Touch_FrameReported(object sender, TouchFrameEven ...
- Linux设备模型 学习总结
看LDD3中设备模型一章,觉得思维有些混乱.这里从整体的角度来理理思路.本文从四个方面来总结一些内容: 1.底层数据结构:kobject,kset.2.linux设备模型层次关系:bus_type,d ...
- 高效渲染css
译自:http://css-tricks.com/efficiently-rendering-css/ 无可否认我并不经常考虑这个问题… 我们书写的CSS的效率如何,浏览器渲染它的速度如何? 浏览器的 ...
- boost::asio 使用实例
#include <iostream> #include <boost/asio.hpp> using namespace std; using namespace boost ...
- use python get information from one page
#!/usr/bin/python read = file('thread-1554-1-1.html','r') wr = file('list','w') while 1: line=read.r ...
- thinkphp数据库添加表单提交的数据
$data['catename'] = I('catename'); 获取表单的数据 $cate=D('cate'); 实例化cat ...
- 008sudo用户管理
1.Sudo是Unix/Linux平台上一个非常有用的工具,它允许系统管理员分配给普通用户一些合理的权利,让它们执行一些只有超级用户或其他特许用户才能完成的任务(主要体现为命令),比如,运行一些像mo ...