JavaWeb_(Spring框架)注解配置
系列博文
JavaWeb_(Spring框架)xml配置文件 传送门
JavaWeb_(Spring框架)注解配置 传送门
Spring注解配置
a)导包和约束:基本包、aop包+context约束;

<?xml version="1.0" encoding="UTF-8"?>

<beans xmlns:xsi="http://www.w3.org/2001/XMLSchema-instance"

       xmlns="http://www.springframework.org/schema/beans"

       xmlns:context="http://www.springframework.org/schema/context"

       xsi:schemaLocation="http://www.springframework.org/schema/beans http://www.springframework.org/schema/beans/spring-beans.xsd http://www.springframework.org/schema/context http://www.springframework.org/schema/context/spring-context.xsd ">

    <!-- 注解开发 -->

    <!-- 开启组件扫描 base-package 扫描该包下以及子包的所有注解   -->

    <context:component-scan base-package="com.Gary.bean"/>

</beans>
applicationContext_annotation.xml
b)将对象注册到容器内;
在User2.java中需要用到<bean name="user" class="com.Gary.bean.User">的地方使用@Component("user")
@Controller() 1对应web层
@Service("user") 对应service
@Repository() 对应dao层
package com.Gary.bean;

import org.springframework.stereotype.Component;

//<bean name="user" class="com.Gary.bean.User">

@Component("user")

public class User2 {

    private Integer u_id;

    private String u_username;

    private String u_password;

    //加入宠物字段

    private Pet u_pet;

    @Override

    public String toString() {

        return "User [u_id=" + u_id + ", u_username=" + u_username + ", u_password=" + u_password + ", u_pet=" + u_pet

                + "]";

    }

    public Pet getU_pet() {

        return u_pet;

    }

    public void setU_pet(Pet u_pet) {

        this.u_pet = u_pet;

    }

    public User2() {

        System.out.println("默认使用 User2 对象空参构造方法");

    }

    public Integer getU_id() {

        return u_id;

    }

    public void setU_id(Integer u_id) {

        this.u_id = u_id;

    }

    public String getU_username() {

        return u_username;

    }

    public void setU_username(String u_username) {

        this.u_username = u_username;

    }

    public String getU_password() {

        return u_password;

    }

    public void setU_password(String u_password) {

        this.u_password = u_password;

    }

}
User2.java
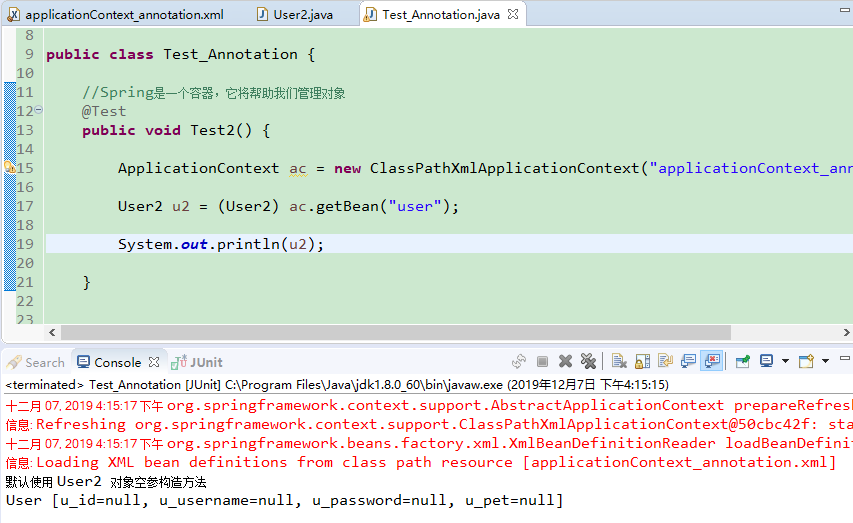
package com.Gary.test;

import org.junit.Test;

import org.springframework.context.ApplicationContext;

import org.springframework.context.support.ClassPathXmlApplicationContext;

import com.Gary.bean.User2;

public class Test_Annotation {

    //Spring是一个容器,它将帮助我们管理对象

    @Test

    public void Test2() {

        ApplicationContext ac = new ClassPathXmlApplicationContext("applicationContext_annotation.xml");

        User2 u2 = (User2) ac.getBean("user");

        System.out.println(u2);

    }

}
Test_Annotation.java
<?xml version="1.0" encoding="UTF-8"?>

<beans xmlns:xsi="http://www.w3.org/2001/XMLSchema-instance"

       xmlns="http://www.springframework.org/schema/beans"

       xmlns:context="http://www.springframework.org/schema/context"

       xsi:schemaLocation="http://www.springframework.org/schema/beans http://www.springframework.org/schema/beans/spring-beans.xsd http://www.springframework.org/schema/context http://www.springframework.org/schema/context/spring-context.xsd ">

    <!-- 注解开发 -->

    <!-- 开启组件扫描 base-package 扫描该包下以及子包的所有注解   -->

    <context:component-scan base-package="com.Gary.bean"/>

</beans>
applicationContext_annotation.xml
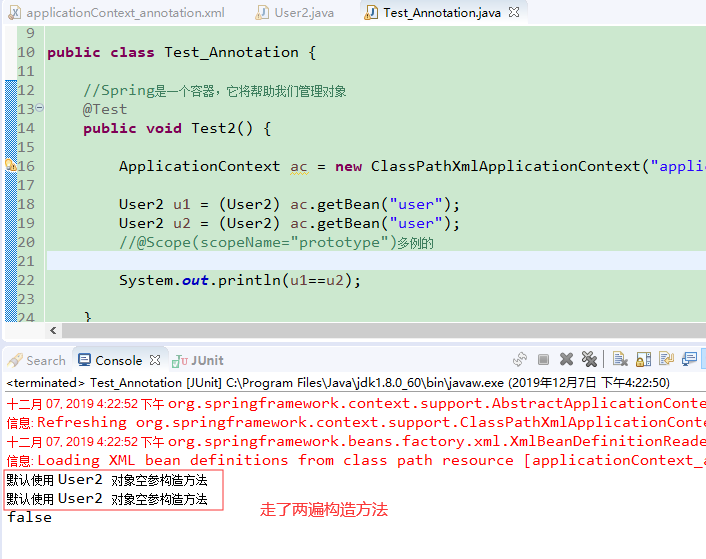
c)用注解配置Scope属性;
在需要加Scope属性的bean实体层下使用
  @Service("user")

  //@Scope默认是单例的

  @Scope(scopeName="prototype")
package com.Gary.bean;

import org.springframework.context.annotation.Scope;

import org.springframework.stereotype.Component;

import org.springframework.stereotype.Service;

//<bean name="user" class="com.Gary.bean.User">

//@Component("user")

@Service("user")

//@Scope默认是单例的

@Scope(scopeName="prototype")

public class User2 {

    private Integer u_id;

    private String u_username;

    private String u_password;

    //加入宠物字段

    private Pet u_pet;

    @Override

    public String toString() {

        return "User [u_id=" + u_id + ", u_username=" + u_username + ", u_password=" + u_password + ", u_pet=" + u_pet

                + "]";

    }

    public Pet getU_pet() {

        return u_pet;

    }

    public void setU_pet(Pet u_pet) {

        this.u_pet = u_pet;

    }

    public User2() {

        System.out.println("默认使用 User2 对象空参构造方法");

    }

    public Integer getU_id() {

        return u_id;

    }

    public void setU_id(Integer u_id) {

        this.u_id = u_id;

    }

    public String getU_username() {

        return u_username;

    }

    public void setU_username(String u_username) {

        this.u_username = u_username;

    }

    public String getU_password() {

        return u_password;

    }

    public void setU_password(String u_password) {

        this.u_password = u_password;

    }

}
User2.java
package com.Gary.test;

import org.junit.Test;

import org.springframework.context.ApplicationContext;

import org.springframework.context.annotation.Scope;

import org.springframework.context.support.ClassPathXmlApplicationContext;

import com.Gary.bean.User2;

public class Test_Annotation {

    //Spring是一个容器,它将帮助我们管理对象

    @Test

    public void Test2() {

        ApplicationContext ac = new ClassPathXmlApplicationContext("applicationContext_annotation.xml");

        User2 u1 = (User2) ac.getBean("user");

        User2 u2 = (User2) ac.getBean("user");

        //@Scope(scopeName="prototype")多例的

        System.out.println(u1==u2);

    }

}
Test_Annotation.java
<?xml version="1.0" encoding="UTF-8"?>

<beans xmlns:xsi="http://www.w3.org/2001/XMLSchema-instance"

       xmlns="http://www.springframework.org/schema/beans"

       xmlns:context="http://www.springframework.org/schema/context"

       xsi:schemaLocation="http://www.springframework.org/schema/beans http://www.springframework.org/schema/beans/spring-beans.xsd http://www.springframework.org/schema/context http://www.springframework.org/schema/context/spring-context.xsd ">

    <!-- 注解开发 -->

    <!-- 开启组件扫描 base-package 扫描该包下以及子包的所有注解   -->

    <context:component-scan base-package="com.Gary.bean"/>

</beans>
applicationContent_annotation.xml
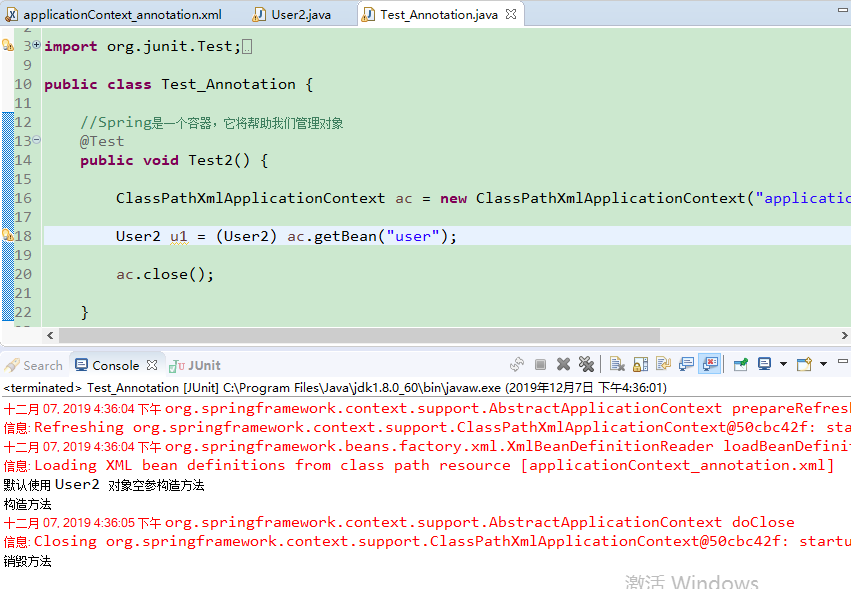
d)注解配置init-method与destroy-method;
    //在构造方法后调用

    @PostConstruct()

    public void userInit() {

        System.out.println("构造方法");

    }

    //在销毁方法前调用

    @PreDestroy()

    public void userDestory() {

        System.out.println("销毁方法");

    }
package com.Gary.bean;

import javax.annotation.PostConstruct;

import javax.annotation.PreDestroy;

import org.springframework.context.annotation.Scope;

import org.springframework.stereotype.Service;

//<bean name="user" class="com.Gary.bean.User">

//@Component("user")

@Service("user")

public class User2 {

    private Integer u_id;

    private String u_username;

    private String u_password;

    //加入宠物字段

    private Pet u_pet;

    @Override

    public String toString() {

        return "User [u_id=" + u_id + ", u_username=" + u_username + ", u_password=" + u_password + ", u_pet=" + u_pet

                + "]";

    }

    public Pet getU_pet() {

        return u_pet;

    }

    public void setU_pet(Pet u_pet) {

        this.u_pet = u_pet;

    }

    public User2() {

        System.out.println("默认使用 User2 对象空参构造方法");

    }

    public Integer getU_id() {

        return u_id;

    }

    public void setU_id(Integer u_id) {

        this.u_id = u_id;

    }

    public String getU_username() {

        return u_username;

    }

    public void setU_username(String u_username) {

        this.u_username = u_username;

    }

    public String getU_password() {

        return u_password;

    }

    public void setU_password(String u_password) {

        this.u_password = u_password;

    }

    //在构造方法后调用

    @PostConstruct()

    public void userInit() {

        System.out.println("构造方法");

    }

    //在销毁方法前调用

    @PreDestroy()

    public void userDestory() {

        System.out.println("销毁方法");

    }

}
User2.java
package com.Gary.test;

import org.junit.Test;

import org.springframework.context.ApplicationContext;

import org.springframework.context.annotation.Scope;

import org.springframework.context.support.ClassPathXmlApplicationContext;

import com.Gary.bean.User2;

public class Test_Annotation {

    //Spring是一个容器,它将帮助我们管理对象

    @Test

    public void Test2() {

        ClassPathXmlApplicationContext ac = new ClassPathXmlApplicationContext("applicationContext_annotation.xml");

        User2 u1 = (User2) ac.getBean("user");

        ac.close();

    }

}
Test_Annotation.java
<?xml version="1.0" encoding="UTF-8"?>

<beans xmlns:xsi="http://www.w3.org/2001/XMLSchema-instance"

       xmlns="http://www.springframework.org/schema/beans"

       xmlns:context="http://www.springframework.org/schema/context"

       xsi:schemaLocation="http://www.springframework.org/schema/beans http://www.springframework.org/schema/beans/spring-beans.xsd http://www.springframework.org/schema/context http://www.springframework.org/schema/context/spring-context.xsd ">

    <!-- 注解开发 -->

    <!-- 开启组件扫描 base-package 扫描该包下以及子包的所有注解   -->

    <context:component-scan base-package="com.Gary.bean"/>

</beans>
applicationContext_annotation.xml
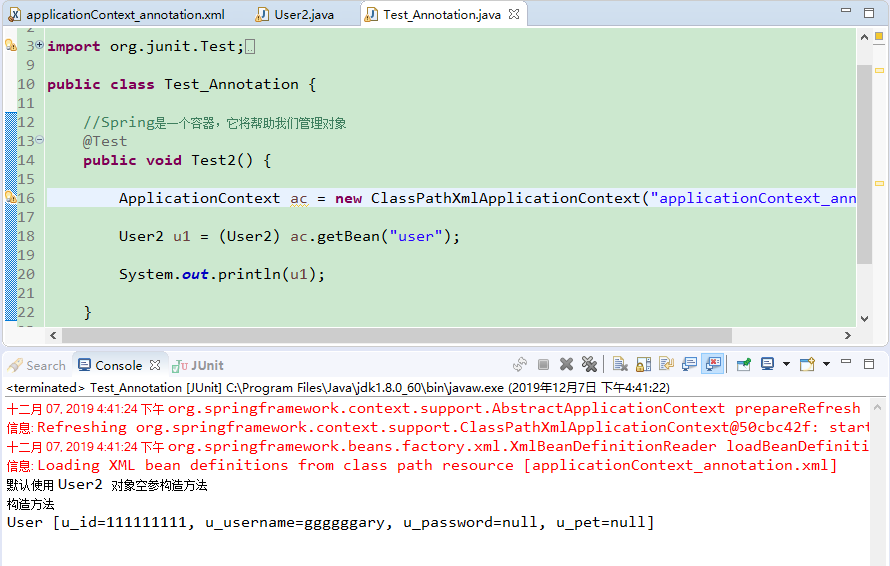
e)注解配置属性注入,值类型与引用类型;
属性、值注入
    @Value(value="111111111")

    private Integer u_id;

    @Value(value="ggggggary")

    private String u_username;

    private String u_password;
package com.Gary.bean; import javax.annotation.PostConstruct;
import javax.annotation.PreDestroy; import org.springframework.beans.factory.annotation.Value;
import org.springframework.context.annotation.Scope;
import org.springframework.stereotype.Service; //<bean name="user" class="com.Gary.bean.User">
//@Component("user")
@Service("user")
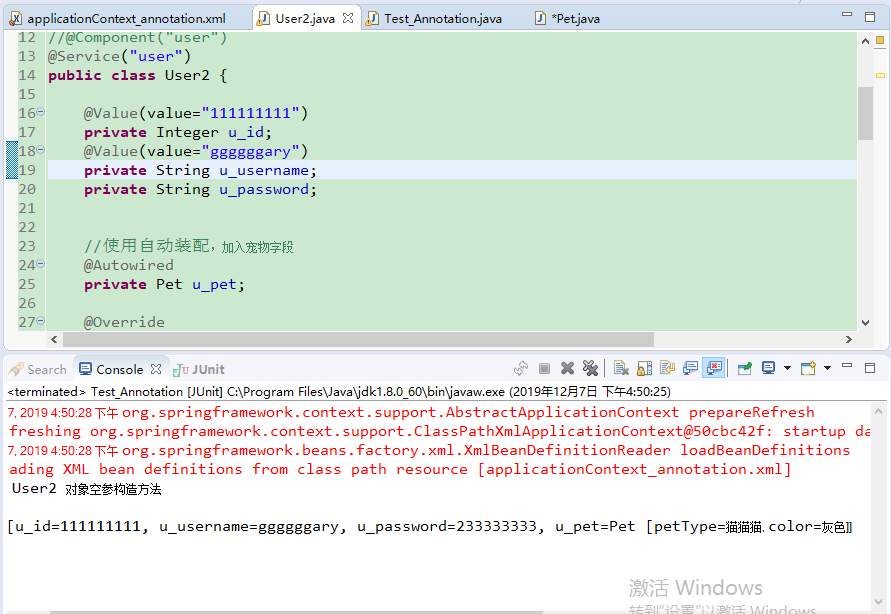
public class User2 { @Value(value="111111111")
private Integer u_id;
@Value(value="ggggggary")
private String u_username;
private String u_password; //加入宠物字段
private Pet u_pet; @Override
public String toString() {
return "User [u_id=" + u_id + ", u_username=" + u_username + ", u_password=" + u_password + ", u_pet=" + u_pet
+ "]";
}
public Pet getU_pet() {
return u_pet;
}
public void setU_pet(Pet u_pet) {
this.u_pet = u_pet;
} public User2() {
System.out.println("默认使用 User2 对象空参构造方法");
} public Integer getU_id() {
return u_id;
}
public void setU_id(Integer u_id) {
this.u_id = u_id;
}
public String getU_username() {
return u_username;
}
public void setU_username(String u_username) {
this.u_username = u_username;
}
public String getU_password() {
return u_password;
}
public void setU_password(String u_password) {
this.u_password = u_password;
} //在构造方法后调用
@PostConstruct()
public void userInit() {
System.out.println("构造方法");
} //在销毁方法前调用
@PreDestroy()
public void userDestory() {
System.out.println("销毁方法");
} }
User2.java
package com.Gary.test;

import org.junit.Test;

import org.springframework.context.ApplicationContext;

import org.springframework.context.annotation.Scope;

import org.springframework.context.support.ClassPathXmlApplicationContext;

import com.Gary.bean.User2;

public class Test_Annotation {

    //Spring是一个容器,它将帮助我们管理对象

    @Test

    public void Test2() {

        ApplicationContext ac = new ClassPathXmlApplicationContext("applicationContext_annotation.xml");

        User2 u1 = (User2) ac.getBean("user");

        System.out.println(u1);

    }

}
Test_Annotation.java
<?xml version="1.0" encoding="UTF-8"?>

<beans xmlns:xsi="http://www.w3.org/2001/XMLSchema-instance"

       xmlns="http://www.springframework.org/schema/beans"

       xmlns:context="http://www.springframework.org/schema/context"

       xsi:schemaLocation="http://www.springframework.org/schema/beans http://www.springframework.org/schema/beans/spring-beans.xsd http://www.springframework.org/schema/context http://www.springframework.org/schema/context/spring-context.xsd ">

    <!-- 注解开发 -->

    <!-- 开启组件扫描 base-package 扫描该包下以及子包的所有注解   -->

    <context:component-scan base-package="com.Gary.bean"/>

</beans>
applicationContext_annotation.xml
也可以在方法上加注释
    @Value("233333333")

    public void setU_password(String u_password) {

        this.u_password = u_password;

    }
Spring能在private私有成员上通过@Value()去赋值,使用了暴力反射去注入的,推荐使用在set()方法上注入属性
引用类型注入
给宠物起名为cat,并给宠物类型和颜色通过@Value赋值
@Component("cat")

public class Pet {
    @Value("猫猫猫")

    public void setPetType(String petType) {

        this.petType = petType;

    }

    @Value("灰色")

    public void setColor(String color) {

        this.color = color;

    }
package com.Gary.bean;

import org.springframework.beans.factory.annotation.Value;

import org.springframework.stereotype.Component;

@Component("cat")

public class Pet {

    //宠物类型  猫  狗

    private String petType;

    //宠物颜色

    private String color;

    @Override

    public String toString() {

        return "Pet [petType=" + petType + ", color=" + color + "]";

    }

    public String getPetType() {

        return petType;

    }

    @Value("猫猫猫")

    public void setPetType(String petType) {

        this.petType = petType;

    }

    @Value("灰色")

    public void setColor(String color) {

        this.color = color;

    }

    public String getColor() {

        return color;

    }

}
Pet.java
在User.java上使用@Autowired()自动装配
    //使用自动装配,加入宠物字段

    @Autowired

    private Pet u_pet;
第一种:用@Autowired()代替,缺点:问题:如果匹配到多个类型一致的对象,将无法注入到具体哪个对象
为了解决这个确定
第二种:用@Qualifier("userService")
第三者@Resource(name="userService")
package com.Gary.bean;

import javax.annotation.PostConstruct;

import javax.annotation.PreDestroy;

import org.springframework.beans.factory.annotation.Autowired;

import org.springframework.beans.factory.annotation.Value;

import org.springframework.context.annotation.Scope;

import org.springframework.stereotype.Service;

//<bean name="user" class="com.Gary.bean.User">

//@Component("user")

@Service("user")

public class User2 {

    @Value(value="111111111")

    private Integer u_id;

    @Value(value="ggggggary")

    private String u_username;

    private String u_password;

    //使用自动装配,加入宠物字段

    @Autowired

    private Pet u_pet;

    @Override

    public String toString() {

        return "User [u_id=" + u_id + ", u_username=" + u_username + ", u_password=" + u_password + ", u_pet=" + u_pet

                + "]";

    }

    public Pet getU_pet() {

        return u_pet;

    }

    public void setU_pet(Pet u_pet) {

        this.u_pet = u_pet;

    }

    public User2() {

        System.out.println("默认使用 User2 对象空参构造方法");

    }

    public Integer getU_id() {

        return u_id;

    }

    public void setU_id(Integer u_id) {

        this.u_id = u_id;

    }

    public String getU_username() {

        return u_username;

    }

    public void setU_username(String u_username) {

        this.u_username = u_username;

    }

    public String getU_password() {

        return u_password;

    }

    @Value("233333333")

    public void setU_password(String u_password) {

        this.u_password = u_password;

    }

    //在构造方法后调用

    @PostConstruct()

    public void userInit() {

        System.out.println("构造方法");

    }

    //在销毁方法前调用

    @PreDestroy()

    public void userDestory() {

        System.out.println("销毁方法");

    }

}
User2.java
package com.Gary.bean;

import org.springframework.beans.factory.annotation.Value;

import org.springframework.stereotype.Component;

@Component("cat")

public class Pet {

    //宠物类型  猫  狗

    private String petType;

    //宠物颜色

    private String color;

    @Override

    public String toString() {

        return "Pet [petType=" + petType + ", color=" + color + "]";

    }

    public String getPetType() {

        return petType;

    }

    @Value("猫猫猫")

    public void setPetType(String petType) {

        this.petType = petType;

    }

    @Value("灰色")

    public void setColor(String color) {

        this.color = color;

    }

    public String getColor() {

        return color;

    }

}
Pet.java
package com.Gary.test;

import org.junit.Test;

import org.springframework.context.ApplicationContext;

import org.springframework.context.annotation.Scope;

import org.springframework.context.support.ClassPathXmlApplicationContext;

import com.Gary.bean.User2;

public class Test_Annotation {

    //Spring是一个容器,它将帮助我们管理对象

    @Test

    public void Test2() {

        ApplicationContext ac = new ClassPathXmlApplicationContext("applicationContext_annotation.xml");

        User2 u1 = (User2) ac.getBean("user");

        System.out.println(u1);

    }

}
Test_Annotation.java
<?xml version="1.0" encoding="UTF-8"?>

<beans xmlns:xsi="http://www.w3.org/2001/XMLSchema-instance"

       xmlns="http://www.springframework.org/schema/beans"

       xmlns:context="http://www.springframework.org/schema/context"

       xsi:schemaLocation="http://www.springframework.org/schema/beans http://www.springframework.org/schema/beans/spring-beans.xsd http://www.springframework.org/schema/context http://www.springframework.org/schema/context/spring-context.xsd ">

    <!-- 注解开发 -->

    <!-- 开启组件扫描 base-package 扫描该包下以及子包的所有注解   -->

    <context:component-scan base-package="com.Gary.bean"/>

</beans>
applicationContext_annotation.xml
JavaWeb_(Spring框架)注解配置的更多相关文章
- JavaWeb_(Spring框架)xml配置文件
系列博文 JavaWeb_(Spring框架)xml配置文件 传送门 JavaWeb_(Spring框架)注解配置 传送门 Xml配置 a)Bean元素:交由Spring管理的对象都要配置在bean ...
- JavaWeb_(Spring框架)Spring整合Hibernate
Dao层类要继承HibernateDaoSupport.java父类 原先使用Hibernate框架hibernate.cfg.xml配置数据库 <hibernate-configuration ...
- 跟着刚哥学习Spring框架--事务配置(七)
事务 事务用来保证数据的完整性和一致性. 事务应该具有4个属性:原子性.一致性.隔离性.持久性.这四个属性通常称为ACID特性.1.原子性(atomicity).一个事务是一个不可分割的工作单位,事务 ...
- java框架之Spring(2)-注解配置IOC&AOP配置
注解配置IoC 准备 1.要使用注解方式配置 IoC,除了之前引入的基础 jar 包,还需要引入 spring-aop 支持包,如下: 2.在 applicationContext.xml 中引入 c ...
- Spring框架学习 - 配置
[资料] ★★☆ Spring 中提供一些Aware相关接口,像是BeanFactoryAware. ApplicationContextAware.ResourceLoaderAware.Servl ...
- 简单实现Spring框架--注解版
自己写的Spring框架——简单实现IoC容器功能 前几天在网上看了篇帖子,是用xml的方式实现spring的ioc容器,觉得挺有意思的,这边自己试着用注解的形式造了一套轮子. 工程结构 codein ...
- JavaWeb_(Spring框架)Spring中的aop事务
1.事务相关知识 a)什么是事务:把多条数据库操作捆绑到一起执行,要么都成功,要么都失败: b)事务的原则ACID: i.原子性:事务包含的所有操作,要么全部成功,要么全部失败回滚,成功全部应用到数据 ...
- Spring纯注解配置
待改造的问题 我们发现,之所以我们现在离不开 xml 配置文件,是因为我们有一句很关键的配置: <!-- 告知spring框架在,读取配置文件,创建容器时,扫描注解,依据注解创建对象,并存入容器 ...
- spring aop注解配置
spring aop是面向切面编程,使用了动态代理的技术,这样可以使业务逻辑的代码不掺入其他乱七八糟的代码 可以在切面上实现合法性校验.权限检验.日志记录... spring aop 用的多的有两种配 ...
随机推荐
- 关于安装Chrome插件elasticsearch-head
因为Chrome商店不能使用,安装插件很麻烦. 可以在github上下载elasticsearch-Head插件:https://github.com/mobz/elasticsearch-head/ ...
- C#的@标志的使用情况—本篇blog采用Markdown编写
@(C# 参考--出自官方文档入口) 1.使 C# 关键字用作标识符. @ 字符可作为代码元素的前缀,编译器将把此代码元素解释为标识符而非 C# 关键字. 下面的示例使用 @ 字符定义其在 for 循 ...
- .NET Core中使用读取配置文件
引入Nuget的两个类库 Microsoft.Extensions.Configuration Microsoft.Extensions.Configuration.Json 使用 var build ...
- 【web】使用ionic搭建移动端项目 icon-radio 标签在ios下全部选中的问题
这块css 导致的问题 .disable-pointer-events { pointer-events: none; }
- 03 Django之视图函数
一.Django的视图函数view 一个视图函数(类),简称视图,是一个简单的Python函数(类),它接受WEB请求并返回Web响应. 响应可以是一张网页的HTML内容,一个重定向,一个404错误, ...
- 移动端自适应之flexible
移动端自适应之flexible 作用:flexible的作用是使页面可以适配不同移动终端 原理:在页面html标签上添加style = "font-size: 36px;"样式,设 ...
- Python TCP通信之仿文件下载
TCP_文件下载_Client.py import socket def main(): # 创建TCP套接字 tcp_socket = socket.socket(socket.AF_INET, s ...
- 为什么需要 RPC 服务?
链接:https://www.jianshu.com/p/362880b635f0 在传统的开发模式中,我们通常将系统的各个服务部署在单台机器,随着服务的扩展,这种方式已经完全无法满足系统大规模的扩展 ...
- swoole深入学习 8. 协程 转
版权声明:本文为博主原创文章,遵循CC 4.0 BY-SA版权协议,转载请附上原文出处链接和本声明. 本文链接:https://blog.csdn.net/yangyi2083334/article/ ...
- 单选框 RadioButton
activity_main.xml <?xml version="1.0" encoding="utf-8"?> <LinearLayout ...